You are using an out of date browser. It may not display this or other websites correctly.
You should upgrade or use an alternative browser.
You should upgrade or use an alternative browser.
HOWTO - Make a BrewPi Fermentation Controller For Cheap
- Thread starter FuzzeWuzze
- Start date

Help Support Homebrew Talk - Beer, Wine, Mead, & Cider Brewing Discussion Forum:
This site may earn a commission from merchant affiliate
links, including eBay, Amazon, and others.
- Status
- Not open for further replies.
Is there any other reason I might not be able to read my new sensors? I am using a basic sketch that was posted earlier. I can read my other probes in parasitic mode. I connected the first of the new sensors I received in normal config. Pin 1 grd, pin 2 data, and pin 3 5v. I fried it. So the next one I did as suggested by elkoe and connected only two leads at a time to try and find the 5v lead in case they were not the standard config. Nothing. So I contacted the supplier and asked then to send a datasheet, they sent me the maxim datasheet which of course is the one I was assuming it was. So that was no help. Is there any other reason why I would not be able to read these sensors? They say Dallas 18b20 right on the sensor. they will not read in parasitic mode at all. They fry when connected in a normal pin config manner. When I connect them with the probes I can already read, depending on which two leads I have connected, it will sometimes cause the sketch to not be able to read any of the sensors. As soon as I remove the sensor it will start reading the other. Is there any other troubleshooting I am able to do on this sensor?
Do you restart your Arduino everytime you connect/disconnect a pin? I had to do a reboot for the sketch to register the new configuration of my wires.
Do you restart your Arduino everytime you connect/disconnect a pin? I had to do a reboot for the sketch to register the new configuration of my wires.
I have tried reloading the sketch after every new pin config, hitting the reset after each new config, and just plugging them in. it seems the one sketch posted on this forum needs to be reset but the other sketch I tried reads them if I just plug them in. In either case tho I am still unable to read the new sensors. The old sensors I have that are reading in parasite mode read just fine in the sketch.
wbarber69
Well-Known Member
- Joined
- Oct 13, 2013
- Messages
- 2,191
- Reaction score
- 263
What happens if you just hook up power and ground no resistor, no data line. see if the arduino restarts or if the probe pops or heats up. maybe there is a problem with the pin you've been using since you keep frying these things.
What happens if you just hook up power and ground no resistor, no data line. see if the arduino restarts or if the probe pops or heats up. maybe there is a problem with the pin you've been using since you keep frying these things.
Do you mean pin on the arduino? I have switched pins and I get the same results. I can read the ones but not the ones that fry.
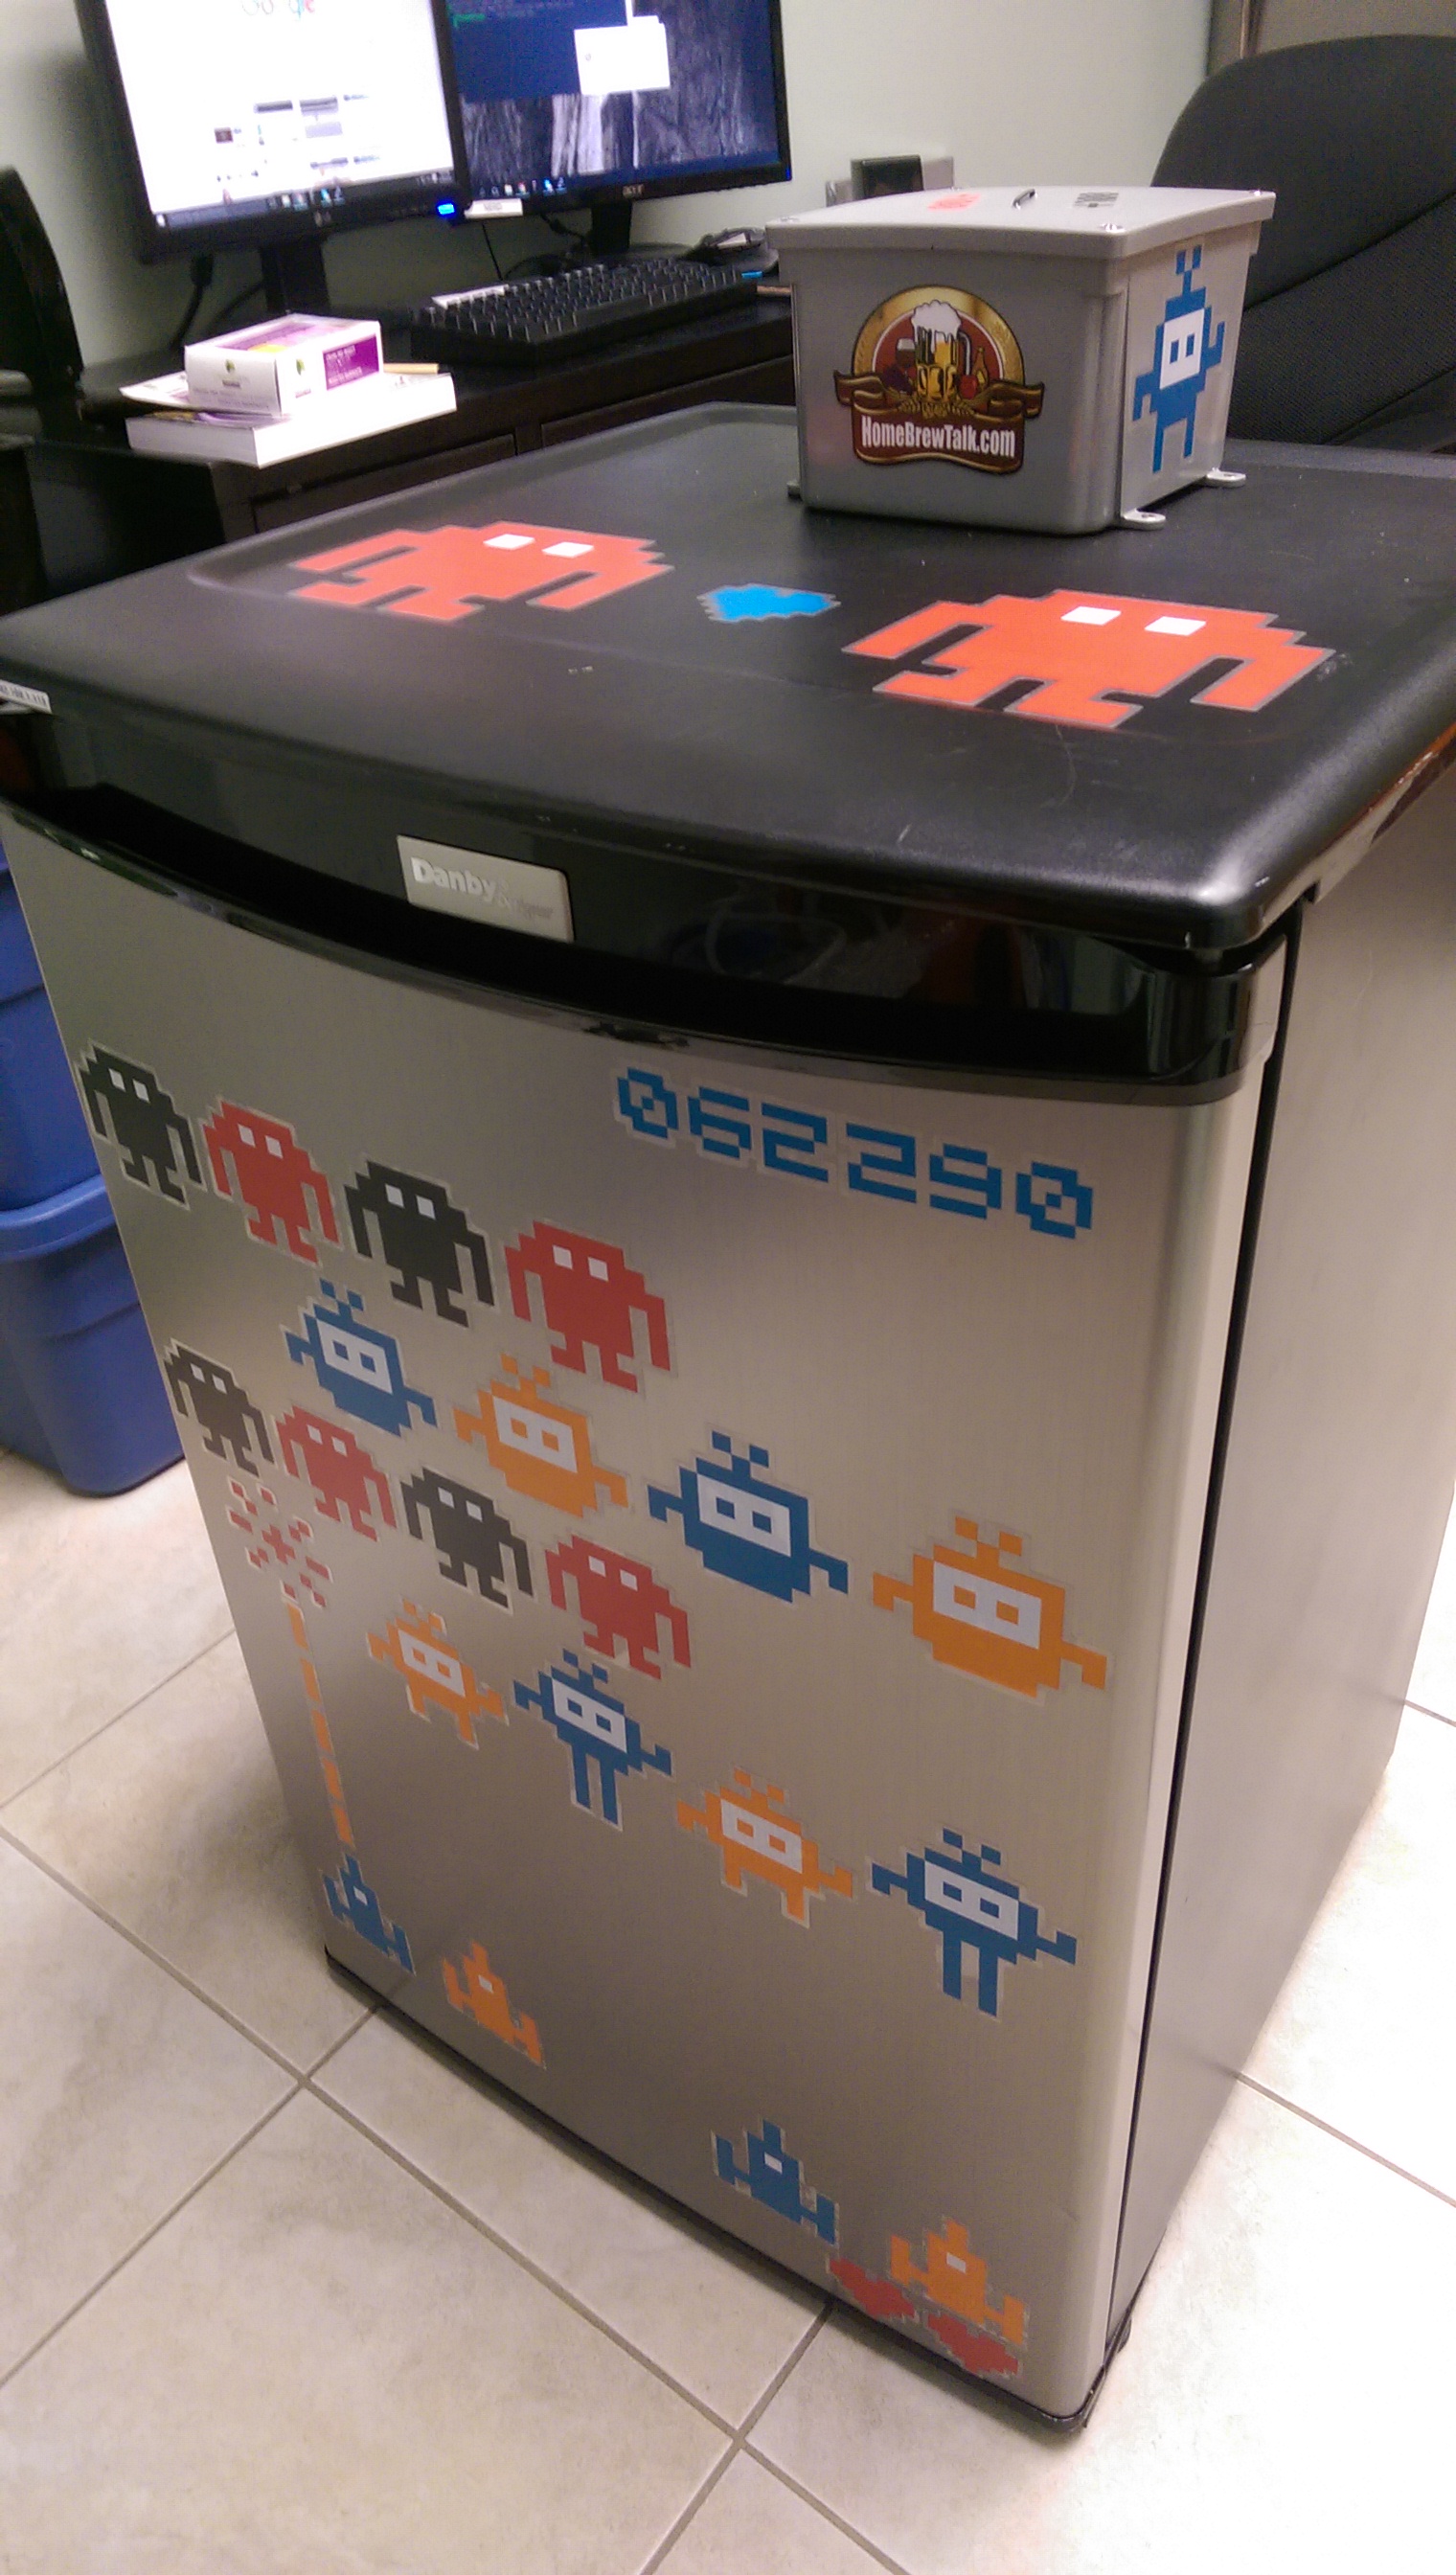
Everything is all put together! Once I get the probes figured out all I need to do is wire the probes to the end on the wires. The big box mounts to the top of my freezer. It contains the rpi, relay, and Uno. I use the phone screen to display the lcd via the Web and if needed I can control the modes via it as well. Then the outlet plugs into my wall outlet and provides constant power to one of the duplex outlets while the other is run by the brewpi system. The small box hangs in the freezer. The fan flips inward and faces to blow air down to circulate the air. The box also serves as the Junction box for the temp probes in the freezer. I will run the other probe to my kegerator to simply monitor the temp or monitor a lager temp, no control over the temp but can simply see what the temp looks like during the lager.
Everything is all put together! Once I get the probes figured out all I need to do is wire the probes to the end on the wires. The big box mounts to the top of my freezer. It contains the rpi, relay, and Uno. I use the phone screen to display the lcd via the Web and if needed I can control the modes via it as well. Then the outlet plugs into my wall outlet and provides constant power to one of the duplex outlets while the other is run by the brewpi system. The small box hangs in the freezer. The fan flips inward and faces to blow air down to circulate the air. The box also serves as the Junction box for the temp probes in the freezer. I will run the other probe to my kegerator to simply monitor the temp or monitor a lager temp, no control over the temp but can simply see what the temp looks like during the lager.
For some reason pictures did not attach... So here they are.
View attachment 1463435686437.jpg
View attachment 1463435700241.jpg
Update to my previous post - (https://www.homebrewtalk.com/showpost.php?p=7563219&postcount=5511)
The no insulation in the door does not seem to hurt the fridge. Its holding at 50F in a room that is 70F and only running for about 8 to 10 min per hour.
Also, my girlfriend made it more awesome for me. See below:
The no insulation in the door does not seem to hurt the fridge. Its holding at 50F in a room that is 70F and only running for about 8 to 10 min per hour.
Also, my girlfriend made it more awesome for me. See below:
So my brewpi installation doesn't render the webpage properly anymore (http://adsl.geordish.org) presumably because there is too much data.
Is there any way to fix this, other than deleting historic data?
Is there any way to fix this, other than deleting historic data?
What part isn't rendering for you?

btw, that's only ~13-14 days of data.
I have plots that have run for months and still render (eventually).
Like this one from my keezer...

Cheers!

btw, that's only ~13-14 days of data.
I have plots that have run for months and still render (eventually).
Like this one from my keezer...

Cheers!
virgil1
Well-Known Member
My BrewPi stops working each day in the afternoon(2pm give or take an hour). I restart it, and it works fine. I checked, and it stops logging at that time. So its not the Raspi alone. Any ideas? I checked /home/brewpi/logs, don't see anything. It just stops. The card isn't full. Where else could I look? Its been running fine for 6+ months. I didn't install anything new or change anything. I thought it might be log filling space or something. I checked, and it shows 39% free space.
midnightbrewing
Active Member
Many thanks to the hundreds of users contributing to this thread, and of course, Fuzee for what I can only imagine is hundreds of hours tied to the original post and constant response through more than 5,500 posts in this thread!!
Some thoughts on the process for me, and some quick context:
My terminal skills are VERY rusty... almost 15 years old since I really did much of anything, and that wasn't much then. I don't program but have a solid enough tech baseline that I felt good with this project and the instructions provided.
I got a friend (diatonic) to print the 3d enclosure based on the file in this thread. The USB hole was slightly too small, and there was no hole to fit the power plug on the arduino. I know it's not necessary, but the board wouldn't sit right if the power plug didn't have a hole to poke through. I also used a standard outlet, which proved to be slightly too big (both directions) for the hole. I would suggest altering the printer file to make the box slightly taller and an additional .5mm around the USB portal, plus the power portal. Plenty of room for a breadboard in the box.
Ordered the canakit raspian which came with Jessie (wasn't worth the time to rebuild a cpu or scrounge a wifi dongle, microSD and case needed for purchasing just the rpi) plus an Arduino Uno from a local recycled electronics store.
Set up both SSH and VPN connections (x11vpn is the way to go) and away I went.
Ran into some problems: despite being a genuine Uno, the default ports ACM0, 1 were incorrect. It connects on ttyUSB0. took a while to figure that out, and to properly correct the config.cfg file (which kept disappearing from the settings folder).
In the process, I also incorrectly set the python to master instead of legacy (because I glossed through the directions on the brewpi docs site) and missed the important change of /var/www to /var/www/html in the right places, including the settings/config.cfg file. The brewpi wiki should have been my first stop:
http://diybrewpi.wikia.com/wiki/Setting_Up_Your_RPI
Once I got the connection working, I couldn't flash the Uno board with the BrewPi hex file - and I couldn't find the right hex file in the link provided in the instructions. This is where my general lack of knowledge tripped me up for half a day: I kept trying to use the bin files or pieces of the other firmware without realizing that the Uno is now behind the times and the last update was 0.2.10. Having that direct link on the wiki instructions page (for those of use going with the Uno) would be very helpful! I had a ton of trouble finding it and am a total rookie when it comes to navigating the github - and that confused the hell out of me for a bit.
Even then, the BrewPi web interface wouldn't upload the file to the Arduino; I jest kept getting outdated software errors and the python script process would kick out.
Finally, I tethered the Uno directly to my computer and used XLoader to upload the hex file directly, swapped it back to the Rpi and rebooted. Success!
Kind of.
My devices wouldn't load properly: I could change and apply all I wanted but nothing moved from detected to installed.
A page or two into a google search (after coming up empty in this thread) I found this page:
http://inboundsbrewing.com/my-experience-building-a-brewpi/
Explaining the exact same situation, and laying out the next step: flash the EEPROM.
From there, all is well and I'm set to calibrate and get fermenting. I'm somewhat proud of myself that I did everything using the resources available and not bothering my more experienced friends or posting questions here. That's not a good or bad thing overall... it is just to say that everything was available via the first couple pages of googling.
I'll probably try again with the 3D printed enclosure, and eventually I'll probably bypass the thermostat in the freezer and tie it directly to the BrewPi... but for now, everything is working and it only took me about 6 hours total from opening the box to having everything appearing to work correctly. pics coming.
Sorry if this is a dumb question (I know very little about computers) if I go the PC route does it have to have Internet connection to do this. The place I'm going to brew in will not have Internet access.
Once you have set it up you don't need an internet connection.Sorry if this is a dumb question (I know very little about computers) if I go the PC route does it have to have Internet connection to do this. The place I'm going to brew in will not have Internet access.
If you are using a PC to run BrewPi (with an Arduino attached) you can run a web browser on the PC and use it to connect with the BrewPi web server on the same PC locally.
wbarber69
Well-Known Member
- Joined
- Oct 13, 2013
- Messages
- 2,191
- Reaction score
- 263
Many thanks to the hundreds of users contributing to this thread, and of course, Fuzee for what I can only imagine is hundreds of hours tied to the original post and constant response through more than 5,500 posts in this thread!!
Some thoughts on the process for me, and some quick context:
My terminal skills are VERY rusty... almost 15 years old since I really did much of anything, and that wasn't much then. I don't program but have a solid enough tech baseline that I felt good with this project and the instructions provided.
I got a friend (diatonic) to print the 3d enclosure based on the file in this thread. The USB hole was slightly too small, and there was no hole to fit the power. plug on the arduino. I know it's not necessary, but the board wouldn't sit right if the power plug didn't have a hole to poke through. I also used a standard outlet, which proved to be slightly too big (both directions) for the hole. I would suggest altering the printer file to make the box slightly taller and an additional .5mm around the USB portal, plus the power portal. Plenty of room for a breadboard in the box.
Ordered the canakit raspian which came with Jessie (wasn't worth the time to rebuild a cpu or scrounge a wifi dongle, microSD and case needed for purchasing just the rpi) plus an Arduino Uno from a local recycled electronics store.
Set up both SSH and VPN connections (x11vpn is the way to go) and away I went.
Ran into some problems: despite being a genuine Uno, the default ports ACM0, 1 were incorrect. It connects on ttyUSB0. took a while to figure that out, and to properly correct the config.cfg file (which kept disappearing from the settings folder).
In the process, I also incorrectly set the python to master instead of legacy (because I glossed through the directions on the brewpi docs site) and missed the important change of /var/www to /var/www/html in the right places, including the settings/config.cfg file. The brewpi wiki should have been my first stop:
http://diybrewpi.wikia.com/wiki/Setting_Up_Your_RPI
Once I got the connection working, I couldn't flash the Uno board with the BrewPi hex file - and I couldn't find the right hex file in the link provided in the instructions. This is where my general lack of knowledge tripped me up for half a day: I kept trying to use the bin files or pieces of the other firmware without realizing that the Uno is now behind the times and the last update was 0.2.10. Having that direct link on the wiki instructions page (for those of use going with the Uno) would be very helpful! I had a ton of trouble finding it and am a total rookie when it comes to navigating the github - and that confused the hell out of me for a bit.
Even then, the BrewPi web interface wouldn't upload the file to the Arduino; I jest kept getting outdated software errors and the python script process would kick out.
Finally, I tethered the Uno directly to my computer and used XLoader to upload the hex file directly, swapped it back to the Rpi and rebooted. Success!
Kind of.
My devices wouldn't load properly: I could change and apply all I wanted but nothing moved from detected to installed.
A page or two into a google search (after coming up empty in this thread) I found this page:
http://inboundsbrewing.com/my-experience-building-a-brewpi/
Explaining the exact same situation, and laying out the next step: flash the EEPROM.
From there, all is well and I'm set to calibrate and get fermenting. I'm somewhat proud of myself that I did everything using the resources available and not bothering my more experienced friends or posting questions here. That's not a good or bad thing overall... it is just to say that everything was available via the first couple pages of googling.
I'll probably try again with the 3D printed enclosure, and eventually I'll probably bypass the thermostat in the freezer and tie it directly to the BrewPi... but for now, everything is working and it only took me about 6 hours total from opening the box to having everything appearing to work correctly. pics coming.
You don't have a genuine arduino if it shows up as ttyusb0 and it doesn't have a proper boot loader flashed to eeprom. you more than likely had these issues because you did the legacy branch, which was recently updated to fix all the problems you are having. and the reason the config file keeps disappearing is because you are trying to change it either through the gui file manager or you are not using sudo when you edit from terminal. honestly I'd just start over and read the directions verbatim instead of glossing over. I once missed an entire page of instructions back in the day because I glossed over them.
I forgot someone had made a 3d printed brewpi enclosure, but if the size is a bit off maybe you could scale it up a bit in the slicer. or maybe have your buddy look into his settings, because he could be over extruding or have his temps too high. Or you forgot the most fundamental step of 3d printing part cleanup and hole filing
")
OP
OP
FuzzeWuzze
I Love DIY
Many thanks to the hundreds of users contributing to this thread, and of course, Fuzee for what I can only imagine is hundreds of hours tied to the original post and constant response through more than 5,500 posts in this thread!!
Some thoughts on the process for me, and some quick context:
My terminal skills are VERY rusty... almost 15 years old since I really did much of anything, and that wasn't much then. I don't program but have a solid enough tech baseline that I felt good with this project and the instructions provided.
I got a friend (diatonic) to print the 3d enclosure based on the file in this thread. The USB hole was slightly too small, and there was no hole to fit the power plug on the arduino. I know it's not necessary, but the board wouldn't sit right if the power plug didn't have a hole to poke through. I also used a standard outlet, which proved to be slightly too big (both directions) for the hole. I would suggest altering the printer file to make the box slightly taller and an additional .5mm around the USB portal, plus the power portal. Plenty of room for a breadboard in the box.
Ordered the canakit raspian which came with Jessie (wasn't worth the time to rebuild a cpu or scrounge a wifi dongle, microSD and case needed for purchasing just the rpi) plus an Arduino Uno from a local recycled electronics store.
Set up both SSH and VPN connections (x11vpn is the way to go) and away I went.
Ran into some problems: despite being a genuine Uno, the default ports ACM0, 1 were incorrect. It connects on ttyUSB0. took a while to figure that out, and to properly correct the config.cfg file (which kept disappearing from the settings folder).
In the process, I also incorrectly set the python to master instead of legacy (because I glossed through the directions on the brewpi docs site) and missed the important change of /var/www to /var/www/html in the right places, including the settings/config.cfg file. The brewpi wiki should have been my first stop:
http://diybrewpi.wikia.com/wiki/Setting_Up_Your_RPI
Once I got the connection working, I couldn't flash the Uno board with the BrewPi hex file - and I couldn't find the right hex file in the link provided in the instructions. This is where my general lack of knowledge tripped me up for half a day: I kept trying to use the bin files or pieces of the other firmware without realizing that the Uno is now behind the times and the last update was 0.2.10. Having that direct link on the wiki instructions page (for those of use going with the Uno) would be very helpful! I had a ton of trouble finding it and am a total rookie when it comes to navigating the github - and that confused the hell out of me for a bit.
Even then, the BrewPi web interface wouldn't upload the file to the Arduino; I jest kept getting outdated software errors and the python script process would kick out.
Finally, I tethered the Uno directly to my computer and used XLoader to upload the hex file directly, swapped it back to the Rpi and rebooted. Success!
Kind of.
My devices wouldn't load properly: I could change and apply all I wanted but nothing moved from detected to installed.
A page or two into a google search (after coming up empty in this thread) I found this page:
http://inboundsbrewing.com/my-experience-building-a-brewpi/
Explaining the exact same situation, and laying out the next step: flash the EEPROM.
From there, all is well and I'm set to calibrate and get fermenting. I'm somewhat proud of myself that I did everything using the resources available and not bothering my more experienced friends or posting questions here. That's not a good or bad thing overall... it is just to say that everything was available via the first couple pages of googling.
I'll probably try again with the 3D printed enclosure, and eventually I'll probably bypass the thermostat in the freezer and tie it directly to the BrewPi... but for now, everything is working and it only took me about 6 hours total from opening the box to having everything appearing to work correctly. pics coming.
The Arduino doesnt need power if its plugged in via USB. You should only need the external power if your using a very long/very ****ty usb cable that cant supply the power properly. Thats why the case doesnt have a hole for it
virgil1
Well-Known Member
My BrewPi stops working each day in the afternoon(2pm give or take an hour). I restart it, and it works fine. I checked, and it stops logging at that time. So its not the Raspi alone. Any ideas? I checked /home/brewpi/logs, don't see anything. It just stops. The card isn't full. Where else could I look? Its been running fine for 6+ months. I didn't install anything new or change anything. I thought it might be log filling space or something. I checked, and it shows 39% free space.
It seems fine today. I setup a ping script in my crontab on my FreeNas box. It's always on, so it pings the brewpi server every 5 minutes. I think it was still working(the Arduino), just the RasPi was losing connection or going to sleep. I didn't update anything on it though...so not sure why it changed.
midnightbrewing
Active Member
The Arduino doesnt need power if its plugged in via USB. You should only need the external power if your using a very long/very ****ty usb cable that cant supply the power properly. Thats why the case doesnt have a hole for it
True - but the power port (like the USB port) extends beyond the edge of the board, and without a hole to poke through, the board will not sit correctly in the printed box. It is too far recessed.
wBarber69, thanks for the thoughts on some of the Arduino problems. The board does have an Arduino logo - which I thought meant it to be genuine? Doesn't matter now. When you say that the legacy branch likely caused the problems; I had originally set the branch to master because I flew through the prompts without looking at the RPI page of the brewpi wiki instructions. When I was struggling, I discovered the more specific wiki instructions, wiped and started over. That's when I made sure to set legacy instead of master. Should I go back and set to master now? Everything appears to be working (save that I don't have a thermowell for now).
True - but the power port (like the USB port) extends beyond the edge of the board, and without a hole to poke through, the board will not sit correctly in the printed box. It is too far recessed...
With the other issues you mentioned above in your post about things being 0.5mm too small, I would agree with wbarber69's comments on your buddy's 3D printer set up. You can't just take a model from a website and print it without making adjustments for how your personal 3D printer prints. Each printer is different. I know my printer "over extrudes" by about 0.2mm so when I design parts to be printed, I take that into account.
If I have to print a 10mm x 10mm square hole, I design it at 10.5mm x 10.5mm.
BrewPi frozen on "Beer Profile = 66.7". Had this BPi running numerous Beer Profiles,and Beer Constant, and was able to edit and update, for the past year-and-a-half.
Now it shows only 66.7 in Beer Profile and will not respond to opening a new beer profile, or will not respond if I change the profile to Beer Constant. Rebooted the RPi, to no good. Unplugged to reboot also to no good - just keeps coming back to Beer Profile 66.7 and keeps cycling the Heat, even though I changed the profile to a much lower temp.
Hope I do not have to wipe the RPi and start over, but what else can I do???
OP
OP
FuzzeWuzze
I Love DIY
True - but the power port (like the USB port) extends beyond the edge of the board, and without a hole to poke through, the board will not sit correctly in the printed box. It is too far recessed.
wBarber69, thanks for the thoughts on some of the Arduino problems. The board does have an Arduino logo - which I thought meant it to be genuine? Doesn't matter now. When you say that the legacy branch likely caused the problems; I had originally set the branch to master because I flew through the prompts without looking at the RPI page of the brewpi wiki instructions. When I was struggling, I discovered the more specific wiki instructions, wiped and started over. That's when I made sure to set legacy instead of master. Should I go back and set to master now? Everything appears to be working (save that I don't have a thermowell for now).
Yea like others said i think its just down to tolerances. The power jack doesnt stick out nearly as far as the USB Port. The USB port should sit flush with the outside, which basically puts the power port right up against the inside wall.
I had the original box creator print me my box and my Uno fits in it perfectly snug.
OP
OP
FuzzeWuzze
I Love DIY
If the brewpi loses power, when power is restored, will it resume the same profile and pick up where it left off?
Yes, thats the real benefit of the Arduino and microcontrollers(Not Microprocessor like the RPI)
wbarber69
Well-Known Member
- Joined
- Oct 13, 2013
- Messages
- 2,191
- Reaction score
- 263
True - but the power port (like the USB port) extends beyond the edge of the board, and without a hole to poke through, the board will not sit correctly in the printed box. It is too far recessed.
wBarber69, thanks for the thoughts on some of the Arduino problems. The board does have an Arduino logo - which I thought meant it to be genuine? Doesn't matter now. When you say that the legacy branch likely caused the problems; I had originally set the branch to master because I flew through the prompts without looking at the RPI page of the brewpi wiki instructions. When I was struggling, I discovered the more specific wiki instructions, wiped and started over. That's when I made sure to set legacy instead of master. Should I go back and set to master now? Everything appears to be working (save that I don't have a thermowell for now).
I never said legacy was the problem, the problem is that you were trying to use master beach at first. And yeah there are billions of fake arduinos with genuine enough looking logos. if it didn't come directly from a reputable arduino seller then you prolly got got.
wbarber69
Well-Known Member
- Joined
- Oct 13, 2013
- Messages
- 2,191
- Reaction score
- 263
BrewPi frozen on "Beer Profile = 66.7". Had this BPi running numerous Beer Profiles,and Beer Constant, and was able to edit and update, for the past year-and-a-half.
Now it shows only 66.7 in Beer Profile and will not respond to opening a new beer profile, or will not respond if I change the profile to Beer Constant. Rebooted the RPi, to no good. Unplugged to reboot also to no good - just keeps coming back to Beer Profile 66.7 and keeps cycling the Heat, even though I changed the profile to a much lower temp.
Hope I do not have to wipe the RPi and start over, but what else can I do???
What happens if you hit the reset button on the arduino?
midnightbrewing
Active Member
I never said legacy was the problem, the problem is that you were trying to use master beach at first. And yeah there are billions of fake arduinos with genuine enough looking logos. if it didn't come directly from a reputable arduino seller then you prolly got got.
ha. fair enough. for $10 I can tolerate getting got.


Bigdaddyale
Well-Known Member
You probably got one with a CH340 usb chip in it.Thats what happen to me. You have to add a line of code for the software to recognize it. The instructions are a few pages back in this thread and over at brewpi.com This is the board I'm using.ha. fair enough. for $10 I can tolerate getting got.
http://www.ebay.com/itm/251712910879?_trksid=p2057872.m2749.l2649&ssPageName=STRK:MEBIDX:IT
Dollar_bill
Member
- Joined
- May 22, 2016
- Messages
- 5
- Reaction score
- 0
Having trouble with my brewpi setup. I have everything up and running on the web interface side. But, it is not detecting the temperature sensors only the controller sensors. I have changed the sensors, used a different Arduino, and have read everything I could find on google. Attached is my current wiring setup. I could only find 10k resistors and not 4.7k, is that ok? Any suggestions?


Having trouble with my brewpi setup. I have everything up and running on the web interface side. But, it is not detecting the temperature sensors only the controller sensors. I have changed the sensors, used a different Arduino, and have read everything I could find on google. Attached is my current wiring setup. I could only find 10k resistors and not 4.7k, is that ok? Any suggestions?
No you need to use 4.7k ohms.
Having trouble with my brewpi setup. I have everything up and running on the web interface side. But, it is not detecting the temperature sensors only the controller sensors. I have changed the sensors, used a different Arduino, and have read everything I could find on google. Attached is my current wiring setup. I could only find 10k resistors and not 4.7k, is that ok? Any suggestions?
Put a pair of the 10K resistors in parallel and you'll have 5K - close enough.
As for the probes: where did you get them?
Cheers!
Dollar_bill
Member
- Joined
- May 22, 2016
- Messages
- 5
- Reaction score
- 0
Got the probes from Amazon. They are the ds18b20.i will try radio shack again tomorrow and see if they get any more resistors in stock.
I had ordered some Ds18b20 probes and they ended up registering as parasite power mode. Which brewpi will not show them as devices when setting up. So I ordered some Ds18b20 from another supplier. Not the waterproof just the sensor. They ended up not working either. I then contacted the supplier and he tested some of his stock and found some of those did not work either and we determined that the ones he originally sent must of been counterfeit. He has another set of sensors on the way that he has tested out and they work.
Following instructions here, on the wiki, and on BrewPi.com I got my system set up and working yesterday. I don't have relays yet but from all accounts it seems like the sensors are the hard part.
Thank you @Elco, @FuzzeWuzze and all who have contributed here.
There were things missing here and there, some things not immediately clear, and some things that only made sense after you got them right. I told myself I was going to make notes. You think I did? Hell no.
Now I need to go back through the thread and hopefully find some ideas for a case.
Dollar_bill
Member
- Joined
- May 22, 2016
- Messages
- 5
- Reaction score
- 0
I bought a 4.7K resistor. Still did not work so I found the sketch a few posts back by geordish and the sensors were running in parasitic mode. Ordered some new ones that will be here tomorrow. Hopefully they will work.
The whole probe fiasco is amazing to me for how many people seem to have been bitten.
But I thought there was a work-around for the ch340 bridge?
Cheers!
But I thought there was a work-around for the ch340 bridge?
Cheers!
Bigdaddyale
Well-Known Member
CaptnDelta
Well-Known Member
- Joined
- May 7, 2014
- Messages
- 164
- Reaction score
- 26
This coupled with the influx of counterfeit ch340 chips out there will make this project nearly impossible
Those chips are not counterfeit, they're just wholly different chips (for which the arduino IDE - obviously - doesn't install a driver).
The arduino knockoff-producers went to use that chip after FTDI (the original chip maker) bricked devices that used FTDI knock-off's:
http://hackaday.com/2014/10/22/watch-that-windows-update-ftdi-drivers-are-killing-fake-chips/
Cheers,
-Th
- Status
- Not open for further replies.
Similar threads
- Replies
- 3
- Views
- 1K
