HOWTO - Make a BrewPi Fermentation Controller For Cheap

Homebrew Talk - Beer, Wine, Mead, & Cider Brewing Discussion Forum

Help Support Homebrew Talk - Beer, Wine, Mead, & Cider Brewing Discussion Forum:

This site may earn a commission from merchant affiliate links, including eBay, Amazon, and others.
Status
Not open for further replies.
I bought one anyhow. It was $17.39 shipped. Arrived the day after I ordered it. I'll test it out after this beer is done fermenting and post how it went. I have a 7 cu ft freezer.

Please do post a screenshot of a day of fermentation with it, i dont think i have an image readily available to show how well it really works in a small chamber.
 
Does anyone with a Lasko My Heat have a larger chamber (15 cubic foot) in a cold garage? Would it keep up? My garage can be about 40 degrees, so I would want it to raise the temp about 30 degrees. Is that asking too much?
 
Does anyone with a Lasko My Heat have a larger chamber (15 cubic foot) in a cold garage? Would it keep up? My garage can be about 40 degrees, so I would want it to raise the temp about 30 degrees. Is that asking too much?

It should be plenty. Mine is nearly too much for my ~12 cuft'er.
 
My original pi crapped out during the off season, so I bought a new one. The new one takes a microSD card and my brewpi software is on SD. Has anyone dealt with this?

I ordered an adapter so that I can write a microSD card from my laptop. I need to copy everything from my SD to my laptop and then write it to the microSD.
 
Does anyone with a Lasko My Heat have a larger chamber (15 cubic foot) in a cold garage? Would it keep up? My garage can be about 40 degrees, so I would want it to raise the temp about 30 degrees. Is that asking too much?

My freezer/chamber (17cuft) is in the garage and it kept my ales at temp all last winter.
 
My original pi crapped out during the off season, so I bought a new one. The new one takes a microSD card and my brewpi software is on SD. Has anyone dealt with this?

I ordered an adapter so that I can write a microSD card from my laptop. I need to copy everything from my SD to my laptop and then write it to the microSD.

If your micro SD card is higher capacity than your original SD card, you can use Win32DiskImager with a card reader to create an image file of the old card then write that image to the new card...

Cheers!
 
Freezing cold. I have 3 insulated walls but that's about it. The ceiling and door is not insulated. I'm in Ohio.

Sweet. I should be fine since my garage will never go below freezing. Thanks!
 
Just thought that i would post an update to the instruction below. After many hours trying to figure out why this was not working for me i had a web chat with Elco through his website store.brewpi.com and he diagnosed the issue as being with the script for the .htaccess file. He kindly logged on to my system and corrected it for me so if anyone else has problems with not being able to re-start their script on the BrewPi web interface after following the instructions below use the following for the .htaccess file instead:

<FilesMatch "admin.php|beer-panel.php|config.php|configuration.php|control-panel.php|maintenance-panel.php|previous_beers.php|program_arduino.php|save_beer_profile.php|start_script.php">
Allow from all
authuserFile /var/www/private/.htpasswd
AuthName "YOUR USER NAME"
AuthType Basic
Require valid-user
</FilesMatch>

Hey all,

Thanks for all of the help getting this set up to make it a pretty easy process for me. I did notice a couple of things as i put it together and wanted to add my 2 cents where applicable.

First off the "Publicly accessible BrewPi" code linked in the first post appears to need some updating. I found that it would never actually display any graphs or fill out the LCD display. so I dug in and updated the code provided by FuzzeWuzze. See below:

  1. Goto /var/www
  2. Code:
    sudo mv index.php admin.php
    (this moves the default brewpi webpage to a new location)
  3. Create a file with vi or nano called index.php and add the contents of the code block below (Mostly fixes in the Javascript section of the file)

Code:
<?php
/* Copyright 2012 BrewPi/Elco Jacobs.
* This file is part of BrewPi.

* BrewPi is free software: you can redistribute it and/or modify
* it under the terms of the GNU General Public License as published by
* the Free Software Foundation, either version 3 of the License, or
* (at your option) any later version.

* BrewPi is distributed in the hope that it will be useful,
* but WITHOUT ANY WARRANTY; without even the implied warranty of
* MERCHANTABILITY or FITNESS FOR A PARTICULAR PURPOSE. See the
* GNU General Public License for more details.

* You should have received a copy of the GNU General Public License
* along with BrewPi. If not, see <http://www.gnu.org/licenses/>.
*/

// load default settings from file
$defaultSettings = file_get_contents('defaultSettings.json');
if($defaultSettings == false){
		die("Cannot open default settings file: defaultSettings.json");
}
$settingsArray = json_decode(prepareJSON($defaultSettings), true);
if(is_null($settingsArray)){
		die("Cannot decode defaultSettings.json");
}
// overwrite default settings with user settings
if(file_exists('userSettings.json')){
		$userSettings = file_get_contents('userSettings.json');
		if($userSettings == false){
		die("Error opening settings file userSettings.json");
		}
		$userSettingsArray = json_decode(prepareJSON($userSettings), true);
		if(is_null($settingsArray)){
		die("Cannot decode userSettings.json");
		}
		foreach ($userSettingsArray as $key => $value) {
		$settingsArray[$key] = $userSettingsArray[$key];
		}
}

$beerName = $settingsArray["beerName"];
$tempFormat = $settingsArray["tempFormat"];
$profileName = $settingsArray["profileName"];
$dateTimeFormat = $settingsArray["dateTimeFormat"];
$dateTimeFormatDisplay = $settingsArray["dateTimeFormatDisplay"];

function prepareJSON($input) {
//This will convert ASCII/ISO-8859-1 to UTF-8.
//Be careful with the third parameter (encoding detect list), because
//if set wrong, some input encodings will get garbled (including UTF-8!)
$input = mb_convert_encoding($input, 'UTF-8', 'ASCII,UTF-8,ISO-8859-1');

//Remove UTF-8 BOM if present, json_decode() does not like it.
if(substr($input, 0, 3) == pack("CCC", 0xEF, 0xBB, 0xBF)) $input = substr($input, 3);

return $input;
}

?>

<!DOCTYPE html >
<html>
	<head>
		<meta http-equiv="content-type" content="text/html; charset=utf-8" />
		<title>BrewPi reporting for duty!</title>
		<link type="text/css" href="css/redmond/jquery-ui-1.10.3.custom.css" rel="stylesheet" />
		<link type="text/css" href="css/style.css" rel="stylesheet"/>
	</head>
<body>
	<div id="beer-panel" class="ui-widget ui-widget-content ui-corner-all">
		<?php
			include 'PublicBeerPanel.php';
		?>
	</div>

	<!-- Load scripts after the body, so they don't block rendering of the page -->
	<!-- <script type="text/javascript" src="js/jquery-1.11.0.js"></script> -->
		<script type="text/javascript" src="js/jquery-1.11.0.min.js"></script>
		<script type="text/javascript" src="js/jquery-ui-1.10.3.custom.min.js"></script>
		<script type="text/javascript" src="js/jquery-ui-timepicker-addon.js"></script>
		<script type="text/javascript" src="js/spin.js"></script>
		<script type="text/javascript" src="js/dygraph-combined.js"></script>
		<script type="text/javascript">
			// pass parameters to JavaScript
			window.tempFormat = <?php echo "'$tempFormat'" ?>;
			window.beerName = <?php echo "\"$beerName\""?>;
			window.profileName = <?php echo "\"$profileName\""?>;
			window.dateTimeFormat = <?php echo "\"$dateTimeFormat\""?>;
			window.dateTimeFormatDisplay = <?php echo "\"$dateTimeFormatDisplay\""?>;
		</script>
		<script type="text/javascript" src="js/main.js"></script>
		<script type="text/javascript" src="js/device-config.js"></script>
		<script type="text/javascript" src="js/control-panel.js"></script>
		<script type="text/javascript" src="js/maintenance-panel.js"></script>
		<script type="text/javascript" src="js/beer-chart.js"></script>
		<script type="text/javascript" src="js/profile-table.js"></script>
	</body>
</html>
Next create another new file with vi or nano called PublicBeerPanel.php with these contents (Fixes display of BrewName variable with decoded URL formatting)
Code:
<?php
/* Copyright 2012 BrewPi/Elco Jacobs.
* This file is part of BrewPi.

* BrewPi is free software: you can redistribute it and/or modify
* it under the terms of the GNU General Public License as published by
* the Free Software Foundation, either version 3 of the License, or
* (at your option) any later version.

* BrewPi is distributed in the hope that it will be useful,
* but WITHOUT ANY WARRANTY; without even the implied warranty of
* MERCHANTABILITY or FITNESS FOR A PARTICULAR PURPOSE. See the
* GNU General Public License for more details.

* You should have received a copy of the GNU General Public License
* along with BrewPi. If not, see <http://www.gnu.org/licenses/>.
*/
?>
<div id="top-bar" class="ui-widget ui-widget-header ui-corner-all">
	<div id="lcd" class="lcddisplay"><span class="lcd-text">
		<span class="lcd-line" id="lcd-line-0">Live LCD waiting</span>
		<span class="lcd-line" id="lcd-line-1">for update from</span>
		<span class="lcd-line" id="lcd-line-2">script...</span>
		<span class="lcd-line" id="lcd-line-3"></span>
	</div>
	<div id="logo-container">
		<img src="brewpi_logo.png">
		<div id=beer-name-container>
			<span>Fermenting: </span><span><?php echo urldecode($beerName);?></span>
			<span class="data-logging-state"></span>
		</div>
	</div>
</div>
<div class="chart-container">
	<div id="curr-beer-chart-label" class="beer-chart-label"></div>
	<div id="curr-beer-chart" class="beer-chart" style="width:815px; height:390px"></div>
		<div id="curr-beer-chart-controls" class="beer-chart-controls" style="display: none">
		<div id="curr-beer-chart-buttons" class="beer-chart-buttons">
			<div class="beer-chart-legend-row">
					<button class="refresh-curr-beer-chart" title="Refresh"></button>
				<div class="beer-chart-legend-label">Refresh Chart</div>
				<br class="crystal" />
			</div>
			<div class="beer-chart-legend-row last">
					<button class="chart-help" title="Help"></button>
				<div class="beer-chart-legend-label">Help</div>
				<br class="crystal" />
			</div>
			</div>
		<div id="curr-beer-chart-legend" class="beer-chart-legend">
			<div class="beer-chart-legend-row time">
				<div class="beer-chart-legend-time">Date/Time</div>
			</div>
			<div class="beer-chart-legend-row beerTemp">
				<div class="toggle beerTemp" onClick="toggleLine(this)"></div>
				<div class="beer-chart-legend-label" onClick="toggleLine(this)">Beer Temp</div>
				<div class="beer-chart-legend-value">--</div>
				<br class="crystal" />
			</div>
			<div class="beer-chart-legend-row beerSet">
				<div class="toggle beerSet" onClick="toggleLine(this)"></div>
				<div class="beer-chart-legend-label" onClick="toggleLine(this)">Beer Setting</div>
				<div class="beer-chart-legend-value">--</div>
				<br class="crystal" />
			</div>
			<div class="beer-chart-legend-row fridgeTemp">
				<div class="toggle fridgeTemp" onClick="toggleLine(this)"></div>
				<div class="beer-chart-legend-label" onClick="toggleLine(this)">Fridge Temp</div>
				<div class="beer-chart-legend-value">--</div>
				<br class="crystal" />
			</div>
			<div class="beer-chart-legend-row fridgeSet">
				<div class="toggle fridgeSet" onClick="toggleLine(this)"></div>
				<div class="beer-chart-legend-label" onClick="toggleLine(this)">Fridge Setting</div>
				<div class="beer-chart-legend-value">--</div>
				<br class="crystal" />
			</div>
			<div class="beer-chart-legend-row roomTemp">
				<div class="toggle roomTemp" onClick="toggleLine(this)"></div>
				<div class="beer-chart-legend-label" onClick="toggleLine(this)">Room Temp</div>
				<div class="beer-chart-legend-value">--</div>
				<br class="crystal" />
			</div>
			<div class="beer-chart-legend-row state">
				<div class="state-indicator"></div>
				<div class="beer-chart-legend-label"></div>
				<br class="crystal" />
			</div>
			<div class="beer-chart-legend-row annotation last">
				<div class="toggleAnnotations dygraphDefaultAnnotation" onClick="toggleAnnotations(this)">A</div>
				<div class="beer-chart-legend-label" onClick="toggleAnnotations(this)">Annotations</div>
				<br class="crystal" />
			</div>
		</div>
	</div>
</div>
<div id="chart-help-popup" title="Beer graph help" style="display: none">
	<p>This chart displays all temperatures and state information logged by BrewPi.
	Not all temperatures are shown by default, but you can toggle them with the colored dots.</p>
	<p>Click and drag left or right to zoom horizontally, click and drag up or down to zoom vertically. Double click to zoom out.
	When zoomed in, you can hold shift to pan around. On your phone or tablet you can just pinch to zoom.</p>
	<p>The state information is shown as colored bars at the bottom of the graph, explanation below.</p>
	<div class="state-info"><span class="state-color state-idle"></span><span class="state-name">Idle</span>
		<span class="state-explanation">
			No actuator is active.
		</span>
	</div>
	<div class="state-info">
		<span class="state-color state-cooling"></span><span class="state-name">Cooling</span>
		<span class="state-explanation">
		The fridge is cooling!
		</span>
	</div>
	<div class="state-info"><span class="state-color state-heating"></span><span class="state-name">Heating</span>
		<span class="state-explanation">
		The heater is heating!
		</span>
	</div>
	<div class="state-info"><span class="state-color state-waiting-to-cool"></span><span class="state-name">Waiting to cool</span>
		<span class="state-explanation">
		The fridge is waiting to start cooling. It has to wait because BrewPi has just cooled or heated. There is a a minimum time for between cool cycles and a minimum time for switching from heating to cooling.
		</span>
	</div>
	<div class="state-info"><span class="state-color state-waiting-to-heat"></span><span class="state-name">Waiting to heat</span>
		<span class="state-explanation">
		Idem for heating. There is a a minimum time for between heat cycles and a minimum time for switching from cooling to heating.
		</span>
	</div>
	<div class="state-info"><span class="state-color state-cooling-min-time"></span><span class="state-name">Cooling minimum time</span>
		<span class="state-explanation">
		There is a minimum on time for each cool cycle. When the fridge hits target but has not cooled the minimum time, it will continue cooling until the minimum time has passed.
		</span>
	</div>
	<div class="state-info"><span class="state-color state-heating-min-time"></span><span class="state-name">Heating minimum time</span>
		<span class="state-explanation">
		There is a minimum on time for each heat cycle too. When the fridge hits target but has not heated the minimum time, it will continue heating until the minimum time has passed.
		</span>
	</div>
	<div class="state-info"><span class="state-color state-waiting-peak"></span><span class="state-name">Waiting for peak detect</span>
		<span class="state-explanation">
		BrewPi estimates fridge temperature overshoot to be able to turn off the actuators early. To adjust the estimators, it has to detect the peaks in fridge temperature.
		When BrewPi would be allowed to heat/cool by the time limits but no peak has been detected yet for previous cycle, it waits in this state for a peak.
		</span>
	</div>
</div>

Secondly I worked out a way host both the Password Protected BrewPi site as well as the one with all of the configurable buttons removed with only a few minor changes. See Below:

  • Putty/SSH into your BrewPi system(or keyboard if its hooked up to a monitor).
  • Run the following commands to enable htaccess
  • cd /etc/apache2/sites-available
  • sudo nano default
  • change file to look like this where under Directory /var/www there is AllowOverride All
    Code:
    <VirtualHost *:80>
            ServerAdmin webmaster@localhost
            ServerName BrewPi
    
            DocumentRoot /var/www
            <Directory />
                    Options FollowSymLinks
                    AllowOverride None
            </Directory>
            <Directory /var/www/>
                    DirectoryIndex index.php
                    Options Indexes FollowSymLinks MultiViews
                    AllowOverride All
                    Order allow,deny
                    allow from all
            </Directory>
    
            ScriptAlias /cgi-bin/ /usr/lib/cgi-bin/
            <Directory "/usr/lib/cgi-bin">
                    AllowOverride None
                    Options +ExecCGI -MultiViews +SymLinksIfOwnerMatch
                    Order allow,deny
                    Allow from all
            </Directory>
    
            ErrorLog ${APACHE_LOG_DIR}/error.log
    
            # Possible values include: debug, info, notice, warn, error, crit,
            # alert, emerg.
            LogLevel warn
    
            CustomLog ${APACHE_LOG_DIR}/access.log combined
    </VirtualHost>
  • Now its time to restart apache:
  • cd /usr/sbin
  • sudo apache2ctl -k graceful
  • Go to /var/www directory
  • Create a file using vi editor called .htaccess and inside of it put the following, modify the first line where it is bold and replace it with what you plan to call your Private PHP file.
    Code:
    <FilesMatch "admin.php">
    Allow from all
    authuserFile /var/www/private/.htpasswd
    AuthName "YOUR LOGIN HERE"
    AuthType Basic
    <Limit GET POST>
    require valid-user
    </Limit>
    </FilesMatch>
    <FilesMatch "beer-panel.php|config.php|configuration.php|control-panel.php|maintenance-panel.php|previous_beers.php|program_arduino.php|s ave_beer_profile.php|start_script.php">
    Order deny,allow
    Deny from All
    Allow from 192.168.1.
    </FilesMatch>
  • Edit the last allow line that says Allow from 192.168.1 to match up with whatever your local LAN IP address scheme is. You dont need wildcards or subnet masks or anything else.
  • Create a directory called private(to store the above .htpasswd file), and go into it.
  • Type htpasswd -c .htpasswd <UserName>, it will pop up asking you for a password, and make you repeat it.
  • Your done! If you try going to Http://YourBrewPiWebSite.com/admin.php it will now ask you for a password and take you to the "Full BrewPi site". But if you go to http://YourBrewPiWebSite.com it will take you to the "Public Site" without the need for a password.
  • Also make sure obviously that if you want to access this from the external world that your RPI is port forwarding properly through your router.
 
Why heat space? Heat your beer!
I use one of these: http://www.amazon.com/dp/B000F54AOW/?tag=skimlinks_replacement-20

very effective and cheap for my side-by-side kegerator/ferm chamber fridge

I thought it didn't work like that. Is there a new algorithm for heaters applied directly to the beer? This is what Elco says about heating the beer:

"the algorithm is written for a chamber heater. The fridge air acts as a buffer between actuators and beer temperature. The actuators are therefore coupled to the fridge air temperature. Heating the beer directly will not work well."

From:
http://forum.brewpi.com/discussion/659/fermwrap-heater-attach-to-carboy-or-to-fridge-wall
 
Last edited by a moderator:
I thought it didn't work like that. Is there a new algorithm for heaters applied directly to the beer? This is what Elco says about heating the beer:


"the algorithm is written for a chamber heater. The fridge air acts as a buffer between actuators and beer temperature. The actuators are therefore coupled to the fridge air temperature. Heating the beer directly will not work well."


From:

http://forum.brewpi.com/discussion/659/fermwrap-heater-attach-to-carboy-or-to-fridge-wall


No but it has been proven that the algorithm will fiction perfectly fine with direct heating.
 
No but it has been proven that the algorithm will fiction perfectly fine with direct heating.


The heating pad I posted works perfectly for me. I suspect the lag time of heating 5-6 gal of beer a couple of degrees dampens the tendency to overshoot. Much more efficient this way, too I think (also cheaper and safer)
 
Lag time? My reptile tape changes temps in my beer about as fast as I would like. Anything faster would be too hard to control.
 
Lag time? My reptile tape changes temps in my beer about as fast as I would like. Anything faster would be too hard to control.

Oh, it's plenty fast, I just mean that heating 5gal of beer takes some time, it's not instant, in which case you'd probably overshoot. I suspect Elco's code needs that lag time, but probably not as much lag time as heating a volume of air to heat a volume of liquid inside that volume of air.
 
at first I thought it was my probe, but now I see BrewPi measures or logs the Room Temperature differently.

in the graph, you can see the graphs for Beer, Fridge and Room temps, top to bottom.

at 8:32, I swapped the Room Temp & Beer Temp Device Functions. as expected, the 2 lines crossed, but the temperatures the probes were recording remained constant. it's just the function that swapped.

before I swapped the functions, I noticed the Room Temp displayed more as a sawtooth wave and not as smooth as the Beer & Fridge plots. when I swapped the functions, the line displaying the Room temp stayed sawtooth, but the history before the swap switched.

I don't know if I'm explaining it well at all.

probe swap.JPG
 
at first I thought it was my probe, but now I see BrewPi measures or logs the Room Temperature differently.,,,

Your graph looks perfectly normal to me. As I've previously mentioned, the Beer Temp uses software filtering, so the graph will appear to be a smoother line. The Room Temp and the Fridge Temp Sensor do not utilize the filtering. That is also why the Beer temp sensor will appear to react slower than the others. Since you swapped their assignments in the maintenance panel, your graph is what I would expect.


Edited to add:
It's referenced on the BrewPi Forum here: Room Temp Sensor Sensitivity

That would certainly explain it, thank you

Not that I was concerned, just thought it odd
 
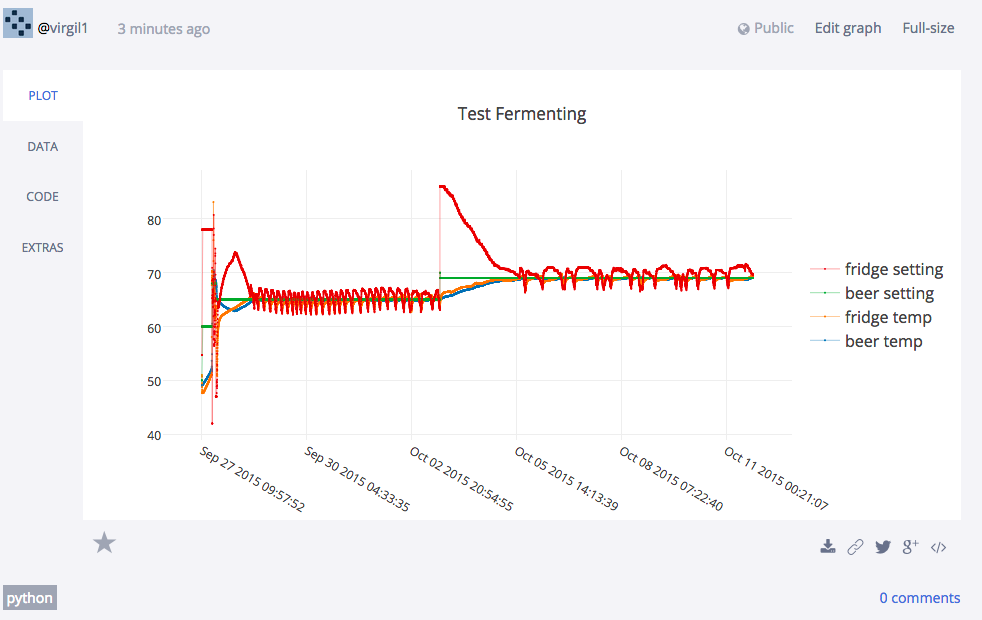
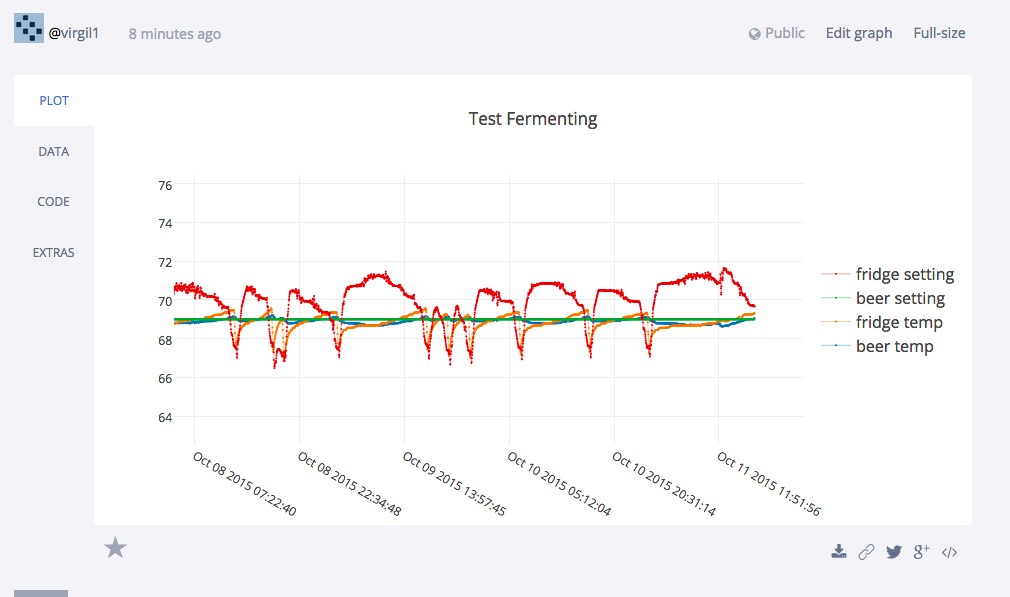
I didn't really want to control my brewPi setup remotely(away from home), but I did want to be able to monitor it. I wrote a python script that reads the csv file that brewPi already creates, and set it up to read it every 5 minutes. Plot.ly is totally free. It allows you to send data and create graphs 'on the fly' that you can access via a public URL(a website anyone can access). Now I can check to see how things are going anytime I want(without opening up my network):
https://plot.ly/~virgil1/86

If anyone is interested, happy to share the script.

Screen Shot 2015-10-11 at 5.15.08 PM.png


Screen Shot 2015-10-11 at 5.14.31 PM.png
 
Ok, that's nice, but I have to ask, why go to all the trouble when you get every bit of that for "free" already?

I mean, I can check any of my BrewPi systems from anywhere with i'net access without doing...anything...outside of the box-stock installation plus a tiny bit of router and gateway configuration...which I'm pretty sure you had to do anyway.

Can you zoom into the plot with that tool?

Cheers!

Yep, you can zoom into the plot. One of the pics I showed is 'zoomed in'. I read so many people having trouble trying to get their apache configured so they could access it remotely(read all the pages of this forum), I figured it would be useful. I'm not interested in opening up my network. Call me paranoid, I would just prefer not to do it, and I am fine not having access to start/stop/change things. Plus, I like to code. It was fun :):)
 
You must've allowed access into your lan to be able to pull up that plot, yes?
Doesn't seem any different to me...

Cheers!
 
I didn't really want to control my brewPi setup remotely(away from home), but I did want to be able to monitor it. I wrote a python script that reads the csv file that brewPi already creates, and set it up to read it every 5 minutes. Plot.ly is totally free. It allows you to send data and create graphs 'on the fly' that you can access via a public URL(a website anyone can access). Now I can check to see how things are going anytime I want(without opening up my network):
https://plot.ly/~virgil1/86

If anyone is interested, happy to share the script.

I'd like to see your script:) So if I'm understanding correctly, your script uploads the brewpi data every 5 minutes to the plot.ly servers so that you don't need to open up your firewall. Right?
 
You must've allowed access into your lan to be able to pull up that plot, yes?
Doesn't seem any different to me...

Cheers!

The plot is hosted on plot.ly. No access to the lan. They have libraries in just about any language you want to write it in. I used Python. The API sends data to their website/engine.
 
I'd like to see your script:) So if I'm understanding correctly, your script uploads the brewpi data every 5 minutes to the plot.ly servers so that you don't need to open up your firewall. Right?

Yep, you have it right. I could send it to you as well, but here it is. I put some notes/comments in it.
Be sure to change the user id and api key! I could make those command line arguments, just didn't get around to it.

Code:
#!/usr/bin/python

# Learn about API authentication here: https://plot.ly/python/getting-started
# Find your api_key here(you need to sign up first): https://plot.ly/settings/api
# a few of the pages I read to get things going
# https://plot.ly/python/axes/
# https://plot.ly/python/line-and-scatter-plots-tutorial/
# this page really got me started with the multiple lines in one plot:
# https://plot.ly/python/line-charts/
# I put the script here on my pi:
# /home/pi/brewpi-tools/brewpi_plot_ly.py
# here is the crontab entry I used:
# 0,5,10,15,20,25,30,35,40,45,50,55 * * * * sudo /home/pi/brewpi-tools/brewpi_plot_ly.py >/home/pi/logs/brewpi_plot_ly.log 2>&1
# the script looks in your /var/www/data/ directory
# it will look for csv files of the same name of the directory and name your graph the same name as your directory
# It skips the "Sample Data", ".gitignore" ,"profiles" and "My First BrewPi Run" directories
# it will print out the name of the graph/directory and the URL when it is done

import os, sys
import os.path, time
import string
import plotly.plotly as py
from plotly.graph_objs import *
import plotly.tools as tls


def read_and_write_graph(whole_path, graph_name):
	graph_name = string.replace(graph_name, '%20', ' ')
	time_stamp = []
	bt = []
	ft = []
	bs = []
	fs = []
	with open(whole_path) as f:
		content = f.readlines()
	
	for beer_string in content:         
		beer_data = beer_string.split(';',9)
		beer_date = beer_data[0]
		beer_temp = beer_data[1]
		beer_setting  = beer_data[2]
		ignore_1 = beer_data[3]
		fridge_temp  = beer_data[4]
		fridge_setting = beer_data[5]
		ignore_2 = beer_data[6]
		ignore_3 = beer_data[7]
		ignore_4 = beer_data[8] 
		time_stamp.append(beer_date)
		bt.append(beer_temp)
		ft.append(fridge_temp)
		bs.append(beer_setting)
		fs.append(fridge_setting)


	trace1 = Scatter(
		x=time_stamp,
		y=bt,
		mode='lines+markers',
		name="beer temp",
		line=Line(
			shape='linear',
			width=0.4
		),
		marker=Marker(
			size=2,
		)
	)

	trace2 = Scatter(
		x=time_stamp,
		y=ft,
		mode='lines+markers',
		name="fridge temp",
		line=Line(
			shape='linear',
			width=0.4
		),
		marker=Marker(
			size=2,
		)
	)

	trace3 = Scatter(
		x=time_stamp,
		y=bs,
		mode='lines+markers',
		name="beer setting",
		line=Line(
			shape='linear',
			width=0.4
		),
		marker=Marker(
			size=2,
		)
	)

	trace4 = Scatter(
		x=time_stamp,
		y=fs,
		mode='lines+markers',
		name="fridge setting",
		line=Line(
			shape='linear',
			width=0.4
		),
		marker=Marker(
			size=2,
		)
	)
	data = Data([trace1, trace2, trace3, trace4])
	layout = Layout(
		title=graph_name,
		legend=Legend(
			y=0.5,
			traceorder='reversed',
			font=Font(
				size=16
			),
		
		),
		xaxis=XAxis(
			tickmode='auto',
			nticks=6
		)
	)
	fig = Figure(data=data, layout=layout)
	plot_url = py.plot(fig, filename=graph_name)

	print graph_name + " is at this URL: " + plot_url


tls.set_credentials_file(username='YOUR_USER_ID', api_key='YOUR_KEY')

# Open the directory
path = "/var/www/data/"
dirs = os.listdir( path )
file_list = []

# This would print all the files and directories
for file in dirs:
   #print file
   if file != "Sample Data" and file != ".gitignore" and file != "profiles" and file != "My First BrewPi Run":
   	#print "adding ", file
   	whole_path = path + file + "/" + file + ".csv"
   	#print "adding whole path", whole_path
   	#print "last modified: %s" % time.ctime(os.path.getmtime(whole_path))
	#print "created: %s" % time.ctime(os.path.getctime(whole_path))
	read_and_write_graph(whole_path,file)
 
Very cool, my first home made ferm controller I made on arduino used cosm which turned to xively...same idea as that service you got there.
 
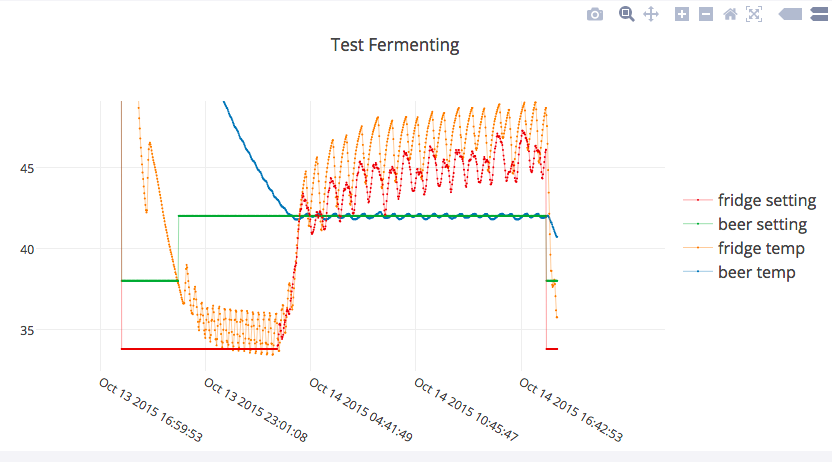
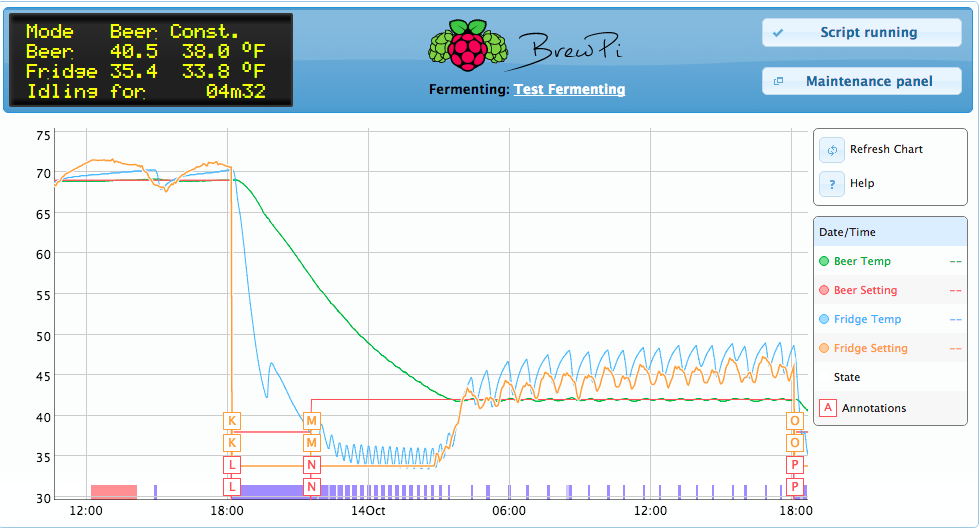
I did a cold crash after dry hopping this week. BrewPi is the best thing ever. Here are pics from BrewPi and from plot.ly. I went a little colder than I wanted to start, so bumped it up.
:ban::ban::ban::ban::ban:

Screen Shot 2015-10-14 at 6.44.50 PM.png


Screen Shot 2015-10-14 at 6.44.40 PM.png
 
I did a cold crash after dry hopping this week. BrewPi is the best thing ever. Here are pics from BrewPi and from plot.ly. I went a little colder than I wanted to start, so bumped it up.
:ban::ban::ban::ban::ban:


Looks good. Similar to what I see. My current profile for us05/ simple ale is 6 days 18degc. Ramp to 20 over 2 days hold at 20 for another 6 days cold crash 2 days. If I re pitch a slurry it usually takes off quicker than a rehydrated pack so I reduce the initial 6 to 4 or 5 days. Here is the time taken to reach 4 deg c. View attachment ImageUploadedByHome Brew1444898251.886557.jpg
 
Looks good. Similar to what I see. My current profile for us05/ simple ale is 6 days 18degc. Ramp to 20 over 2 days hold at 20 for another 6 days cold crash 2 days. If I re pitch a slurry it usually takes off quicker than a rehydrated pack so I reduce the initial 6 to 4 or 5 days. Here is the time taken to reach 4 deg c. View attachment 309536

Cool. I've only done the dry packs so far. I have some liquid yeast waiting to brew another. Might do it this weekend once I get this one in the keg.
 
Just an FYI in case some folks are reading this and limited on space like I am. I had kegged my first beer and used brewPi to keep it at chilling temperatures. Worked great. I don't really have room for another keezer, but really wanted to use brewPi and my keezer to control my ferm temps. I went ahead used my keezer to ferment, forgoing the serving temp of my keg for a while. Worked great for fermenting. I cold crashed(about two weeks later...also dry hopped before I cold crashed), which essentially brought be back down to serving temps, and the keg still tastes great! I only brew every 6-8 weeks so this works really well for me.
 
Had my BrewPi successfully running through the first batch. Thanks to everyone for posting, especially Fuzze. :mug:

I go to set my profile for tonight's brew session this afternoon and blamo Raspberry Pi crashed and nothing is happening when I reboot. Decided to reinstall OS and BrewPi software. Now I am unable to access http://raspberrypi.local (this got me to the interface before). Tried the IP address too. The RPi GUI looks considerably updated as well.

Any ideas on how to access the BrewPi web interface?

Thanks in advance!
 
Status
Not open for further replies.
Back
Top