Home brewery floor plan

Homebrew Talk - Beer, Wine, Mead, & Cider Brewing Discussion Forum

Help Support Homebrew Talk - Beer, Wine, Mead, & Cider Brewing Discussion Forum:

This site may earn a commission from merchant affiliate links, including eBay, Amazon, and others.

Head1855

Member
Joined
Jan 29, 2020
Messages
5
Reaction score
0
I am new to the forum and did not see a better category to post this question as it will be a DIY project.... I have 9' x 9' area in my garage that I would like to turn into my home brewing workshop. I am looking for suggestions on floor plans, equipment (brewing in the intro level bucket and a kettle I bought from Wal-Mart right now). I am ready to take this to the next level and am looking at a new fermenter like the Catalyst (can't do a stainless conical right now) and fermenting in a fridge controlled by by one of those temp control modules. I should mention that this area in my garage is where my hot water heater is located so I theoretically could have a sink but would need to put in a drain. I would like to up my game but make it scale-able so I don't break the bank right now. In other words, I am not looking to get into a tricked out electric system just yet.

One more thing, this area would be primarily for brewing. It is not convenient to the other "entertaining" areas of my home.

Basically I am looking for folks that have done or had thoughts on something like this and would like to provide guidance/suggestions on layout, must have equipment, etc.
 
Adding a utility sink to my garage brewery was the best improvement I've made in terms of convenience. You'll be doing a lot of cleaning/sanitizing, make it easy on yourself. Good lighting helps, too.
 
Was this just a simple plastic one or a restaurant style stainless one? was thinking I could look for one with a counter attached.
 
Is 9x9 a room or just the area you could eek out?

Do you have 1 wall, 2 walls, 3 walls or 4 you are working with?

I assume 5 gallon batches and propane?

Until you get pumps you would probably be best served with a gravity system. There are plenty of builds on here. Just search for gravity tier rigs and that should get you started.

I would recommend at the very minimum a 10 gallon pot with a spout and a 10 gallon round cooler with a false bottom. That would take precedence over a fermenter, for me at least. A bucket is fine for now, especially if you have a way to control fermentation temps. You said you had a fridge, so you just need a temperature controller.

For me, at the very minimum I would want at least 1 utility sink, one with a side board is nice, but you can always build a shelf next to a cheap plastic unit and throw a rubber shoe mat on it, with one lip cut off. This allows water to drain back to sink and lets you purchase a cheap sink.

A hose bib and a white potable water RV hose. If you are just running city water to brew with this will allow you to fill kettles in place and not have to lift kettles full of water. If you brew with RO you will still have to lift.

As was already mentioned, light. You don’t know how much it helps until you don’t have it.

Finally a floor drain. If no floor drain then make extra sure you have a clear path to push water if needed, without a bunch of obstacles. Your floor will get wet, not matter how conscientious you are, and every brewer has had at least 1 mishap where they spilled a large quantity of fluid on ground. The last thing you want is that soaking into card board boxes, or running under something you can not easily move to mop it up. Especially if it is extra sweet wort. You will have ants and mice in no time.

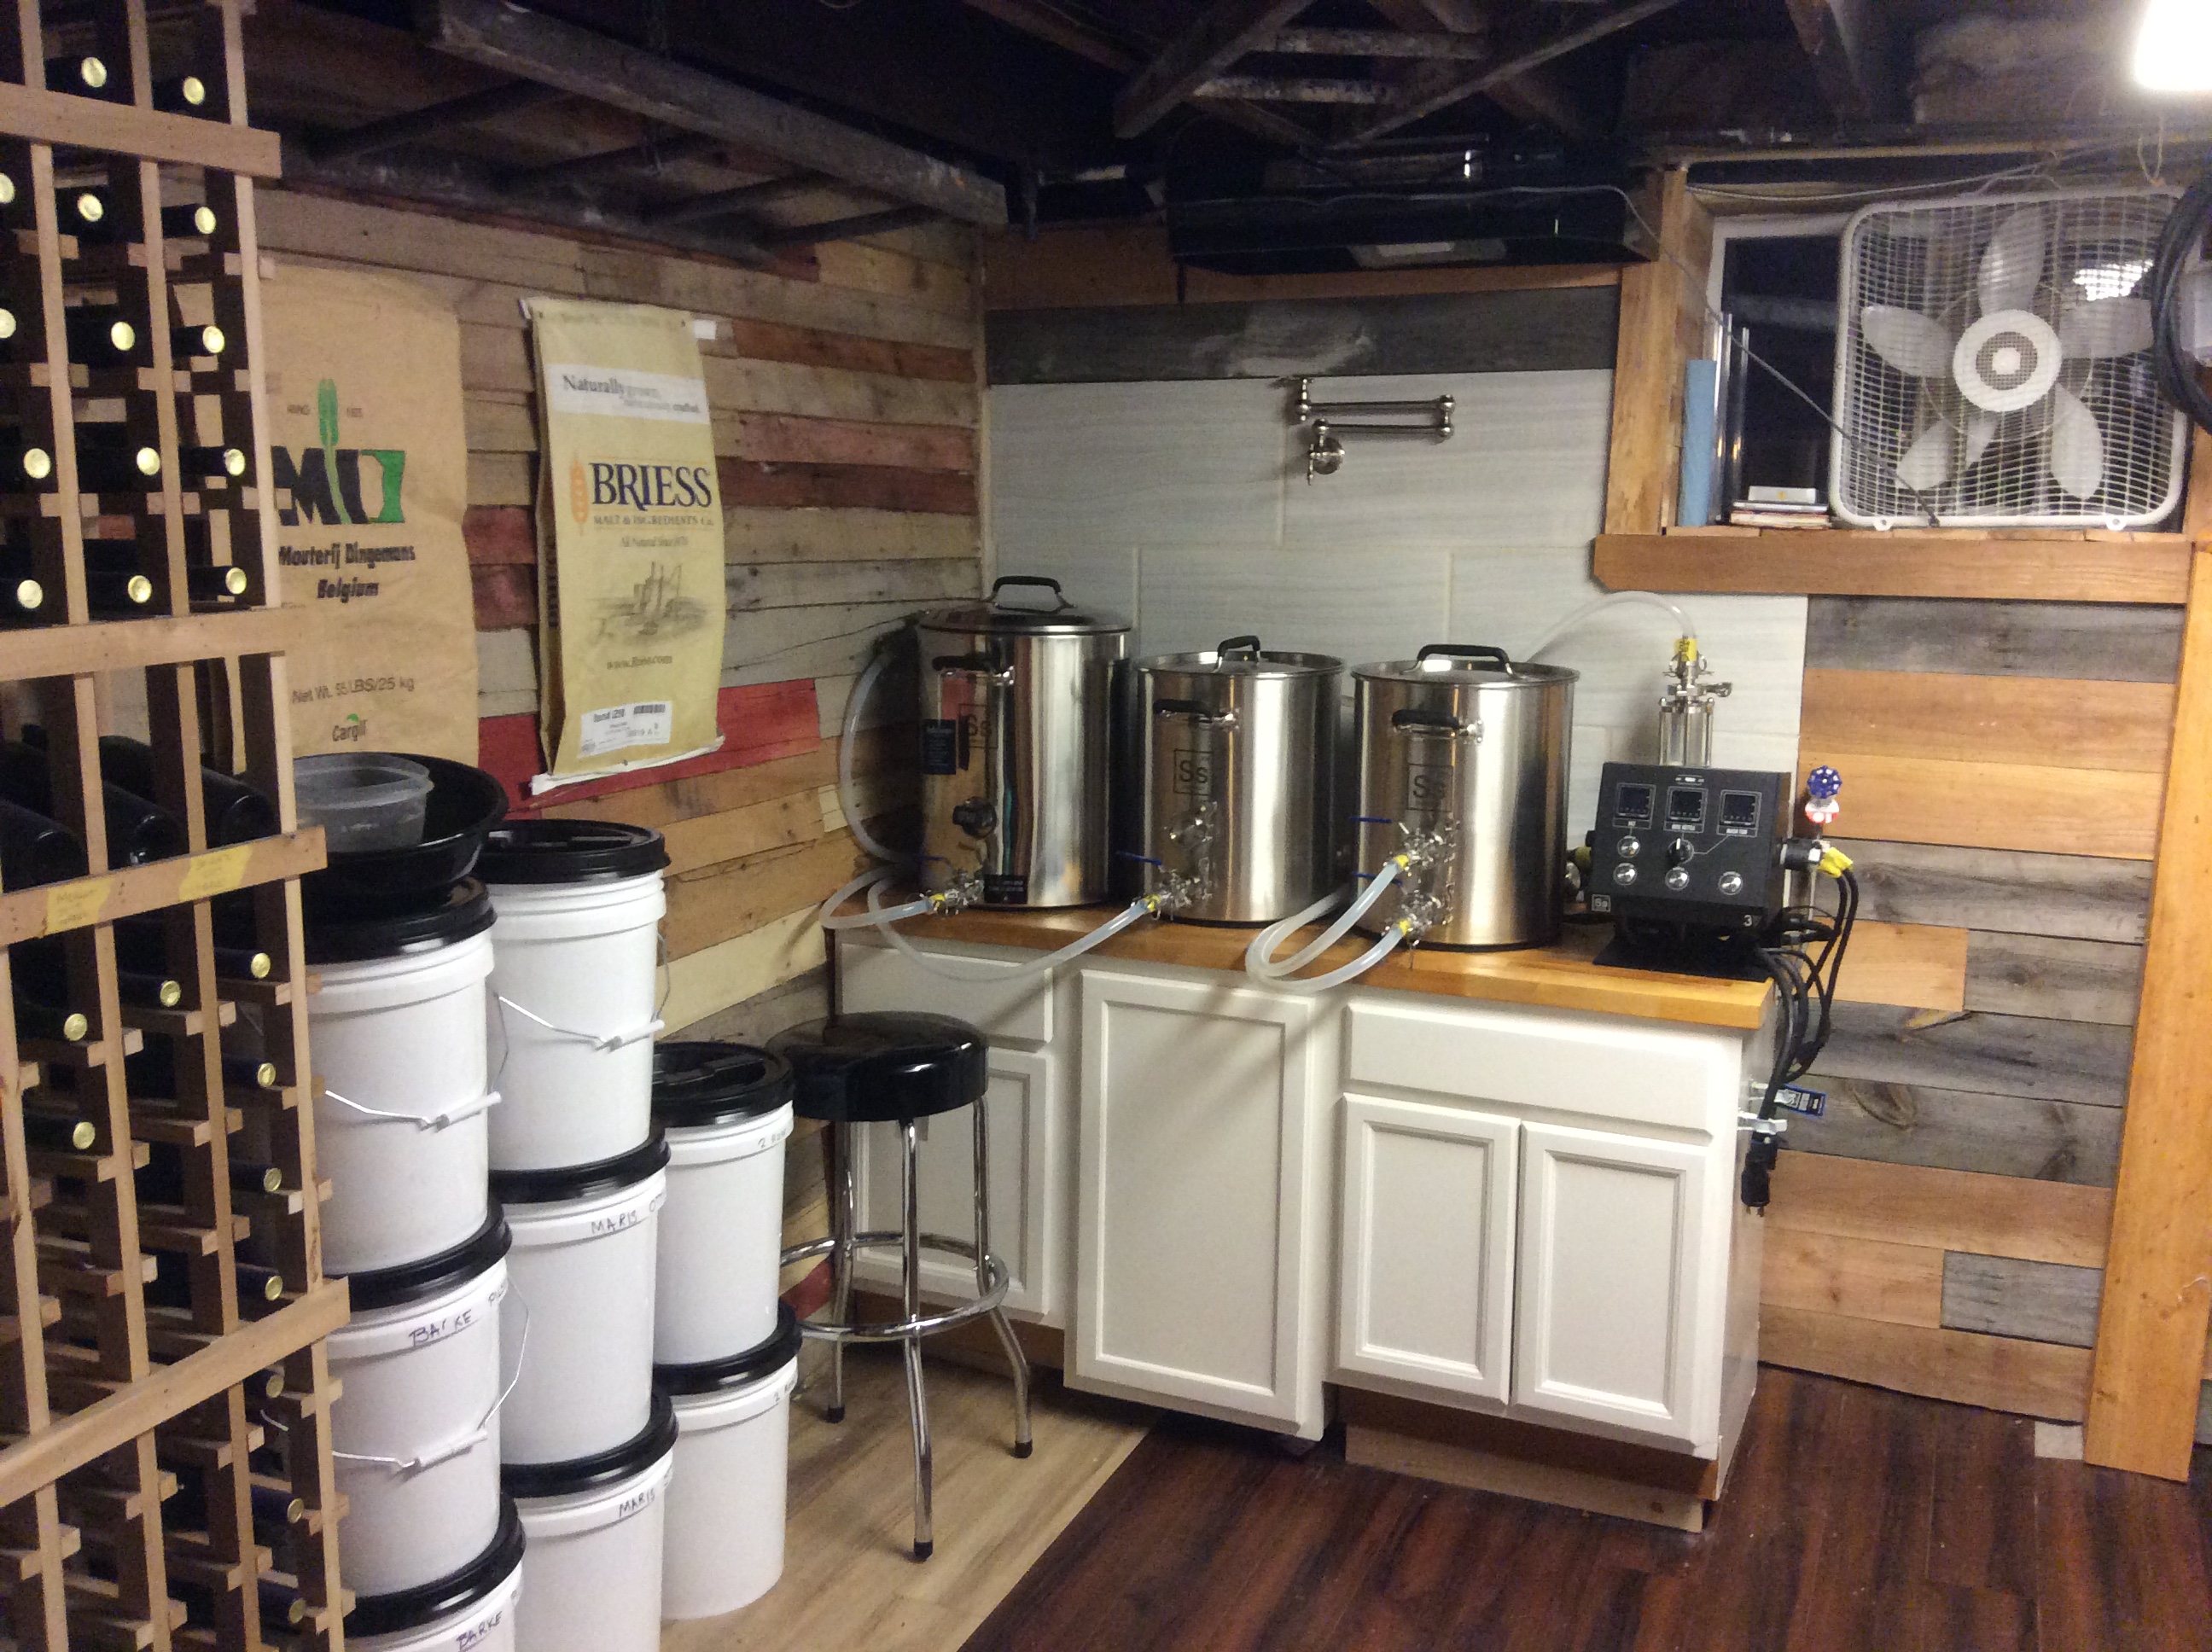
C49630BB-0F0D-43E9-B325-262B3529EC53.jpeg


This is my brew area. It is compact and about the same size you have to work with. Pay no mind that it is electric. The overall length of counter is just over 5 foot. You can easily fit a tiered gravity system in 9 feet and still have room left over. What you cannot see is to the right of where I took picture are 2 utility sinks side by side. One has a regular faucet, the other has a hose sprayer. I can fit every piece of equipment I have in them to clean. Lastly I would put your fridge where I have my wine rack.

All of that would fit In a 9x9 area and would be functional. Any extra space you have will quickly get used up with brewing accessories you are sure to acquire.

Good luck, and report back with what you come up with.
 
I use a big plastic one.
https://mustee.com/catalog/28f-40-bigtub-utilitub-laundry-tub/

I can put small buckets of PBW and sanitizer inside it, along with a dishrack. It's deep enough that with a hand sprayer all the overspray stays inside the tub.

I sometimes put a board on part of the top to create a higher work surface for comfort (cleaning big kettles or kegs) because I don't have an adjacent work surface, yet.

Get a good combo faucet/sprayer to go with it. You can get a suprisingly good one for about $60. I did need to add a wood reinforcement on the underside of the tub where the faucet mounts. It was a bit flexy without it, now it is very solid.

I'm about to add a couple hose bibs next to the sink so I can connect my CFC in the garage instead of using a garden hose bib, and so I can have a conical cleaning/floor washdown hose permanently installed.

I find that the more convenient I can make anything, the more fun it is to brew.
 
Is 9x9 a room or just the area you could eek out?

Do you have 1 wall, 2 walls, 3 walls or 4 you are working with?

I assume 5 gallon batches and propane?

Until you get pumps you would probably be best served with a gravity system. There are plenty of builds on here. Just search for gravity tier rigs and that should get you started.

I would recommend at the very minimum a 10 gallon pot with a spout and a 10 gallon round cooler with a false bottom. That would take precedence over a fermenter, for me at least. A bucket is fine for now, especially if you have a way to control fermentation temps. You said you had a fridge, so you just need a temperature controller.

For me, at the very minimum I would want at least 1 utility sink, one with a side board is nice, but you can always build a shelf next to a cheap plastic unit and throw a rubber shoe mat on it, with one lip cut off. This allows water to drain back to sink and lets you purchase a cheap sink.

A hose bib and a white potable water RV hose. If you are just running city water to brew with this will allow you to fill kettles in place and not have to lift kettles full of water. If you brew with RO you will still have to lift.

As was already mentioned, light. You don’t know how much it helps until you don’t have it.

Finally a floor drain. If no floor drain then make extra sure you have a clear path to push water if needed, without a bunch of obstacles. Your floor will get wet, not matter how conscientious you are, and every brewer has had at least 1 mishap where they spilled a large quantity of fluid on ground. The last thing you want is that soaking into card board boxes, or running under something you can not easily move to mop it up. Especially if it is extra sweet wort. You will have ants and mice in no time.

View attachment 664202


This is my brew area. It is compact and about the same size you have to work with. Pay no mind that it is electric. The overall length of counter is just over 5 foot. You can easily fit a tiered gravity system in 9 feet and still have room left over. What you cannot see is to the right of where I took picture are 2 utility sinks side by side. One has a regular faucet, the other has a hose sprayer. I can fit every piece of equipment I have in them to clean. Lastly I would put your fridge where I have my wine rack.

All of that would fit In a 9x9 area and would be functional. Any extra space you have will quickly get used up with brewing accessories you are sure to acquire.

Good luck, and report back with what you come up with.

The 9x9 area is one end of a small garage (think golf cart size) that is attached to and beside my main two car garage. There is a door from my main garage and the 9x9 area would be to the left when you walk through that door. The other end has my lawn and garden equipment (will have to take extra precautions to prevent contamination I know). All that to say that it has three walls. I am looking at making an upgrade to a tankless gas water heater. In doing this I am thinking about putting a gas line drop in for a future gas range (my house is all electric now) which is on the other side of the back wall. I had the thought that I may get them to put another drop in this area for a future built in burner.... maybe on the right wall so I could vent to the outside. Like I said in the original post...... scalable. See area below.
 

Attachments

  • IMG_5050.jpg
    IMG_5050.jpg
    1.8 MB · Views: 74
I use a big plastic one.
https://mustee.com/catalog/28f-40-bigtub-utilitub-laundry-tub/

I can put small buckets of PBW and sanitizer inside it, along with a dishrack. It's deep enough that with a hand sprayer all the overspray stays inside the tub.

I sometimes put a board on part of the top to create a higher work surface for comfort (cleaning big kettles or kegs) because I don't have an adjacent work surface, yet.

Get a good combo faucet/sprayer to go with it. You can get a suprisingly good one for about $60. I did need to add a wood reinforcement on the underside of the tub where the faucet mounts. It was a bit flexy without it, now it is very solid.

I'm about to add a couple hose bibs next to the sink so I can connect my CFC in the garage instead of using a garden hose bib, and so I can have a conical cleaning/floor washdown hose permanently installed.

I find that the more convenient I can make anything, the more fun it is to brew.
I REALLY like that sink and how wide it is. The only ones that I have seen are square or double/two square ones. But I am just starting the the research part of R&D.
 
Back
Top