Got a welder, now the fun begins...

Homebrew Talk - Beer, Wine, Mead, & Cider Brewing Discussion Forum

Help Support Homebrew Talk - Beer, Wine, Mead, & Cider Brewing Discussion Forum:

This site may earn a commission from merchant affiliate links, including eBay, Amazon, and others.
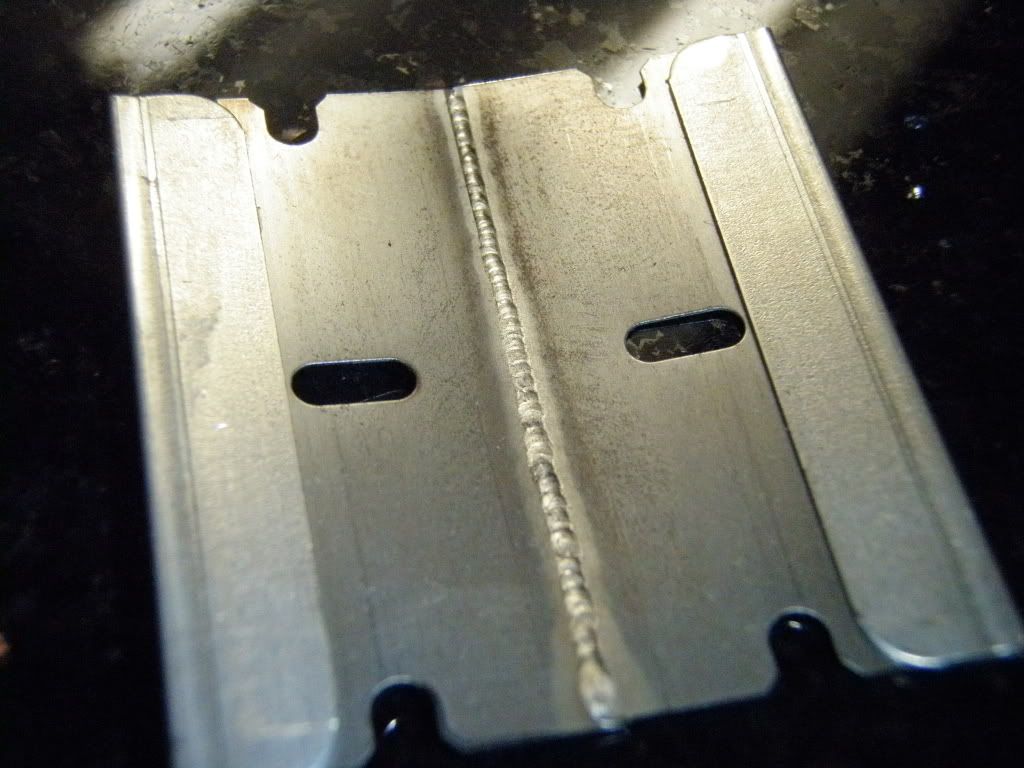
Wow... I'm now even more impressed by the work that some of the folks have shown here. Even IF you get everything set right (not sure I have done that yet), managing the pedal, feeding the rod, keeping the torch a consistent distance and speed is A LOT to coordinate.

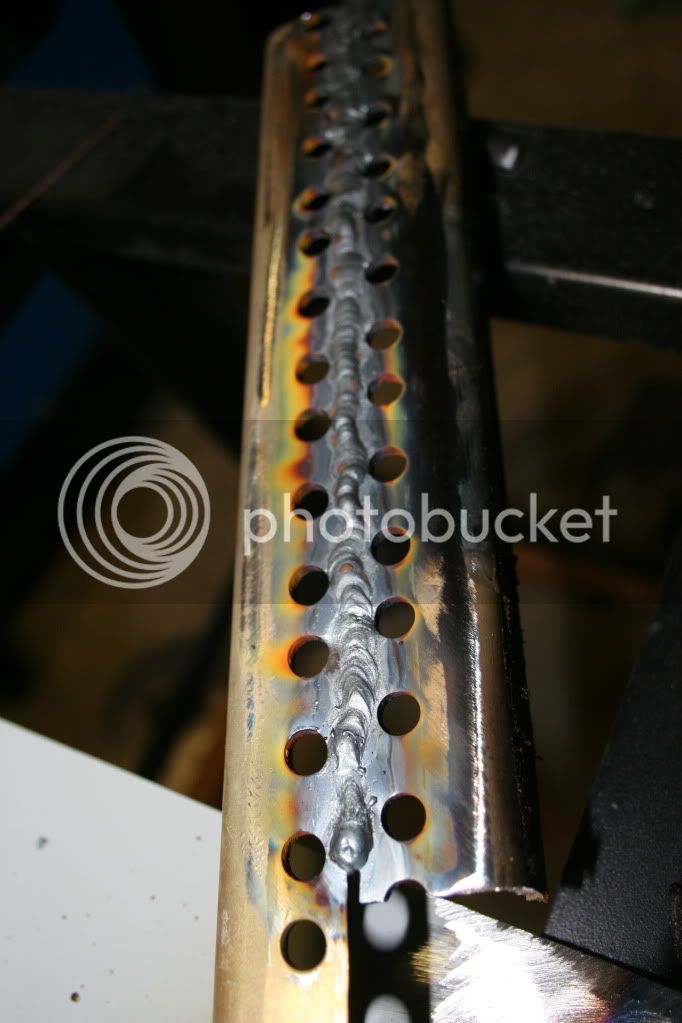
After a few more practices:

IMG_3445.jpg
 
Ed,
Sharpen the tungsten to a sharp point. The angle of the point is good though.
The exposure will vary with the type of joint. You will need more stick out for deep grooves, tight spots, or weird angles.
Do you have a gas lens under your cup or a gas diffuser? Gas lenses will give you a more consistent gas column coming from the cup which means improved shielding.
 
I'm jealous. TIG is on my list of things to learn.
FWIW, my friend has some kind of abrasive wheel on his grinder, it's more soft, maybe a scotch brite (but much denser) wheel. He sharpens the tungstens on a belt sander and then finishes them on the wheel, which has worn down a nice groove in the center from the tungstens. This makes a very sharp point like a pencil and it's less blunt than what you did, I'm sure every one has their preferences. I've done a lot of tungsten sharpening for him while he welds stuff for me.
 
Ed,
Sharpen the tungsten to a sharp point. The angle of the point is good though.
The exposure will vary with the type of joint. You will need more stick out for deep grooves, tight spots, or weird angles.
Do you have a gas lens under your cup or a gas diffuser? Gas lenses will give you a more consistent gas column coming from the cup which means improved shielding.

Thanks for the feedback.
I read different things on sharpening to a fine point vs a "blunt" tip. I will resharpen to a fine point. I do not have a gas lens, just the collett holder. Not sure if that is the same as a gas diffuser? With my whooping 15 minutes experience with a torch, 90% of the time, I pull the torch away at the end of the weld instead of taking my foot off the pedal and letting the post flow do it's work.

I'm jealous. TIG is on my list of things to learn.
FWIW, my friend has some kind of abrasive wheel on his grinder, it's more soft, maybe a scotch brite (but much denser) wheel. He sharpens the tungstens on a belt sander and then finishes them on the wheel, which has worn down a nice groove in the center from the tungstens. This makes a very sharp point like a pencil and it's less blunt than what you did, I'm sure every one has their preferences. I've done a lot of tungsten sharpening for him while he welds stuff for me.

Thanks for responding.
I bought a bunch of tools from a guy a couple months ago and he threw in a cheap belt/disk sander. I think it has found a new life as a tungsten sharpener. The belt on it is fairly course which makes quick work of shaping, I'll look for a finer disk that I can use for finishing.


Ed
 
Boy I missed all todays action Ed.
Been out directing the wife and kids to replace my X-mas
decorations the fence seems a group of people ripped me off
last night plus other neighbors I alone lost over $350 worth.

Ed, it's a big learning curve ya just have to hold your tongue correctly to tig.
Call it mutitasking like clutch, brake and throttle for heel toe shifting like on a road course.

I would recommend a pointed and smooth finished tungsten vs the small blunt tip.
I forgot, how's the HF start working now?
Tig on bro......~=o&o>........

HF starts are working good. I have the intensity set to about 25.
The only time have had issues is when I've gotten a bit close to the work with the tungsten (ok, ok... I touched the puddle) :eek:

A couple times I had a bit of trouble and found that if I just touched the cup sideways to the work piece the HF would kick right in.

I really haven't had much trouble keeping an arc. Keeping the pedal constant has been the challenge.

Ed
 
My friend after Tigging a couple years still piles on the heat and filler, heat affected zone way too wide not necessary with tig this ain't stick welding.
It's sad with this bad economy high schools plus adult ed classes not having night welding classed like years ago.
Best to learn right than to break bad self taught habits, i'm guilty.
How long of a HF arc do you get now that your spark gap contacts have been cleaned and gapped?
Inlaws coming i'm out of here sorry Ed. The wife hits harder.

HF arc is probably at least 1/2".

I understand the need to avoid gettin the wife after you. The worst beatin I ever had was from the SWMBO and she never laid a hand on me :eek:

Ed
 
Damn glad to see you got it running.:mug:

IMO, your not doing too bad. That last pic, that piece would be hard to learn on due to the holes. I understand that practice is done on what ever you can spare. The holes will cause heat fluctuations in the puddle. However, what I see I don't think its half bad for the first go.

I also like to sharpen my tungsten to a point, due to being lazy and not putting in the flay spot. The more steep or the more short the point is, the more penetration. I sharpen mine at 50*.
 
...I need an argon bottle, some filler material and I'd like to run the correct coolant instead of distilled water. ...

Ed

While you're at it look around for the bits you'll need to run argon or CO2 inside whatever you're welding. It protects the back side of the weld.

At least read a little on it.

I'm really jealous. I've been after my wife to let me get one for 20+ years.
 
Damn glad to see you got it running.:mug:

IMO, your not doing too bad. That last pic, that piece would be hard to learn on due to the holes. I understand that practice is done on what ever you can spare. The holes will cause heat fluctuations in the puddle. However, what I see I don't think its half bad for the first go.

I also like to sharpen my tungsten to a point, due to being lazy and not putting in the flay spot. The more steep or the more short the point is, the more penetration. I sharpen mine at 50*.

GM,

Thanks for chiming in.

The holes did make it a bit of a challenge. One benefit was it forced me to "feather" the pedal at each hole.

Looking around the shop, nearly all the scrap metal I have is painted. It's a pain to have to strip the paint, before practicing. I really need to come up with some scrap to practice with.

Ed

Well, you could grind the weld off that piece and weld on it again, and again...... Then you would get more practice with the feathering of the pedal.

When I get those pieces of "metal cloth" for you, I'll also send you some small pieces of tubing so you can build a purge out of it. I'll see what I can do about some small squares of scrap sheet too. Then you can play with SS, Inconel, and I'll try to grab some titanium just for fun.
 
You could also try asking around at some small job shops.
They always have scraps lying around, and may give you some.
It will probably be carbon steel but any time under the hood is gonna help.
Don't call ahead just show up. It's easier to tell someone "no" over the phone than face to face. Tell them that your learning how to weld and they most likely will oblige you.
 
For welding in AC mode the way you sharpened the tungsten was good but in dc mode I find a sharp point focuses the arc better.
I ordered a "T" from the local welding shop that connects to the bottle and bought a cheap flowmeter off of ebay to supply backgassing. I was afraid that with a "T" after the flowmeter I could not be sure of the flow to the torch.
 
You could also try asking around at some small job shops.
They always have scraps lying around, and may give you some.
It will probably be carbon steel but any time under the hood is gonna help.
Don't call ahead just show up. It's easier to tell someone "no" over the phone than face to face. Tell them that your learning how to weld and they most likely will oblige you.

That's a good point. You may get a lot further ahead if you agree to bring back the scrap after your done with it. They may just let you pilfer the scrap bin all you want.
 
The local college auto shop instructor always collects exhaust pipe scraps for his students, the scrap man gets what's left.

Ed, save that scrap with holes for filling holes shut later.
As I told you before is to tap off for back gassing before
the flow meter to not starve the torch like mentioned above.
You get a Vee Neck sunburn yet?
 
While you're at it look around for the bits you'll need to run argon or CO2 inside whatever you're welding. It protects the back side of the weld.

At least read a little on it.

I'm really jealous. I've been after my wife to let me get one for 20+ years.

Thanks, I'm familiar with back purging. The need to back gas is real, but I'm not sure it's a skill... just something you do or don't (maybe figuring out how to do it effectively is a skill). I'm thinking I want to practice and work on my coordination before worrying too much about the backside. That way I will also be saving gas. I am thinking of the stuff I will need.

Ed
 
Well, you could grind the weld off that piece and weld on it again, and again...... Then you would get more practice with the feathering of the pedal.

When I get those pieces of "metal cloth" for you, I'll also send you some small pieces of tubing so you can build a purge out of it. I'll see what I can do about some small squares of scrap sheet too. Then you can play with SS, Inconel, and I'll try to grab some titanium just for fun.

GM,

Thanks! I have some SS (keg cutouts and 1/2" tubing) and some aluminum. I thought I would be better off working on my coordination with mild steel before wasting the "good stuff" ;) Anything you can put together would be appreciated. Just let me know, I'll be happy to cover shipping.

Ed
 
You could also try asking around at some small job shops.
They always have scraps lying around, and may give you some.
It will probably be carbon steel but any time under the hood is gonna help.
Don't call ahead just show up. It's easier to tell someone "no" over the phone than face to face. Tell them that your learning how to weld and they most likely will oblige you.

For welding in AC mode the way you sharpened the tungsten was good but in dc mode I find a sharp point focuses the arc better.
I ordered a "T" from the local welding shop that connects to the bottle and bought a cheap flowmeter off of ebay to supply backgassing. I was afraid that with a "T" after the flowmeter I could not be sure of the flow to the torch.

That's a good point. You may get a lot further ahead if you agree to bring back the scrap after your done with it. They may just let you pilfer the scrap bin all you want.

The local college auto shop instructor always collects exhaust pipe scraps for his students, the scrap man gets what's left.

Ed, save that scrap with holes for filling holes shut later.
As I told you before is to tap off for back gassing before
the flow meter to not starve the torch like mentioned above.
You get a Vee Neck sunburn yet?

There is a couple muffler shops close... I will drop in and see if they have any scraps they will "loan" me.

I'm kinda leaning toward an extra bottle for back purging (but it will probably be a while). I'm not sure how to split my current line and still maintain the set flow to the torch. An extra tank would also serve as a backup.

BB - No sunburn yet, I pretty quickly thought of a long sleeve collared shirt ;)

Thanks for the input guys, I hope to get in some more practice today.

Ed
 
Ed,
with the size bottle you have I would add a Tee just after the regulator to branch off to the torch flow meter, the other leg to a needle valve or another flow meter for the purge. I have used a needle valve for years for a light back gasing flow it's not a critical flow amount just a displacement gas.
Save some money before the wifey wacks you in the head.
 
GM,

Thanks! I have some SS (keg cutouts and 1/2" tubing) and some aluminum. I thought I would be better off working on my coordination with mild steel before wasting the "good stuff" ;) Anything you can put together would be appreciated. Just let me know, I'll be happy to cover shipping.

Ed


I'll be in touch. This is my last week of work for the year. So I'll gather what ever I can for you.

I would be careful about the exhaust tubing. Make sure it isn't galvanized. I'm not sure there is much of that out there, just a thought.
 
Ed,
with the size bottle you have I would add a Tee just after the regulator to branch off to the torch flow meter, the other leg to a needle valve or another flow meter for the purge. I have used a needle valve for years for a light back gasing flow it's not a critical flow amount just a displacement gas.
Save some money before the wifey wacks you in the head.

My regulator and flow meter are one in the same (see picture below).
Not sure how I can tee off before the flow meter. I kinda think I am money ahead for getting a bottle below the LWS price. So eventually, I could see getting another maybe an 80cf. I don't think I'm going to rush it... so that may help with not getting wacked ;)

IMG_3456.jpg


Ed
 
My 1/6" tungsten got pretty rough.
This was with the current set to 100amps and 15cfh gas.
Do you think too much current or too little gas?

IMG_3450.jpg


IMG_3452.jpg


Ed
 
I do not have a gas lens, just the collett holder. Not sure if that is the same as a gas diffuser? Ed

I'm sure you know this but, I figure it will be good info for the thread.

I took a pic of part of my collection showing the differences.
I run a 2 series torch, Starting on the left is the basic collet, next is a gas lense, next is another type of gas lense, and the far right is the gas lense I use all the time.
P1010179.jpg


This shot just shows the difference in them. I switched up the order to keep every one guessing. Sorry. The two on the right in the first pic have been switched.
P1010180.jpg
 
I switched back to the 3/32" tungsten which seemed to hold up much better.
Here's my latest grind (60 grit belt, followed by a 180grit disk):
IMG_3455.jpg
 
I'm sure you know this but, I figure it will be good info for the thread.

I took a pic of part of my collection showing the differences.
I run a 2 series torch, Starting on the left is the basic collet, next is a gas lense, next is another type of gas lense, and the far right is the gas lense I use all the time.

This shot just shows the difference in them. I switched up the order to keep every one guessing. Sorry. The two on the right in the first pic have been switched.

GM,
Thanks for the pictures, that really helps!
I only have the basic collets. Right now I only have 1/6" and 3/32". Do you suggest I get a gas lense? I will probably be ordering some tungstens, should I stick with Thoriated?

Ed
 
All yes to the above questions Ed plus it's a good idea to have a spare cup as they can be broken when one does something not thinking or in a hurry moving around, trust me on this one.
Heck my friend gave me a couple .040" tungstens, i'd like to add .020" also and try them someday on thin low amp projects.
 
GM,
Thanks for the pictures, that really helps!
I only have the basic collets. Right now I only have 1/6" and 3/32". Do you suggest I get a gas lense? I will probably be ordering some tungstens, should I stick with Thoriated?

Ed

2% is all I buy and use. I have tried using the others but, to be honest. I didn't see any real difference for what I do. I'm sure others will disagree with me a bit on this. Also, being in aerospace we can't use or do anything that the weld schedule doesn't allow. In other words, if the weld schedule says 40 amps max. I legally can't go over that amperage. Having said that, ALL our weld schedules say to use 2%. So, prior to my current position. I never bought in to the different tungsten. Now I can't use any of the other tungsten. (at work)

Now, 2% doesn't hold up worth a darn when pulse welding. I just sharpen more often.

As mentioned earlier, A gas lens will help. The screen makes the gas come out in a column rather then a couple of streams. A gas lens will give much less turbulence when the gas leaves the cup. Yes I suggest picking up a gas lens. I wouldn't say that your basic parts are no good though. There will be times you need them cause they are much more thin in diameter.

Here is a chart for tungsten
http://www.ckworldwide.com/tech-4.pdf

Here is the whole tech book. Page 6 shows the gas lens comparison.
http://www.ckworldwide.com/technical_specs.pdf
 
All yes to the above questions Ed plus it's a good idea to have a spare cup as they can be broken when one does something not thinking or in a hurry moving around, trust me on this one.
Heck my friend gave me a couple .040" tungstens, i'd like to add .020" also and try them someday on thin low amp projects.


I run razor blades on 1/16" and a number 10 shade in my lid. No filler.

Edit; No pulse either. Just a back-n-forth motion.
P1010140.jpg
 
Here is the project that got the welder purchase approved.
SWMBO bought this "pumpkin" candle holder at a craft show. One of the welds broke and she asked me over a year ago if I could weld it. I told her no way with the stick welder I have. When I floated the idea of the TIG welder, her first question was "Can you fix my pumpkin?" I told her the welder could do it, and with practice, I might be able to make the welder do it... So here is the project that justified the welder:

IMG_3447.jpg


IMG_3448.jpg


IMG_3449.jpg


Tips / Hints / Suggestions?
So what do you think my chances are?

Ed
 
I think your chances are great. Put in just a bit more time, then grind the paint off. Using a small clamp hold the pieces together, then just fuse them together. The material will flow from the broken piece to the base. Once you done, blast it with air to cool things down fast and not damage any more paint then necessary.

Question.
Is the really riveted, or are they just for looks?
 
I think your chances are great. Put in just a bit more time, then grind the pain off. Using a small clamp hold the pieces together, then just fuse them together. The material will flow from the broken piece to the base. Once you done, blast it with air to cool things down fast and not damage any more paint then necessary.

Question.
Is the really riveted, or are they just for looks?

One rib on each side is welded (one of the two is broken), the rest are riveted. The riveted ribs swivel to collapse for storage.

So you think just fuse it with no filler?
I assume I will have to grind a bit of paint off somewhere to get a ground connected.
 
One rib on each side is welded (one of the two is broken), the rest are riveted. The riveted ribs swivel to collapse for storage.

So you think just fuse it with no filler?
I assume I will have to grind a bit of paint off somewhere to get a ground connected.

A fusion should be just fine IMO.
By grinding the paint off of the bottom of the weld joint, (since it will burn off anyway) the piece will ground through there. Just place it on a piece of plate, attach the ground to the plate.
 
Clamping a mini C clamp that has a point instead of cup on the threaded shoe will ground thru paint then attach the welder ground clamp to the C clamp. This results in minimum damage to painted surfaces vs removing paint.
 
Thanks for the input guys.

My fear is that I start an arc and the entire thing instantly melts into a puddle.

I worked on my coordination a bit today. For whatever reason, I started with the pedal on my left foot. I'm right handed so today, I tried the pedal right footed and it felt much more comfortable.

I bought a couple pieces of 6" x 18" 22ga steel from Lowes to practice on.
I cut a couple small pieces off and ran a bunch of beads on the small pieces.

I read that you should set the amperage about 20% higher than the current for the material being welded and plan to weld at 80% pedal with room for a little extra if needed. Does that sound right?

Ed


I can understand your fear about it all turning into a puddle. Perhaps you could set things up so you can start the arc on another piece and then once you get a stable small arc, you can move onto the pumpkin. Then you can slowly increase the heat to get things to fuse.

Yea, I have read and been told the same on the amperage setting too. The one thing I have to go back to is, the fact that your TIG welding. You have pretty much complete control over the heat being applied.
 
I must be different, I like settings of 40% over range not having the pedal
almost floored during welding.
I like it set this way to heat up quicker forming the puddle with less heat soaking the surrounding area.
 
I can understand your fear about it all turning into a puddle. Perhaps you could set things up so you can start the arc on another piece and then once you get a stable small arc, you can move onto the pumpkin. Then you can slowly increase the heat to get things to fuse.

Yea, I have read and been told the same on the amperage setting too. The one thing I have to go back to is, the fact that your TIG welding. You have pretty much complete control over the heat being applied.

I guess my question is, if you are welding something that requires say 60 amps, do you set the dial to 60, or where would you set it?

I know you could crank the dial all the way up, put it seems that would make the pedal real touchy.

Ed
 

Latest posts

Back
Top