Perfect! Run the set cap command on that one and you should be set.Ah! It's in the /usr/local/bin/ directory instead!
You are using an out of date browser. It may not display this or other websites correctly.
You should upgrade or use an alternative browser.
You should upgrade or use an alternative browser.
Fermentrack: Fermentation monitoring & BrewPi-www Replacement for Raspberry Pi
- Thread starter Thorrak
- Start date

Help Support Homebrew Talk - Beer, Wine, Mead, & Cider Brewing Discussion Forum:
This site may earn a commission from merchant affiliate
links, including eBay, Amazon, and others.
Definitely. The “fix environment” scripts should force a Python 3.7 environment, but I’m thinking @HarlemBrewDoug might not be fully updated. If that readlink command returns an earlier version that might be part of the issue.
[/QUOTE]
Can confirm that python3.7 showed when I ran the readlink command. Should've specified in my previous post.
[/QUOTE]
Can confirm that python3.7 showed when I ran the readlink command. Should've specified in my previous post.
- Joined
- Jul 6, 2013
- Messages
- 142
- Reaction score
- 56
I ran the setcap and my Tilt is working fine.
FYI - I updated to the latest dev code and when I go to the Tilt troubleshooter, it reports "Python is missing capability flags." I ran setcap again but no change.
FYI - I updated to the latest dev code and when I go to the Tilt troubleshooter, it reports "Python is missing capability flags." I ran setcap again but no change.
rkhanso
Well-Known Member
- Joined
- Jan 24, 2017
- Messages
- 776
- Reaction score
- 175
Hello -
I've been using CraftbeerPi to control my plastic conical fermenter and DIY glycol chiller pretty successfully, and with an iSpindel to boot. One thing I've never done was calibrate the iSpindel. I didn't really care because I was only interested in seeing when fermenting was done, not tracking the SG along the way.
Then I recently stumbled across Fermentrack and saw there was some sort of automatic (well, maybe just easier) way to calibrate the iSpindel and thought I'd give it a try.
I did get another Pi Zero and some ESP8266 boards and have a basic install of Fermentrack running - but I have to order some more 1-Wire probes. I had some trouble using Fermentrack to flash the ESP boards, but using the Brewflasher app, it worked fine.
I've only gone through about 1/4 of the almost 40 pages of this thread, as well as searched the thread about glycol chiller control. It appears there is no glycol chiller control when using a single ESP8266, right? If I want chiller control (Window AC unit), I'll need to use a second ESP8266 in Fermentrack to control it?
Additional questions:
- Is there some sort of built-in delay for fridge or AC unit compressors so it doesn't cycle them on/off too quickly?
- Is the heat control PWM capable? I'm using Fermwrap type heat film around the cone of the fermenter. Thinking that PWM might minimize overshooting of the goal temperature.
- I'm sure I'll have more questions (most of them stupid) and problems as I progress moving from CraftbeerPi to Fermentrack.
chucknorris101
Well-Known Member
- Joined
- Jul 17, 2014
- Messages
- 95
- Reaction score
- 16
@rkhanso there is no explicit glycol support (yet). Most of us with Glycol kludge it with just using the fridge temp as the set temperature and using that probe in the beer (and not using the beer temp probe). This doesnt allow use of profiles, but works well enough to party. No need for a second esp8266, each esp is independent.
rkhanso
Well-Known Member
- Joined
- Jan 24, 2017
- Messages
- 776
- Reaction score
- 175
Thanks for the quick reply.@rkhanso there is no explicit glycol support (yet). Most of us with Glycol kludge it with just using the fridge temp as the set temperature and using that probe in the beer (and not using the beer temp probe). This doesnt allow use of profiles, but works well enough to party. No need for a second esp8266, each esp is independent.
If you're using the fridge temp in the beer, does this temp ever bounce over/under the set point frequently and cause the AC unit for the chiller to turn on/off quickly (multiple times per hour)? Or is there something like the Compressor Delay plugin for CraftbeerPi built in to Fermentrack? I would hope so since isn't Fermentrack designed to control a refrigerator compressor also? I've seen in many other threads that these compressors shouldn't cycle on/off quickly. They like to be run for an hour or more and then off for the same.
chucknorris101
Well-Known Member
- Joined
- Jul 17, 2014
- Messages
- 95
- Reaction score
- 16
The typical setup wouldnt have your glycol chiller being plugged into fermentrack controller at all. You would just have the chiller plugged in (infinite cold reservoir) and your pump that circulates the gylcol from the tank to the jacket would be what plugs into the fermentrack controller.
rkhanso
Well-Known Member
- Joined
- Jan 24, 2017
- Messages
- 776
- Reaction score
- 175
OK. That kinda sucks. Not too bad though, since it's only going to cost me the few dollars for the additional ESP8266.
I need to control the A/C unit. The way I do it in CraftbeerPi is to have 2 "Fermenters" - one is the actual fermenter and the other is the chiller system. I keep the chiller about 5-8 degrees lower than the set point in the fermenter to avoid overshoots on the cold side. I need to keep that going. CraftbeerPi couldn't compensate enough to NOT overshoot on the cold side if the water is too cold in the tank. I currently do this all from just the PiZero W that runs everything for CraftbeerPi. The extra "fermenter" is set up in software only.
I'm trying to get away from CraftbeerPi, even though it's been working OK for me. I don't think it's being maintained and the last couple times I set up a new instance, ran into trouble with updated RaspberryPi OS versions. I'd go to BruControl, but can't justify to my wife the $ for it.
I guess I'll have to use the two ESP8266 boards for the Fermentation set up then.
One to control the heat and water pump from the chiller tank into the SS immersion coil and take the iSpindel data. The other simply to control the glycol system A/C unit.
Is the heat and cool side of Fermentrack using PWM or otherwise learning so it doesn't overshoot the set temp? I can keep CraftbeerPi within +/- .5 F each side of the set temp (1 degree F total fluctuation).
And, does Fermentrack have some sort of safeguard built-in so the A/C Compressor won't cycle too frequently?
Last edited:
chucknorris101
Well-Known Member
- Joined
- Jul 17, 2014
- Messages
- 95
- Reaction score
- 16
Does your A/C unit not have a generic STC type controller already to limit how cold it gets so it doesnt freeze? If not would be the only reason I could see why you would need a second controller...at least with fermentrack, my beer was just at 90F and my chiller at 32, and there was hardly a quarter degree of overshoot on a crash to 55. I am working with a jacket rather than an immersion coil, so a bit less quick probably, but i think fermentrack's parameters are pretty well set.
I believe if youre using a standard profile, the fridge plug/control does have settings for A/C compressor protection
I believe if youre using a standard profile, the fridge plug/control does have settings for A/C compressor protection
rkhanso
Well-Known Member
- Joined
- Jan 24, 2017
- Messages
- 776
- Reaction score
- 175
My A/C runs full-cool when it has power. I didn't do anything with the manual control on the A/C unit (similar to most people who run this type of DIY chiller, I think). It's simply turned to the coldest it can go.
Right now, CraftbeerPi powers the A/C unit through a 40A SSR when the temp in the chiller tank rises above the set-temp. I'd really like this same function with Fermentrack. My chiller needs a controller, no matter if it's an Inkbird, CraftbeerPi or another ESP8266 with Fermentrack. I'd like to use just one controller for all.
Can Fermentrack be easily modified to add another cooling output? I'm not a programmer and have no idea. It's sort of a waste to have to use another ESP8266 since it has more outputs that could be used for more control.
Hi All
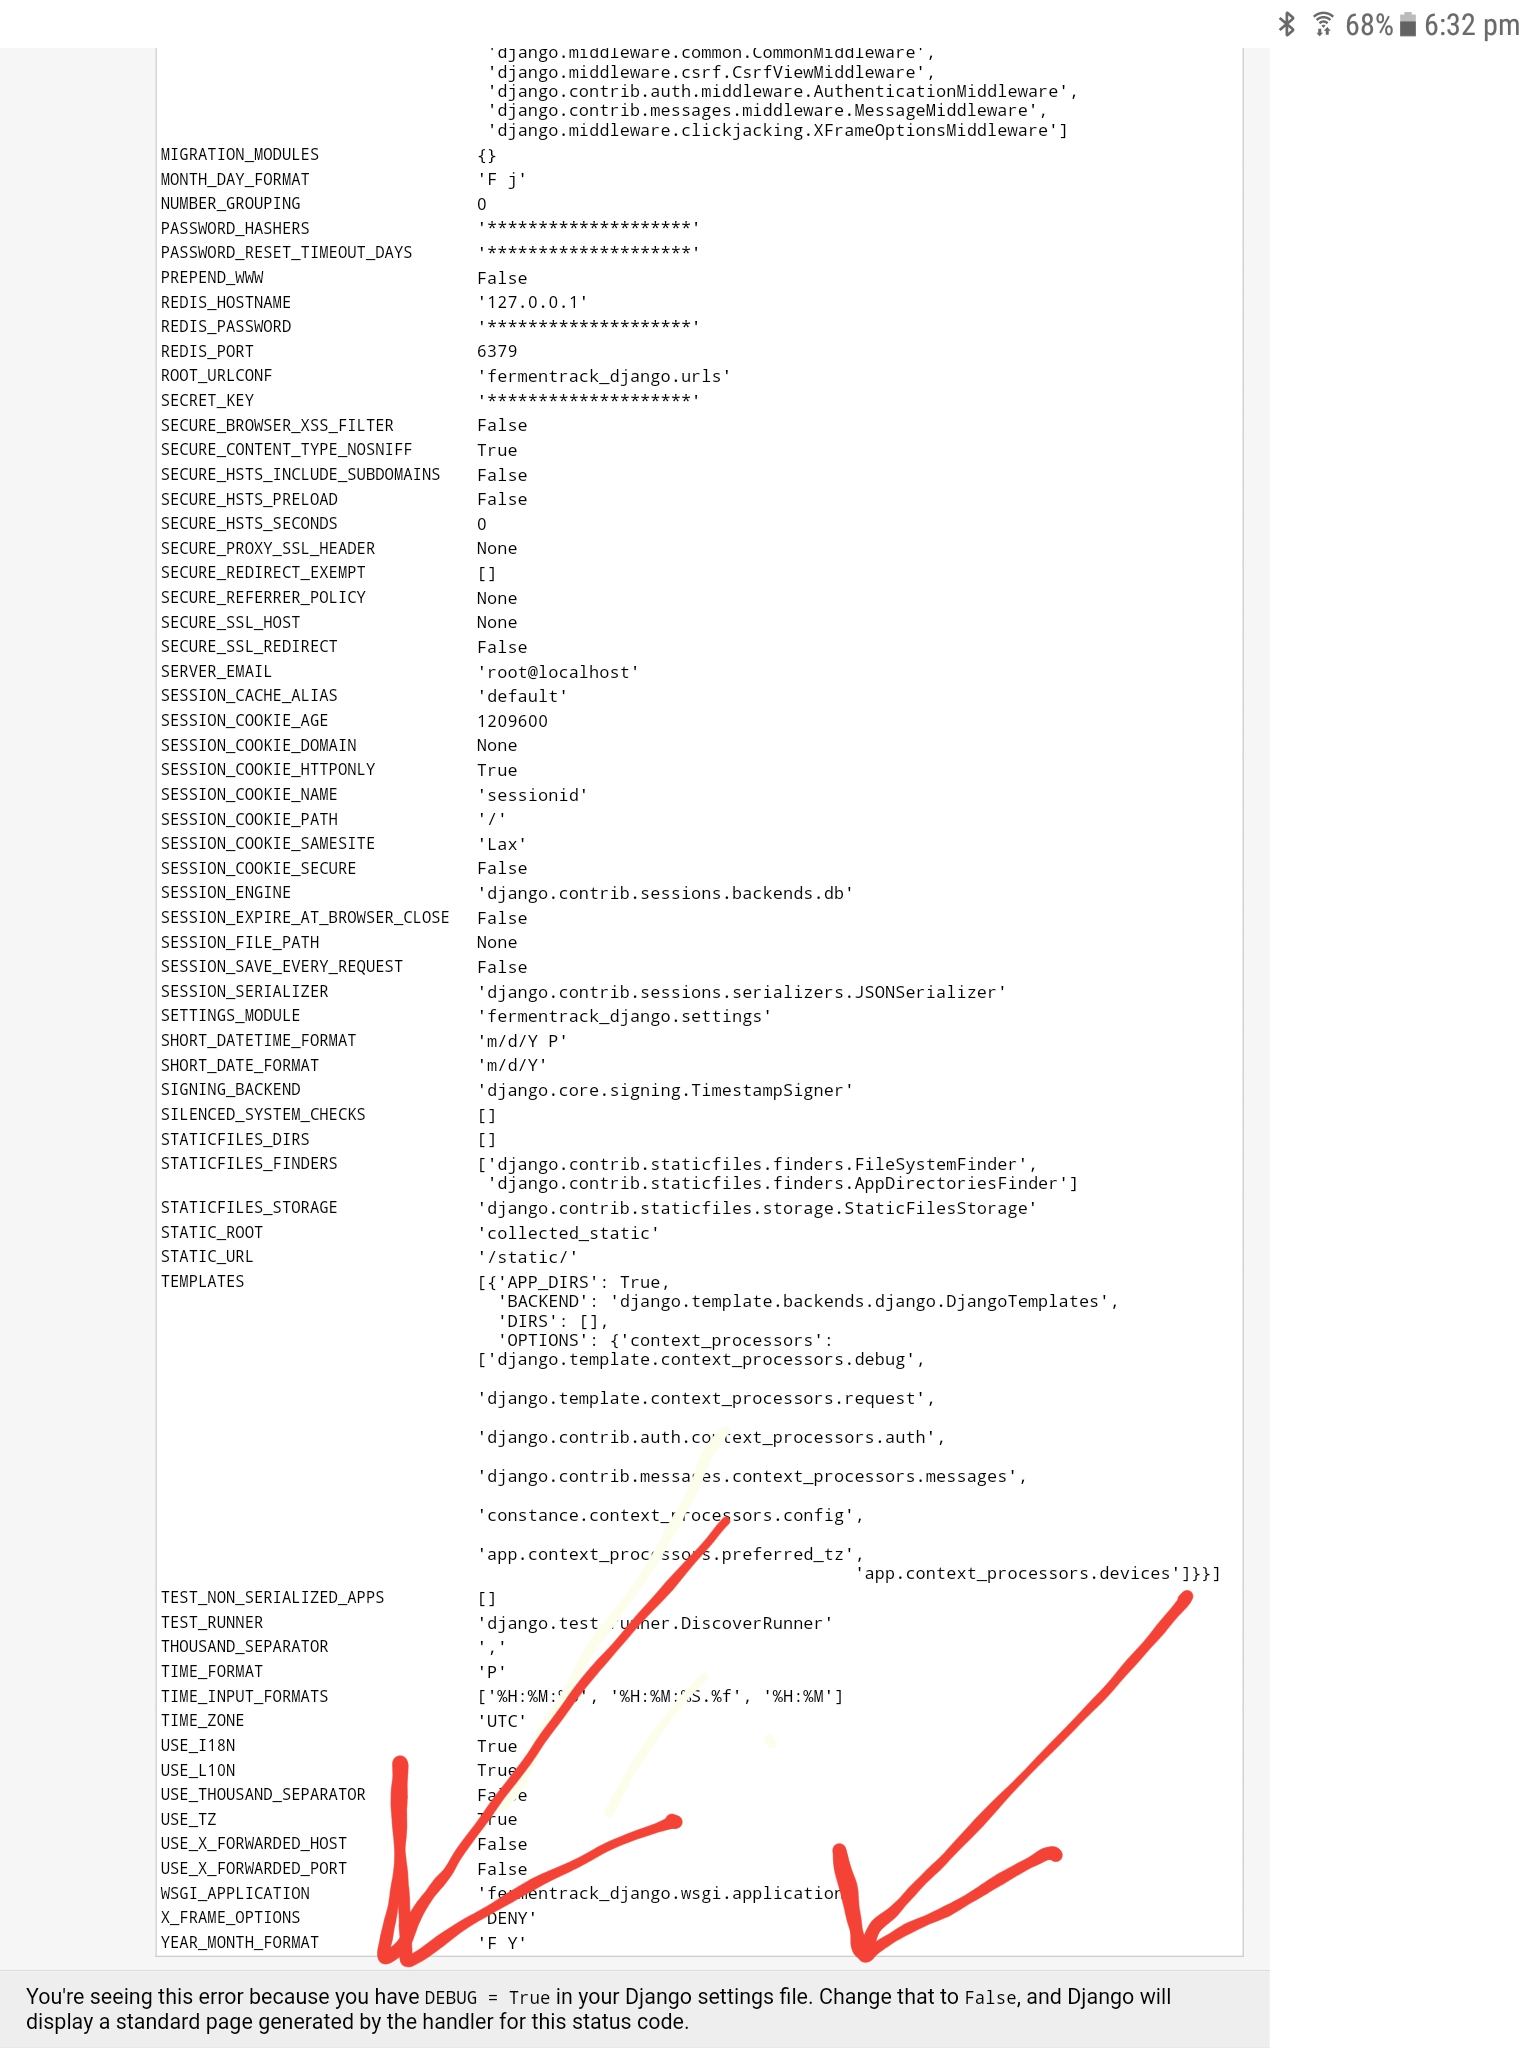
Ive got fermentrack up and running and it is great. Couple of small issue. I've got the debugging set as true in django settings, how do i get it back to false to disable it
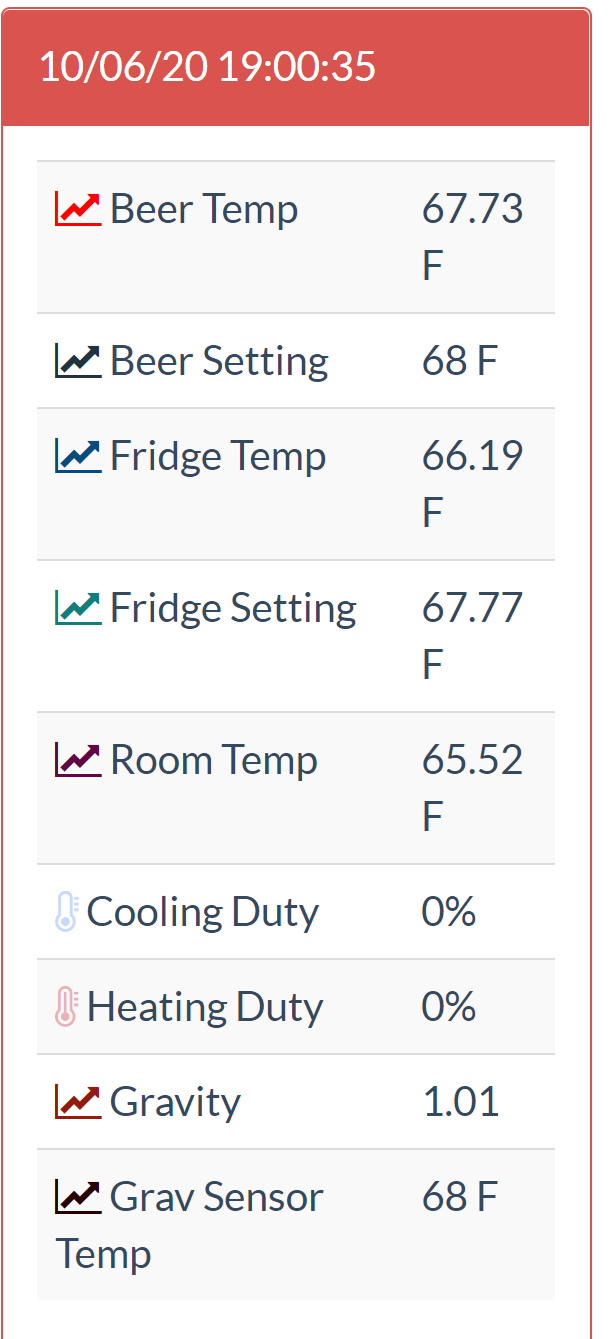
And the heating/cooling duty is always on 0% how do i get this working
Its also set up with my ispindle, and been great 3 brews in upto now.

- Joined
- Jul 6, 2013
- Messages
- 142
- Reaction score
- 56
I was just coming here to ask the same question re:Cooling Cycle. The chart has lots of blue bars so I know it's cooling.

- Joined
- Jul 6, 2013
- Messages
- 142
- Reaction score
- 56
Hi All
I've got fermentrack up and running and it is great. Couple of small issue. I've got the debugging set as true in django settings, how do i get it back to false to disable it
And the heating/cooling duty is always on 0% how do i get this working
Its also set up with my ispindle, and been great 3 brews in upto now.
try adding "/admin" on your URL? Although I don't see a debug setting on that page
There is also a settings.py file here: /home/fermentrack/fermentrack/fermentrack_django with a DEBUG entry. But again, mine is set to 'true' and I don't get the output you have.
How do i access this filetry adding "/admin" on your URL? Although I don't see a debug setting on that page
There is also a settings.py file here: /home/fermentrack/fermentrack/fermentrack_django with a DEBUG entry. But again, mine is set to 'true' and I don't get the output you have.
- Joined
- Jul 6, 2013
- Messages
- 142
- Reaction score
- 56
SSH into your pi.How do i access this file
cd /home/fermentrack/fermentrack/fermentrack_django
sudo nano settings.py
l30ns
New Member
- Joined
- Jun 10, 2020
- Messages
- 2
- Reaction score
- 0
Hey @Sard0k,
How did you manage to set up this pat /home/fermentrack/fermentrack/db.sqlite3)
My Docker is screaming at me that db.sqlite3 is wrong and impossible. It would help a lot if you could guide me trough your process.
How did you manage to set up this pat
My Docker is screaming at me that db.sqlite3 is wrong and impossible. It would help a lot if you could guide me trough your process.
/home/fermentrack/fermentrack/db.sqlite3
rkhanso
Well-Known Member
- Joined
- Jan 24, 2017
- Messages
- 776
- Reaction score
- 175
I'm sorry for this likely basic question -- I've not used ESP8266 controllers before.
In the past, I normally used just a RaspberryPi to connect all 3 wires from the temp probe. When I did that with the ESP8266, I let out some smoke and I think fried the controller.
I'm using an ESP8266 Node MCU type controller board. I have it flashed and set up in Fermentrack.
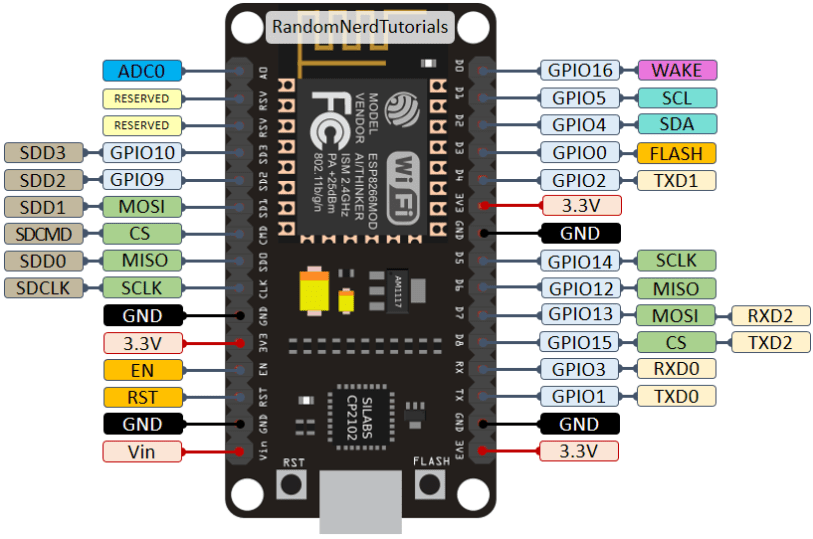
I'm trying to get the 1-wire temp probes connected to it. Am I supposed to only connect the data pin to the ESP8266, and for power (GND, 5V), use a different supply? Not connect the black/GND and red/5V directly to the ESP8266?
Or might I have a bad temp probe (cheap probes from Amazon) that caused the release of smoke?
My ESP8266 board pinout:
Thanks.
In the past, I normally used just a RaspberryPi to connect all 3 wires from the temp probe. When I did that with the ESP8266, I let out some smoke and I think fried the controller.
I'm using an ESP8266 Node MCU type controller board. I have it flashed and set up in Fermentrack.
I'm trying to get the 1-wire temp probes connected to it. Am I supposed to only connect the data pin to the ESP8266, and for power (GND, 5V), use a different supply? Not connect the black/GND and red/5V directly to the ESP8266?
Or might I have a bad temp probe (cheap probes from Amazon) that caused the release of smoke?
My ESP8266 board pinout:

Thanks.
The simplest thing is to get one of the boards. If you are intent on not using one you need 5V to the power and a 3V3 pull-up on data. As you have learned, the 8266 does not like 5V on it's data pins.
rkhanso
Well-Known Member
- Joined
- Jan 24, 2017
- Messages
- 776
- Reaction score
- 175
Thanks for the reply.The simplest thing is to get one of the boards. If you are intent on not using one you need 5V to the power and a 3V3 pull-up on data. As you have learned, the 8266 does not like 5V on it's data pins.
I did forget to mention that I am using 4.7k Ohm resistor between power/data on the 1-wire temp sensor.
I'm not sure what you mean about "get one of the boards" - what board? I do have one more ESP8266 that is good.
Should I tap into the 5V and GND connection for the red and black wire on the temp probe from my computer USB cable that powers the ESP Controller? Then connect the yellow wire of the temp probe to D6 on the ESP8266 controller? With the 4.7k ohm resistor between the 5V and data on the temp probe? I don't want to fry another controller board because it's the last one I have.
rkhanso
Well-Known Member
- Joined
- Jan 24, 2017
- Messages
- 776
- Reaction score
- 175
In this video, the guy uses just the ESP board pins to connect the temp probe:
Though he appears to put the 4k7 resistor between Vin and data (my Vin is 4.35V)
OK - the problem I had then was because I put the resistor between 5V and data? Instead, I should put it between 3v3 and data on the ESP Controller? Not like the guy in the video who put it between Vin and Data?
Though he appears to put the 4k7 resistor between Vin and data (my Vin is 4.35V)
OK - the problem I had then was because I put the resistor between 5V and data? Instead, I should put it between 3v3 and data on the ESP Controller? Not like the guy in the video who put it between Vin and Data?
Correct. You will easily find people to tell you that the 8266 is "5V tolerant", but they are taking liberties with your money.OK - the problem I had then was because I put the resistor between 5V and data? Instead, I should put it between 3v3 and data on the ESP Controller? Not like the guy in the video who put it between Vin and Data?
rkhanso
Well-Known Member
- Joined
- Jan 24, 2017
- Messages
- 776
- Reaction score
- 175
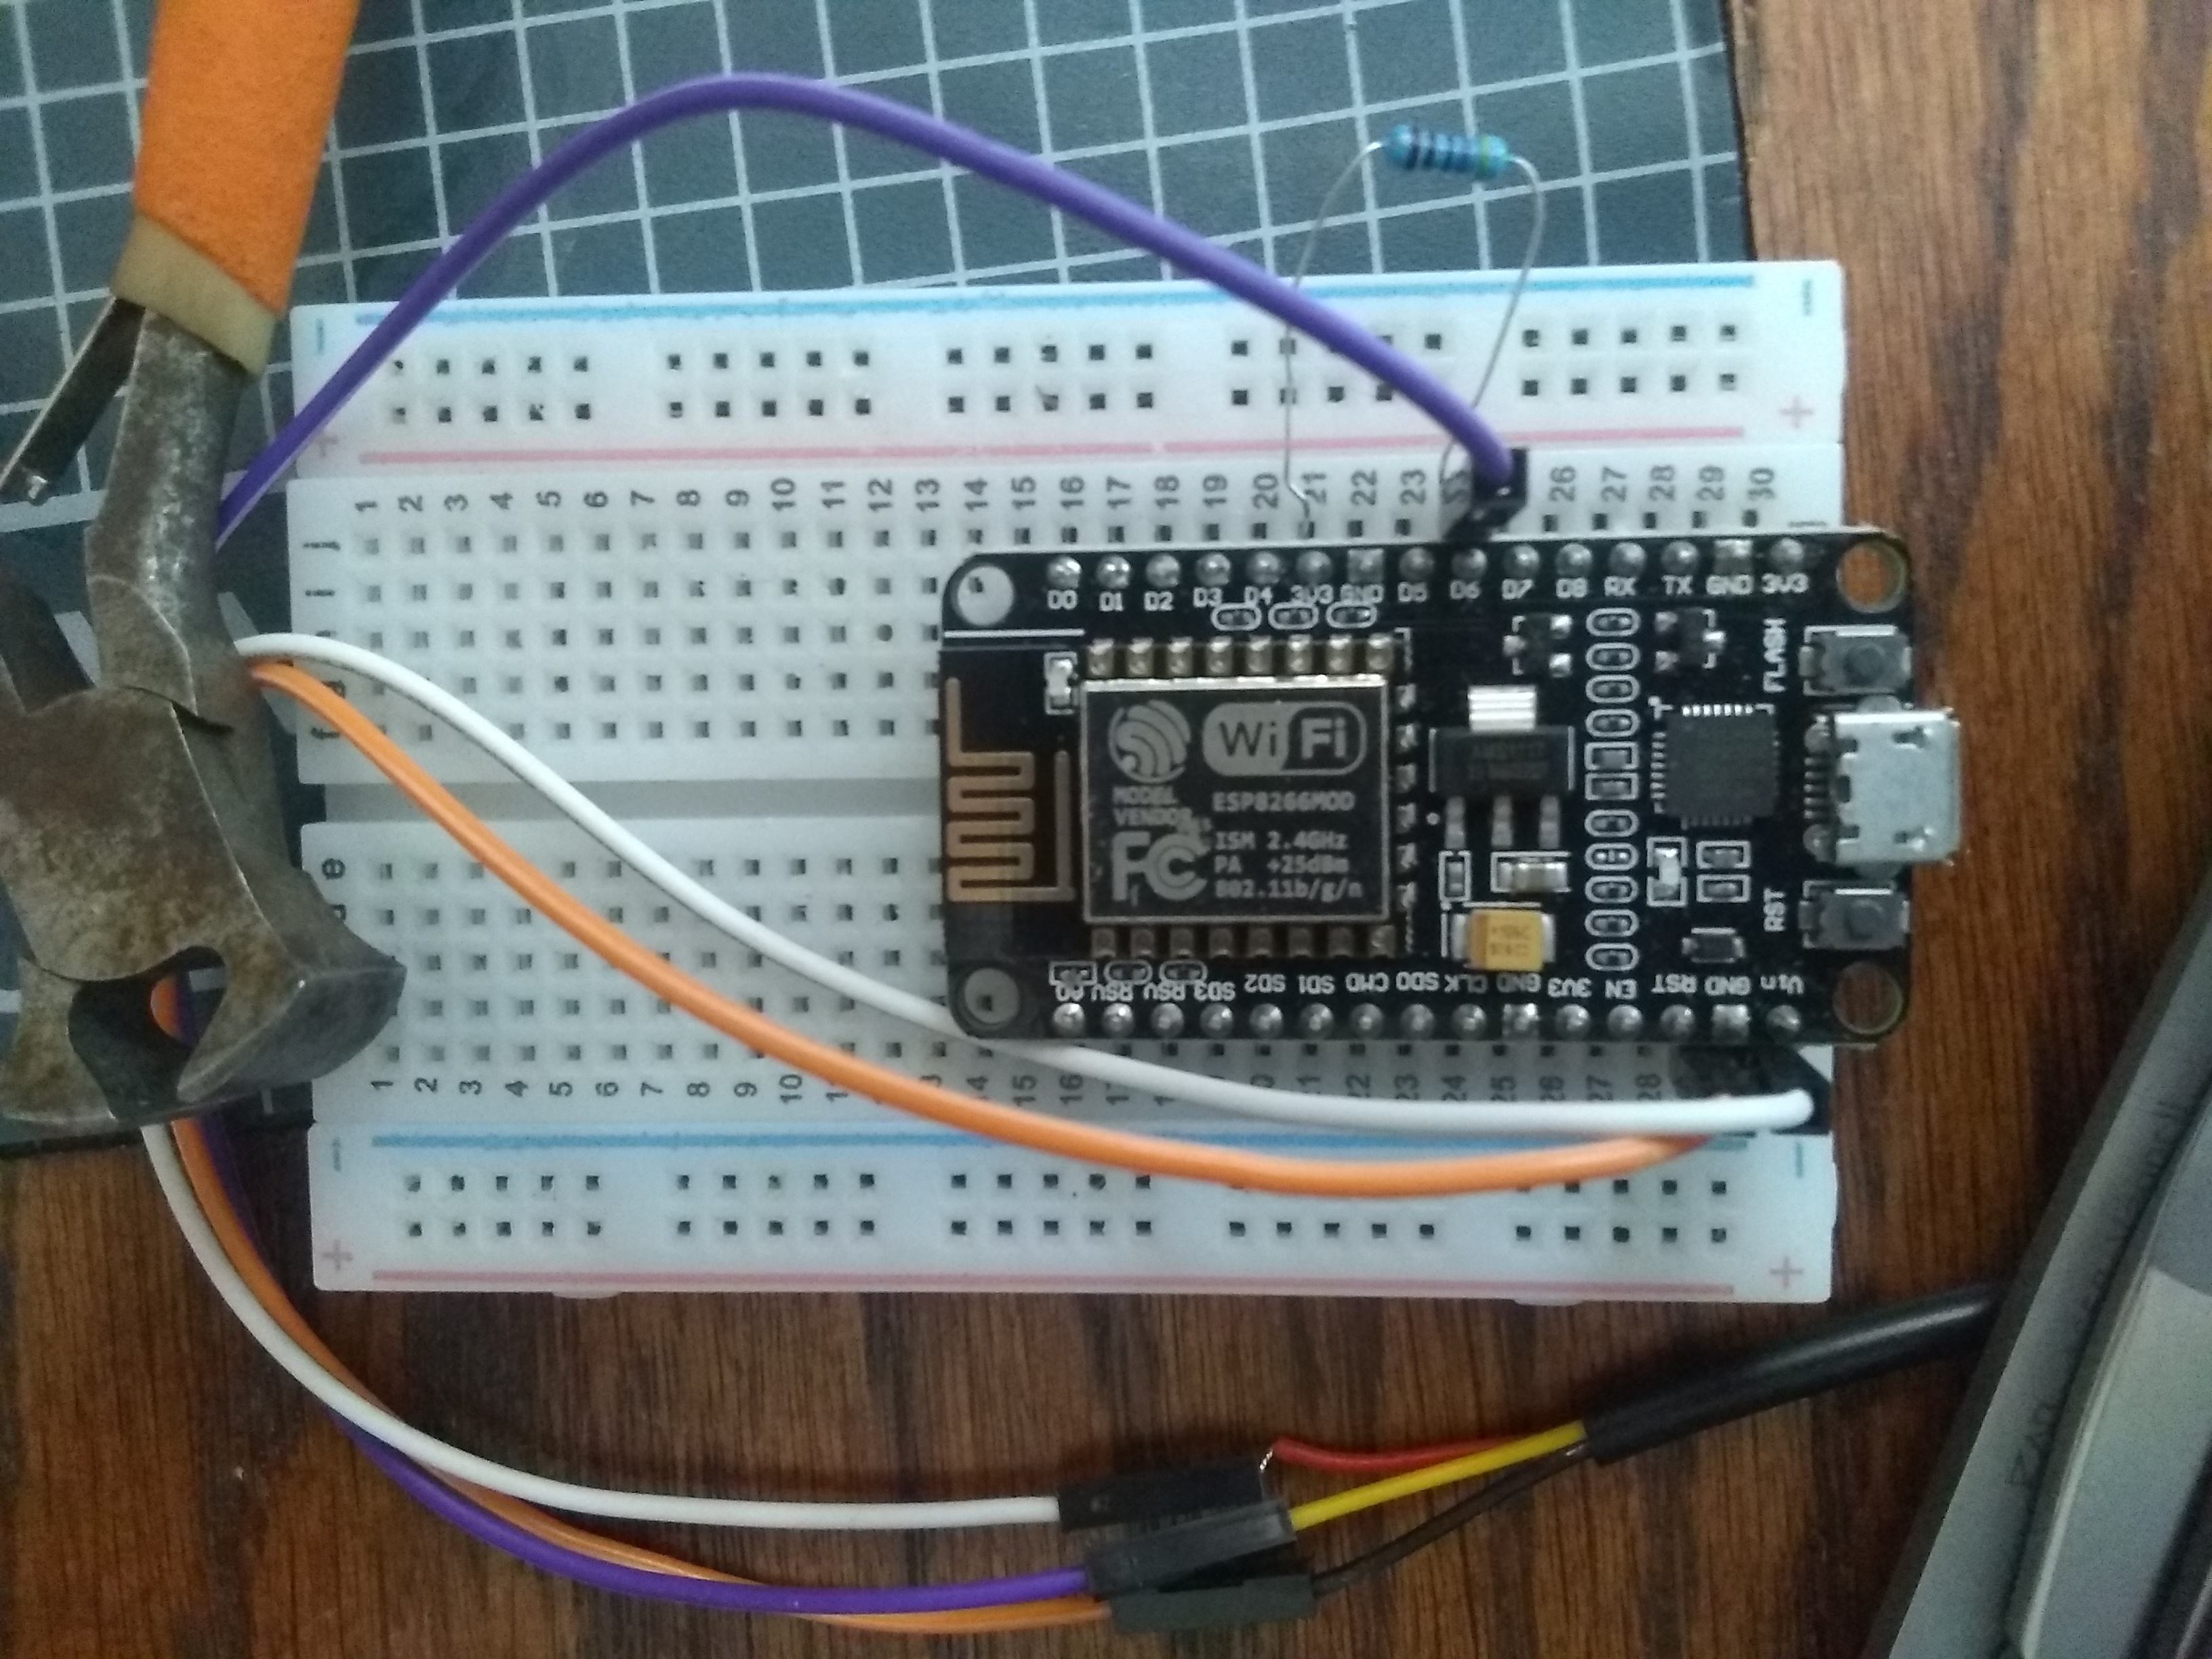
In hopes of not ruining my last ESP8266, here's a picture before I power it up.
Does this look correct?
Does this look correct?

Understanding that I'm not buying you one if it's wrong - yes it does look correct.Does this look correct?
rkhanso
Well-Known Member
- Joined
- Jan 24, 2017
- Messages
- 776
- Reaction score
- 175
I'm really stumped. I'm sure I'm doing something stupid and just don't see it. Should I start a new thread for this?
I changed up the wiring above and put 5V/GND on the DS18B20 sensor from a separate power supply, not off the ESP pins Vin and GND as shown above.
The rest of the wiring was the same.
The DS18B20 got super hot. At least I didn't ruin the ESP this time.
I changed up the wiring above and put 5V/GND on the DS18B20 sensor from a separate power supply, not off the ESP pins Vin and GND as shown above.
The rest of the wiring was the same.
The DS18B20 got super hot. At least I didn't ruin the ESP this time.
It sounds like the leads are wrong. Have you validated the wiring diagram from the supplier? Not all use the yellow = data, power = red, black = ground paradigm.
rkhanso
Well-Known Member
- Joined
- Jan 24, 2017
- Messages
- 776
- Reaction score
- 175
The wires are as I expected them - https://www.amazon.com/gp/product/B082WVWC3T/ref=ppx_yo_dt_b_asin_title_o00_s00?ie=UTF8&psc=1
I might not have had the data wire connected....If I just connect 5V and GND, without the data pin connected to anything, would that overheat the temp sensor?
Maybe I should try these newly bought temp sensors with one of my CraftbeerPi controllers and see if they work there.
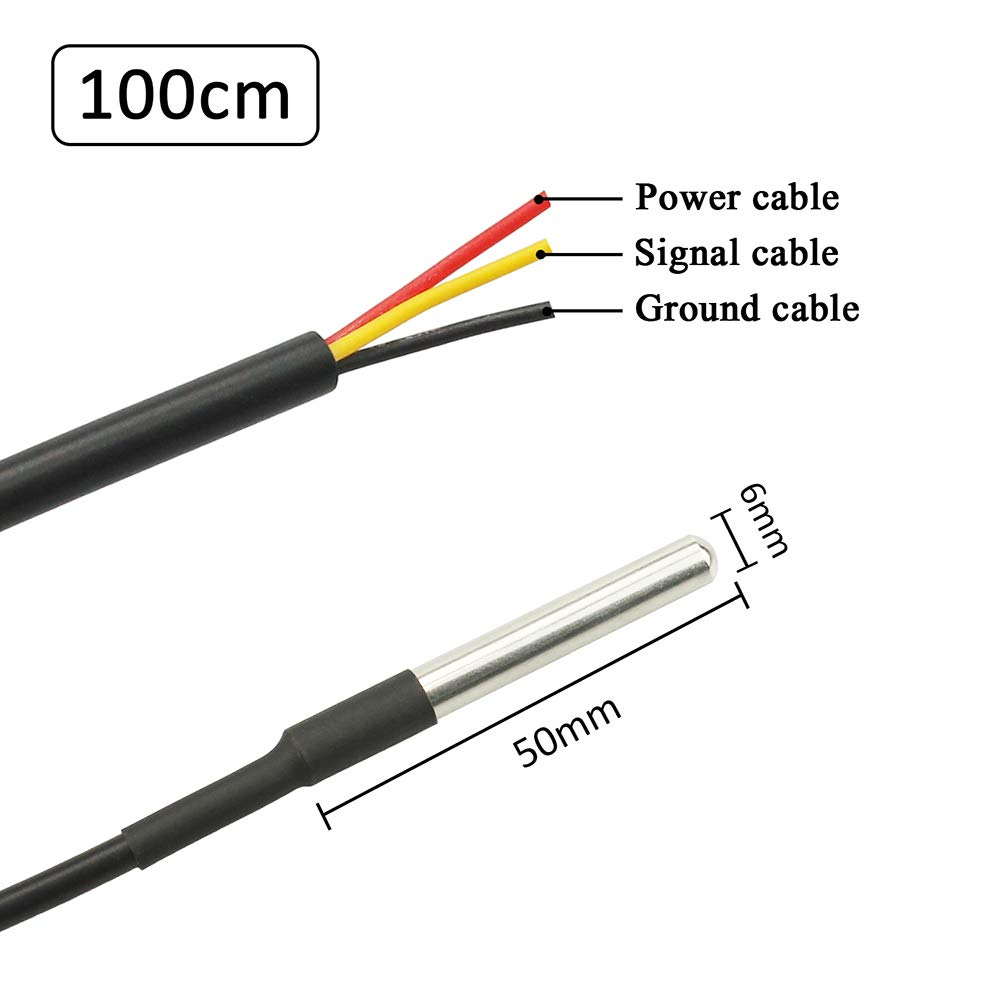
I might not have had the data wire connected....If I just connect 5V and GND, without the data pin connected to anything, would that overheat the temp sensor?
Maybe I should try these newly bought temp sensors with one of my CraftbeerPi controllers and see if they work there.

Last edited:
In hopes of not ruining my last ESP8266, here's a picture before I power it up.
Does this look correct?
View attachment 701595
I am the first to admit that wiring and anything electrical is not my strong suit for giving advice....but isn't that still pulling from the Vin? Doesn't the DS18B20 need to be getting its power from the 3v3 pin and then you would run the 4.7K R from the data to the 3V3 (that you're pulling power from)?
rkhanso
Well-Known Member
- Joined
- Jan 24, 2017
- Messages
- 776
- Reaction score
- 175
This would be the correct way to connect it, right? I just didn't want to fry my last ESP8266 board.
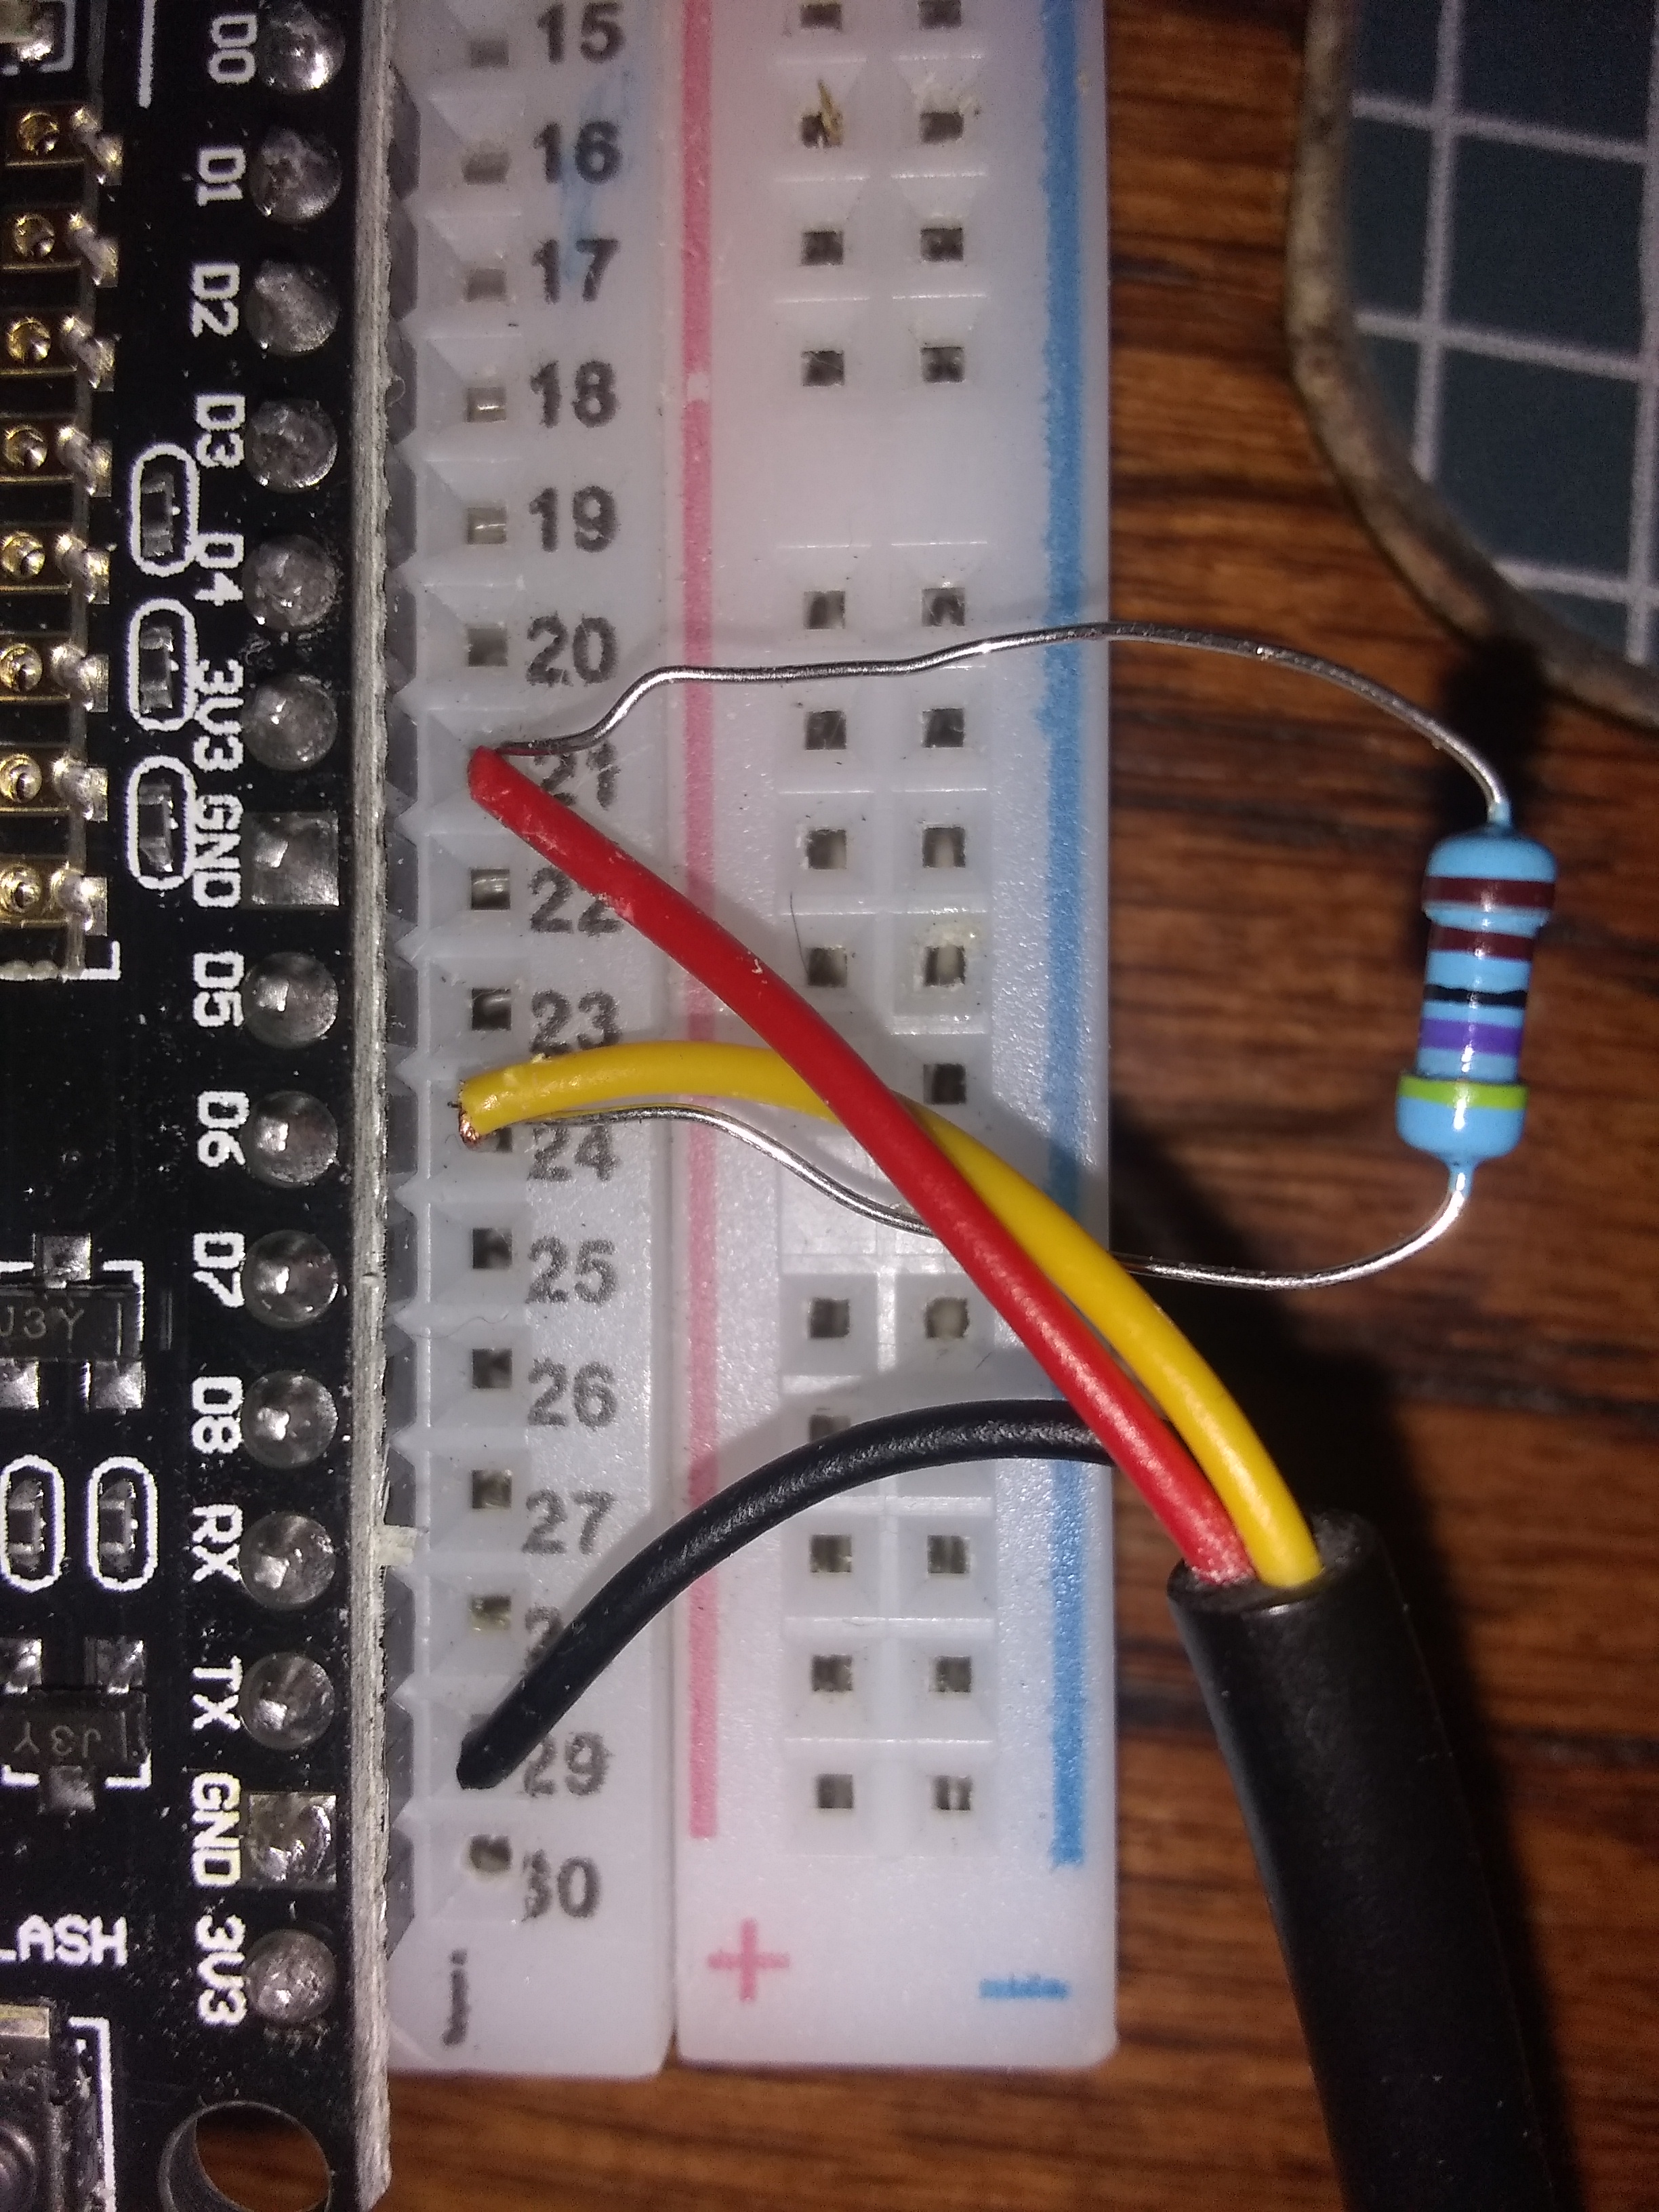

Most probes can be powered from 3V3, but a lot of us have found that they work better with 5V.I am the first to admit that wiring and anything electrical is not my strong suit for giving advice....but isn't that still pulling from the Vin? Doesn't the DS18B20 need to be getting its power from the 3v3 pin and then you would run the 4.7K R from the data to the 3V3 (that you're pulling power from)?
I don't see anything wrong with that.This would be the correct way to connect it, right? I just didn't want to fry my last ESP8266 board.
rkhanso
Well-Known Member
- Joined
- Jan 24, 2017
- Messages
- 776
- Reaction score
- 175
Took the risk and this time it worked.
Thanks for the help.
Thanks for the help.
I am the first to admit that wiring and anything electrical is not my strong suit for giving advice....but isn't that still pulling from the Vin? Doesn't the DS18B20 need to be getting its power from the 3v3 pin and then you would run the 4.7K R from the data to the 3V3 (that you're pulling power from)?
As Lee stated, while the ds18b20 is rated for functionality with VCC from 3.3 to 5V, they seem to be more reliable at 5V than 3.3V.
The shared data line can be pulled to any communication voltage between those two levels, leaving the choice of pull-up voltage to be determined by the host interface spec - which for RPi's and ESPs is 3.3V while for most Arduinos is 5V...
Cheers!
- Joined
- Sep 8, 2020
- Messages
- 139
- Reaction score
- 9
Just wondering, is there any documentation anywhere relating to the control constants?
I had a PM out to @Thorrak on this exact question
These are my more exact questions or assumptions.
I see things in the settings talking about the 'estimator' and values updating the algorithm.
I understand this isn't some ML tool, but I am lead to believe that some constants get updated maybe on overshoots etc. So this leads me to believe that the software 'learns' your equipment. That is what I am trying to understand or was looking for guidance or documentation on that.
With that said, IF the software does adjust, should I run a test run with water (understanding the heat exchanges could vary with alcohol in it), before I run a beer batch through? Also, I have different levels of insulation on me SS Brewbuckets vs my Spike CF10. Also assuming some values (constants) would vary based on the equipment.
HairyJamie
Member
You'll find that the algorithm adjusts quick enough on a first brew to not have to bother with a test run.
You may get a really small over/under shoot when the temp changes or when maintaining a set point at first but nothing bad enough to impact your ferment
You may get a really small over/under shoot when the temp changes or when maintaining a set point at first but nothing bad enough to impact your ferment
- Joined
- Sep 8, 2020
- Messages
- 139
- Reaction score
- 9
So where this is going is, I currently use Inkbirds to control my fermenters. It’s very common that I may be cold crashing at ~34 and fermenting ~64.
I use a glycol chiller, which I know is not 100% supported. With that said, I can’t keep my chiller temp differential close on the fermentation vessels. My hope is that I won’t get the overshoots I am seeing since the Inkbirds aren’t ‘smart’.
In the Controller Constants, there seem to be a few values that could be adjusted i.e. coldest allowed temp. Where other values seem to be updated through a ‘learning’ process. What I am trying to understand is more detail on if X happens, value Y is updated. So on the case where there may be I issues, you could dial things in. Also, I’m sure there are values that are really a no no to adjust.
It’s not a controller issue, or a question about Fermentrack, it’s about PID loops and what they mean. You would have to start by studying those, they are well known and described in literature. Even the Wiki article on PID will be a good starting place.
- Joined
- Sep 8, 2020
- Messages
- 139
- Reaction score
- 9
It’s not a controller issue, or a question about Fermentrack, it’s about PID loops and what they mean. You would have to start by studying those, they are well known and described in literature. Even the Wiki article on PID will be a good starting place.
I’m sorry, but I have to disagree with the statement, ‘It’s not a controller issue, or a question about Fermentrack.’
Unless you’re saying my Inkbird controller had an updating algorithm (PID K values), which Fermentrack DOES have that ability.
I didn’t want my question to get so granular to ask what each and every constant does, but more an understanding of when X happens, Y value gets updated. To be specific, what is the ‘estimator’? Is that the PID K values?
Fermentrack applies a PID control loop.
What you are asking, is explained there. Fermentrack and BrewPi (and most of the other controller-based implementations) apply an industry-standard PID loop.
From: PID controller - WikipediaA proportional–integral–derivative controller (PID controller or three-term controller) is a control loop mechanism employing feedback that is widely used in industrial control systems and a variety of other applications requiring continuously modulated control. A PID controller continuously calculates an error valueas the difference between a desired setpoint (SP) and a measured process variable (PV) and applies a correction based on proportional, integral, and derivative terms (denoted P, I, and D respectively), hence the name.
What you are asking, is explained there. Fermentrack and BrewPi (and most of the other controller-based implementations) apply an industry-standard PID loop.
- Joined
- Sep 8, 2020
- Messages
- 139
- Reaction score
- 9
Fermentrack applies a PID control loop.
From: PID controller - Wikipedia
What you are asking, is explained there. Fermentrack and BrewPi (and most of the other controller-based implementations) apply an industry-standard PID loop.
Thank for the link, which I already reviewed.
What I am asking is not PID specific.
What I am asking is SPECIFICALLY about the Constants in Fermentrack (one listed in my last post).
I was looking for more in depth documentation. Should I just list specific questions? I didn’t want to bog down the thread if such documentation exist, rather than asking a bunch of individual questions.
chucknorris101
Well-Known Member
- Joined
- Jul 17, 2014
- Messages
- 95
- Reaction score
- 16
As someone who runs glycol in the half supported fridge temp schema, the PID loop is spot on with my setup, even with my ferm temp up at 90 and crashing to 50. I have done a few batches already though. I recall the first time or two there was some <1 degree overshoot i think
Similar threads
- Replies
- 9
- Views
- 3K
- Replies
- 450
- Views
- 30K
