Facelift for my control panel

Homebrew Talk - Beer, Wine, Mead, & Cider Brewing Discussion Forum

Help Support Homebrew Talk - Beer, Wine, Mead, & Cider Brewing Discussion Forum:

This site may earn a commission from merchant affiliate links, including eBay, Amazon, and others.
Copper is also selling for about 10 times the price of stainless these days and you can't clean it the same way as stainless, so it's less popular. It is a far better heat conductor than stainless. I use it for my heat exchangers, nothing wrong with it.

Regarding contact with wine, wine is far more acidic than beer. Generally sits around pH 3.45 or even lower.

Interesting. I thought about the cleaning aspect too..

My plate chiller contains copper as well... I believe most if not all of them do.
 
Last edited by a moderator:
Excellent, thank you!
The Inkbird version has good reviews on Amazon ill probably go with that or the Sestos like you

the inkbird version IS the sestos timer.... inkbird is just a marketing middleman for the most part... they rebrand existing products and market them (sometimes at higher prices) for the homebrewing market... They do in some cases work with manufacturers to develop and improve the products for our uses but most of the stuff is just generic and rebranded. Just like Aubrins does.
 
Thanks for the clarification, I didn't know that!
Ill look for the sestos timer if it will be cheaper :)
 
Great job. It seems that the right one is inkbird or Sestos brand PID CONTROLLER?

The PIDs are actually "Mypin" brand TD4 models... I looked at a few different timers and the ones you and sestos market seem to be the easiest to use at the time. I honestly dont know if anything newer has come out in the last 2 years that would work better but I have no complaints. the alarm works as it should with the timer as well.

I dont think "Inkbird" was around when I built my panel a couple years ago..

"Inkbird" is new brand for one year. Actually we specialize in temperature controller for 5 years. Now we focus on our INKBIRD brand temperature controller and it is familiar by many brewers.
 
I just wanted to share that I finally used my 3rd conical wrapped with the blue 1.5" discharge hose as a cooling jacket sunday night and the larger diameter hose works amazingly fast to drop temps on a vanilla porter I brewed.... I was able to take 11 gallons of 77.4degree wort down to 65 degrees in under 30 minutes!
This works better than my coolzone jacket I use on my other 12.5 gallon conical and the surgical rubber hose I used on my 7.3 gallon conical.
At a total cost of under $25 it was a steal to build too...

What page in your thread will I find that info?
 
"Inkbird" is new brand for one year. Actually we specialize in temperature controller for 5 years. Now we focus on our INKBIRD brand temperature controller and it is familiar by many brewers.

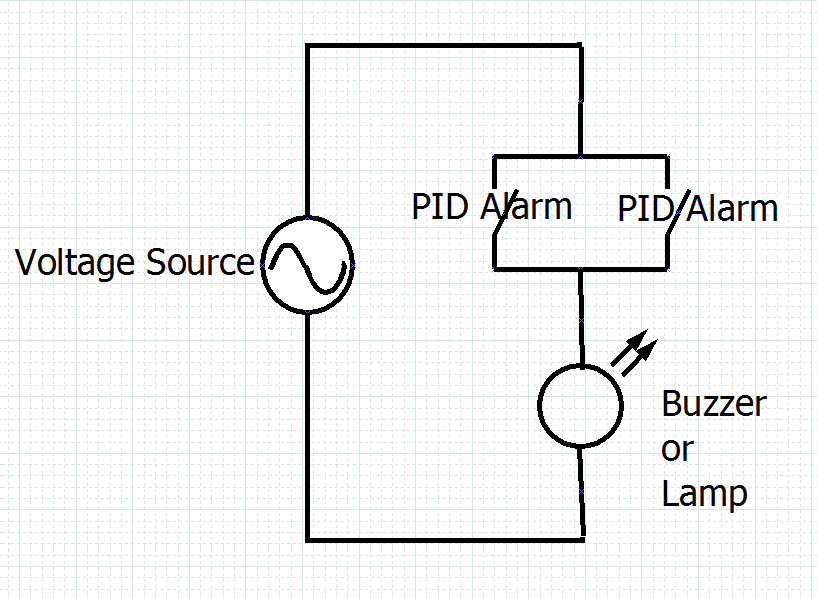
Can you explain how your (and others) alarm output circuit works? Do I have to connect it to an SSR which is connected to a 120v buzzer circuit? Or, can I connect a low voltage buzzer to it? If I have 2 PIDs, can I connect both alarm circuits to the same SSR/buzzer? I have tried a 3V buzzer connected to the alarm output and it doesn't work, so I assume I need a relay.
 
Can you explain how your (and others) alarm output circuit works? Do I have to connect it to an SSR which is connected to a 120v buzzer circuit? Or, can I connect a low voltage buzzer to it? If I have 2 PIDs, can I connect both alarm circuits to the same SSR/buzzer? I have tried a 3V buzzer connected to the alarm output and it doesn't work, so I assume I need a relay.

The alarm output is just a relay.

Yes you can connect several relays in parallel and use one buzzer.

alarmrelays.png
 
Can you explain how your (and others) alarm output circuit works? Do I have to connect it to an SSR which is connected to a 120v buzzer circuit? Or, can I connect a low voltage buzzer to it? If I have 2 PIDs, can I connect both alarm circuits to the same SSR/buzzer? I have tried a 3V buzzer connected to the alarm output and it doesn't work, so I assume I need a relay.

The alarm is just a relay switch... You have to feed the voltage in and out to the actual alarm... yes you can have multiple pids wired to one alarm just as I did... just think of it as having multiple switches feeding the same voltage to a light.. if any switch is on the light will stay lit. I have a 110v alarm in one panel and a 12v alarm in another... since the pids and timers just activate a relay and allow the power you supply it doesnt matter.

EDIT* I really have to get in the habit of reading all the replies first... I see others have already explained..
 

Thank you.

I was thinking of that hose straight away. I know it as "lay flat" hose. I bought some years ago for a coatings business I worked for and the guy at the Parker fittings store referenced it as lay flat.

You have a really cool build going on. I especially like how you employ the cheaper components and the ingenuity you've brought into the build. It seems to me sometimes that others builds have to out due someone else's and then those components become gospel and everything else is crap. It's easy to get caught up in numbers when reading and comparing things when the reality is......a lot of the time. No one will ever tell the difference between a $50 part and a $200 part that has 3 points better rating at whatever it does. The lack of understanding helps push the gospel I mentioned earlier. Your pumps come to mind.........you seem to be doing what they need to get reliability from them.

Thanks, yes feed the pumps the correct voltage, enough current and keep the grain out of them and they work awesome... The filter setup I use to keep the grains out of the pump is cheap and easy to employ. In my opinion it's a way more economical approach to spending $400 on 3 pumps and throttling them way back anyway.
To make things even more confusing, a lot of the stuff in this hobby is generic and its being sold by different distributors at drastically different price points. Misinformation get spread that product x is better than product y because it cost 50% more and that not always the case.

Prost
:mug:
 
How often do you take apart your rims tube to clean. I bought the 36" 240v heater and a 36" stainless 1" pipe to put it in. I was just wondering if it was worth it to get the 1" camlocks, or if just flushing it out was good.
 
How often do you take apart your rims tube to clean. I bought the 36" 240v heater and a 36" stainless 1" pipe to put it in. I was just wondering if it was worth it to get the 1" camlocks, or if just flushing it out was good.

To be honest I flush (cip) my system with pbw every 4 or 5 brews but I havent needed to physically clean it yet, its always been completely clean. I ran a brush through it a couple weeks ago and there was nothing I could see that came out of the tube, the element was completely clean this was after a brew without cleaning. I do run clean water through it after every beer.
 
To be honest I flush (cip) my system with pbw every 4 or 5 brews but I havent needed to physically clean it yet, its always been completely clean. I ran a brush through it a couple weeks ago and there was nothing I could see that came out of the tube, the element was completely clean this was after a brew without cleaning. I do run clean water through it after every beer.

I agree with augiedoggy. I run hot water through mine when I am done mashing, during the sparge. I don't want to take the chance of sugars from the wort drying and solidifying inside it. I also occasionally put a brush through it. Taking it apart and dealing with subsequent leaks would be a real pain.

I run dollar store Oxicllean through it every once in a while. I put a scoop of it in a 5 gallon bucket with hot water, hook up all my hoses and chillers etc into one long run and pump it through for 10 or 15 minutes. It is amazing how much the color of the water changes.

Yes I've used oxy clean too I bought a half gallon tub of it...But I bought some pbw on ebay to try it and it just seems to be a little more aggressive yet easier to rinse away. I attributed most of the greenish color change to the copper in my plate chiller but maybe some of it is from the film inside my rims and such. My first smaller rims element actually got a buildup I had to clean I assume that was because it was only LWD.
 
To be honest I flush (cip) my system with pbw every 4 or 5 brews but I havent needed to physically clean it yet, its always been completely clean. I ran a brush through it a couple weeks ago and there was nothing I could see that came out of the tube, the element was completely clean this was after a brew without cleaning. I do run clean water through it after every beer.

Cool, that's all I do with my counter flow chiller and was figuring if it's good enough just to rinse that out why not my rims tube also.
 
Cool, that's all I do with my counter flow chiller and was figuring if it's good enough just to rinse that out why not my rims tube also.

Well here's the thing... Depending on how gentle the heat is against your wort (watt density) you can get caramelization and buildup on you element that just recirculating water may not be able to remove. This is what I tan into with my 10" 800w rims element... Eventually it lead to scorching because I let it go too long without removing and cleaning.
 
So Ive been in Belgium for business for the last week and I had a chance to tour a small brewery in Ieper yesterday.... I found it interesting that one of the brewery founders who was a scientist "microbiologist" mentioned they are replacing their copper mash/ boil kettles soon because of the links between copper and altziemers disease and other health concerns. He stated they are replacing their equipment with stainless mainly for this reason.
The brewery is very small and located inside word war 1 soldiers bunkers buried in the cities wall.


I've heard copper exposed to wort can potentially cause health issues... If the copper is able to oxidize and the wort is acidic enough, apparently you can end up with some bad stuff in the beer. I imagine this only becomes an issue over time, but can't blame them; better safe than sorry heh
 
You really should have gotten the 24v version of the tan ones they are stronger and pump more....

As far as the power supply .8 amp is the MINIMUM amount of amps you want... your better to go bigger as I found they actually use more... a 1.5 amp or 2 amp supply would be better... The pump only draws what it needs. I power my pumps off of a 7 amp supply.

Copper would work but it would be a bare to keep clean as pbw or oxy would remove the protective layer which means you would end up with a lot of copper in your beer which is not really a great thing...
a little is ok but you should research why copper is not food grade and no longer legal to be sold for food grade use without being coated in tin or stainless where is has food contact.. It likely wont hurt you though... my first rims was made of copper.

I ordered my stainless piping on ebay and found it was fairly cheap there... not much more than 1" copper really

Do you have a link to your power supply? Do they come with wiring instructions or are they pretty straight forward to wire up in your control panel?
 
I've heard copper exposed to wort can potentially cause health issues... If the copper is able to oxidize and the wort is acidic enough, apparently you can end up with some bad stuff in the beer. I imagine this only becomes an issue over time, but can't blame them; better safe than sorry heh

I understood this only to be a problem with beer and not wort... something to do with the pH. Thoughts?
 
I understood this only to be a problem with beer and not wort... something to do with the pH. Thoughts?


I'm definitely no chemist, but I could see wort potentially having an acidic pH depending on the beer you're making (especially if you go outside of just standard malt/grain).
 
Well... My mash water is 5.2 on the phone scale... When I used to use a copper sparge manifold I sometimes finished brewing late at night and waited till the morning to dump my mashtun of spent grain... At that time the copper was heavily discolored by the wet grain alone touching it. Even after cleaning it. Copper is not ideal for food contact period but the yeast help consume much of it from the beer from what I have read... Other research gives me a strong indication it is being phased out and will eventually be banned from direct brewing contact.
 
Do you have a link to your power supply? Do they come with wiring instructions or are they pretty straight forward to wire up in your control panel?

The ones I already linked toward the beginning of the thread are super simply to wire... Hot and neutral going in if your powering on 120v or two hot wires if your running on 240v and a + and - for DC power out... Red is the +...
 
Not a chemist either, but my understanding was that fermentation mitigates (eats, transforms) the copper. If true, no problem with wort, problem with beer.
 
The ones I already linked toward the beginning of the thread are super simply to wire... Hot and neutral going in if your powering on 120v or two hot wires if your running on 240v and a + and - for DC power out... Red is the +...

Thanks, I found it (in the China pump thread) shortly after I posted that!
Going to order one tonight, thanks!:mug:
 
So I made yet more changes...

I moved my HLT pump to a better position for easier priming. Installed a siteglass to easily see if the rims is empty and because I thought it looked cool... Plus it gives me another easy point to disassemble and clean even though pbw rinses have worked without any scubbing needed so far.
I also added a newer amp/voltage/ wattage/ kwh meter to replace my old one. its cool to see how much electricity I have used (18kwh for one brew session) and how many watts each one of my elements are really putting out...

IMG_20160105_181759298[1].jpg


IMG_20160105_181900364[1].jpg
 
Back
Top