EZBoil DSPR320 experience

Homebrew Talk - Beer, Wine, Mead, & Cider Brewing Discussion Forum

Help Support Homebrew Talk - Beer, Wine, Mead, & Cider Brewing Discussion Forum:

This site may earn a commission from merchant affiliate links, including eBay, Amazon, and others.

nik_taylor

Member
Joined
Jan 16, 2014
Messages
22
Reaction score
8
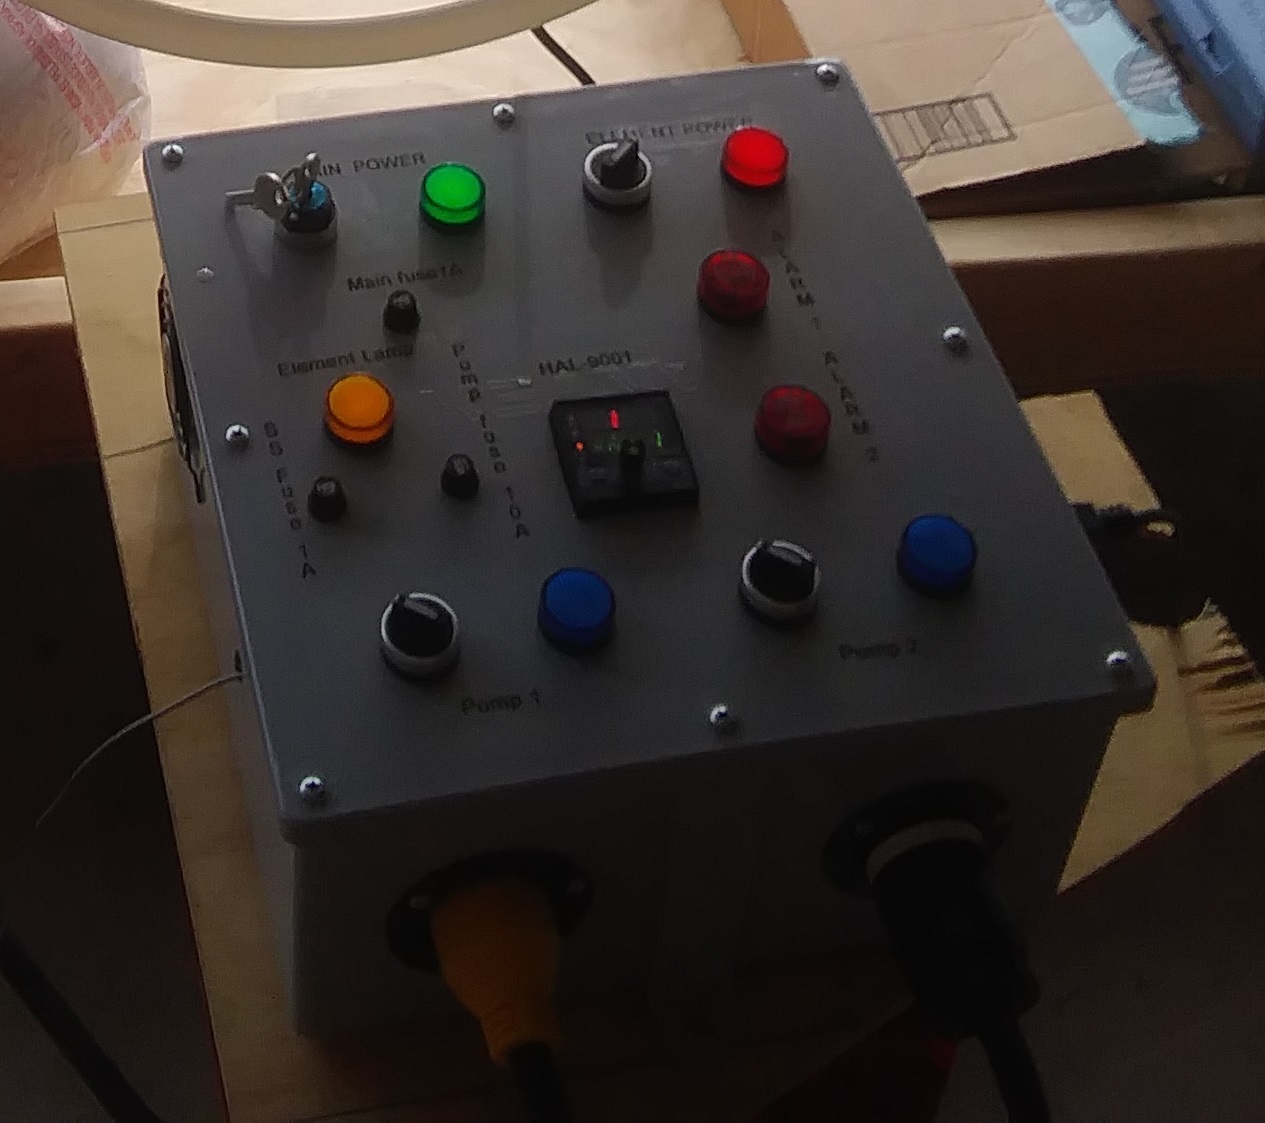
I recently bought a new setup for eBIAB and I had the controller made (I don’t trust myself to build my own) with and EZBoil DSPR320. I have to say, I love the automation and I wanted to share my programmed steps both for feedback and to help others wanting to use the device.

Each program step on the EZBoil has a time and an activity. The activities can be mash or boil which are basically hold at a temperature or apply a % of power respectively. Each time step can also be set to HOLD which is stay on that step until you press run or END, which is the end of the program.

I have only done 1 run and have made some tweaks to the program. Here’s what I’m trying for round 2:


1. 158 (strike temp) – 0 secs: gets to strike temp then moves immediately to next step
2. 150 (2 degrees below mash temp) – HOLD: my thinking here is I want to dough in and don’t really want the element to fire too much while I’m stirring. When I’m ready, I press RUN
3. 152 (mash temp) – 60 mins: Mash step. Can add more of these for step mashes
4. 170 – 10 mins: mashout
5. 170 – HOLD: Hold at this temp while I take the grain bucket out. Press RUN when ready to boil
6. 85% - 0 mins: This is the first boil step. The EZBoil has a temp at which it switched from 100% of power when getting to the boil, to the power you set it at to avoid boil over. I boil at 70% power but want a bit more umph to get me to boiling. As soon as it hits boiling it moves to the next step (0 mins)
7. 70% - 60 mins: Boil step
8. 70% - END: Kills the power to the element

Feedback welcome.
 
I just purchased the same controller and did my first run through yesterday with water. It took a little while and some help from a much smarter friend to figure it out but came up with a similar program idea.

I’m wondering if you’ve figured out how to use the relays? The manual states that you can set alarms for hop timings as well as automate turning on and off pumps during mash and whirlpool but doesn’t really explain how to do this.

I haven't actually looked into the relays. I didn't build the controller myself so i'm hesitant to change any of the wiring. Turning pumps on and off would be nice though. Please revert back if you work it out.
 
Don’t forget about the boil timer and steps. I love having the beeping reminder and 10 second grace period to add hops/etc along the way. And it alternates timer/step number.
 
Don’t forget about the boil timer and steps. I love having the beeping reminder and 10 second grace period to add hops/etc along the way. And it alternates timer/step number.
I cant work out how to do that from the manual. Any pointers? Thanks.
 
Hold down the turn knob 5 seconds, scroll over to “boil”, push turn knob to select. You have to keep pushing turn knob until you get to “n=x”. That’s your number of boil events (hops, whirlfloc, etc.) So if you set it to 4, push turn knob again and it lets you select the time for each of the 4 events.

When it gets to a programmed time, it will beep and stop the timer for 10 seconds to allow you to add the scheduled ingredient.


That's great. Thanks very much. I did not pick that up from the manual.
 
Just remember that when you set 10 min mashout (any step except the first one), it will hold for ten minutes after the temperature probe reads mash out temp. I usually add about 6 minutes to every step because that's the time it takes for the whole mash in my setup to reach set temp after the EZBoil starts the timer.

Why don't you set 158 Hold, then 150 60 minutes? Just press play after doughing in?
 
Just remember that when you set 10 min mashout (any step except the first one), it will hold for ten minutes after the temperature probe reads mash out temp. I usually add about 6 minutes to every step because that's the time it takes for the whole mash in my setup to reach set temp after the EZBoil starts the timer.

I noticed I had to crank my pump up higher at the mash step and the mashout step to normalise the temp gradients when the timer starts. 6 mins sounds about right.

Why don't you set 158 Hold, then 150 60 minutes? Just press play after doughing in?

I arranged it the way I did incase when I doughed in it came under temp somehow and I didnt want the element to fire and the timer to start while I was stirring. I basically have it a 2F buffer so that when I finished stirring and got the lid on and the pump running and the temp dispersed evenly, then I wanted to press start. Might not be a big deal, just the control freak in me wanted the timer to start when I wanted it to. I get your point about just adding the 6 mins. Makes sense.
 
I noticed I had to crank my pump up higher at the mash step and the mashout step to normalise the temp gradients when the timer starts. 6 mins sounds about right.


I arranged it the way I did incase when I doughed in it came under temp somehow and I didnt want the element to fire and the timer to start while I was stirring. I basically have it a 2F buffer so that when I finished stirring and got the lid on and the pump running and the temp dispersed evenly, then I wanted to press start. Might not be a big deal, just the control freak in me wanted the timer to start when I wanted it to. I get your point about just adding the 6 mins. Makes sense.

Right, I'm following. So no switch to turn off the element manually?
 
No. I have the WortHog. The heating element switch shuts off the pid as well as the heat.
So if the SSR fails in the "on" mode (most common failure), then the only way to turn off the heating element is to unplug the controller?

Brew on :mug:
 
No. I have the WortHog. The heating element switch shuts off the pid as well as the heat.

I might say that this is a "bug" in their reasoning. If you shut off the controller you also have to start all over again, or am I mistaken?

Shutting down just the element is to my reasoning the way I'd wire a control panel, (done it myself) because you can set the controller on hold/pause for the timers sake.
 
So if the SSR fails in the "on" mode (most common failure), then the only way to turn off the heating element is to unplug the controller?

I don't know the internal wiring, but that could well be the case. There are two fuses on the right i might be able to trip but i'm not sure.
Wort-Hog-EBC-130-2-detail.png
 
I might say that this is a "bug" in their reasoning. If you shut off the controller you also have to start all over again, or am I mistaken?

This is correct. The program is stored and you can jump to the correct step when it powers back up. If you were in the middle of a timer step and killed the power, you'd have to jump to the next step at the correct time manually.

Not ideal.
 
I don't know the internal wiring, but that could well be the case. There are two fuses on the right i might be able to trip but i'm not sure.
Wort-Hog-EBC-130-2-detail.png
Their on-line description contains the following: "Outlets completely de-energized with switches off". This would imply that the "Heat" switch actually controls a contactor (since the Heat switch is not big enough to do the job itself) to connect/disconnect both hot lines. You should be able to hear a very obvious "click/clunk" when turning the "Heat" switch on and off. Is this what happens?

I have to agree with @Smellyglove that having the "Heat" switch also turn the EZBoil on/off is a poor design decision.

Brew on :mug:
 
I myself would not build a panel where one can not kill the voltage to SSR or Contactor manually. This setting which OP describes is of one of the reasons. But also in an "emergency", where you see you're going into a stuck mash for example.

Keep the control unit alive, kill the heat. What's OP's situation, can you do this?
 
Last edited:
Their on-line description contains the following: "Outlets completely de-energized with switches off". This would imply that the "Heat" switch actually controls a contactor (since the Heat switch is not big enough to do the job itself) to connect/disconnect both hot lines. You should be able to hear a very obvious "click/clunk" when turning the "Heat" switch on and off. Is this what happens?

No big clunk (I assume this is a relay sound?). It's just the noise of the switch flipping.

Edit - just read the website and it says: 'Outlets completely de-energized with switches off'
Details here: https://www.highgravitybrew.com/store/pc/Brewery-Controller-Electric-Wort-Hog-EBC-130-272p5041.htm

Copied from post below.
 
I myself would not build a panel where one can not kill the voltage to SSR or Contactor manually. This setting which OP describes is of one of the reasons. But also in an "emergency", where you see you're going into a stuck mash for example.

Keep the control unit alive, kill the heat. What's OP's situation, can you do this?

I dont think so. I dont see a way to do that on the unit. But it does say - 'Outlets completely de-energized with switches off'
Details here: https://www.highgravitybrew.com/store/pc/Brewery-Controller-Electric-Wort-Hog-EBC-130-272p5041.htm
 
The device in the bottom center of the enclosure is a double pole relay/contactor. It is probably controlled by the "Heat" switch, which would allow full disconnect of power from the element outlet.

Brew on :mug:
 
The device in the bottom center of the enclosure is a double pole relay/contactor. It is probably controlled by the "Heat" switch, which would allow full disconnect of power from the element outlet.

It looks like two wires running from the "Heat" switch that are connected to the PID are then extended down to the double pole relay/contactor. The output of the SSD also runs to the relay so it looks like if I flip the switch, it will also kill the power.

Is this a recommended / recognized layout? I'd rather have the pid stay on and be able to kill the power to the element but at lease I know I have can kill the power safely.
Yes it's a recognized layout. Without adding another switch it is possible to rewire a little so that the PID comes on as soon as the box is connected to power, and the "Heat" switch only controls whether power is enabled to the element. You can add another small switch that controls power to the PID and is in series with the element switch, such that the element power can only be enabled when the PID is on.

Brew on :mug:
 
Last edited:
Yes it's a recognized layout. Without adding another switch it is possible to rewire a little so that the PID comes on as soon as the box is connected to power, and the "Heat" switch only controls whether power is enabled to the element. You can add another small switch that controls power to the PID and is in series with the element switch, such that the element power can only be enabled when the PID is on.

Great, thanks.
 
Last edited by a moderator:
I love my DSPR320 btw. Awesome to program multi step mashes and set hop timers for the boil, etc.

But just learned the hard way last night, if you're gonna run a big whole cone run with hops you grew and use pumps and a counter circ chiller either use a hop spider or a torpedo screen.
 
I recently bought a new setup for eBIAB and I had the controller made (I don’t trust myself to build my own) with and EZBoil DSPR320. I have to say, I love the automation and I wanted to share my programmed steps both for feedback and to help others wanting to use the device.

Each program step on the EZBoil has a time and an activity. The activities can be mash or boil which are basically hold at a temperature or apply a % of power respectively. Each time step can also be set to HOLD which is stay on that step until you press run or END, which is the end of the program.

I have only done 1 run and have made some tweaks to the program. Here’s what I’m trying for round 2:


1. 158 (strike temp) – 0 secs: gets to strike temp then moves immediately to next step
2. 150 (2 degrees below mash temp) – HOLD: my thinking here is I want to dough in and don’t really want the element to fire too much while I’m stirring. When I’m ready, I press RUN
3. 152 (mash temp) – 60 mins: Mash step. Can add more of these for step mashes
4. 170 – 10 mins: mashout
5. 170 – HOLD: Hold at this temp while I take the grain bucket out. Press RUN when ready to boil
6. 85% - 0 mins: This is the first boil step. The EZBoil has a temp at which it switched from 100% of power when getting to the boil, to the power you set it at to avoid boil over. I boil at 70% power but want a bit more umph to get me to boiling. As soon as it hits boiling it moves to the next step (0 mins)
7. 70% - 60 mins: Boil step
8. 70% - END: Kills the power to the element

Feedback welcome.
It would be cool if you put a vid on the set up process
 
I just finished putting my EBIAB system together and wanted to get to know this DSPR320, dang there is a lot to learn. I'm not the sharpest tool in the shed, so it's sort of difficult to put everything together. The instructions aren't very clear in my opinion.
 
It's easy to understand once you have done it. Pretty much you have a boil and a mash program. Within those you have steps.

Easy 3 step mash program - For my mash I use an initial step
Step 1 which is a target temp with 0:00 for the time. I don't want to hold that time just get there. It hits it alarm goes off. (Say 159 or something)

Immediately moves on to Step 2 - Step 2 is my mash temp with a timer. It will let the mash temp free fall till it hits my target then start the timer. (After adding grain temp will fall. Say I am mashing at 152)

Step 3 - is set to be "STOP". So when the timer runs out on 2 it goes to step 3 which is to shut down. You could program lots of things like a mash out (I do sometimes) or a maintain temp indefinite or something.

So after setting that up choose your mash program and hit RUN. Not hard after you do it a few times. Just remember pushing the dial in the middle - Short push vs Long push. Hold it down(long push) to get into program setup stuff. It all becomes 2nd nature after a few runs.

And you WILL screw it up first time like we did but the beer will still be drinkable. It always is. Just do something easy. :yes:

I have both alarms hooked up to external alarm buzzers but usually don't program them separately. I have my pumps on separate manual switches. You can put them on Relays and have the 320 control those but eh. It's not hard for me to turn my pumps off and on.

controller.jpg
 
Last edited:
I have been running some practice runs with just water and I keep over shooting my temps. The element shuts off but the temp keep rising a few degrees. I have tried using the overshoot setting, I have it set up to about 10 degrees already. I think its my false bottom retaining the heat honestly, I guess I could just guess and set my temp a couple of degrees below what I shooting for, say 156 for 158.

Also, how to I clear out my setting for a program a run other than going to system and resetting?

Hmm I over shoot 1-2 degrees every once in a while but not normally. And even then it comes back quickly. It's good about feathering the element as it nears the target and seems to self tune well. Yeah I just reset the program then edit the steps. But I'm not running multi step mashes or complicated stuff.
 
Last edited:
I have been running some practice runs with just water and I keep over shooting my temps. The element shuts off but the temp keep rising a few degrees. I have tried using the overshoot setting, I have it set up to about 10 degrees already. I think its my false bottom retaining the heat honestly, I guess I could just guess and set my temp a couple of degrees below what I shooting for, say 156 for 158.

Also, how to I clear out my setting for a program a run other than going to system and resetting?
Where is your temp probe located? Many problems with poor response of temp controllers are due to the temp probe being placed too far from where the heating actually occurs. This causes a time lag between when temp targets are exceeded and when the controller finds out about it, in which case the controller can't do anything to avoid the overshoot.

Brew on :mug:
The temp probe is located in T fitting coming from the ball valve.
 
Where is your temp probe located? Many problems with poor response of temp controllers are due to the temp probe being placed too far from where the heating actually occurs. This causes a time lag between when temp targets are exceeded and when the controller finds out about it, in which case the controller can't do anything to avoid the overshoot.

Brew on :mug:

In theory, well-tuned PID constants (or perhaps an autotune) would take care of it. In this case, increasing the I term would work. But that's being pedantic. I agree though, simple solution is to move the sensor to where the wort enters the MT. It should never overshoot then (unless you had a flow obstruction).

I just installed one of these DSPR320's in my panel :) I was planning on using it for boil, but I'll probably move it over to the MT if I ever get a HERMs coil installed. I'll probably just replace the BK PID position with the simpler easyboil PID they have.
 
the temps inside the t will only bee accurate when there is actualy recirculation going on... if you get a probe thats long enough to actually reach through the tee into the kettle you will get much more accurate readings.
 
the temps inside the t will only bee accurate when there is actualy recirculation going on... if you get a probe thats long enough to actually reach through the tee into the kettle you will get much more accurate readings.

Oh, not a concern for me. The whole point of my planned system is to recirculate. If I wasn't going to recirculate, I'd just insulate and leave it be.

I don't want a probe extending into the kettle. That would be a rip hazard for a bag and could interfere with a mesh basket.
 
Back
Top