Etching PWM board - second attempt

Homebrew Talk - Beer, Wine, Mead, & Cider Brewing Discussion Forum

Help Support Homebrew Talk - Beer, Wine, Mead, & Cider Brewing Discussion Forum:

This site may earn a commission from merchant affiliate links, including eBay, Amazon, and others.

chuckjaxfl

Well-Known Member
Joined
Feb 16, 2010
Messages
331
Reaction score
23
Location
Jacksonville, FL
I finally got the little back project box in from Hong Kong so I made another attempt at etching this PWM board.

I printed the circuit out on a page from the Northern Brewer catalog:
6958135520_39f88e8f63.jpg


Then I ironed it to just-cleaned piece of copper clad PCB. I first ironed the PCB itself, with a sheet of clean printer paper under the iron to keep its surface clean. Once the PCB is good and hot, I laid the toner side of the catalog page right against the copper, with the clean piece of paper on top of that, then iron that onto the PCB.

EDIT TO ADD: I trimmed the paper to line it up with the corner of the board.

The toner fused to the copper very well. It stuck well enough to hold its own weight:
6958254666_6d40e376d2.jpg
 
Then into the etching solution. This is supposed to be some pretty nasty stuff. It's viscous, and it takes about 10 minutes or so to etch all of the exposed copper off the board. You can see here where it turned the copper some gross color as it eats it:
6958303296_2f53ab917c.jpg
 
The Sharpie works GREAT! And... it wipes RIGHT OFF with some rubbing alcohol.
7104400013_2b083e4579.jpg


The toner, however, is harder to remove. I used a scothbright pad to scour it off, but it scuffs up all of the traces very badly. I checked them all for continuity with a meter... but they're still all scratched up compared to the Sharpie part that just wiped clean easily. This is larger - maybe you guys can see what I mean:
6958338768_2dffba7eca_b.jpg
 
I think the scotchbright might have been a little rough -
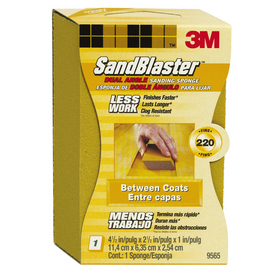
I used one of these (220 grit) to polish it up:

051131999510lg.jpg


also, a very very very close inspection prior to the etching - touch up the traces with the sharpie if any traces are not solid.

nicely laid out tutorial!
 
I've got two ideas for next time.

a) see if acetone will dissolve the toner w/o any abrasiveness at all.

b) I'm thinking about drawing all of the pads all 0.09" in diameter, with a 0.07" hole. The toner will draw tiny, thin rings for all of the pads. Then I'll "darken in the dots" with the Sharpie. When it's done, I'll just remove the Sharpie from the pads, and leave the toner right where it is, like a mask.

Any thoughts?
 
That's looking pretty good! I have done a fair amount of boards with the toner transfer method, mag paper and clothes iron. If you are looking to doing this more in the future I would invest in a cheap laminator , it works wonders. Also look into using pulsarprofx paper and greentrf foil for a perfect board every time.. With practice I can now do surface mount traces no prob. Also I use acetone to clean toner off and some #00 steel wool to shine up the traces before I tin them.. Hope this helps
 
Back
Top