Electric Mashtun Leaks...

Homebrew Talk - Beer, Wine, Mead, & Cider Brewing Discussion Forum

Help Support Homebrew Talk - Beer, Wine, Mead, & Cider Brewing Discussion Forum:

This site may earn a commission from merchant affiliate links, including eBay, Amazon, and others.

maztec

Supporting Member
HBT Supporter
Joined
Apr 6, 2009
Messages
418
Reaction score
5
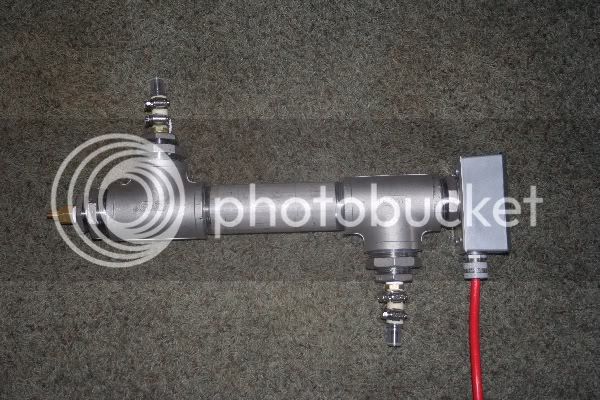
Put my electric Kettle [updated text] together last weekend. I basically followed the design located here: http://www.theelectricbrewery.com/node/9?page=show

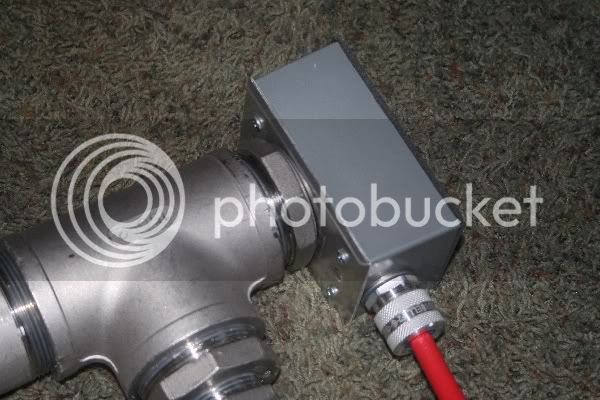
So, here is the problem. If I connect the electric box, by putting it between the washer and the head of the heater element, my rig leaks. I remove the box, connect the heater element directly, and it doesn't leak. It seems that the connection to the box is too thick to allow the other the element to seal correctly when it is included.

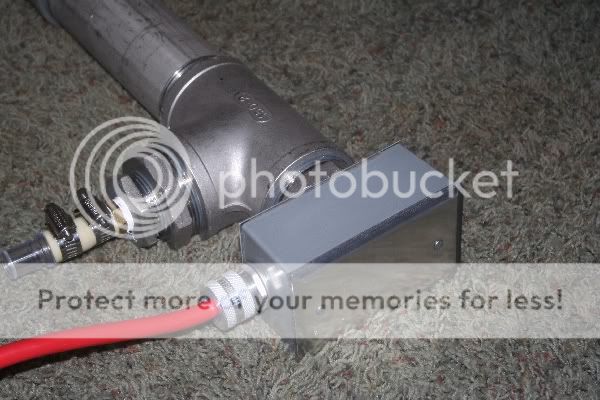
One reason this happened, my hole was cut a touch too big. *sigh* I asked for it to be cut to 1 1/4", it was cut to 1 3/8". If anyone has a suggestion on how to compensate for a hole that is a smidge too big, I would love it - I'm going to try a slightly bigger o-ring, but am not sure how well it will work. I could try welding something in, but I don't weld, and I don't know anyone in Washington who could do it for me.

The other option seems to be to find a different way to mount the electrical box over the end of the heating element, so the wiring is protected. If anyone has a suggest, I am all ears! Perhaps a simple cap arrangement over the end (where to find such a cap that would be water tight)? Or something...?

Thanks for the tips!
 
In the design you reference he uses RTV to solve this problem. I think it would have been better to use a second O-ring (or washer) to form the seal between the element and the electrical box. If you do this, make sure you Ground Bond the box to the keg in some other way (i.e. a ground wire).

Paul
 
The leak path is through the thread valleys. The oring is doing a great job to keep liquid from dripping between the vessel the box, but I assume your leak is inside the box right?
 
Did you wrap the threads with Teflon tape?

I used a modified version of this technique and have had no problems (I did use Teflon tape on the threads).

With a 1/8" over sized hole your only hope is to have the element perfectly centered or the o-ring will not cover the gap.

I think the over sized hole is a likely problem but I would try Teflon tape before throwing in the towel. You might also try a thicker o-ring.

I also read a thread from someone that used a silicon baking sheet as gasket material (not sure were it came from).

Good luck,

Ed
 
I did not wrap the threads in Teflon tape. I had not thought of that, good idea!

I believe his use of RTV was mostly a "just in case".

Double gasketing is a good idea, but the screw length does not seem to be enough for that.

I will see what an o-ring with a greater fractional width does, throw a little teflon tape on, and smear on some food safe silicon. May be overkill, but better than a leak that can harbor bacteria and electrocute me!

I suppose the other option is a gasketed locknut, but I never found any that were food safe.
 
Went into Lowe's. Looked at their Teflon tape. On the box it had a posted temperature range of "-30F to 150F" and is made in China, no indication of its health impact. Somehow, I do not think that is going to work. Funny thing is i go online, look up Teflon tape, and it is generally rated -450F to 550F.

I guess I will have to go to a different hardware store, but I thought I would share what I found at Lowe's.
 
I'm probably not understanding the issue properly. I've read the thread a number of times and am still puzzled. (I just went back again and looked) A heating element has straight threads - not - tapered pipe threads. Teflon tape will not reliably seal that connection. The electric heating element is sealed with a washer that is compressed between the element hex flange and the receiving flange. If there is anything between these 2 mating surfaces, it WILL leak. Teflon tape will NOT help.
 
I'm probably not understanding the issue properly. I've read the thread a number of times and am still puzzled. (I just went back again and looked) A heating element has straight threads - not - tapered pipe threads. Teflon tape will not reliably seal that connection. The electric heating element is sealed with a washer that is compressed between the element hex flange and the receiving flange. If there is anything between these 2 mating surfaces, it WILL leak. Teflon tape will NOT help.


Good to know! I think what is happening is that my hole is just a smidge too big, so when I include the connecting panel for the power panel the o-ring "might" slip, and if it slips it goes through the hole, and thus does not seal the hole, and we have a leak.
 
I also followed the "electric brewery" with sever different combinations of washers, O-rings, teflon tape ect. I had success one time but I had to crank the crap out of it and the O-ring was bulging out the side. I picked up a small bottle of liquid acid flux and some lead-free solder and within 10 mins I soldered two 1" nuts to two kettles and had both elements installed with no leaks. They have been sitting for about 3-4hrs now with 10gals of water in each and not a drip. I would seriously recommend just soldering these nuts in place. This would also solves your slightly larger hole problem
 
Good to know! I think what is happening is that my hole is just a smidge too big, so when I include the connecting panel for the power panel the o-ring "might" slip, and if it slips it goes through the hole, and thus does not seal the hole, and we have a leak.
If I'm understanding correctly, (maybe not - probably not) The element, with its sealing washer, goes through a hole in a box. The element will seal very well with the box. Now, the box is up against the vessel. What is providing the seal between the box and the vessel?

Nothing? It will leak.
Period..
 
I also followed the "electric brewery" with sever different combinations of washers, O-rings, teflon tape ect. I had success one time but I had to crank the crap out of it and the O-ring was bulging out the side. I picked up a small bottle of liquid acid flux and some lead-free solder and within 10 mins I soldered two 1" nuts to two kettles and had both elements installed with no leaks. They have been sitting for about 3-4hrs now with 10gals of water in each and not a drip. I would seriously recommend just soldering these nuts in place. This would also solves your slightly larger hole problem

Something doesn't sound right... the o-ring should fit inside the washer and be a bit thicker than the washer... there is no way it should bulge out the side?

I've done 3 elements based on this design and not one leak? The difference in my method is I don't use a loose nut on the inside of the kettle. I have a coupling welded in and use a reducer which gives a large flat area for the washer to fit against with no curvature.

I also use teflon tape.

Ed
 
If I'm understanding correctly, (maybe not - probably not) The element, with its sealing washer, goes through a hole in a box. The element will seal very well with the box. Now, the box is up against the vessel. What is providing the seal between the box and the vessel?

Nothing? It will leak.
Period..

Look at the pictures in the original link...

O-ring and washer goes between the box and the kettle.
O-ring OD = Washer ID, but O-ring is thicker than the washer.
O-ring gets sandwiched... when it flattens out, it squeezes the element threads, the washer keeps if from expanding out.

You end up with metal to metal contact between the box / washer / kettle, which makes for a great ground path and the element connections are serviceable.
Oh I undersatand all of that very well.. However, his setup is leaking. No? Now what?
 
I did it that way, and it leaks. Using the nut on the inside and trying to turn the element is for the birds. A welded or soldered fitting is where it is at. I also have numerous weld-less fitting installed in 4 keggles a I have never had a leak. This design just didn't work for me.
 
Something doesn't sound right... the o-ring should fit inside the washer and be a bit thicker than the washer... there is no way it should bulge out the side?

I've done 3 elements based on this design and not one leak? The difference in my method is I don't use a loose nut on the inside of the kettle. I have a coupling welded in and use a reducer which gives a large flat area for the washer to fit against with no curvature.

I also use teflon tape.

Ed

Could you link me to the coupling you are welding in?

-- And folks, main reason I am leaking here is because my hole is too big. Welding something in seems like the most likely, successful fix. And, via a friend, I just found a guy who can weld it, so I just need to figure out what to put in.
 
I'm actually in Seattle.

You just hit the jackpot!!! I was prepared to ship 3 kegs across the country and beg GreenMonti to do the welding for me when I finally got something local I could live with.

I had a 2" coupling welded in (I had to cut it in half to make a half coupling). Then I use a 2" to 1" reducer which makes the large flat surface I mentioned in the earlier post. The element threads into the reducer.

Ed
 
I'm actually in Seattle.


All we have to do is arrange a meeting. I would be happy to do the welding for you if that other welder doesn't come through or you just aren't comfortable. PM me if you are interested.

Good Luck.

Cheers.:mug:
 
You just hit the jackpot!!! I was prepared to ship 3 kegs across the country and beg GreenMonti to do the welding for me when I finally got something local I could live with.

I had a 2" coupling welded in (I had to cut it in half to make a half coupling). Then I use a 2" to 1" reducer which makes the large flat surface I mentioned in the earlier post. The element threads into the reducer.

Ed

Thank you for the kind words.:mug:
 
Awesome, thanks chaps!

I'm going to proceed as follows:

1) Larger o-ring comes in later this week, if it works, yay, I'll with the pot as is.
2) If it doesn't, GreenMonti - you will be hearing from me.

That noted, GreenMonti you are going to think I am insane when you see what I am slowly planning to do to my pot. Honestly, this pot is just my starter/test pot, with plans to bump up the size eventually. I am hoping to eventually build a single-pot portable system for Mash&Kettle. As a result, I'm putting a temperature probe in my kettle, yes, I know, it is unnecessary. At this point, I am just getting this started, adding one thing to complicate matters at a time.... And when I move up beyond the test pot, I will definitely be contacting you.

So, now to figure out which pipe fitting I need. Finding what I need near here tends to be near impossible, so I usually order from McMaster. Except, I'm having a bit of a time finding what here would be ideal for this application. Any recommendations? Site: http://www.mcmaster.com/#stainless-steel-pipe-fittings-and-pipe/=6c3vg4 . I was thinking part number: 4452K517 might be right, except this hole "pipe sizes and threads are not what they say they are" thing confuses the hell out of me.

Except, I thought the thread on the hot water element was BSP, and most of those threads are NTP. Of course, I could be wrong. Anyone with more knowledge about pipe fittings able to fill my brain in on this (and point out which part I actually should go - aka, easiest to weld on, easiest to use, right size, right threading, etc)? I'm more of a electrical/programmer geek than a pipe geek, but willing to learn.

Thanks!
 
I really think it's an issue of leakage through the thread channels. Have you even tried the teflon tape? I know it's straight thread, but give it 3 or four wraps, I'd bet money it holds.
 
Awesome, thanks chaps!

I'm going to proceed as follows:

1) Larger o-ring comes in later this week, if it works, yay, I'll with the pot as is.
2) If it doesn't, GreenMonti - you will be hearing from me.

That noted, GreenMonti you are going to think I am insane when you see what I am slowly planning to do to my pot. Honestly, this pot is just my starter/test pot, with plans to bump up the size eventually. I am hoping to eventually build a single-pot portable system for Mash&Kettle. As a result, I'm putting a temperature probe in my kettle, yes, I know, it is unnecessary. At this point, I am just getting this started, adding one thing to complicate matters at a time.... And when I move up beyond the test pot, I will definitely be contacting you.

So, now to figure out which pipe fitting I need. Finding what I need near here tends to be near impossible, so I usually order from McMaster. Except, I'm having a bit of a time finding what here would be ideal for this application. Any recommendations? Site: http://www.mcmaster.com/#stainless-steel-pipe-fittings-and-pipe/=6c3vg4 . I was thinking part number: 4452K517 might be right, except this hole "pipe sizes and threads are not what they say they are" thing confuses the hell out of me.

Except, I thought the thread on the hot water element was BSP, and most of those threads are NTP. Of course, I could be wrong. Anyone with more knowledge about pipe fittings able to fill my brain in on this (and point out which part I actually should go - aka, easiest to weld on, easiest to use, right size, right threading, etc)? I'm more of a electrical/programmer geek than a pipe geek, but willing to learn.

Thanks!

I believe electric elements are 1" straight thread.

OhioEd, posted his way of doing it. He likes to use a 2" coupling and then use a bushing to adapt it to the element.
 
I believe electric elements are 1" straight thread.

OhioEd, posted his way of doing it. He likes to use a 2" coupling and then use a bushing to adapt it to the element.

www.BargainFittings.com is a vendor here on HBT and gets great reviews.
If they don't have what you are looking for, I purchased my SS fittings from:

http://www.murrayequipment.com

IMO, the fittings from MurrayEquipment are inexpensive but also cheap. I don't have a great deal of experience with SS pipe fittings, but I am not impressed with the way the fittings thread together. I got them to work, and have ordered from them more than once, but I just question how they can be so inexpensive (I am a firm believer in "you get what you pay for").

As GreenMonti said, I use a 2" coupling and a reducer. I did that to get a flat surface to mount an electrical box on the kettle instead of going the usual route of potting the connections in epoxy. I had to cut the 2" coupling because the element I use (5500 watt ripple) is "wavy" and would not fit.

Many folks just have a 1" coupling welded in and I would think that would probably work just fine also.

I have 3 elements threaded into NPT reducers and no leaks. I hear folks saying elements are straight thread, but the NPT reducers worked for me (I did wrap the element threads with lots of teflon tape).

Ed
 
Thought I'd add a few pictures (every thread need em ;) )...

I don't have any pictures of the elements in my HLT or BK but here are a few pics of the RIMs heater I built. The HLT & BK use the same setup, but the 2" busing is threaded into a 2" coupling welded into the kettle instead of the tee as in the pics...


RIMS.jpg


RIMS-2.jpg


RIMS-3.jpg
 
Ohio-Ed: How did you attach the box to the reducer? I like your idea of using 2" couplings with a reducer to provide a large surface area for a seal. I use 1" half couplings for my elements. I have not had problems with sealing but I still like your idea. I had SS bolts welded to the kettle to hold waterproof electrical boxes in place.
 
Ohio-Ed: How did you attach the box to the reducer? I like your idea of using 2" couplings with a reducer to provide a large surface area for a seal. I use 1" half couplings for my elements. I have not had problems with sealing but I still like your idea. I had SS bolts welded to the kettle to hold waterproof electrical boxes in place.

Steve - I don't want to hijack the thread anymore than I already have (sorry maztec :confused: ). Quick answer; the box is just sandwiched between the element and the washer. The original post in this thread has a link to the site which has a great description. The only difference from the description in the site is that I use a welded coupling and reducer.
 
Anytime your using JB weld to secure steel I think its a bad idea.

Why not just thread the element by its self where you said it doesnt leak and then use a pices of PVC tube and a cap with a hole to cover the connections to the element?

Way easier
 
Put my electric mashtun together last weekend...

maztec - I feel like such a bonehead... I've been following along offering up advice on how you might be able to fix your leak, and just re-read the title of this thread.

Are you really putting an electric heating element in your MT?

If so, that may be a whole new topic...

Ed
 
maztec - I feel like such a bonehead... I've been following along offering up advice on how you might be able to fix your leak, and just re-read the title of this thread.

Are you really putting an electric heating element in your MT?

If so, that may be a whole new topic...

Ed

LOL. I started reading the thread and instantly fell into the herd thinking about a kettle and didn't notice the mashtun reference at the start.

Maybe (hopefully) just a typo?
 
Primarily a typo. This unit is a prototype for me. The intent at this point is to put it together as a kettle.

However, once the kettle aspect is go, I will be adding a screen and an on-demand regulated induction heating inlet, so I can use the kettle as a mash tun. So, ultimately, I think of it as an electric mash tun, but that is several months out and some significant modifications. I do not intend to operate the heating element while it is operating as a mash tun, since my understanding is that can burn the malt. However, I could be wrong on that. But, speaking of hijacking, the entirety of this project is probably an entirely separate project. As, I have to fix my leak first! :) (Although, if someone sees something obviously wrong with that idea right now, feel free to bring it up.)

And, I don't mind the brief hijack Ohio-Ed. That is a cool unit, and actually seeing it helps a lot with my going forward and fixing this problem.
 
I do not intend to operate the heating element while it is operating as a mash tun, since my understanding is that can burn the malt. However, I could be wrong on that.

You're not wrong at all. That's exactly why I was hoping you had a typo up there at the top. :D
 
Phew! This actually ends up being a two pot system no matter what - since the mash fluids need to be stored elsewhere, at the least during cleaning before boiling in a kettle. But I'm rather attached to my induction on-demand heating unit. :)
 
Primarily a typo. This unit is a prototype for me. The intent at this point is to put it together as a kettle.

However, once the kettle aspect is go, I will be adding a screen and an on-demand regulated induction heating inlet, so I can use the kettle as a mash tun. So, ultimately, I think of it as an electric mash tun, but that is several months out and some significant modifications. I do not intend to operate the heating element while it is operating as a mash tun, since my understanding is that can burn the malt. However, I could be wrong on that. But, speaking of hijacking, the entirety of this project is probably an entirely separate project. As, I have to fix my leak first! :) (Although, if someone sees something obviously wrong with that idea right now, feel free to bring it up.)

And, I don't mind the brief hijack Ohio-Ed. That is a cool unit, and actually seeing it helps a lot with my going forward and fixing this problem.

Not sure what your plans are for switching between MT & BK, but I'd try to avoid mashing with the element installed (even if you don't turn it on). I think it'll be harder to clean the spent grain if you're working around an element. When I bought the couplings I had welded in, I also bought plugs for them, so I "could" remove the elements and heat with propane if needed.
 
This is what I did on my HLT. I soldered a 1-in stainless half coupling to the keg, knocked out a deep octagon box to fit the element and welded the flange of the element to the box. I just tightened the element in by hand using the box. No leaks!

0107101507a.th.jpg
[/URL][/IMG]

0109101105a.th.jpg
[/URL][/IMG]
 
Not sure what your plans are for switching between MT & BK, but I'd try to avoid mashing with the element installed (even if you don't turn it on). I think it'll be harder to clean the spent grain if you're working around an element. When I bought the couplings I had welded in, I also bought plugs for them, so I "could" remove the elements and heat with propane if needed.

Hmm, good point and idea. We'll see what I actually end up with. :)
 
By the way: what size batches are you making and what wattage element did you install?

10 gallon and 5 gallon batches, same kettle.

5500W, ULWD element. Assumed 100% energy transfer efficiency since it is inside the kettle, so that is 18,766 BTUs.

1 BTU raises 1 pound of water by 1 degree Fahrenheit in 1 hour. (Gallons * 8.3lbs/gallon * (Boiling - StartTemp))/BTUs = time to boil.

For 10 gallons starting at 70F to boil it is: (10*8.3*(212-70))/18766 = rounded up 38 minutes to boil.

For 5 gallons starting at 70F to boil it is 19 minutes.


These seem like reasonable times to me. Furthermore, if I install a PID/SSR, I can manage the degree of boiling so it is a nice rolling boil rather than a thunderous turn the pot over boil.

"IF" one is available, an infinite switch will give the same control as a PID/SSR all in one unit. Like an electric stove does.
 

Latest posts

Back
Top