DIY Kettle Hop Screen

Homebrew Talk - Beer, Wine, Mead, & Cider Brewing Discussion Forum

Help Support Homebrew Talk - Beer, Wine, Mead, & Cider Brewing Discussion Forum:

This site may earn a commission from merchant affiliate links, including eBay, Amazon, and others.

NTexBrewer

Supporting Member
HBT Supporter
Joined
Feb 19, 2013
Messages
959
Reaction score
383
Location
Just North of Dallas
My brew system is a Ruby Street Fusion 15, with 15 gallon boil kettle and a plater chiller.

The setup comes with a Hop Spider similar to this one https://smile.amazon.com/gp/product/B072Q1G91R/ref=ppx_yo_dt_b_search_asin_title?ie=UTF8&psc=1
I used 2 Hop Spiders to split up the hops but my utilization was about 75% so I was using even more hops to get proper bitterness.

I was given a Hop Stopper Hop Stopper and this worked great for filtering out the hops and not clogging my plate chiller. The thing that I did not like about the Hop Stopper was that it was hard to clean and the Stopper I was given was probably a little too small for my kettle.

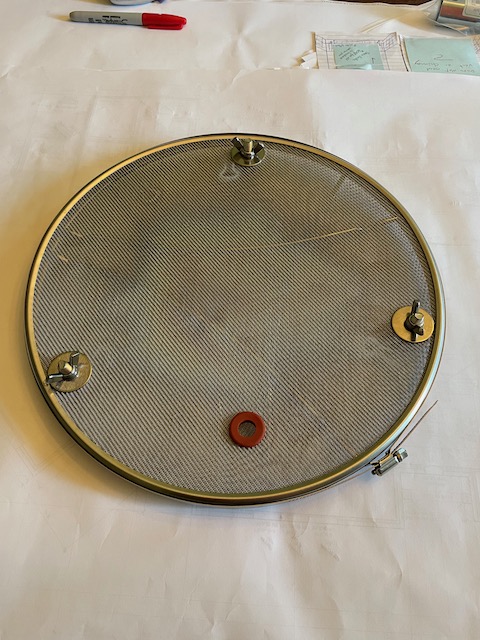
In Zymurgy's Gadgets issue I saw how Jeff Gaastra made a Kettle Hop Screen with two SS Splatter Screens. This looked great but he "sewed" the two screens together with SS wire again making it hard to clean imo. I did a little thinking and modified his design. I'm using SS bolts, washers and wing nuts to hold the two screens together. I then use a 14" diameter SS hose clamp to go around the edge of the screen to make sure that wort only flows through the screen. It is hard to tell from the pictures in Zymurgy but the other thing I did is have the "handle" part of the splatter screen facing down for the bottom screen so the screen sits off the bottom of the kettle. When I tried it the other way it clogged. I think having the screen elevated off the bottom of the kettle allows the wort to actually be drawn in the dip tub from under the bottom screen while the hops settle on top. After brew days, I hose it off, take it apart and stick everything in the dish washer to thoroughly clean it.

Total Cost for my homemade version: $44.83

I already had a dip tub and rubber grommet for the dip tub.

Splash Screens Amazon.com

Hose Clamp https://smile.amazon.com/gp/product/B07DXF4MNQ/ref=ppx_yo_dt_b_search_asin_title?ie=UTF8&psc=1

Bolts were 8mm-1.25x22mm Stainless Steel
Wing Nuts 8mm-1.25 Stainless Steel
Washers 5/16 Fender Washer Stainless Steel
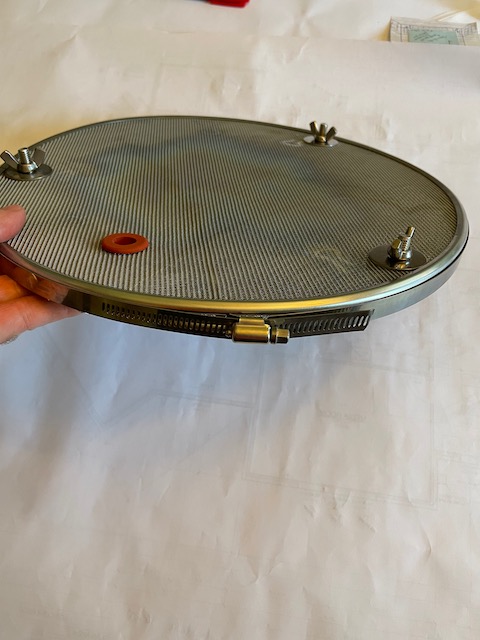
1 - 5.jpeg
1 - 4.jpeg
1 - 3.jpeg
1 - 2.jpeg
1 - 1.jpeg
 
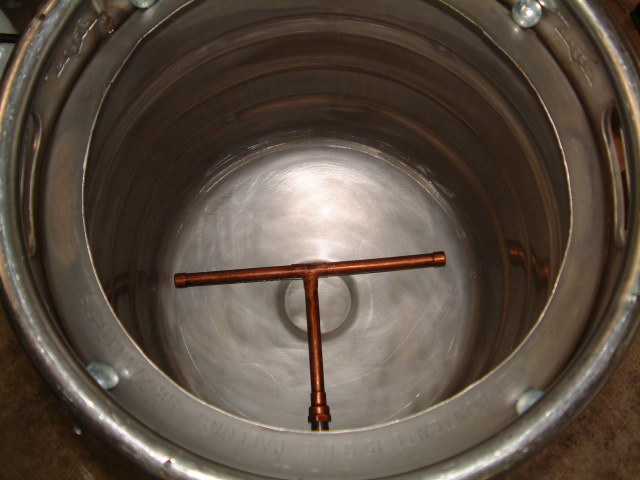
I am very interested in doing something like this. My LHBS no longer sells whole leaf hops. My system works very well with leaf hops, but plugs horribly with pellet hops. My hop filter is a 1/2 copper pipe "T" with hacksaw slits cut on the underside every 1/4" or so. Gravity run-off.

DSCF0920.JPG


I know I can order from Freshhops or summat, but I also want a plan "B" to use pellet hops.

I presume the grommet is silicone. Any ideas where to source that? It looks like the preferred mesh for pellet hops is 300 micron. Any idea what the mesh of that splatter screen is? Have you tested it on an IPA with pellet hops

Thanks,

Todd K.
 
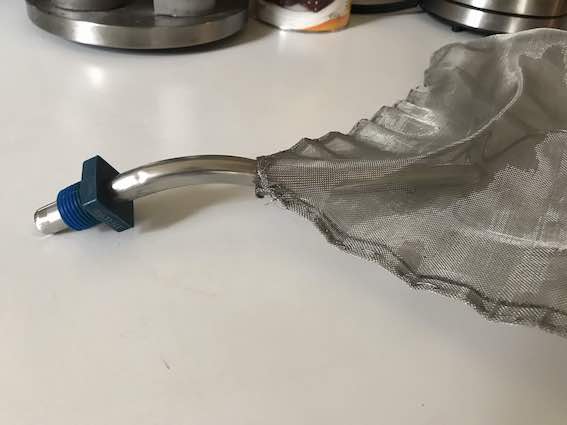
I notice you have a keggle..so do I and I throw my hop pellets in loose. I made a fairly simple 'pillow-filter' with some 420-mesh and 304 SS 'thread' that I got from ebay. I put a pair of bent SS wire handles salvaged from a deep-fryer basket inside it to prevent collapse and allow maximum surface area above and below and it works great with never a slowdown in flow or plugging:
IMG_1306.jpg

IMG_1307.jpg

Keggleinside.jpg

* Note: Not shown in pic: I roll an o-ring over the screens neck around the diptube.
:mug:
 
Looks easy. How is cleanup?
Mostly easy: Because of its size, most of the cat-barf in the kettle is sitting on it after a good whirlpool and I just slide it off the diptube and bang it off (gently) into a bin, then rinse it out in my kitchen sink using the spary head. I'll get a small amount of particles in the seam occasionally, but very little which dries out and is easy to then shake out the rest and give another rinse. It made getting most of the kettle trub out a happy bonus.
 
This is conceptually similar to my Hop Stopper V2 (from the Electric Brewery folks). It works so well I haven't used my 6"x20" SS spider in years. Unfortunately, however, the person who fabricated the Hop Stoppers has retired and the line has been discontinued :(

1713385743224.png

Cheers!
 
I think a place like Arbor Fabrication or Utah Biodiesel Supply could fabricate something like that. Utah built a stainless steel basket for me to fit inside a quarter barrel keg.
 
I understand that whirlpooling has a great effect on dropping out proteins and hop matter, i myself have not tried it yet and have been using a nylon bag for a while. the terrors of plugging the plate chiller run deep and is not a fun ordeal. plus, an extra 15-30 minutes to brew day for a whirlpool has not enticed me to try.

screens need a large surface area to also prevent clogging up which what is shown would seem to work great as most sediment falls on top while liquid is able to pass through the bottom easily.
 
I use a plate chiller too, and had those same fears of getting it clogged up. There's other types of filters to use, inside the kettle or external.

The whirlpool doesn't add much time, IMO, it's just part of the brew day. Stir the wort then let it sit. I do other things during that time.
 
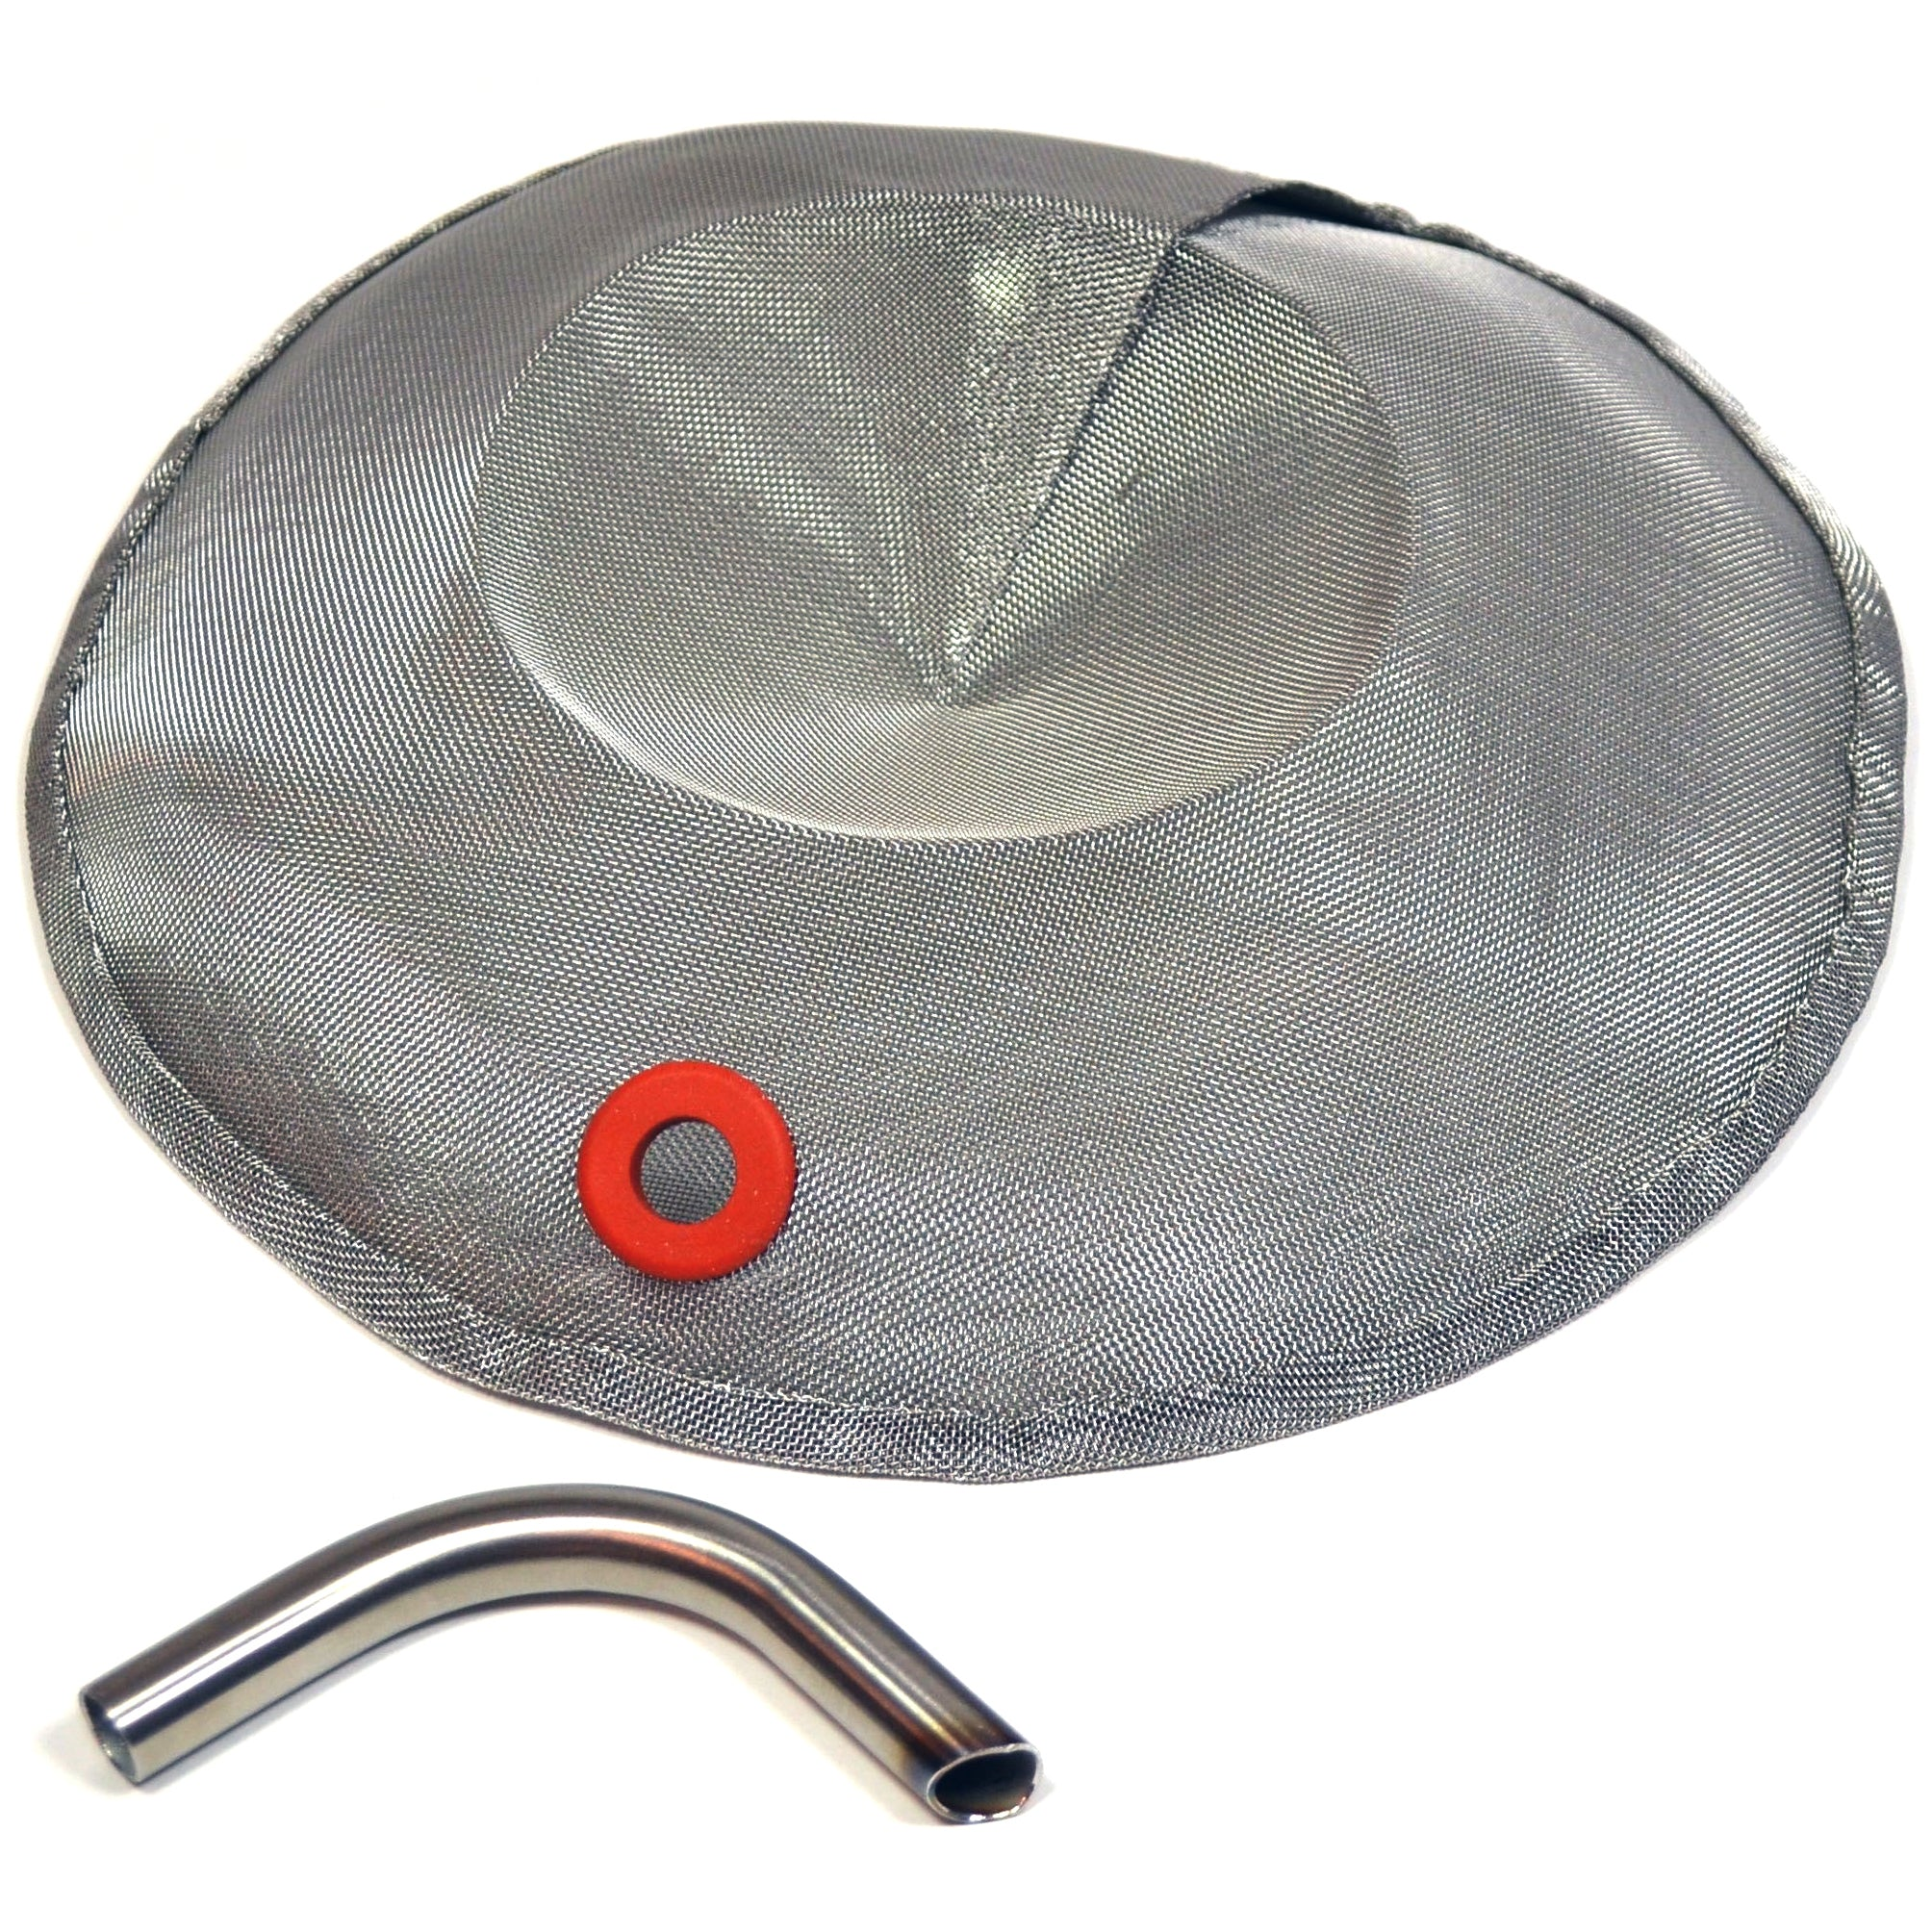
I really want to build one of these but have no clue how to get the silicone grommet. Not even sure what to search for. Anyone have a lead for the grommet?
 
There's these:
https://www.grainger.com/category/h...ts?attrs=Inside+Dia.+(A)|1/2+in&filters=attrs
I thought about it, but went square with the filter in part so I could just leave a corner open and use an o-ring as a 'rubber-band' over it...also didn't want to cut off and discard useful surface area. I also have difficulty with fine-fingerwork and I don't trust myself to make a firm enough hole in the screen to hold a grommet.
It's an option.
:mug:
 
I worry that those grommets aren’t food grade and that the max temp isn’t much above boiling. But will keep looking. May just have to copy @Broken Crow design. Did you follow any guide on “sewing” the edges or just wing it?
 
fwiw, "The red o-ring is made of high temperature silicone that is FDA compliant and can withstand temperatures from -65F to +450F."

All the valves and Camlocks on my rig are equipped with high temperature red silicone washers and O-rings. Probably 10 times as much silicone total than that one grommet ;)

Cheers!
 
... with some 420-mesh and 304 SS 'thread' ...:
Do you know the "thread" gauge you used to sew it? My initial thought is wire diameter for sewing should be no greater than the screen mesh size.

As far as mesh screen size, I think 400 micron is about right. Commercial hop spiders are 300 micron and I read one report of a 500 micron hop filter.

This is the path I am pursuing to convert my kettle to pellet hops.

For the o-ring, it needs to be silicone. However, I am going to try just tying the bag to the tube with copper wire.
 
I worry that those grommets aren’t food grade and that the max temp isn’t much above boiling. But will keep looking. May just have to copy @Broken Crow design. Did you follow any guide on “sewing” the edges or just wing it?
I have the same concerns... dunno if you clicked on any of the silicone ones on the linked page or not, but on the product page it's only described as being suitable for wiring grommets https://www.grainger.com/product/Rubber-Grommet-1-1-16-in-Outside-3MRT1 and I wouldn't trust it myself. To sew it, I just used a thin metal ruler on top and folded the edges over.
Do you know the "thread" gauge you used to sew it? My initial thought is wire diameter for sewing should be no greater than the screen mesh size.

As far as mesh screen size, I think 400 micron is about right. Commercial hop spiders are 300 micron and I read one report of a 500 micron hop filter.

This is the path I am pursuing to convert my kettle to pellet hops.

For the o-ring, it needs to be silicone. However, I am going to try just tying the bag to the tube with copper wire.
I just checked my ebay history and though it doesn't tell me which exact wire I got, it does include the available range you could choose from 0.2mm - 0.6mm. I probably used whatever was in the middle.
For my first use of it, I used a SS wire type hose clamp: https://www.ontariobeerkegs.com/11-14mm-wire-clamp.html (sorry for the Canadian link) Ideally, I'd like to eventually get rid of all the hot-silicone and use SS spring-clips but the o-ring will do for me for now.
As to the mesh side; The defacto standard 300 mesh used by most brewers works just fine, but I wanted less particulate matter in my plumbing and I figured since I had such an oversized surface area I could get away with the finer size and luckily it works great.
One thing to keep in mind if you go the 'pillow' route rather than the more rigid designs: If you don't have any support inside the filter, it will collapse under the trub-load. For the filter I have so far, as I said; I used a pair of SS wire handles salvaged from a deep-fryer basket, bend some curves in them, and sewed the filter with them loose inside. For the next one I make, I bought some thicker 2mm SS wire that I intend to make a loose support frame to go inside.
Whatever you devise for yourself; Please come back and post it! I'm always looking for improvements and new ideas.
:mug:
 
To clarify, you stated you used 420 micron (I assumed "mesh" was a typo). That is wider mesh than 300 micron.

https://www.ecologixsystems.com/resources-calculators-mesh-micron/
Sorry.. I've got some physically shorn axons that cause me a lot of problems with comparative measures and numbers and it causes me to be clumsy in my descriptions as well. My poor wording aside, what I have is definitely 420-mesh. Here's some pics in another thread where I was poor with wording; https://www.homebrewtalk.com/threads/washing-yeast-vs-pitching-trub.726863/page-2#post-10257449
Many more holes per inch than the commonly sold '300-something' bazookas and spiders.
:mug:
 
Back
Top