DIY Interwoven "Rib-Cage" Immersion Chiller

Homebrew Talk - Beer, Wine, Mead, & Cider Brewing Discussion Forum

Help Support Homebrew Talk - Beer, Wine, Mead, & Cider Brewing Discussion Forum:

This site may earn a commission from merchant affiliate links, including eBay, Amazon, and others.
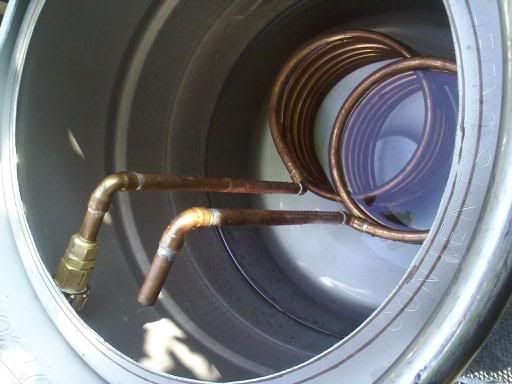
when i get home i'll put mine in the keggle. The lid may be a problem isf you cut the hole narrow. Keggles are all unique
 
Just a thought, im new to this. How about just using the cooling fins out of an old air conditioning unit, or piggy back a few. Just sterilize it and solder some ends on. AC's are free at any dump.

radiator.gif
 
I'm bumping this thread because I'm wondering if anyone has tried this with a keggle. I have purchased all the materials to build a single column IC for a keggle (I just made) but after seeing this rib-cage IC I've put the breaks on.

If you use the 2 paint cans method I think rib-cage IC going to be too wide to fit in the keggle. This would imply smaller diameter columns. I'd like to know if others have already tried??

Thanks.

I used a growler to wrap my coils around for a 50ft one I built. It works great in a keggle, fits easily. You can always adjust the total diameter of the chiller by pushing each "rib" closer to the other one.
 
THe water is heated up on its way through the first coil, and then as its racing up the second, there should be a small temperature differential in the wort.

:shrug:

If theres only a small temperature differential, that part of the chiller isn't chilling. You guys would be much better off splitting the feed and having two separate attached coils.
 
If theres only a small temperature differential, that part of the chiller isn't chilling. You guys would be much better off splitting the feed and having two separate attached coils.

The original chiller that I posted in here was 20' of 3/8" tubing and with 42* input water would chill 5 gallons to pitching temp in 9 minutes. Realistically speaking, there was 18' in contact with the wort. Thats pretty damn fast. Could it go faster? Sure it could with a better optomized design.

But again, the point that the ones that want to pick apart the design always miss is this: A dual coil design will chill faster than a single coil design. The reason why is more wort coverage/more even distribution of coils throughout the wort.

I guarantee that you can make a single coil chiller out of the same material, same length, as a dual coil design and the dual will be faster.

:)
 
If theres only a small temperature differential, that part of the chiller isn't chilling. You guys would be much better off splitting the feed and having two separate attached coils.

Thats what I did with my rib-cage-based design. Also, in reference to a previous poster, I use mine in a keggle. I wound the coils on a corny keg. My results are sort of mediocre. My tap water is about 65. I run tap water through it and out for 10 gallons, and then switch to ice-water recirculated using a very very wimpy pond pump (2nd smallest one sold at home depot). I get down to about 100 degrees in 10 minutes, and its another 15 to get it down to 80. I'm sure a bigger pump would help a moderate amount. Another issue is that it quite difficult to get any sort of circulation going in the keggle via stirring, as the chiller sort of blocks a lot of the space. And a final final issue is that my chiller is sitting about 1/3 out of the wort for 5 gallon batches. None of these statements are meant to criticize the rib-cage chiller - I would not do anything different - just some observations and data points.
 
Not quite as impressive in a keggle. maby CFC is the way to go there? five gallons of water.

get-attachment-4.jpg
 
Just to clarify, since I think I'm going to be making one of these this weekend: to make the rib-cage chiller, you simultaneously wind the coils around 2 paint cans, right? i.e. each half of the chiller is wound around its own can, then the two halves are sort of smushed together? Or can you wind to coils in opposite directions around 1 can, then pull them apart?

I'm only asking because reading this thread, it seems like most people have done the 2 can method, but it looks like the OP (I may be wrong here) wound it with one can. As I said, though, I may be wrong. I'm only planning on doing this once so I want to get it right!

Thanks!
 
Yeah, I actually did make it, a few days after posting that. I started from the middle and winded out in first one direction, than in the other. Then I just kind of opened the two coils and smushed them together.

I gotta say, the thing works pretty great. I bought a 50' roll of tubing, and figured out that only about 35' worth of IC would fit in 5 gallons of wort. So I took the other 15' and made a little pre-chiller. Not sure what my groundwater temp is - I'm guessing around 65 or so - but since I've built it I can consistently get from boiling to 70 in about 18 minutes, boiling to 65 in about 20. Not quite the mind-blowing times you get, but I'm super happy with it! I pretty much keep the wort circulating the whole time.

It's a great design, IMO, since it just makes so much sense. Thanks for the idea and the thread!
 
So how are you guys bending the tubing so smoothly without kinking it? I was under the impression that it kinks pretty easily.
 
So how are you guys bending the tubing so smoothly without kinking it? I was under the impression that it kinks pretty easily.

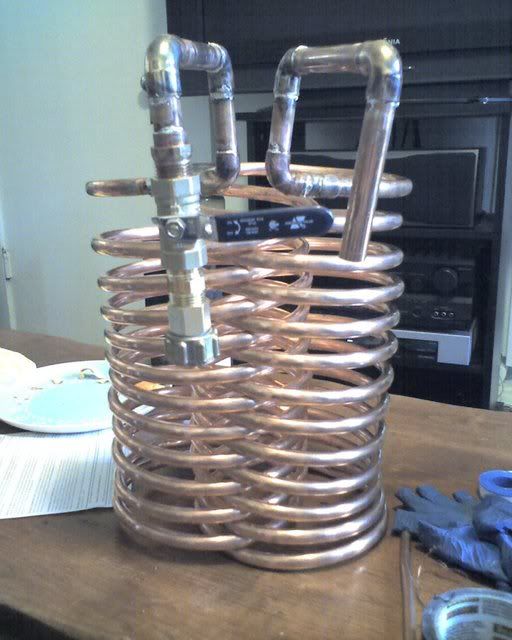
just take your time. and don't try to bend too tight. paint can, cornie keg, something about that size. the smaller you try to wrap it, the easier it is to kink.
 
So how are you guys bending the tubing so smoothly without kinking it? I was under the impression that it kinks pretty easily.

Yeah, it's not really that hard if you go kind of slowly. I was a little worried about this too, since there are a bunch of posts about people kinking their tubing (sure there's a dirty joke in there somewhere). But if you just be sure to bend it around a paint can or whatever you'll be fine.

If you're worried, for a few bucks at any hardware store you can buy a tube bender, which is basically a long spring that fits over the tubing and distributes pressure to avoid kinking. Might help, too.
 
Made one today out of 50 ft of 1/2" refrigeration tubing. Hardest part was unrolling 25ft of coil to find the center. Need to get some hose fittings and its done. Thanks for the idea and now I have the coolest IC on the block.
 
palefire, I see you're in SF. Not sure how cold your water temps get out there, but 65* water is what impedes your cooldown times. I had 23* cooler water than you, which is why I got those crazy times. Also, what helped in forcing the temp down was immersing the pot in a tub of cold water, and letting the spent water flow around the outside of the pot; dual contact of the cold water on the wort and pot sure makes the temp crash.
 
Finished building on a few days ago in preparation for my first AG brew. Tested it out last night.

5.5 gal water at 204F (boiling at this altitude)
50' 1/2in copper, bottom 2/3 summered
Tap water at 53F

100F in 7.5 min
80F in 11 min
70 in 14 min
65F in 16 min

Worked great! I made my coils about 10" in diameter to fit my 15 gal pot.

http://s841.photobucket.com/albums/zz332/daveotero/?action=view&current=IMAG0790.jpg

Only thing I noticed is that with both lines starting at the top it's a little difficult to drain. Are you guys just leaving them full of water? I blew mine out but it took some lung power.

Thanks for the awesome design!
 
Made this design this weekend and drop from a full boil to 70 degrees in under 14 minutes with a the pot in a cold bath. Only used 25' of 1/2".

Great Design and only spent about 40$
 
Here's my version. 50' 3/8 cut into 35' and 15' pieces. 35' section was used to go into 8.75gal pot. The 15' section will be used inline in an ice bath to improve efficiency. Coils were made by wrapping the copper around a paint can (6.5" diameter).

I pressure tested the setup today and had no leaks or blow offs. Can't wait to test times on my next batch.

img9652large.jpg

img9653large.jpg

img9654large.jpg

img9655large.jpg
 
Great idea! I was inspired by it so I made one last night, too! I soldered my joints mainly because I wanted to learn how to solder. =P But I figured since I'd be soldering, I may as well throw on a ball valve and hose connecter. I have since soldered the two riser pipes together but I did not take a picture of it. Does anyone know how to make the pipe around the soldered joints look presentable again? They're all kinda burnt looking now...

I used a Corny Keg to wrap around to make my first chiller and the one pictured below I used a piece of 7 inch PVC that I got from work.

Chiller.jpg


Chiller2.jpg
 
The original chiller that I posted in here was 20' of 3/8" tubing and with 42* input water would chill 5 gallons to pitching temp in 9 minutes. Realistically speaking, there was 18' in contact with the wort. Thats pretty damn fast. Could it go faster? Sure it could with a better optomized design.

But again, the point that the ones that want to pick apart the design always miss is this: A dual coil design will chill faster than a single coil design. The reason why is more wort coverage/more even distribution of coils throughout the wort.

I guarantee that you can make a single coil chiller out of the same material, same length, as a dual coil design and the dual will be faster.

:)
Mechanical engineer jumping in here. If the flow around the chillers is turbulent, then both chillers will be functionally identical. Shaking a chiller or stirring wort isn't exactly a difficult thing to do.
 
Mechanical engineer jumping in here. If the flow around the chillers is turbulent, then both chillers will be functionally identical. Shaking a chiller or stirring wort isn't exactly a difficult thing to do.

I am also a mechanical engineer.

I would disagree somewhat. Yes, theoretically speaking, heat transfer over the same surface area would make both chillers chill identically given the warm parts of the batch of wort could flow over the surface of the tubing equally. In a perfect world, you are completely correct. We engineers like to think in terms of a perfect world because it makes things easier. That is where the problem lies. The thermal conductivity of water is 0.6 W/K*m versus copper thermal conductance of 401 W/K*m. A cold pocket of wort is formed around the IC coils and the wort is much worse at heat transfer than the copper. With a traditional IC, the only way to gain the benefits of the copper's superior heat transfer ability is to stir the wort vigorously. "Swirling" a traditional IC in a pot still leaves a big pocket of wort in the middle that has a difficult time contacting the copper coil.

Now, you mentioned that "shaking a chiller or stirring wort isn't exactly a difficult thing to do." If that were everyone's mentality, then there would be no autosiphons, spigots, transfer pumps, or any other brewing innovation... as an Engineer, I would think you would be the first to welcome an idea that could improve a process.

Anyway, the dual coil design essentially covers that central portion (and then some) of wort that has a hard time getting in contact with the traditional IC. On top of that, if you "swirl" the rib cage IC, the wort will be much more turbulent than swirling with a traditional IC, thus creating even more copper surface contact.

As for the argument that the chiller water will get too warm by the end of the coil, well, first off, no matter what the IC shape, the same problem could potentially occur. It is not a problem that would be isolated solely to a ribcage design. If any IC was efficient enough to reach equilibrium with the wort by the end of the coil, then please, show me how to make it because that would make an amazing chiller. =) As long as there is a temperature differential between the output water in the chiller and the wort, then heat exchange is still happening. And I know with my IC, the water coming out is definitely colder than the wort it just went through.

That's my two cents. Besides, the rib cage IC just looks cool. :rockin:
 
I am also a mechanical engineer.

I would disagree somewhat. Yes, theoretically speaking, heat transfer over the same surface area would make both chillers chill identically given the warm parts of the batch of wort could flow over the surface of the tubing equally. In a perfect world, you are completely correct. We engineers like to think in terms of a perfect world because it makes things easier. That is where the problem lies. The thermal conductivity of water is 0.6 W/K*m versus copper thermal conductance of 401 W/K*m. A cold pocket of wort is formed around the IC coils and the wort is much worse at heat transfer than the copper. With a traditional IC, the only way to gain the benefits of the copper's superior heat transfer ability is to stir the wort vigorously. "Swirling" a traditional IC in a pot still leaves a big pocket of wort in the middle that has a difficult time contacting the copper coil.

Now, you mentioned that "shaking a chiller or stirring wort isn't exactly a difficult thing to do." If that were everyone's mentality, then there would be no autosiphons, spigots, transfer pumps, or any other brewing innovation... as an Engineer, I would think you would be the first to welcome an idea that could improve a process.

Anyway, the dual coil design essentially covers that central portion (and then some) of wort that has a hard time getting in contact with the traditional IC. On top of that, if you "swirl" the rib cage IC, the wort will be much more turbulent than swirling with a traditional IC, thus creating even more copper surface contact.

That's my two cents. Besides, the rib cage IC just looks cool. :rockin:
You appear to have misunderstood the mechanism by which forced convection cools more quickly. It has nothing to do with the difference in thermal conductivity between copper and wort and everything to do with the temperature difference between the chiller and the wort. Forcing convection means that a temperature gradient never forms, and heat transfer is based upon a step function between the free stream velocities of the coolant and the wort.
The pocket of wort in the middle has almost no angular velocity and is thus a poor approximation of forced convection. The flow across the chiller will be most turbulent farthest from the center of the kettle, where a normal IC has the most coils.

I understand the forced convection argument. That is why I included it in my argument. I just disagree with the fact that a temperature differential in the wort "never forms" under conditions that most brewers chill. Again, I agree that if your forced convection current was sufficient enough to create a uniform temperature in the wort, then your theory would be sound.

In my mind, though, two things go against this scenario. First, many think that vigorous stirring at high wort temperatures allows for detrimental oxygenation (as opposed to beneficial aeration after cooldown) of the wort. Second, I would argue that if one did decide to stir hot wort, most people would do it with not near enough strength to create enough current to keep uniform temperature in the wort, thus, a temperature gradient DOES exist.

I think this is all a bit of a moot argument since we are arguing a dynamic situation with our best speculations. So let me ask you this, given zero stirring, which wort chiller would you say would cool the wort faster?

Note: I absolutely love debating things like this but have been told by numerous friends and associates that I come off as argumentative. Please know that I am very much enjoying our back and forth, maskednegator. :mug:
Given zero stirring, I'd say that the chiller with the furthest spread on the coils would chill most quickly. That's kind of like asking whether I'd prefer to be kicked in the shin or in the balls, though.
I'm not at all offended by this conversation. :mug:
 
Holy crap. I got to test my new IC yesterday while making a 5 gallon batch of ginger beer. It went from 212 to 100 in 4 minutes, It went from 212 to 80 in 8 minutes, 30 seconds total - NO STIRRING!

I'm sure this not only has to do with the rib cage design but also the fact that it is 50' 1/2" OD pipe (as opposed to my old 20' of 3/8" OD pipe) but hey, I am super happy with an under 10 minute chill time!

IC.jpg
 
Hey any of you folks out there whirlpooling with one of these? Does it affect the formation of the trub cone?

I am going to be building my chiller soon and like the looks of this design but want to recirc/whirlpool. What is the word rib cagers? Anyone whirlpooling do you still get a cone?
 
Hey any of you folks out there whirlpooling with one of these? Does it affect the formation of the trub cone?

I am going to be building my chiller soon and like the looks of this design but want to recirc/whirlpool. What is the word rib cagers? Anyone whirlpooling do you still get a cone?

I highly doubt you'd get a cone... the ribcage chiller chills more volumetric area so you don't need to do a concurrent whirlpool nor would it really help much.

The whirlpool on a traditional IC was designed specifically to combat the limitations of a traditional IC, not a ribcage.

If you build a rib cage, build a rib cage, chill, pull it out, then do your whirlpool...

If you build a whirlpool IC, then build a whirlpool IC.
 
Quan, thanks so much for your history and practical advice. What you says makes much sense. And after reading my question again I begin to wonder how late I should be staying up or how much sleep I should be allowed to loose before I ask any more questions. LOL!!!

I appreciate ya, thanks again. A whirlpooler I will be!
 
I bought the copper pipe today, and it was a lot easier to work with than I expected! It isn't the prettiest, and I have to cut out the kinks at the top and solder on some 45˚ couplers. There is also a small kink between the coils, but I'm going to pretend that it is there on purpose to create turbulence in the water :D
 
Wow, look what I started. Quan, I'm very impressed with your results and happy my design worked out for you. 8 minutes 30 seconds is awesome! Doesn't even give you enough time to get the equipment pot away before its time to pitch the yeast. ;)
 
I built a rib cage immersion chiller a while back after discovering a 75' coil of 3/8" refrigeration copper in a box under my stairs in the basement. My HVAC guy must have left the leftover copper when he installed my central air when I build the house 5 years ago. :ban: 
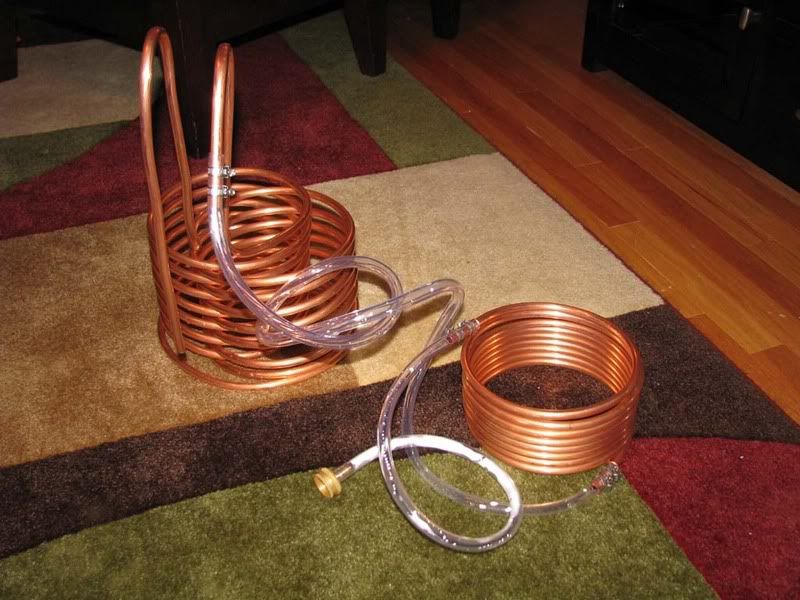
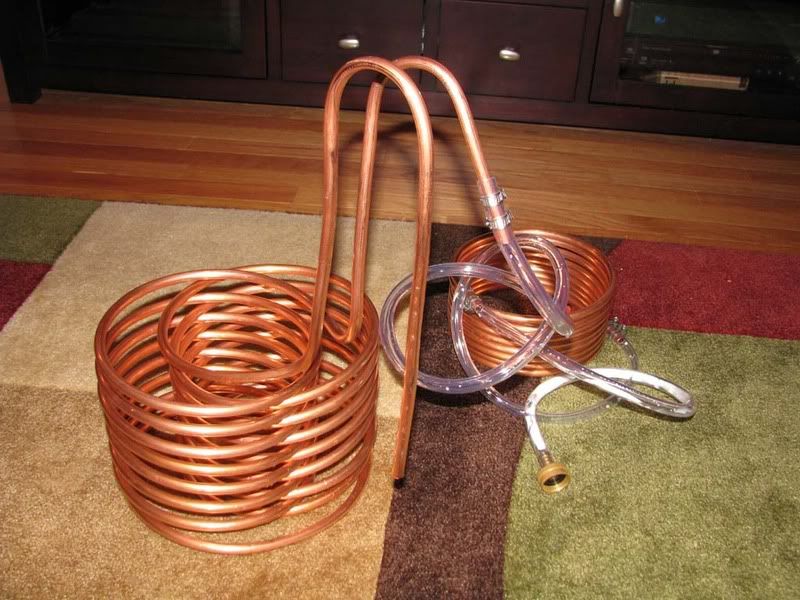
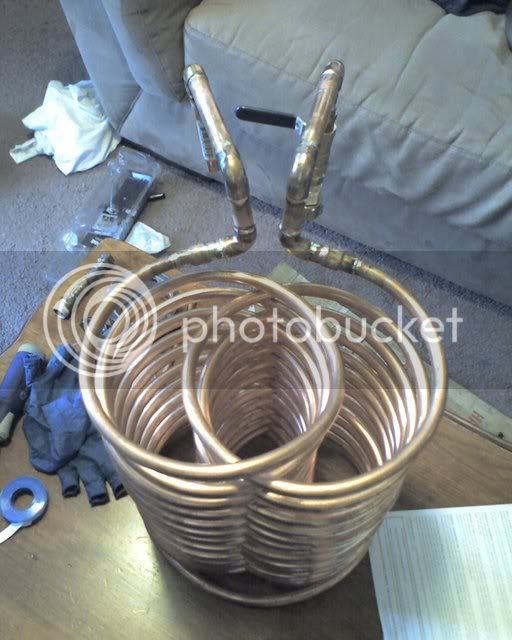
I already bought a 25' copper immersion chiller from a guy off of CL, so now I used them both. The 25'er is used as a prechiller, which I place in a 5 gallon bucket full of ice (snow) water and salt to drop the H2O temp. and the rib cage chiller goes into my 5 gallon pot to chill the wort. I used all 75', so that when I finally get my SS kegs converted and move to all grain, 10 gallon batches, I have something that will handle that capacity. I have used this system twice and was able to cool both batches from boiling to 80 degrees in under 10 minutes. It works great! Just thought I would share my experience with my chillers. :mug:
 
I have a regular 3/8" OD, 50' IC, but I am contemplating this rib cage design. I would love just to keep the lid on and not stir, and then whirlpool at the end after the IC removal. I picked up 50' of 3/8" OD tubing, but I think I make a modification and tell me what you think. Since both of the coils exit at the top of the dual columns, what about if I made a split at the bottom where the two coils meet and connect them with a "T" and then run the "T" vertically to exit the keggle as the "water out.". Now, I could run 2 cold water lines in and have them exit where they join at the "T" at the bottom and then out of the keggle. I could also join/solder the two vertical incoming lines together since they will both be running cold water in to make it sturdier. Essentially, this would be like two mini IC's intertwined. I think the advantage of two cold water lines plumbing each section of the rib cage might be a worthwhile endeavor. The only disadvantage would be for those that have to deal with the inconvenience of connecting two water lines from two different sources. I brew outside and have two spigots within easy access. What do you think before I get started? Should I go with 1/2" OD diameter instead?
 
One does not get a second chance to make it pretty.

2494-75-feet-copper-nasty-kink.jpg


My chiller has a pump to move the cooling ice snow water around.

2493-immersion-chiller-pump.jpg


It seems to work ok, but I think it is the Ugliest rib cage immersion chiller in Western Canada.
 
So I built one of these over the weekend with 50' of 3/8 refrigeration tubing. Wrapped around a paint can in tight coils then mashed em together while meshing the coils. Just tested it tonight with a test boil of 6 gallons plain water. Just for giggles I left the kettle on the electric burner that was used to boil and left the pot unmolested. No stirring, just taking temps. As soon as the heat was turned off, the water was turned on. In 2 minutes boiling water was down to 152 degrees. After 4 minutes it was 129. In 9 minutes the water was cooled to 72 degrees. Granted, the water coming out of the tap is 51 degrees, but I am thoroughly impressed. This summer I suppose there will be cause for a pre-chiller, but for now this thing rules. :ban: Cant wait to try it out on beer!

Oh, and FWIW The whole shebang was only $51 US. Vinyl tube, hose fitting, clamps and tube, and about 20 minutes to build.
 
You have cheaper copper than I do here. My chiller was $72 (50' of 3/8" tube, 7 hose clamps, hose barb, vinyl tubing).

I'm going to brew a batch this weekend and give this puppy its maiden voyage!
 
Back
Top