DIY Conical Fermenter

Homebrew Talk - Beer, Wine, Mead, & Cider Brewing Discussion Forum

Help Support Homebrew Talk - Beer, Wine, Mead, & Cider Brewing Discussion Forum:

This site may earn a commission from merchant affiliate links, including eBay, Amazon, and others.
Interior, just inside where the leg mount is welded:

interior.jpg


The lid:

fermenter_lid.jpg


The underside of the lid:

lid_seal.jpg


Closeup (there's a caulk bead to keep nasties from getting under the seal):

lid_weld.jpg
 
That's beautiful system Yuri. Nicely done. Is it still working well for you? When I scale up in the next year I may have to do a similar thing. Do you have any concern about bacteria hiding in the seal that you used for the lid? Do you just sanitize that with an iodine solution or do you use something else? Thanks for the info and again, nicely done.
 
i've got one sitting in my friends basement at the moment. it works wonderfully. we currently have it filled with a rye mash for "experiments"

i just sanitize with iodine by turning the lid upside down and letting it drain into the conical, then rubbing the rest of the conical with iodine. seems to have worked so far.

once it gets cooler, i can start brewing some 15 gallon batches in there. it's just too warm right now and it won't fit in my fermentation cabinet.

can't wait...just another month or two.
 
:) Makes me smile. Great job Yuri! Took a little bit to determine what those pink squiggly things were in post 162. Carpet FTW!! :D
 
yuri; i've been watching your frementer project from the start, great I must add. Question; on that 21 gallon conical fermenter what is the liquid level distance down from the top of flange or rim when the conical is filled with 21 gallons? I'm looking at all options for a conical fermenter for my needs be it a manufactured unit (yuck way to exspensive) besides not in the volume capacity range i'm looking for vs building my own.
Thanks. Carl..........
 
:) Makes me smile. Great job Yuri! Took a little bit to determine what those pink squiggly things were in post 162. Carpet FTW!! :D

No those are bug larva just before they hatch due to poor sanitation practices before putting away your equipment the last time used.
Rug fiber filtration system your onto something.
 
my first thought was "mmmm.... pork sausage..."

This would require many mini toothpicks while serving if using proper eating manners.
Remember the one about a big overweight person in the buff who took a photo of a antique steam kettle then posted it on ebay. The photo showed clearly a reflection of him. What a moron.
Sorry got off the OP thread here a little but it was fun.
 
So what is the general location for placement of the racking port? And where should the dip tube be located at when racking?
 
Sanitary is not a marketng ploy-there are welders that are qualified to do such- similar to the same experts that weld submarine hulls-these are the creme of the crop in the sea of welders- imagine welding a 8-10" thick hull sub perfectly- skill- mad skills!!!
Looks very good Yuri-
 
I have to agree with the reply a couple pages back about using a large diameter plate same diameter as the lid say 1/4" or even 5/16" to distribute even flat pressure on the lid hence a seal even under any elevated pressures above the fermentation process. I must add that center cover bolt I would use a rod coupling for long thread life under load.
As for what Yuri stated about low pressures creating high forces due to the lids large surface area this is true and adds up rather quickly. My question is with a cover plate and any pressures applied above normal fermentation like Co2 transferring what would prevent the contact spots at the flat octagon frame against that tapered conical from being forced down denting into the conical? Small contact on eight locations with those high pressures and that conical is only .037" thick at that contact point. Don't take this wrong but I would of used 1" standard angle iron that has been rolled into a hoop for full contact support around the tapered conicals bottom and one for the top. JMO.
 
I have to agree with the reply a couple pages back about using a large diameter plate same diameter as the lid say 1/4" or even 5/16" to distribute even flat pressure on the lid hence a flat 100% seal even under any forced Co2 elevated pressures during fermentation or the transfer process. I must add also that center cover bolt I would use a rod coupling for long thread life under constant use and loads it will have if used a lot. I don't know what size or thread on the clamp bolt but I would go to 1/2" all thread.
As for what Yuri stated about low pressures creating high forces due to the lids large surface area this is quite true and adds up rather quickly. My question is with the cover plate screw pressure, Co2 pressure if above normal fermentation pressures plus the weight of the full fermenter all resting on eight small contact spots on that sharp box octagon frame edge against that tapered conical. What prevents that tapered conical from being forced down under all that pressure denting into the conical under those eight small contact spots vs a full conical contact area? Those eight contact locations transfer all this weight and pressure against the full conical that is only .037" thick at those contact spots. That conical at the taper is rather thin, .037" less than one mm for those metric members and made of soft 304 stainless easy to draw and spin. Don't take this wrong Yuri but I would of used 1 1/4" square tube that has been rolled into a hoop for a full contact support around the tapered conicals section. On the top cross bar I would of used rectangle stock mounted vertical for added strength vs square stock to prevent any possible bowing if elevated Co2 fermenting or Co2 transferring pressures were applied plus a low pressure safety relief pop off valve to protect the system. JMO's
 
A plate would be awesome, but stainless plate of that thickness nearly doubles the price of the project.

As for thread life, I scavenged parts from a heavy duty clamp. Those threads were designed for repeated stress.

Buy me a tubing roller or slip roll capable of handling thick stock, and I'll gladly use a hoop. Until then, a hexagon is the best I can do. There isn't THAT much stress on the conical portion - the clamping force is fairly minimal (it's designed for low pressure transfers, not force carb pressures).

During fermentation, there should be ZERO pressure buildup, so a relief valve is pointless there. During transfers, one end of the system should always be open, acting as a pressure relief. Rectangular stock makes some sense, but, again, the system is designed for minimal pressure.

In any event, I don't think I'll be selling any more fermenters anytime soon. It is a cost/time prohibitive venture. I had a great time with the project, and I learned a ton. Hopefully others can learn from my successes and failures.
 
I was thinking of using aluminum it's cheap as a disk to transfer the pressure to the outer lids sealing area.
I always liked that three powered roller hoop machine that American Chopper has besides the manual flat stock hoop or radius bender. I believe that manual bender is $700 base price before you add any dies, that would triple the value of the bender.
Like a Bridgeport the accessories cost more than the machines base price if you loaded one up.
I have a spot in the shop for any of their bend or hoop machines, all donations accepted 24/7.
That would be a quick and simple way to make square stock hoops, weld, dress and move on a fast operation.
 
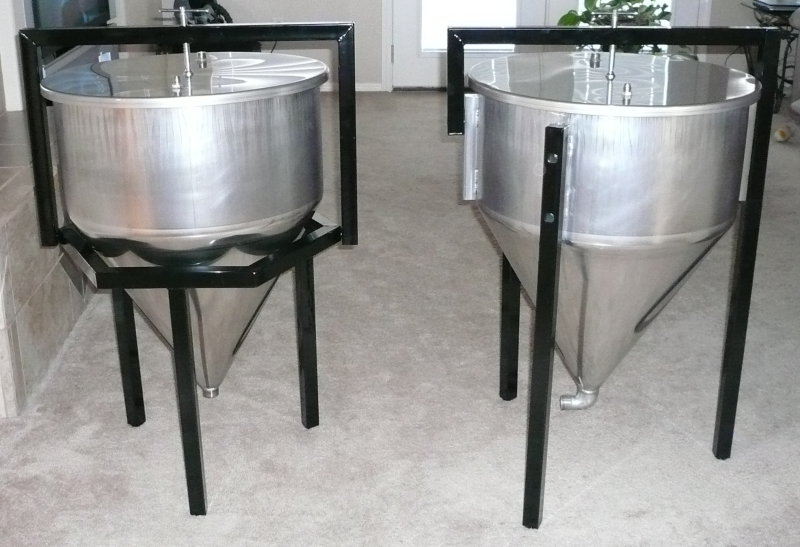
I bought one of Yuri's conicals and months ago, but by the time i was set up to use it, summer had hit and the basement just wasn't cool enough. so we did a 100% rye mash, which has been turned into some wonderful whiskey.

We had some left after the run-off, and i was waiting until the weather cooled down to brew some beer in there. So we went to open it up the other day, expecting some foulness to clean up inside. Pop the lid, and there was still co2 in there! it smelled great, a little sour, but great. We took a sample, and it tasted like a lambic!

So my friend brought over some black berries and a lambic yeast blend (brett and lacto, i think). We'll blend with another wort later and make a gueuze/kriek type thing. After it's bottled, i'm going to destroy all the equipment we use as i'm not a big fan of brett :D but i'm really curious as to how this turns out.

anyway, we dismantled and cleaned the conical out and, now that the weather is cool again, we brewed up my first 15 gallon batch of beer yesterday. i made my SMaSH Ale:

30 lbs of Vienna Malt (150°F mash)
2.5 oz 7% Northern Brewer @ 60 min
2.0 oz 7% Northern Brewer @ 20 min
2.0 oz 7% Northern Brewer @ Flameout
3 packs nottingham yeast

i ended up getting 90% efficiency! there was very little heat loss in the mash (we completely filled a 15.5 gallon keg) and the rest of the session went incredibly smooth. it only took us 6 hours compared to our regular 5 for 5 gallons. big batches are the way to go! We're going to do a batch every 2-3 weeks with this and keep kegs constantly full of tried and true recipes.

Yuri, thanks again! wonderful setup!
 
Update! My buddy that bought the other conical never used it and needed money for his motorcycle, so he sold it back to me. I now have awesome capacity, I can brew up to 60 gallons in stainless! :rockin:

So both these puppies will now be in the basement:

new_conicals.jpg


I'm a little concerned about this, as it will be difficult to clean:

4688-dumpweld.jpg


And we were planning on going with sanitary fittings anyway, so we're going to cut this guy off, weld on a sanitary fitting and attach it to an elbow with a butterfly valve.

Then we will finally have a true 20 gallon "pilot" setup that could actually be used in a brewery!

Yuri, I'll give you some pictures when we do this so you can check it out.

As for brewing...we've been doing 18 gallon batches, due to my biggest pot only being 20 gallons and concern for headspace, but after looking in the fermenters after they are done, I think we could easily go to 20 gallons. The krauesen never gets high enough to be a problem. We get about a 16 gallon yield right now, so those extra two gallons would be very beneficial for filling a 4th keg to 3 gallons or so.

Oh, and we now use about 10 clamps all the way along the side of the rim. It works much better than sealing the top (even when we placed wood on top under the clamp.)

We clean in place. The conical never moves. We use pressure to transfer and after we run cleaner through and lightly scrub the conical itself, all the fittings are removed and cleaned.

It's actually quite a wonderful setup and I'm really excited to have two of them.

Thanks again, Yuri! This is definitely my favorite equipment!
:mug:
 
Hey there. Great info here. What about that Toledo's 31 gal hopper and asking them attach a dome to it for a 1bbl fermenter? If that could work, it appears to be a modestly affordable SS conical fermenter. Thoughts?
 
Anyone thought of boiling directly in the conical with heatsticks?

The welds wouldn’t be a concern because they will be sanitized by the boil. This would also eliminate the need for a boil kettle / make it easier to justify the purchase of a conical.

If you incorporated a stainless IC in the lid it could first be used to chill the wort and afterwards to cool/heat the fermenting beer. You would have to use a bag for the hops and dump the trub after boiling.

What’s you thoughts on this dream/idea ?
 
thats a great idea,i was thinking about the same. theroretecly its possible. i see only one problem with that, you gona have alot off crap stack to the sides above the wort after to are done boiling! if you put hopps in a some kind of container with a filter and pushed boilig wort thru it with a pump. a multy stage filtering might be nessesary! but than you have a temperature drop, so one more heating element is nessesary to keep on boiling in container where the hopps are.
 
I'm going to start my HERMS build with the brew kettle. This way I can still do Extract & PM while I gather material. I was planning to use a half keg. I intend to put the drain valve in the bottom of the keg just like suggested above. Would a false bottom keep all the hops from draining or would I still need a SS mesh of some sort?

Are there any other concerns I should think about? If this doesn't work I can always convert it to a fermentor fairly easily.
 
I know I'm reviving an ancient thread, but I love the design, I hadn't come across toledo metal before, and I bet you could come up with a functional version of these for 10 gal batches for 300/each, if you had the metalworking capabilities (which I do).

I think this could even be made easier by throwing the stand together out of wood (looking at the hexagonal design), especially if, as I'm going to, you make the legs high enough that you can gravity into a corny and not have to worry about pressure.

I guess my point is, thank you to Yuri for saving me from blowing money on the blingmanns. Besides, putting it together myself should be a lot more fun.
 
Yuri, quick question on the 21 gallon Toledo hoppers...pre- molestation/modification, were the bottoms solid?

What I'm getting at is can I drill a hole of my own in these, or are they pre-drilled?
 
The bottom weld (interior):

cleaned_weld.jpg

I am always intrigued by your DIY threads. You have great ideas and back them up with excellent quality.
If I may, I'd like to suggest a welding tip.
I noticed at the stops of your welds you have a couple of "fish eyes"
Those are caused by coming off the foot pedal too quickly when ending a weld. Come off the foot pedal slower and let the puddle solidify completely before extinguishing your arc. Those fish eyes can be surprisingly deep depending on how quickly you pulled out of the weld.
Hope I didn't offend, and I'll always be on the look out for your next thread!
 
Well not to hijack the thread but I found this at work today. I work at a power plant and this was an Emergency Eyewash station. It is SS and in perfect swhape. We had to change styles because of the feds. Anyway It is 36" high and 12" across. Can anyone tell me roughly gallons??


Im thinking a fermentor or something. Any ideas anyone. Im very curious. I love DIYing stuff so this is right up my alley for my backyard brew station.

Thanks everyone. Be Creative Im open minded.


:mug:
You must work at Diablo, I work at San Onofre. I have also had my eye on those eyewashes. They would be great. I could fit 4 an my fridge.
 

Latest posts

Back
Top