Cooling wort at a low cost

Homebrew Talk - Beer, Wine, Mead, & Cider Brewing Discussion Forum

Help Support Homebrew Talk - Beer, Wine, Mead, & Cider Brewing Discussion Forum:

This site may earn a commission from merchant affiliate links, including eBay, Amazon, and others.

jIM_Ohio

Active Member
Joined
Jan 2, 2008
Messages
41
Reaction score
0
I am not quite ready to finish my basement and spend $$ to install a wort chilling system.

Right now I empty my ice tray in sink, make a cold water bath, put the pot in the bath, then let wort cool to about 80 degrees, then transfer to fermenter, add water and knock temperature down to 70-75 degrees before pitching yeast.

I have a wort chiller which I purchased, it does not attach to my sink faucet, so I only use it for a few minutes, I don't like standing over sink for 45 minutes letting wort chiller help, when 90 minutes without wort chiller is cooling wort effectively.

Give me suggestions or problems with this technique, please.
 
Ice bath is the cheapest although not the quickest. You should be able to buy an adapter to hook the IC up to the sink.

I do everything outside so I use a garden hose and a CFC, you can make a CFC for less than $50 search the DIY thread and you'll find instructions on building one
 
If you have a two basin sink you can make a water bath in the one side and use an aquarium pump like a mini jet 404 or 606, or a small classic mag drive pump to circulate the bath water through the chiller. I've moved to full boil all grain and use this method with pretty good results.

I cool 5gal in about 10-15 minutes. I use a rubbermaid tube for my bath. Freeze water in milk jugs and use a bag of ice that i add after getting it down to around 120.

We do similar things in our lab. we even have a drilled stopper that we put a tube in that acts as an over flow which would allow you to just add more ice or cold water to your bath with out flooding the floor.

The more flow the more efficient the cooling so i would suggest the classic mag drive but if $$$ is a factor the 606 is not bad. I have used all three since i can snag them form work, and all have done the job but i would only use the 404 in a pinch.
 
I have a 5 gal cooler that has a spigot and run a hose to the wort chiller. Fill it up with ice water and slowly run it throught the chiller. Once it empties I get more cold water and fill it up again. After ten gallons it get pretty cool maybe 85 degrees in 15 minutes. One more time and it's 70.
 
I have a 5 gal cooler that has a spigot and run a hose to the wort chiller. Fill it up with ice water and slowly run it throught the chiller. Once it empties I get more cold water and fill it up again. After ten gallons it get pretty cool maybe 85 degrees in 15 minutes. One more time and it's 70.

Can you post a picture of the cooler? This is a cooler like I would use for tailgaiting? So a hose from sink/faucet to wort chiller, then ice bath in the cooler, and have a way to regenerate/ refill the cooler with water...

This makes the most sense of anything I read in this thread, thank you.
 
Ice bath is the cheapest although not the quickest. You should be able to buy an adapter to hook the IC up to the sink.

I do everything outside so I use a garden hose and a CFC, you can make a CFC for less than $50 search the DIY thread and you'll find instructions on building one

I agree. If you can make enough ice to chill your wort then thats ok... however if you are spending 3 or 4 bucks for bagged ice then the cost of a wort chiller is by far the cheapest way to cool your wort, long term.
 
I agree. If you can make enough ice to chill your wort then thats ok... however if you are spending 3 or 4 bucks for bagged ice then the cost of a wort chiller is by far the cheapest way to cool your wort, long term.

My sister drinks bottled water. A TON of bottled water. Day before brew day, I empty the recycling bin, fill up all the bottles with water, put them in the freezer. I'm still doing partial boils, but it cools 2-3 gallons in pretty short order.
 
I have a wort chiller which I purchased, it does not attach to my sink faucet, so I only use it for a few minutes, I don't like standing over sink for 45 minutes letting wort chiller help, when 90 minutes without wort chiller is cooling wort effectively.

Can you not unscrew the aerator cap on your faucet and then install a faucet/garden hose adapter? I haven't come across a kitchen faucet yet that didn't have some form of threaded aerator on it. I'm not saying there aren't, but I think the one's without are rare.

pressurelowkitlav1.jpg


Faucet garden hose adapter

faucet%20adapter%20sink.jpg


In fact I can leave my adapter on and replace my aerator on it, so when I want to hook up my chiller I just remove the aerator.

You are the second person to tell me this, I need to investigate this more, thx for tip.
 
Another option I used to do when I had a darkroom was to modify a dollar store faucet hair washing sprayer.

FAUCET-TO-SHOWER-CONVERTER.jpg


It slips right over most faucets.

I used to cut the sprayer part off and just leave the hose. And a lot of my darkroom gear, such as film roll washers I had plastic nipples hooked up to, and I would just hook them into the other end of the hose.

You could easily just clamp that on to the end of your chiller like the normal hose end is.

If the part that fits to the faucet isn't all that tight, you could always just add a sip tie to hold it in place better.
 
jIM_Ohio said:
This would take longer than the 90 minutes it takes me now, what would the benefits be?

It takes longer than 90 minutes to dump hot wort into a bucket? :D
 
I bought the $34 1/4" chiller from NYbrew. Got the faucet adapter for $3.50 at Ace. I set the kettle in a sink of water with a tray or two of ice cube, run cold tap water through the chiller and get down to 80 F in about 10 minutes.
 
Revvy said:
We get this a lot, a lot of new brewers don't realize that their aerators come off. You can buy the adaptor at any homebrewshop or hardware store.

This! I found a quick disconnect part for my sink and IC inlet hose at home depot
 
is the QD different than what I showed? Got a pic?
Sorry it it's a bit small but there ya go. Blue hose is a washing machine supply line that I cut and snake-clamped to one side of the QD
38549d1321495379-challenge-can-done-40-days-forumrunner_20111116_180255.jpg


Well, you then have to wait six hours before you can pitch the yeast.
True, but you don't have to stand around for 90 minutes :D
 
Late to the party here but stirring increases how fast the wort cools. I actually use my IC to stir my wort, periodically pulling the IC out so the copper gets cold again, dunk and continue stirring. I get my wort down below 70 in under 10 minutes this way.
 
For other cheapo' brewers that are using the ice bath method. Find a Tupperware container roughly the dimensions of your sink walls and a couple inches deep. Fill 4 of them half way with water and freeze them the night before you brew. Gets 5 1/2 gallons down to 100* in about 30 minutes. The last 20* seams to take forever regardless.
 
For other cheapo' brewers that are using the ice bath method. Find a Tupperware container roughly the dimensions of your sink walls and a couple inches deep. Fill 4 of them half way with water and freeze them the night before you brew. Gets 5 1/2 gallons down to 100* in about 30 minutes. The last 20* seams to take forever regardless.

This gave me a few ideas, however I need to rethink freezer space. We have little freezers (two of them) and creating a sheet of ice for the bottom to rest on/melt has some merit.

why only half way up?
 
Another option I used to do when I had a darkroom was to modify a dollar store faucet hair washing sprayer.

FAUCET-TO-SHOWER-CONVERTER.jpg


It slips right over most faucets.

I used to cut the sprayer part off and just leave the hose. And a lot of my darkroom gear, such as film roll washers I had plastic nipples hooked up to, and I would just hook them into the other end of the hose.

You could easily just clamp that on to the end of your chiller like the normal hose end is.

If the part that fits to the faucet isn't all that tight, you could always just add a sip tie to hold it in place better.


Revvy, your hair looks so soft...We now know your dollar store secret!
 
My brother told me of a method he and a buddy came up with last week (may not be new, but I hadn't heard of it before):

1) Plug one side of a two-basin sink
2) Set your pot in that basin
3) Remove sprayer handle, or depress with a rubber band
4) Run cold water into the stopped basin by leaving the sprayer in the bottom
5) The basin overflows into the other basin, circulating water
6) Stir the wort until desired temp is reached

He said it got 5.5 gallons from boiling to pitching temp in baout 15 minutes. I guess it would depend on ground water temps, but if you're using an IC, I'll assume that's already been considered. One downfall is that you're using in-home plumbing rather than pressurized irrigation (at least, it's a downfall here. Irrigation is flat-rate where I am. YMMV).

My workaround for that was to get a big Rubbermaid tub, put and old towel in the bottom, and then run pressurized irrigation water through the hose, into the tub, and let it run over the sides. Keep it off the grass, as that discharge is really hot and will kill it.
 
I know there will be a lot of hate for this methode but I have been useing it ever since I started brewing and have never had a problem. At the end of the boil I simply dump about 2 gallons of ice in the pot. Inside of 3 minutes the wort is cooled to pitching temp and the volume is up close to what you need for 5 gallons.
Benefits:
No moving parts
No cleaning
Cheap
Temp is down very fast further eliminating any further diacytal that forms but is not boiled off

Cons;
Brewing snobs make fun of you

50+ batches and never a bad one
 
SIXFOOTER said:
I know there will be a lot of hate for this methode but I have been useing it ever since I started brewing and have never had a problem. At the end of the boil I simply dump about 2 gallons of ice in the pot. Inside of 3 minutes the wort is cooled to pitching temp and the volume is up close to what you need for 5 gallons.

I used this method for 15 or so batches. I prefer my stainless chiller, but the ice method worked beautifully. I stole the idea from Alton Brown. I should mention that it only works for partial boil.

I scouted the area for the best ice cooler that had the highest turnover.

Sixfooter, you're right...many brewers HATE this method. However, I've not heard of a story where this method resulted in an infection or other problem.
 
I know there will be a lot of hate for this methode but I have been useing it ever since I started brewing and have never had a problem. At the end of the boil I simply dump about 2 gallons of ice in the pot. Inside of 3 minutes the wort is cooled to pitching temp and the volume is up close to what you need for 5 gallons.

I also used to do this and have had great success with this method, especially with my Partial Mash and Extract brews.

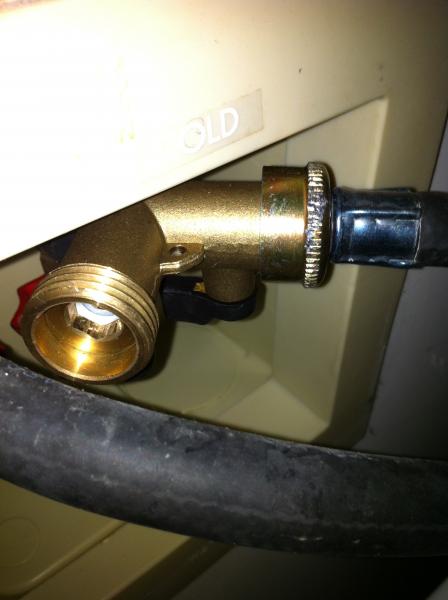
I recently purchased a brass Y valve and split my cold water laundry supply line. Was a little tricky getting everything to fit without leaks but once installed it works well, knock on wood. If you go the Y valve route, I would definitely recommend the Camco 20123 RV Water Connector Brass Y Valve.

IMG_0664.jpg


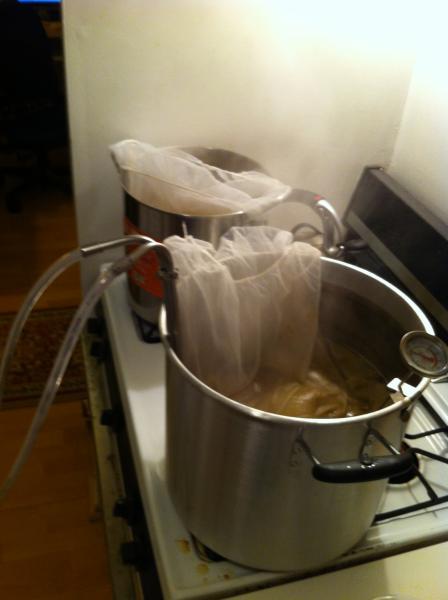
IMG_0670.jpg
 
Back
Top