baumgrenze
New Member
- Joined
- Oct 30, 2018
- Messages
- 2
- Reaction score
- 2
In the 1980's I took Prof Michael Lewis' two weekends home brewing class at Davis.
Michael taught us many tricks. I don't have the bandwidth to try and trick Google into finding if home brewers are still using them.
I want to know if the approach to brewing I describe below is well documented and known to 2018 home brewers. If it is, I'd appreciate a reply containing a link to the description.
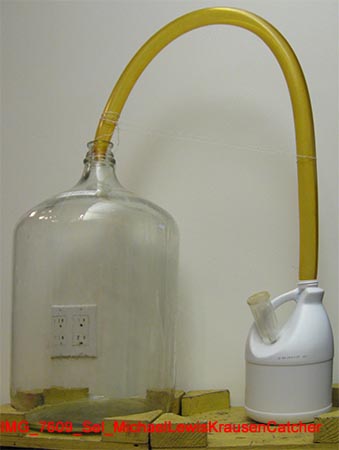
I brewed in 6.5 gallon carboys. One key step was growing an active yeast culture from an agar slant, starting with a sterile solution of malt in water in a test tube and when it was active transferring it in steps to increasingly larger Erlenmeyer flasks until about 2 liters of starter was actively growing distributed between two 1 liter Erlenmeyer flasks. On that day I prepared an ale wort, chilled it, and then pitched it with the active starter. This ensured a quick start to the fermentation, one that was otherwise aseptic assuming the brewer followed Michael's instructions to rinse and drain all the apparatus with 1 Tbs of old 5% laundry bleach/gallon water. Within a day the brew was fermenting vigorously; it often foamed up and out of the neck of the carboy, in the process blowing out the classical stopper with air-lock.
The solution to this problem was a length of Tygon tubing of slightly larger diameter than the neck of the carboy. Each end was heated gently until it could be stretched and necked down at each end to a diameter that fit snugly into the carboy at one end and a plastic gallon milk jug containing half an inch of dilute bleach with an added hole carrying an air-lock protected with a bit of dilute bleach. This allowed a small amount of the brew to 'burp' gracefully into the milk jug and protected the wort from contamination.
I will add an observation of my own. Perhaps others now use it regularly. I bought a tube of test strips made to check for glucose in urine. After the brew appeared quiet and finished I would withdraw a few drops with a sterile rod and check for residual glucose. I liked this approach because it is less likely to cause contamination than the classical hydrometer method and it is also simpler.
thanks
baumgrenze
Michael taught us many tricks. I don't have the bandwidth to try and trick Google into finding if home brewers are still using them.
I want to know if the approach to brewing I describe below is well documented and known to 2018 home brewers. If it is, I'd appreciate a reply containing a link to the description.
I brewed in 6.5 gallon carboys. One key step was growing an active yeast culture from an agar slant, starting with a sterile solution of malt in water in a test tube and when it was active transferring it in steps to increasingly larger Erlenmeyer flasks until about 2 liters of starter was actively growing distributed between two 1 liter Erlenmeyer flasks. On that day I prepared an ale wort, chilled it, and then pitched it with the active starter. This ensured a quick start to the fermentation, one that was otherwise aseptic assuming the brewer followed Michael's instructions to rinse and drain all the apparatus with 1 Tbs of old 5% laundry bleach/gallon water. Within a day the brew was fermenting vigorously; it often foamed up and out of the neck of the carboy, in the process blowing out the classical stopper with air-lock.
The solution to this problem was a length of Tygon tubing of slightly larger diameter than the neck of the carboy. Each end was heated gently until it could be stretched and necked down at each end to a diameter that fit snugly into the carboy at one end and a plastic gallon milk jug containing half an inch of dilute bleach with an added hole carrying an air-lock protected with a bit of dilute bleach. This allowed a small amount of the brew to 'burp' gracefully into the milk jug and protected the wort from contamination.
I will add an observation of my own. Perhaps others now use it regularly. I bought a tube of test strips made to check for glucose in urine. After the brew appeared quiet and finished I would withdraw a few drops with a sterile rod and check for residual glucose. I liked this approach because it is less likely to cause contamination than the classical hydrometer method and it is also simpler.
thanks
baumgrenze