
fs2k2isfun
Member
Building the BrewShelf
I recently moved out of an apartment where I had been extract brewing with great difficulty to a house which features not only a garage, but a driveway which would be great for brewing. I decided with no further ado to make the plunge into all grain brewing and settled on a three tier setup.
My goals for this project were to quickly, cheaply, and safely build a functioning three tier system. I don't have much in the way of tools so pretty much everything aside from a screwdriver, hammer, drill, and adjustable wrench would have to be purchased. As my background is mechanical engineering I had the technical know how to design a stand, but the fabrication would have to be outsourced to someone better equipped than I.
After pricing out metal from The Home Depot and consider options such as wood encased in sheet metal, I discovered Costco sells the (Whalen Industrial Rack). I realized I would be spending over $100 in materials and several times that in labor if I were to design my own stand from scratch and have it built locally. Several subsequent trips to Costco and I was convinced that for $179.99 for a heavy duty shelf would be the best option for me to brew on.
I liked the rack since it was very rugged, very adjustable, and I could also use it as a shelf when I wasn't brewing. Problems with it were the lack of wheels and it's weight (nearly 200 lbs!). There is a hole pre-drilled in the base of each leg, but its diameter wasn't big enough for the casters I wanted and I couldn't find any casters with a large enough weight capacity as well as a thinner bolt.
I decided the stand would have to be on wheels so I could safely brew in the driveway instead of under the garage. I purchased some casters from Amazon (Steelex D2614, 220 lbs weight capacity, $7.30 each) and some serious washers and nuts from Home Depot to attach the casters to the bottom of the stand. This worked very well, aside from needing a new large drill bit to penetrate the very strong steel of the shelf.
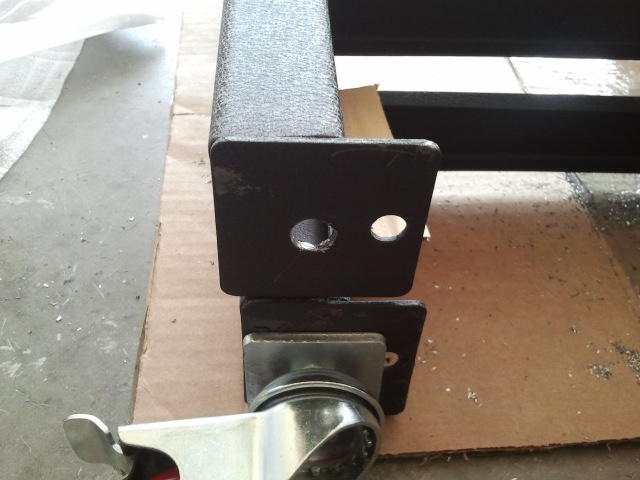

Caster attached along with the washer.
After assembling the shelf, I had to adjust the shelves so my bottom tier would be tall enough to pour from the brew kettle's spigot into my carboy. I bought a 10 gallon brewkettle from a friend in my local club along with a 5 gallon cooler for use as a mash tun.
Once I got the shelves adjusted to where I wanted them, I began attaching my banjo burners. I bought two of the BG-14 burners from Agrisupply.com ($29.99 each). Initially I suspended the burners from the shelf using metal wire loops I made using thin wire joined with these aluminum crimps recommended to me by the salesman at Home Depot.
During my first brew (Centennial Blonde), two of the four loops supporting each burner snapped under the heat and the metal shelving became warped from the heat. I decided for subsequent brews I would need a different burner mounting design.

Initial burner mounting showing the warped shelf and broken metal wire supporting burner.
I decided to cut some holes in the grate just big enough for the arm of the burner to fit through. Now, instead of the burner being below the shelf, it was above. I also bought a few bricks to sit the HLT and kettle on. This design worked much better. After modifying the rack, I was able to change the height of everything since the kettle and HLT each sat about 4 inches higher than before. The Whalen stand made this very quick and easy.
For propane supply I decided to build a manifold to split one line into two. I used the adjustable regulator/valve sold by Agrisupply ($22.49) and connected that to a brass manifold built from assorted parts and ball valves from Home Depot. I could now control the flow to each burner individually or have only one burning at any time. I had never worked with propane or plumbing like that before, but leak testing with soapy water was very easy and any leaks were quickly found and corrected. I also bought two, 6 foot long high pressure propane lines from Amazon (Bayou Classic 7906, $17.06 each) to connect the manifold I built to the burners.
I did have problems with one burner because the orifice included was too small and my flame would often extinguish. A quick call to Agrisupply and I had 4 new orifices in the mail a few days later.
So far, I have brewed three times on the BrewShelf, and have been very satisfied. I'm still on the original propane tank, though it is getting pretty light.
If anyone has questions, or needs more detailed advice in case you want to do something similar, please let me know. I don't have any updated pictures of the new burner mounting, but a brew day is coming up soon and I'll be sure to take some.
I haven't run up the whole total, but I estimate for the stand and propane equipment (excluding tank) I spent about $350 on the stand. I'm not counting brewing equipment such as the kettle, HLT, or mash tun in those numbers.
Finally, here is a picture from a recent brew day.
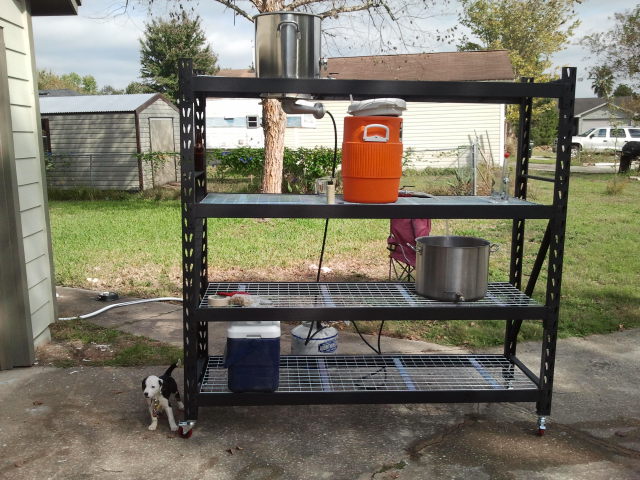
My helper, Pliny, is a fan of brew days as well
I recently moved out of an apartment where I had been extract brewing with great difficulty to a house which features not only a garage, but a driveway which would be great for brewing. I decided with no further ado to make the plunge into all grain brewing and settled on a three tier setup.
My goals for this project were to quickly, cheaply, and safely build a functioning three tier system. I don't have much in the way of tools so pretty much everything aside from a screwdriver, hammer, drill, and adjustable wrench would have to be purchased. As my background is mechanical engineering I had the technical know how to design a stand, but the fabrication would have to be outsourced to someone better equipped than I.
After pricing out metal from The Home Depot and consider options such as wood encased in sheet metal, I discovered Costco sells the (Whalen Industrial Rack). I realized I would be spending over $100 in materials and several times that in labor if I were to design my own stand from scratch and have it built locally. Several subsequent trips to Costco and I was convinced that for $179.99 for a heavy duty shelf would be the best option for me to brew on.
I liked the rack since it was very rugged, very adjustable, and I could also use it as a shelf when I wasn't brewing. Problems with it were the lack of wheels and it's weight (nearly 200 lbs!). There is a hole pre-drilled in the base of each leg, but its diameter wasn't big enough for the casters I wanted and I couldn't find any casters with a large enough weight capacity as well as a thinner bolt.
I decided the stand would have to be on wheels so I could safely brew in the driveway instead of under the garage. I purchased some casters from Amazon (Steelex D2614, 220 lbs weight capacity, $7.30 each) and some serious washers and nuts from Home Depot to attach the casters to the bottom of the stand. This worked very well, aside from needing a new large drill bit to penetrate the very strong steel of the shelf.
Caster attached along with the washer.
After assembling the shelf, I had to adjust the shelves so my bottom tier would be tall enough to pour from the brew kettle's spigot into my carboy. I bought a 10 gallon brewkettle from a friend in my local club along with a 5 gallon cooler for use as a mash tun.
Once I got the shelves adjusted to where I wanted them, I began attaching my banjo burners. I bought two of the BG-14 burners from Agrisupply.com ($29.99 each). Initially I suspended the burners from the shelf using metal wire loops I made using thin wire joined with these aluminum crimps recommended to me by the salesman at Home Depot.
During my first brew (Centennial Blonde), two of the four loops supporting each burner snapped under the heat and the metal shelving became warped from the heat. I decided for subsequent brews I would need a different burner mounting design.
Initial burner mounting showing the warped shelf and broken metal wire supporting burner.
I decided to cut some holes in the grate just big enough for the arm of the burner to fit through. Now, instead of the burner being below the shelf, it was above. I also bought a few bricks to sit the HLT and kettle on. This design worked much better. After modifying the rack, I was able to change the height of everything since the kettle and HLT each sat about 4 inches higher than before. The Whalen stand made this very quick and easy.
For propane supply I decided to build a manifold to split one line into two. I used the adjustable regulator/valve sold by Agrisupply ($22.49) and connected that to a brass manifold built from assorted parts and ball valves from Home Depot. I could now control the flow to each burner individually or have only one burning at any time. I had never worked with propane or plumbing like that before, but leak testing with soapy water was very easy and any leaks were quickly found and corrected. I also bought two, 6 foot long high pressure propane lines from Amazon (Bayou Classic 7906, $17.06 each) to connect the manifold I built to the burners.
I did have problems with one burner because the orifice included was too small and my flame would often extinguish. A quick call to Agrisupply and I had 4 new orifices in the mail a few days later.
So far, I have brewed three times on the BrewShelf, and have been very satisfied. I'm still on the original propane tank, though it is getting pretty light.
If anyone has questions, or needs more detailed advice in case you want to do something similar, please let me know. I don't have any updated pictures of the new burner mounting, but a brew day is coming up soon and I'll be sure to take some.
I haven't run up the whole total, but I estimate for the stand and propane equipment (excluding tank) I spent about $350 on the stand. I'm not counting brewing equipment such as the kettle, HLT, or mash tun in those numbers.
Finally, here is a picture from a recent brew day.
My helper, Pliny, is a fan of brew days as well