Braided Herms Coil Hole... Fixable?

Homebrew Talk - Beer, Wine, Mead, & Cider Brewing Discussion Forum

Help Support Homebrew Talk - Beer, Wine, Mead, & Cider Brewing Discussion Forum:

This site may earn a commission from merchant affiliate links, including eBay, Amazon, and others.

FreddyMar3

Well-Known Member
Joined
Dec 30, 2010
Messages
379
Reaction score
74
Location
Berwyn
Without going into too much detail... I stumbled upon a killer deal on a used morebeer 1550 (digital SMART version) on Craigslist. The only downside is the braided copper HERMS coil has a hole in it, something I knew prior to purchase and part of the reason I was able to get it for $2600.

Is there anything that can be done to fix this? If not, should I:
a) sell it for scrap a buy a replacement braided coil for $175
b) sell it for scrap and put the fittings on my old copper immersion chiller (non braided).

I guess my question is, how important is it for the HERMS coil to be braided (assuming it can't be fixed)?
po55.jpg
 
I don't know if that split is on a braided portion or not. It's hard to tell. If it's smooth, just cut out the bad section and solder in a coupling. If it's on a bumpy area, just wirebrush the hell out of it, flux, apply some solder to the surface and then to a small piece of copper as a patch and hold the patch over the hole (with pliers obviously).
 
coupling would be easiest as bobby mentioned or carefully work the split back together with pliers and braze the hole shut. Mapp gas in the yellow bottle should get you hot enough for the braze to melt an dflow.
 
If that's all that's wrong with it, you probably saw a good deal and got it.
Looks like a split from a freeze-up.

As sad before, bring the copper back together to close the hole mostly, and solder or braze a piece of copper patch over it, such as a coupler.
 
I thought there was no way this would be fixable. Thanks so much for the input, I'm definitely going to give it a shot. the hole is on the braid but just as it finishes tapering into the smooth portion of the coil so it is only very slightly raised.
 
Going to go ahead and give this a shot tonight. I'll take some pictures and do a mini writeup in case someone comes across this problem in the future.

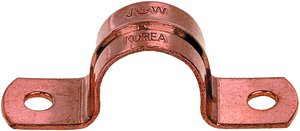
I decided to go the patch route since it seems like there is just enough braiding on that section that a coupler may not work. Went to the hardware store today and bought one of these for $0.20. It fits nearly flush around the hole but I'll see what I can do with the torch to make it fit perfectly.
0450438_hr4c.jpg


More to come tonight...
 
You sure that's solid copper? It may just do the trick.

I would've probably attempted the patch with a coupler instead. Cut it through lengthwise, or even remove a slice to create a tubular patch. I've made successful patches like that in a radiant heating system, where copper coils are embedded in walls and ceilings. That was a lot of joy, once it was all done.

Anyway, slide it over the leftover hole and solder it all together, making sure the hole is pointing downward to prevent excess solder being sucked in, deposited and thus plugging up the coil. Keep us posted.

Thinking about it, very thin copper "tape" could be wrapped around the irregular shape a few times, and conformed more precisely. Then sweating all together.
 
I'm going to label this a pending success. It doesn't leak but until I hook it up to the pump and take the system on a dry (well technically wet) run I'm not going to give it the final stamp of approval.

You'll gather from these pics that I am by no means an expert in metalworking. In fact, this is my first go at anything like this besides soldering speaker wires. Thankfully my dad has 60 years of engineering experience and all the tools I needed to pull this off, although this was out of his wheelhouse as well.

Thoroughly cleaned and being heated:
h5v1.jpg


Closed the hole as much as possible. Cleaned and fluxed:
b28s.jpg


Soldered the hole closed:
v78c.jpg


Clipped the wings off of that clamp:
zt5r.jpg


Filed the edges, cleaned and fluxed the patch:
wyd5.jpg


Skipping the two failed attempts and getting it to stay on... here is the final product. You can tell by the excessive solder that it was a bit of a challenge for us:
ti97.jpg


And that's that. $0.20 plus some flux and solder and the $170 coil is not leaking anymore.

Side note: I found out on a thread here about soaking copper in star san... holy crap, the results are incredible. Just compare these pics to the first post.
 
Congrats with the successful operation!

That frost damage could have been a lot worse. You've got a nice convoluted coil now.
 
Back
Top