BLING BLING Electric HERMS Conversion

Homebrew Talk - Beer, Wine, Mead, & Cider Brewing Discussion Forum

Help Support Homebrew Talk - Beer, Wine, Mead, & Cider Brewing Discussion Forum:

This site may earn a commission from merchant affiliate links, including eBay, Amazon, and others.
Duster, nice to see you buddy, been using those hops?

I wanted exactly what you want, to power the PID, but not the element so that I can monitor my kettle temp always. Here is how, there is no wiring diagram :(

I ran 240VAC into the box, this went to a distribution block where I connected the (2) hots and the (1) ground and (1) neutral.

From this block I ran (1) hot to the PID and (1) neutral. So, whenever the panel is plugged in, the PID is ON. I then placed a DPST switch on the HOTS that go to (1) the SSR and (1) the 240VAC 30A outlet where the element plugs in. Again, this allows me to have ULTIMATE control over my element (in case if impending boil over??) The PID, is always on, even if the element "master" is off. The PID will still send signals to the SSR, but there is no current there (DPST switch) unless I turn that switch on.

I am getting ready to use A LOT MORE of those hops :)

Okay, we are thinking the exact same thing, I thought that this is what you had done.

Just found this thanks to google - this look right to you?
diagram.jpg
 
Yes, except that there is a switch on the LINE into the SSR and that same switch also accomodates the other LINE to the element.
 
Right, I just wanted to make sure I was getting the PID wired correctly.

I am sure I will have more questions. Laying out now, hope to wire later.
 
Pol,
Thanks for making things easy for us. I have been reading all the threads on your new electric BK upgrade and the HERMS system.

I have all the parts for the HERMS ordered and things are coming in daily from McMaster, NorthernBrewer and MoreBeer. I've got the bulkheads made and I'm ready to roll -- really excited.

Like you, I had become frustrated with losing temperature in my curent cooler MLT - -losing up to 6 degrees in a single mash session. That's what prompted me to search out and find your very elegant system.

Do you mind sending me a copy of your HLT water management spreadsheet?

Once my wife gets over this newest spending spree, I'll be on to converting to electric BK, and getting my garage wired for 240V for the next upgrade! Thanks again.
 
Send me a PM with your email addy...

Tonight I just tested my closed cooling system on this thing. No garden hoses, all I do is use my HLT with the HERMS coil as my heat exchanger to COOL the wort. Here are the stats on the test.

Closed system cooling WORKS, here are some numbers:

5.5 gallons BOILING
4.0 gallons 65F water and 44 pounds of ICE

5 minutes in:
COOLING WATER TEMP 50F
KETTLE TEMP 148F

10 minutes in:
COOLING WATER TEMP 54F
KETTLE TEMP 99F

15 minutes in:
COOLING WATER TEMP 52F
KETTLE TEMP 81F

20 minutes in:
COOLING WATER TEMP 50F
KETTLE TEMP 66F

25 minutes in:
COOLING WATER TEMP 48F
KETTLE TEMP 57F

30 minutes in:
COOLING WATER TEMP 48F
KETTLE TEMP 57F


So the cooling water gets colder??

That's a lot of ice!
 
So the cooling water gets colder??

That's a lot of ice!

Yes, the cooling water gets colder.

The wort is cooling, so it is adding fewer calories of energy to the cooling water. The ice is not melted at that point, so as the wort cools, the ice actually begins to cool the cooling fliud faster than the wort is heating it.

It is an awesome amount of ice ;)
 
At what point (if any) did the ice completely melt? I made up a spreadsheet with the proper formulas and knew your technique would work. I wish I had read the thread when it started, I teach this type of chemistry every year.
 
At what point (if any) did the ice completely melt? I made up a spreadsheet with the proper formulas and knew your technique would work. I wish I had read the thread when it started, I teach this type of chemistry every year.

The ice completely melted at about 20 minutes. You can also see this in the fact that the HLT temp stabilized at 48F and the kettle temp stabilized at 57F.

The FASTER the ice melt, the FASTER I can cool the wort. I may try making smaller ice cubes, this will speed cooling.
 
The wort is cooling, so it is adding fewer calories of energy to the cooling water. The ice is not melted at that point, so as the wort cools, the ice actually begins to cool the cooling fliud faster than the wort is heating it.

Yeah,that makes sense with 44 lbs of ice...

FWIW, my no-chill took about 4 minutes of my time to watch it drain into the cube on Saturday ;)

Seriously, what you are doing looks better than a plate chiller - no chance of clogging.
 
Closed System Wort Cooling:

Here are some photos:
BrewBeastcooling.JPG


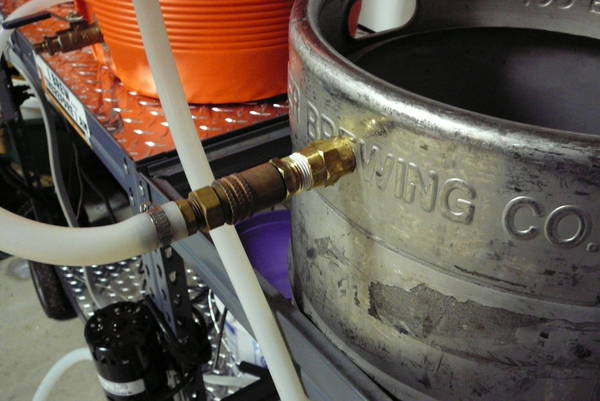
Keggle Fittings:
Kegglerecirc1.JPG


Kegglerecirc3.JPG


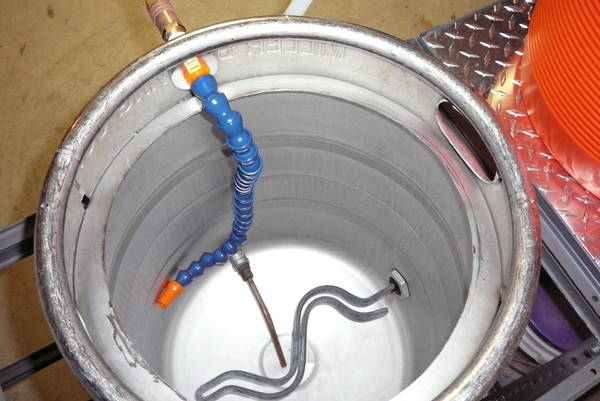
Keggle Recirc. Indside:
Kegglerecirc2.JPG
 
Pol,
Got a Q on the innards of your control box. The ground bar and the distribution block; they're not just flopping around in there(I hope) - but there's no screwholes showing on either side of your box for mounting these things. So... JBWeld? Silicone?

Thanks
-OCD
 
Silicone is for wussies... JB Putty holds them all in place.
 
Do you think I could get away with having only the HLT and MLT hooked up with a PID and then just do direct power to the BK? Also, do the PID and SSR limit the amount of power flowing to the element or does it just shut off the power when target ambient temp is achieved?

You've inspired yet another follower... I'm going to try to do about the same with insulated Kegs. Gotta say you really have made it easy for the less technically inclined. Thanks for putting up such an awesome thread!
 
Pol - I see that you used a pre-made dryer cord for your heating element, but did you also use one to connect the "control panel" to the incoming power (i.e. did you a wall mounted receptacle or is the black cable hard wired to a sub panel)?
 
Do you think I could get away with having only the HLT and MLT hooked up with a PID and then just do direct power to the BK? Also, do the PID and SSR limit the amount of power flowing to the element or does it just shut off the power when target ambient temp is achieved?

You've inspired yet another follower... I'm going to try to do about the same with insulated Kegs. Gotta say you really have made it easy for the less technically inclined. Thanks for putting up such an awesome thread!

How will you control the boil in the BK? You really need a way to use 100% power to reach the boil and then have the ability to turn it down, you really do.

The PID does a couple things. In AutoTune it learns the parameters of your system and turns on and off the current to the heating element to maintain the temparture that you select.

In Manual mode it offers you % output. When you boil you set it at 100% until the wort boils, then I turn my element down to 70%. It is ON/OFF, so 70% power is 70% on and 30% off on a one second cycle time.
 
Pol - I see that you used a pre-made dryer cord for your heating element, but did you also use one to connect the "control panel" to the incoming power (i.e. did you a wall mounted receptacle or is the black cable hard wired to a sub panel)?

Umm, that cord from the panel to the 240VAC source should be covered in the parts list. It is a 50A range cord, 4 prong (2 hots, 1 neutral and 1 ground) The panel is NOT hard wired to anything, it plugs into a 240VAC outlet in the wall in my garage. My pump, BK and HLT temp control/heating element also have outlets on the back of the panel as you can see in my photos. The only thing that is hard wired to the panel, is the PID.

I move this rig around in my garage, I cannot have it hard wired to anything.
 
My bad, I now see you posted that in the very first paragraph! I've checked Lowes and HD neither have 30 amp DP GFCI breakers of any brand. Since I have to install a new sub panel anyway I suppose i can find the least expensive one online and get the appropriate sub panel locally.
 
Hey Pol,

After blatantly copying your eHerms set up, I am almost done copying this one. I have a couple questions about the wiring. As far as the outlet in your control box that powers the keggle you have the two hots, what have you attached to the third? Is it the neutral or is it going to the ground bar?

Also I believe I read that you attached the PID to the power via one hot for positive and the neutral for the negative, is this correct?

Hopefully you can remember, as mine is already resembling a bowl of spaghetti!


Thanks
 
I love your avatar... you already knew this.

Okay, here we go.

The three pronged outlet on the panel that powers the element via the "dryer" cord is supplied by (2) hots and (1) ground. You are exactly right.

Yes, the PID is powerd directly via (1) hot and (1) neutral (+/- on the PID) This comes directly off the distribution block, so that the PID is powered at all times.

The DPST for the element ON/OFF control is directly below the PID so that the element can be turned OFF regardless of what the PID decides to do.

The PID being powered always is nice as I use it to read the temp as I do closed circuit cooling, obviously with the element off.
 
Perfect! I forgot to mention I left the outlets and pump and stir switches outside since that was already wired on my stand. They run on a separate 120 line. So in my case the pid should be the only line connected to the neutral
 
Perfect! I forgot to mention I left the outlets and pump and stir switches outside since that was already wired on my stand. They run on a separate 120 line. So in my case the pid should be the only line connected to the neutral

Sounds like it!
 
I think most people are using GFI breakers, arent they?
 
I think most people are using GFI breakers, arent they?

Std breaker, with the GFI brick appliance cord off Ebay. I did this just in case I end up in the garage at some point on the other circuit. I am currently planning on basement brewing - but stuff changes over time so I thought to make it as portable as I can.

-OCD
 
Please everyone use GFI's on all ckts plugged into your system, 120 or 240. Do this first before you build any other part of your electrical brew system. The breaker alone will not save you.


Ok..... I used to be an elctrician I did all sorts of cool wiring projects in many mega homes throughout our valley. I am familiar with the whys and hows of complicated electrical systems. Including several hottub installs with GFI breakers.

Two nights ago I was talking to my old boss and kayaking buddy. (degree in EE and Master Electrician). I was talking to him about my new system I am building and I was asking him about proper circuit sizes for my elements and how I am going to wire them.

The first question he asked me was "why do you need a GFI". I was puzzled and told him just for extra safety and because all the guys on HBT seem to be using them on there rigs. He was not convinced I needed it. Based on the distance to the breaker (my box is in the garage) and the fact that just about all Water heaters, and other household element appliances don't use them. Such as electric stoves where you boil water and other locations that are "wet". He was saying just to make sure the wiring is up to "code". Using seal tight and the proper boxes.

In the end he told me to give him my panel model because he might have a GFI breaker laying around his shop I can have. I get the hot tub issue because alot of times those can be 60amp circuits with the breaker far away and you are immersed in the water. Also most local codes say you need a disconnect within reach of the tub.

Can any of you comment on why you are specifically using an Expensive GFI?

PS: You don't need to convince me. I understand electric, and I will be using a GFI, I just want to hear experience and knowledge based reasons for using one.
 
I never have a reason for anything that I do... whatever sounds good.:mug:

My breaker is within about 3 feet of my outlet and the outlet within about 3 feet of my brew rig, they are all in pretty close proximity to one another.

I wouldnt compare what we are doing to an electric stove, or a water heater. I mean, really... I cannot imagine any of these rigs would get the UL seal of approval.
 
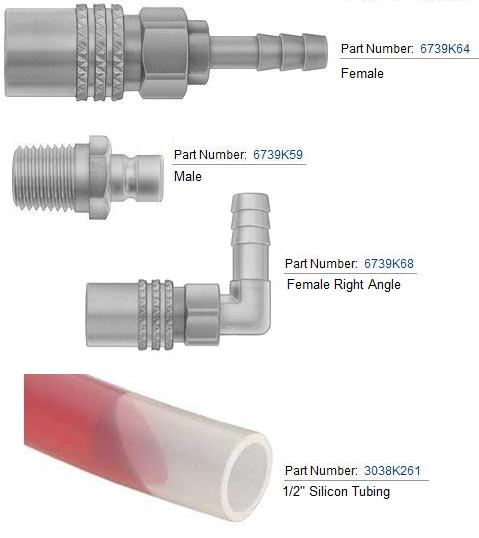
Here's what I used. Looks like the same as Pols. They're GREAT!
QDs.jpg

I would offer an alternative to this... I have found that you strangle your throughput using these connections. The 1/2" diameter tubing becomes 3/8" with these connectors.

The I.D. of these connectors is only 0.34375 inches. The maximum flow rate you could achieve with the March 809 HS is 3.3 gallons/minute with 3/8" I.D. connections and that is assuming no head pressure.

I moved up to true 1/2" connectors on the input side so I don't starve the pump but maintained 3/8" on the output because I had already spend money on those connectors.

If I had moved to a completely 1/2" system the maximum flowrate I could achieve is 5.36 gallons/minute - about a 60% increase in flow.
 
I have a 30A breaker on my brew ckt. If I grab a hot wire with one wet hand and touch a grounded pipe (or similar) with the other, the breaker will not draw 30A, and will not trip. I will get zapped.

A GFCI will instantly measure the lost current (in this case, to earth ground) and trip because of the difference. I believe they will trip with as little as 5mA ( 0.005 A) difference between what is going out the hot leg(s) and what is returning.

Thanks for that info. That is a real help. My buddy also asked me what type of breaker I would want. I guess they come in 2 flavors 5mA and 25mA.

I will tell him to look around for a 5mA breaker. He thinks he has a bunch laying around his shop.
 
Here's what I used. Looks like the same as Pols. They're GREAT!

Passedpawn,

Do you have any issued with flow converting from 1/2 to 3/8 and then back to 1/2? I just noticed that the QD on that part is 3/8. Thanks!

Wow looks Like I need to refresh a little more often on this thread... Quick responses!
 
Remember with flow rates that the LENGTH of the run and the HEAD of he run will affect it as well.

The longer the run (chillers, HEXs) the slower the flow due to resistance in the plumbing.
 
Back
Top