Well that's the problem for them to figure out. Maybe multiple sensors and average them together, I don't know. Do all all-in-ones have this same issue?I’m not sure what you expect them to do. It takes time for everything in there to heat soak. If they were to move the sensor to the top or whatever, I guess you would see the lower temperature there, but the temperature down by the element is going to be way higher. Then you’d be whining that it’s way too hot at the bottom
You are using an out of date browser. It may not display this or other websites correctly.
You should upgrade or use an alternative browser.
You should upgrade or use an alternative browser.
ANVIL FOUNDRY ALL-GRAIN BREWING SYSTEM
- Thread starter czmkid
- Start date

Help Support Homebrew Talk - Beer, Wine, Mead, & Cider Brewing Discussion Forum:
This site may earn a commission from merchant affiliate
links, including eBay, Amazon, and others.
This was only my second brew so it's just me not used to the equipment, I'm sure after a few more brews I will get better with it.
That is definitely true. I use a calculator to set my temps.
# pounds grain at # temperature
# gallons of water in the foundry at # temperature
becomes # pounds of grain at your target mash temp after it's all mixed together
Basically everything is known and entered except the foundry temp for the strike water and it's what gets calculated. You set the Foundry to that, give it the time to heat to it, and when you enter your grain and stir it in you are basically at the temp you wanted. The lift / lower, stir, recirculation, 50% or whatever power setting and etc. just help keep it there.
Short version is that you should be able to mash in and basically hit your temperature right away. After that it's easy to hold.
Yeah, the mash temp I took manually was exactly what I wanted based on my calculations. It was the temp on the Foundry screen being 15 over that I wish was closer to reality. But it is what it is, there's that pool of water below the grain basket that will be hotter than the water in the mash basket.That is definitely true. I use a calculator to set my temps.
# pounds grain at # temperature
# gallons of water in the foundry at # temperature
becomes # pounds of grain at your target mash temp after it's all mixed together
Basically everything is known and entered except the foundry temp for the strike water and it's what gets calculated. You set the Foundry to that, give it the time to heat to it, and when you enter your grain and stir it in you are basically at the temp you wanted. The lift / lower, stir, recirculation, 50% or whatever power setting and etc. just help keep it there.
Short version is that you should be able to mash in and basically hit your temperature right away. After that it's easy to hold.
I do not use the mash basket anymore, instead use a false bottom and brew bag. It seems to have pretty much eliminated the temperature variance and with recirculation the on-screen temperature is pretty much dead on.
I plan to switch to a brew bag. I have one of these in my Amazon cart: https://a.co/d/dqZ5RaiI do not use the mash basket anymore, instead use a false bottom and brew bag. It seems to have pretty much eliminated the temperature variance and with recirculation the on-screen temperature is pretty much dead on.
Is a pulley a requirement to lift it out after mashing? How do you sparge?
AlbertaBeer
Well-Known Member
I’d say the pulley setup would be a very wise decision unless you’re physically capable of lifting the bag and holding it there while it drains, or have a helper to put a grille or something on top of the kettle to rest the bag on while it drains
Sparging seems to be (like everything) a whole can of worms. Some guys say it’s not necessary when doing biab, they just pull the bag and let it drain out into the kettle (some guys squeeze it out).
Sparging seems to be (like everything) a whole can of worms. Some guys say it’s not necessary when doing biab, they just pull the bag and let it drain out into the kettle (some guys squeeze it out).
As for sparge, in the past I have lifted the bag and put it into a large collander set over a big pot to drain, then just poured sparge water over it. This past brew I left the bag in the anvil, drained into the separate pot, and poured in the sparge water into the brewer, stirred and let it sit for a few minutes then pulled the bag, put it into the collander and squeezed the bejesus out of it. A bit convoluted but it seemed to work well. All in all, I think a pulley system might be a smoother way to go, but I have been too lazy to get into it. AlbertaBeer's take on it is true--it's a bit of a kluge however you go about it.
I don't have a dedicated brew space so I am thinking about making a pulley that rests on the top of door trim, similar to those contraptions you can buy to do pullups with. Should be pretty easy, and cheap. Or just use the pull-up unit I have and add a pulley to it
AlbertaBeer
Well-Known Member
Yea something like that would definitely do the trick. Or even a tripod that you can stow away when not brewing, that’ll give you the convenience of not having to brew in the doorway!
I use a step ladder from which to hang the pulley.Yea something like that would definitely do the trick. Or even a tripod that you can stow away when not brewing, that’ll give you the convenience of not having to brew in the doorway!
Brew on

NSMikeD
Well-Known Member
Fwiw, and admittedly I am not pushing any limits on the grain bill and using full volume of water, but I do take my time adding the grain and making sure I give it a good mix along the way. I think this evens out the temperature. I didn't do this for temperature reasons, just wanted to make sure I wasn't getting any dough balls and desired a good initial hydration of the grain. Turns out this method doesn't result in material stratifications and reduces the strike versus mash temperature gap.
Noob_Brewer
Well-Known Member
@RyPA Sorry to hear of your issues on the foundry. First, what was your actual strike temp prior to doughing in? Ive never had this extreme of a temp difference between what the foundry shows versus the mash at the top with my thermapen. You will have some difference regardless if using a malt pipe or bag on a false bottom though. But the difference should definitely be closer than you experienced. I am using a bag with brewzila false bottom and not the malt pipe currently. My last brewday, I set the strike water to 160F and my target mash temp was 152F. After reaching strike temp, I doughed in. Immediately after doughing in, my top measurement was 151F and the foundry read 156F. After 8 minutes (not recirculating) the top was 150 and bottom was 154F and then I started recirculating. This is common for me to have a 5-8degree difference between the top of the mash (which reasonably would be cooler after doughing in) compared to the bottom temp which is NOT in the actual mash. I typically start recirculating at 8minutes and it evens out pretty quick. Of course, inputting good data into your software about grain temp (which I measure), mash tun temp, etc also helps.My brew day is not starting well. My Foundry temp screen reads 169 while my mash temp is actually 155. Starting to regret buying this thing.
Edit: It evened out once I did a few lifts of the mash basket and got the pump going. But I wish Blichmann/Anvil would correct this issue, somehow.
Not trying to insult your brewing skills in any way but I have to ask...when you hit your strike temp and started doughing in, did you remember to shut the element off or at least switch your strike temp to your set mash temp on the foundry? I have done this ONCE and after doughing in the foundry was still reading my strike temp lol. After reaching strike temp, I set my foundry to the target mash temp AND I shut the % power to off.
Strike water in the Foundry was set to 163 to get me at a 155F mash with grain @ 71F and 7 gallons of strike water.
What I did is poured the grain in 4 separate batches with stirring in between to avoid dough balls. Upon doughing in, I set the temp on the Foundry to my mash temp of 155 and left it at 100%.
I then took the temp of the top of my mash which was at 155 but the screen read 169. I adjusted pH and waited 10-15 mins and then did a lift of the basket, letting most water drain out then I put it back in, I then got the pump going and the temp reading eventually came down to 155.
It was mentioned, but to be clear, back this off or you'll get a lot of temperature overshoot.100%.
Noob_Brewer
Well-Known Member
Yup, since your strike was only 163 which seems much more reasonable given your target mash temp, leaving the temp at that temp and power at 100% is what caused the big overshoot while you were doughing in. My normal process is to hit strike temp, then set the temp to mash temp and turn power off completely prior to doughing in. After doughing in the foundry will still likely read a few degrees above mash temp but the top should be good with what you want. Then I adjust power to 50-60%, once you start recirulating you will see the foundry temp drop to right where you want it. You'll keep dialing in your process over a couple brews and you'll be fine.What I did is poured the grain in 4 separate batches with stirring in between to avoid dough balls. Upon doughing in, I set the temp on the Foundry to my mash temp of 155 and left it at 100%.
I then took the temp of the top of my mash which was at 155 but the screen read 169.
millerjoe49
New Member
Love the mod to show your wort level on the outside. Do you have any instructions anywhere on how you did that?I'll show my set up, I just recently added a new pump with less power and very much needed, I can recirculate my sparge and just add the water on top as I'm recirculating, that helps with depositing bits of grain back to the top as well as a constant cleaning of the grain
It may be cheaper to buy a preassembled one, I just have a bunch of parts and threw it together, the only thing to worry about is it's double wall, you fasten to the inner wall and cut the outer wall the size of your elbow, I just used a street elbow a nipple with an oring lock nut, then on the plastic tube the cap and oring from the end of the anvil ball valve against a 1/4" site glassLove the mod to show your wort level on the outside. Do you have any instructions anywhere on how you did that?
If you have your hose near the kettle, and the pump's been off a while but the valve is still open, then the hose leading out of the pump should be a good indicator. Make some markings on the outside of the kettle to read the level?
hilljack13
That's what she said!
Somewhat skewing the topic as I didn't think a new thread was necessary. Any chance Anvil goes on sale during Black Friday or other holiday sales? Have they in the past?
Right now they have 15% off the 10.5G. This is my top runner for AIO that I was looking at. Problem is I can't use it until January. Don't want it to sit only to find out it has an issue and most of my warranty gone. Was hoping to purchase later to avoid this, but that discount is good enough to all me to get all the accessories I wanted and throw in the grain bag and still come out cheaper than expected.
Right now they have 15% off the 10.5G. This is my top runner for AIO that I was looking at. Problem is I can't use it until January. Don't want it to sit only to find out it has an issue and most of my warranty gone. Was hoping to purchase later to avoid this, but that discount is good enough to all me to get all the accessories I wanted and throw in the grain bag and still come out cheaper than expected.
- Joined
- Sep 17, 2021
- Messages
- 276
- Reaction score
- 231
They have had a black friday sale, last year was 15% off of lots of stuff, 2 days on anvil, but year prior other stuff only. If it were me, I'd buy now, open it up and test it with just water. If you can't do that, wait... thats just my opinion
hilljack13
That's what she said!
Thanks. Probably will have to. When I say I can't use it, I mean I won't even be able to put hands on until thenThey have had a black friday sale, last year was 15% off of lots of stuff, 2 days on anvil, but year prior other stuff only. If it were me, I'd buy now, open it up and test it with just water. If you can't do that, wait... thats just my opinion

- Joined
- Sep 17, 2021
- Messages
- 276
- Reaction score
- 231
Then I think I'd wait. 4 or 5 months lost on the warranty is a bummer. You might call them and see if they can allow you to purchase and them not ship till say December 30th. Their system may allow future ship dates.
Or wait and watch the classified ads here. A new offering of the10.5 seems to be up every month or so. That might be 20-30% off retail. Shipping can kill tho. The older gens are pretty good still.
Note- most 10.5 sales are to downgrade iirc.
Note- most 10.5 sales are to downgrade iirc.
Noob_Brewer
Well-Known Member
@hilljack13 Alternatively you can go to the anvil website and look in their discount den. They currently have a 10.5gal for $320! Thats a BIG discount for what is likely a cosmetic issue or its just surplus. That one says its "V1" so Im actually assuming its surplus. BTW, this is likely not the latest one out there as it says V1, but I have the actual 1st generation where the temp control is on the bottom. Ive been brewing on this system as its my first system all along. Its great. Also customer support for anvil is fantastic. After the first ~20 brews, The malt pipe slipped out of my hands and it dropped only about 10inches to the cement floor of my garage and it hit just right and popped one of the legs off. My warranty had already expired and I asked about getting a replacement expecting to pay....They sent me a new malt-pipe free of charge and said those legs were "lightly soldered on". My fuse went out a couple of times, and then I found out that they moved to a circuit breaker on the units. Again I emailed about this and they sent a cirucit breaker along with instructions in how to swap it out - again free of charge. I've now brewed on this unit about 75times and its still ticking despite me learning how to brew on this system and at times beating on it a bit much lol. But if you are looking at a bunch of AIOs, I would say that the foundry is an excellent choice and the way its designed it is extremely flexible to modifications if you should choose as well. Not to mention customer service is 100% awesome.
And if you are wondering, no I didn't get paid for this review by anvil....although I'd welcome it!
And if you are wondering, no I didn't get paid for this review by anvil....although I'd welcome it!
hilljack13
That's what she said!
^ That! Definitely taking that into serious considerationNot to mention customer service is 100% awesome.
Hey, so I've been using the 6.5 unit for a while, now with BIAB and one of those 11.6" false bottoms originally intended for bbq. It does work, but with my protocol I've gotten some serious dents in the kettle base. The kettle base seems like pretty thin stainless. Don't really want to cause any further damage. The legs of the false bottom definitely concentrate a lot of force over a small area. For those of you that use that false bottom mod., how do you protect your kettle base from any possible denting?
Huh, I've never seen any denting at all. Just used this setup a few days ago for an Imperial Stout w/ 12 lbs grain.
Do you have pictures? Are you pressing on this at some point? If you see dents, you probably have them, but it's hard to believe. The metal isn't *that* thin.
Do you have pictures? Are you pressing on this at some point? If you see dents, you probably have them, but it's hard to believe. The metal isn't *that* thin.
Here's a shot of what the dents look like. So this is the base of the 6.5 model. This has happened a few times. My brew sessions are right around 6lbs of grain and 2.5 gallons of water. So nothing really unusual. I've used splayed wine corks on the feet of the false bottom but that's really only a single use solution. Any advice is appreciated.

OK, wow, I have no idea. I use a false bottom with 3 legs that are around that same diameter to hit in those areas and never had a single mark left behind. I can't say what's different.
DuncB
Well-Known Member
That looks like a problem in the long run. Picture of your barbecue thing perhaps?
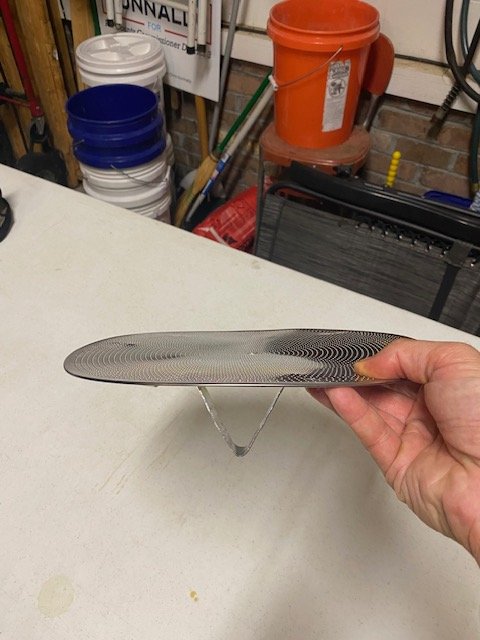
It's weird because going through the thread I haven't noticed anyone else with this kind of issue. I got my 6.5 within the past year so I'm wondering if the manufacturer reduced the base thickness on the more recently produced units. I have a photo of my false bottom here; it's one of the ones available on amazon that a lot of people have been using. I had a friend weld the washers onto the feet which I'm hoping will take care of the problem by distributing the weight over a larger area.

DuncB
Well-Known Member
You've changed that from a stiletto to a proper heel, if that causes a dent you do have a bottom of kettle problem.
I tried my first big beer in the Foundry and ended up a bit disappointed and puzzled. With 15 lbs of grain, BeerSmith estimated an OG of 1.085. My first runnings were 1.087, which I knew was a little low, but not terrible. I drained and collected 4.4 gallons so I poured another gallon over the grain then squeezed to get to 5.6 gallons. After an hour boil I was down to 5.4 gallons but it measured just 1.068! I was so shocked that I measured it twice from the bottom and once from the top and got the same reading every time. I am really struggling to figure out where this went wrong and how I can fix it for next time.
If you aren't familiar with it, and easy tool to see if things make sense, is volume * gravity but only after the decimal.
4.4 * 87 = 383
5.4 * 68 = 367
They're close to each other so things make sense. The higher volume dilutes what you have and the gravity goes down accordingly.
One thing to note is that volume changes with heat, so you may want to "calibrate" your markings the best you can and then use a calculator to take a stab at what they are at other temps. For example, if your Anvil is correct at room temps, things will read a little high at mash temp (1/16 - 1/8 gallon) because the water has physically expanded. And just off boil, to see where you at, it will be worse, you will read 1/8 - 1/4 gallon high, again because of the water temperature. Let that water cool back to room temp, the extra volume goes away, and you are back to what you expect. The short version is... if you want say 5 gallons in the fermenter, you might need 5-1/4 in the Anvil just off boil, if for no other reason that it's because the water increased in volume with temperature. (Gets worse if the Anvil is off, or you want to plan to leave some trub behind).
Anyhow... if your gravity started low, you have to look at efficiency... how long you mashed, the temperature, the pH, and especially the grain crush.
Also did you use the pipe? If so did you lift and lower it a few times to get that dead space around the sides mixed in? It's pure water around the sides of it that doesn't really become part of the mash unless you physically lift and lower the pipe itself to make it mix in. If you're doing a 5 gallon brew, you can actually have right around a full gallon of water outside the pipe, and it's practically "just water" that comes rushing in at the end of your mash when you take out your grain, causing a ton of dilution.
One other thing, just as a backup plan, is that it's good to have a pound or three of DME on hand. So if you measure yourself to be a bit low, you can make up for it. It's not the same as getting it right, but for some beer might be better than nothing.
Noob_Brewer
Well-Known Member
I think you have created a vacuum-like scenario here where suction from the pump is too much (too high flow rate). I have a 10.5gal foundry. After a coupe of years of using the anvil little pump, I switched to a MARKII amazon knock off. This happened to me when brewing an imperial stout with ~25lbs of grain. I use a wilser bag and a brewzilla false bottom where I have to bend the legs to a "V" position so the false bottom would clear to dip tube. With my process, I sparge with the bag in place. When I sparge, I start running the wort to a second vessel and then manually add sparge water over the top of the mash one quart at a time. On that particular brew, after adding sparge water was complete, but continuing to send wort to second vessel so that eventual lifting the bag with hoist is easy, I noticed a high-pitched screeching sound like nails on a chalkboard. Once I stopped the pump, the sound immediately stopped. After lifting the bag and pumping the wort back to the foundry kettle from the second vessel, when I removed the false bottom, I noticed it was now concave lol. When brewday was over, and I was cleaning the foundry I noticed three indents on the bottom of the foundry precisely where the legs were sitting. At first I thought it was due to the weight of the mash, but again, once I stopped the pump, the high pitched sound immediately stopped. So I came to the conclusion that I was draining to the second vessel too fast and created a vacuum-situation. SO ever since, I've reduced the flow when sparging and sending wort to the second vessel. I've never noticed it during the actual mash but then again, I do not run the pump with a high flow rate when recirculating during the mash. I average ~1qt/minute or less: yes I've measured it and now I know what that rate "looks" like visually lol. Nonetheless, regardless of when in your process this occured, I think if you slow down your pump flow, this will certainly help because I think the vacuum is what caused this. So even though you modified the feet of your false bottom to help distribute the pressure over a wider area, this will still happen if flow is too high. Hope this helps! I've attached pics to show mine. My feet of the false bottom actually are narrower than yours and hit on the raised portion of the foundry's bottom. I imagine that if I increased the flow rate when I heard that high-pitched screeching sound ie metal bending, I would have probably collapsed my false bottom completely lolHere's a shot of what the dents look like. So this is the base of the 6.5 model. This has happened a few times. My brew sessions are right around 6lbs of grain and 2.5 gallons of water. So nothing really unusual. I've used splayed wine corks on the feet of the false bottom but that's really only a single use solution. Any advice is appreciated.
View attachment 827017
Attachments

I did a double brew-day this weekend due to the crappy weather (and because I love beer) and on Saturday, water must have gotten under the control module while I was cleaning up. I am always very careful about water touching the electronics and I am confident I did not drench it, maybe a few drops.
Before going to bed Saturday night I got the foundry filled with RO for Sunday's brew day, and when attempting to set the delay/time I was getting no display on the screen. I took it apart and dried everything out thoroughly and put it back together, and while not perfect, the display worked well enough to set the timer. I wake up the next morning with water at strike temp, but I again get a blank screen.

I thought I was going to have to cancel brew day but I again took apart the control and snugged up the connector a bit and thank god I got a display. Blichmann/Anvil needs to water proof that control module. I hardly got water on it and I had drops of water on the circuit board. I've grown to love the Foundry and am surprised it has this design flaw.
Both brew days were otherwise successful. 5g of Irish stout (Nottingham) on the left, 6g of Centennial/Columbus WC IPA (US-05) on the right

I've had boil overs that soaked mine pretty well, but never had it affect the display or cause issues. It has left some moisture under the clear overlay and still kept working. Mine is the first gen with the screen down low on the tube. @RyPA how old is yours? I wonder if they might provide some sort of new seal or something.
I got mine in April, it's the latest with the included 240 to 120 plug adapter. There is a cheesy rubber gasket between the unit and black housing, but it should be better and sealed in both places (unit to housing and housing to Foundry body)I've had boil overs that soaked mine pretty well, but never had it affect the display or cause issues. It has left some moisture under the clear overlay and still kept working. Mine is the first gen with the screen down low on the tube. @RyPA how old is yours? I wonder if they might provide some sort of new seal or something.
Similar threads
- Replies
- 4
- Views
- 580
- Replies
- 23
- Views
- 2K
- Replies
- 36
- Views
- 4K
- Replies
- 9
- Views
- 1K
