You are using an out of date browser. It may not display this or other websites correctly.
You should upgrade or use an alternative browser.
You should upgrade or use an alternative browser.
3-in-1 "Boil Kettle, Jacketed Chiller, Conical Fermenter" by Brewha
- Thread starter MeetsCriteria
- Start date

Help Support Homebrew Talk - Beer, Wine, Mead, & Cider Brewing Discussion Forum:
This site may earn a commission from merchant affiliate
links, including eBay, Amazon, and others.
I had the "brilliant" idea .....Being the genius I am, I unscrewed the tri-clamp and pulled out the probe. There is nothing like a blast of 150 sugar water on your leg. The only way to fix this was hold my hand over that hole and quickly get the fitting reattached. That will NEVER happen to me again.
Wow, that's funny. I wouldn't worry over kettle trub and hops. I have been fermenting in my kettle for a couple years.
In leiu of the Neoprene jacket not being available until late summer I'm going to attempt to (crudely) make my own from a sheet of neoprene and some plastic zippers. I'll post up when it's complete. I also plan to get some pipe insulation for all of the silicon hoses reciruclating the water. Hopefully with this I'll be able to cold crash down to 35* without much of an issue and less condensation to deal with.
JB_Brewing2
Well-Known Member
In order to lift my colander from the medium BIAC, I decided to install a hoist to aid in that effort. Looking at just a pure vertical lift seemed like it would create the additional headache of getting the colander to the sink to drain completely. I decided to install a small trolley so I would have both X and Y axes capable of travel. I purchased the $99 Harbor Freight electric hoist with remote control and capable of handling 400 lbs. then purchased roller track and roller track cars from Master-Carr. The HF hoist came with U brackets for mounting to a pipe or bar. I just drilled a hole in each to accept the threaded bolts of the track rollers. Total cost was about $230 for everything. Installing the track this weekend.


JB, very nice. Using the track will make life even easier! I have that same hoist, but mine is not mounted to a track. I've been lowering the MT into a tote to drain and then I tilt/dump the grain into a contractor garbage bag. I have to seal the bags very tightly or by trash pickup day, the smell is pretty bad. The one thing I have been envious of for years is a large sink in my garage.
This afternoon after work, I drained off some trub and took a gravity sample. It took about 15 min for the trub to all fall out of the valve. I honestly don't know how you would drain through a ball valve. The main thing you have to do after it all "falls" out, is to get the valve clean. There will be some trub stuck after you close it. I used a paper towel and then gave it a good spray with Starsan. I used two packages of dry yeast so it got a good dose of yeast.
I hope this beer is not "crappy" if you get my drift.


I hope this beer is not "crappy" if you get my drift.
JB_Brewing2
Well-Known Member
Wow! Given the amount of trub in your photos makes me wonder if my three mason jar harvesters will be large enough? Will probably have to use a bucket like you use for the initial dump then harvest the yeast with the mason jars a little later.

I grabbed this idea off another thread: https://www.homebrewtalk.com/showthread.php?t=510704

I grabbed this idea off another thread: https://www.homebrewtalk.com/showthread.php?t=510704

Wel, I am at the HBC in Sad Diego and Nathan is here, so I will be ordering the medium with one tweak, I am going to go with the Brew Boss DIY controller instead of the normal power box. The Brew Boss will automate the tempature contol process, and since they are here at the convention to I can make sure I cover compatibility issues with plug types, ecetera.
Congratulations. It is really amazing how many options we have for brewing equipment now. I started this hobby back in the mid 1990s and you could not even find a decent 10gal pot. Corny kegs were a lot more plentiful back then but now, you can buy a brand new one for $79 when they are on sale. Automation was definitely not available unless you were some kind of mad scientist with mad diy skills. I stopped brewing for a few years and in 2009 when I started back there were a lot more options and now there are automated table top machines that do everything.
That Brew-Boss controller will really look cool with the BIAC. Other than a glycol chiller that is the only other way you can add additional bling to this thing. Please post photos when you get it all set up. I am still happy with my standard Brewha controls, but I may have done the same as you if I had really thought about that option. Also, their Infusion filters look a lot like my old hop filter... only larger diameter. I'm now wondering if one would fit inside my mash colander (I could just use a large mesh bag too). During my recent brew, I had a lot of grain stuck in the holes and it took a long time to drain.
My BIAC is in my garage connected to the glycol at 40F making a nice little condensation puddle on the floor and I"m still not using a pressure regulator")
That Brew-Boss controller will really look cool with the BIAC. Other than a glycol chiller that is the only other way you can add additional bling to this thing. Please post photos when you get it all set up. I am still happy with my standard Brewha controls, but I may have done the same as you if I had really thought about that option. Also, their Infusion filters look a lot like my old hop filter... only larger diameter. I'm now wondering if one would fit inside my mash colander (I could just use a large mesh bag too). During my recent brew, I had a lot of grain stuck in the holes and it took a long time to drain.
My BIAC is in my garage connected to the glycol at 40F making a nice little condensation puddle on the floor and I"m still not using a pressure regulator
Hello Lads,
I was going to try using CO2 to transfer beer from the 3-in-1 to a keg. But I don't have the right parts for the CO2 post (I thought I did, but I was wrong!). For those using CO2 to transfer, what parts did you use to do this?
I was going to try using CO2 to transfer beer from the 3-in-1 to a keg. But I don't have the right parts for the CO2 post (I thought I did, but I was wrong!). For those using CO2 to transfer, what parts did you use to do this?
RiverCityBrewer
Well-Known Member
Hello Lads,
I was going to try using CO2 to transfer beer from the 3-in-1 to a keg. But I don't have the right parts for the CO2 post (I thought I did, but I was wrong!). For those using CO2 to transfer, what parts did you use to do this?
While I don't have a 3-1 (yet), on my Brewhemoth I use a TC fitting like this that adapts right to a normal beer tailpiece I use for everything.
http://www.brewershardware.com/1-1.5-Tri-Clover-Compatible-X-Male-Beer-Thread.html
I guess you could get a 1/4" NPT to 1/4" MFL then screw on an 1/4" swivel.
I'm sure there are adapter kits that let you build up from a 1/4" MFL to a corny base then to a pin or ball lock post, but I don't know where to find those off the top of my head.
screwing a tail piece right on to that seems simple enough. Wish I had tried that first before buying the cornelius gas in keg post.
While I don't have a 3-1 (yet), on my Brewhemoth I use a TC fitting like this that adapts right to a normal beer tailpiece I use for everything.
http://www.brewershardware.com/1-1.5-Tri-Clover-Compatible-X-Male-Beer-Thread.html
I guess you could get a 1/4" NPT to 1/4" MFL then screw on an 1/4" swivel.
I'm sure there are adapter kits that let you build up from a 1/4" MFL to a corny base then to a pin or ball lock post, but I don't know where to find those off the top of my head.
I've been using just a barbed tri-clamp hose directly do the 3-in-1 lid, but have since purchased the adapter fitting and corny keg post, mostly because I use a second tank of CO2 to move the beer and it's nice to be able to quickly use it to force carb kegs waiting in line for the keezer.
Here's a link to the adapter fitting you are asking about for the 3-in-1 tri-clamp FPT to corny keg post
http://www.homebrewing.org/Plug-Adapter-14-MPT-x-1932_p_4640.html
Here's a link to the adapter fitting you are asking about for the 3-in-1 tri-clamp FPT to corny keg post
http://www.homebrewing.org/Plug-Adapter-14-MPT-x-1932_p_4640.html
- Joined
- Nov 1, 2010
- Messages
- 344
- Reaction score
- 28
Just got back from Homebrew Conference where I met Nathan and I can say that I am even more impressed with the 3-in-1 now than before. I will be ordering it next month once I sell off my eHERMs setup.
That is the exact one I ordered earlier today. Great minds think alike.
I've been using just a barbed tri-clamp hose directly do the 3-in-1 lid, but have since purchased the adapter fitting and corny keg post, mostly because I use a second tank of CO2 to move the beer and it's nice to be able to quickly use it to force carb kegs waiting in line for the keezer.
Here's a link to the adapter fitting you are asking about for the 3-in-1 tri-clamp FPT to corny keg post
http://www.homebrewing.org/Plug-Adapter-14-MPT-x-1932_p_4640.html
Did he have a large BIAC on display?
Just got back from Homebrew Conference where I met Nathan and I can say that I am even more impressed with the 3-in-1 now than before. I will be ordering it next month once I sell off my eHERMs setup.
- Joined
- Nov 1, 2010
- Messages
- 344
- Reaction score
- 28
Only the medium was there but I was able to drool over it in person. It is really a thing of beauty and quality.
Just about finished up my DIY poverty jacket and insulated lines. Got some flexible rubber pipe insulation from home depot and covered all silicon lines coming in and out of the BIAC and aquarium heater/chiller. Got a 48x80" sheet of high quality neoprene for about $50 shipped and made a fairly terrible, but hopefully effective double layer 1/2" jacket. Used seamgrip and a $5 20" zipper that's currently curing right now. Need to cold crash tomorrow so we'll see how it does. I have no data from before but I can already tell its reduced cycling of the chiller so far. I wasn't going to attempt making a pattern for the bottom cone which is the only part not insulated now. For under $100 and a few hours of work it I think it was worth it.
Hi all, I've been getting some help from Nathan at BREWHA about this question. He is a fantastic help, and I want to give him all the credit in the world. He has given me help on a number of fronts since I began researching and bought a BIAC medium back in November 2014. (I don't get any compensation or benefits for saying this. I truly have a lot of appreciation for all his help.)
Question is: Have any of you used the racking hose and had any issues with plugging inside the tube? I began racking to a keg and after about a gallon passed through with no problem, it stopped flowing. I must have spent the better part of another 2 hours messing with cleaning out the racking valve, the beer out tube, the disconnect on the end of the racking hose. I flushed the racking valve and reconnected the hose. still no flow. this went on and on.
I realize there are some variables here, which would end up affecting how much trub/yeast particles could be suspended in the beer I am trying rack. This was only the second time I have used this system. This was a 10 gallon batch of high gravity, Belgian golden strong ale. The first was a 5 gallon batch. I did not have this same thing happ en on the first batch (I had other problems due to inexperience with the ball lock quick disconnect. no issues with the QD this time)
I had an enormous issue with kegging last Sunday and it could have been an issue with plugging in the tube, although I did not take time to dismantle the hose and ream it out. It was quite late on Sunday/Monday am. I had to punt, and angled my kegs at the racking port and let it fly into the kegs.
Anyhow, if you have had an issue like this with the 3 in 1 or BIAC, I'd love to hear your thoughts. As mentioned, Nathan has already emailed his thoughts, which are: haven't had it happen, and have not heard of it as yet.
Sante! (Flemish for Cheers!) I like Belgian beer.
Ron8
Question is: Have any of you used the racking hose and had any issues with plugging inside the tube? I began racking to a keg and after about a gallon passed through with no problem, it stopped flowing. I must have spent the better part of another 2 hours messing with cleaning out the racking valve, the beer out tube, the disconnect on the end of the racking hose. I flushed the racking valve and reconnected the hose. still no flow. this went on and on.
I realize there are some variables here, which would end up affecting how much trub/yeast particles could be suspended in the beer I am trying rack. This was only the second time I have used this system. This was a 10 gallon batch of high gravity, Belgian golden strong ale. The first was a 5 gallon batch. I did not have this same thing happ
en on the first batch (I had other problems due to inexperience with the ball lock quick disconnect. no issues with the QD this time)I had an enormous issue with kegging last Sunday and it could have been an issue with plugging in the tube, although I did not take time to dismantle the hose and ream it out. It was quite late on Sunday/Monday am. I had to punt, and angled my kegs at the racking port and let it fly into the kegs.
Anyhow, if you have had an issue like this with the 3 in 1 or BIAC, I'd love to hear your thoughts. As mentioned, Nathan has already emailed his thoughts, which are: haven't had it happen, and have not heard of it as yet.
Sante! (Flemish for Cheers!) I like Belgian beer.
Ron8
I have had what you described happen three times. Once was because I did not open it up and clear out the bit of trub and hops that settle into the racking port, and instead hooked the racking tube straight to the port and was going to pull my FG sample from there. It instantly plugged up. Just pulled the racking tube off and ran water through it to clear it out, then let the remaining trub out of the racking port before putting the hose back on.
However, the other two times happened exactly how you described and did not plug up until a few gallons into the keg. These were both fairly heavily hopped beers in which I did not crash long enough for the hop debris to settle out of suspension. I pulled off the racking hose as you described and ran water through it no issue, checked the racking port into a bucket and it ran clean. The culprit was the actual keg post/dip tube. These were clogged with hop debris. You can either pull the keg and and put a tiny bit of pressure to it with the disconnect still on and a rag covering it to blow the debris out. Or you can pull the keg post off and clean it out as well as the dip tube, re-sanitize and put it back together.
However, the other two times happened exactly how you described and did not plug up until a few gallons into the keg. These were both fairly heavily hopped beers in which I did not crash long enough for the hop debris to settle out of suspension. I pulled off the racking hose as you described and ran water through it no issue, checked the racking port into a bucket and it ran clean. The culprit was the actual keg post/dip tube. These were clogged with hop debris. You can either pull the keg and and put a tiny bit of pressure to it with the disconnect still on and a rag covering it to blow the debris out. Or you can pull the keg post off and clean it out as well as the dip tube, re-sanitize and put it back together.
Well I think the verdict is in. My little 1/6HP TK500 chiller even with insulated lines and partially insulated BIAC just can't cut it for cold crashing temps in a garage at 85*+. Turned it on last night and after 12hrs of continuous running the best it could do was 45* jacket water temp.
Now the question is whether to get a 3/8HP glycol setup or purchase a more powerful TK2000 chiller that is 1/3HP. I really like the functionality of the all-in-1 system of the TK chiller, but I don't want to spend another $1000 and not be able to cold crash with ease like a glycol setup.
Now the question is whether to get a 3/8HP glycol setup or purchase a more powerful TK2000 chiller that is 1/3HP. I really like the functionality of the all-in-1 system of the TK chiller, but I don't want to spend another $1000 and not be able to cold crash with ease like a glycol setup.
Well I think the verdict is in. My little 1/6HP TK500 chiller even with insulated lines and partially insulated BIAC just can't cut it for cold crashing temps in a garage at 85*+. Turned it on last night and after 12hrs of continuous running the best it could do was 45* jacket water temp.
Now the question is whether to get a 3/8HP glycol setup or purchase a more powerful TK2000 chiller that is 1/3HP. I really like the functionality of the all-in-1 system of the TK chiller, but I don't want to spend another $1000 and not be able to cold crash with ease like a glycol setup.
My 1/3 HP glycol chiller had no problem maintaining 40F on my BIAC and that was with uninsulated lines. I have since insulated my lines with the foam pipe stuff. I like the rubber stuff you used better and I think I'm going to switch to that since it is probably more flexible. I was just using the Ranco controller to turn on the chiller but that allowed the glycol to warm up a bit between cycles. I'm now putting together a proper glycol loop and after a quick test last night, it worked pretty well. I'll be leaving my chiller on and using the electric valve that came with the BIAC to chill the fermenter.
I ordered a couple of rolls of neoprene from Amazon yesterday and I think I'll just use straps or duct tape to hold it. I'll never be able to make a decent seam/zipper. That all arrives tomorrow.
I think I'm just going to use a section of silicon hose and CO2 pressure. My hose is long enough to reach all the way to the bottom of the keg and of course it is bigger diameter than the keg filler hose that I ordered. I can now assemble a proper keg post disconnect on the 3-in-1 and used CO2.
I also crash cooled my last batch for 5 days before I kegged it. I drained off the trub once before I crashed it and again after I crashed it. Even with a butterfly valve, it takes a little patience for all the trub to come out. I use a small bucket that slides right under the 3-in-1 for catching trub. After that gravity worked pretty well for filling a keg. But CO2 will push out all the beer and I won't have any waste. From now on that is what I'm doing.
I also crash cooled my last batch for 5 days before I kegged it. I drained off the trub once before I crashed it and again after I crashed it. Even with a butterfly valve, it takes a little patience for all the trub to come out. I use a small bucket that slides right under the 3-in-1 for catching trub. After that gravity worked pretty well for filling a keg. But CO2 will push out all the beer and I won't have any waste. From now on that is what I'm doing.
Hi all, I've been getting some help from Nathan at BREWHA about this question. He is a fantastic help, and I want to give him all the credit in the world. He has given me help on a number of fronts since I began researching and bought a BIAC medium back in November 2014. (I don't get any compensation or benefits for saying this. I truly have a lot of appreciation for all his help.)
Question is: Have any of you used the racking hose and had any issues with plugging inside the tube? I began racking to a keg and after about a gallon passed through with no problem, it stopped flowing. I must have spent the better part of another 2 hours messing with cleaning out the racking valve, the beer out tube, the disconnect on the end of the racking hose. I flushed the racking valve and reconnected the hose. still no flow. this went on and on.
I realize there are some variables here, which would end up affecting how much trub/yeast particles could be suspended in the beer I am trying rack. This was only the second time I have used this system. This was a 10 gallon batch of high gravity, Belgian golden strong ale. The first was a 5 gallon batch. I did not have this same thing happ
I had an enormous issue with kegging last Sunday and it could have been an issue with plugging in the tube, although I did not take time to dismantle the hose and ream it out. It was quite late on Sunday/Monday am. I had to punt, and angled my kegs at the racking port and let it fly into the kegs.
Anyhow, if you have had an issue like this with the 3 in 1 or BIAC, I'd love to hear your thoughts. As mentioned, Nathan has already emailed his thoughts, which are: haven't had it happen, and have not heard of it as yet.
Sante! (Flemish for Cheers!) I like Belgian beer.
Ron8
Since I'm posting on this thread again, I'll post my newest addition. My recent brew was an IPA and my mash colander drained very slowly. The perforated bottom was clogged. I looked for a slotted bottom that would fit over that and I think I may have found the perfect solution. I got this at Adventures in Homebrewing. It is a 2-piece design and fit right into the bottom of my medium mash colander. I plan to brew this weekend or early next week.
http://www.homebrewing.org/SS-Pico-Style-False-Bottom-bottom-only-No-Feet_p_4587.html

http://www.homebrewing.org/SS-Pico-Style-False-Bottom-bottom-only-No-Feet_p_4587.html
Since I'm posting on this thread again, I'll post my newest addition. My recent brew was an IPA and my mash colander drained very slowly. The perforated bottom was clogged. I looked for a slotted bottom that would fit over that and I think I may have found the perfect solution. I got this at Adventures in Homebrewing. It is a 2-piece design and fit right into the bottom of my medium mash colander. I plan to brew this weekend or early next week.
http://www.homebrewing.org/SS-Pico-Style-False-Bottom-bottom-only-No-Feet_p_4587.html
What is your mill gap set at?
That was ground by Brewmasters Warehouse before they went out of business. I have a 3-roller mill now that I have not used yet.
What is your mill gap set at?
That was ground by Brewmasters Warehouse before they went out of business. I have a 3-roller mill now that I have not used yet.
I wonder if there was another cause..seems odd that it wouldn't drain. I've done some very fine crush, and some fairly coarse crush with the BIAC and have never had an issue with the colander not draining.
I may be stirring too aggressively. I had the same problem with my previous diy system. It used a kettle with the bottom cut out and a perforated false bottom.
I wonder if there was another cause..seems odd that it wouldn't drain. I've done some very fine crush, and some fairly coarse crush with the BIAC and have never had an issue with the colander not draining.
Nathan just put up a new youtube video about valves. The last valve he featured would be the ideal valve, but it is enormous in size. I'd love to have that for my bottom drain but I think it would be too long and too close to the floor. For now, my butterfly valves work just fine on the bottom and racking ports. The multi-piece ball valves that came with my BIAC are still very nice and I don't think there is a homebrew system on the market with better valves than those that come with the BIAC.
Nathan just put up a new youtube video about valves. The last valve he featured would be the ideal valve, but it is enormous in size. I'd love to have that for my bottom drain but I think it would be too long and too close to the floor. For now, my butterfly valves work just fine on the bottom and racking ports. The multi-piece ball valves that came with my BIAC are still very nice and I don't think there is a homebrew system on the market with better valves than those that come with the BIAC.
If you wanted to go with the valve you mentioned, you could put a 1.5" 90° elbow on the bottom of your conical before adding the valve. Should eliminate the clearance problem.
If you wanted to go with the valve you mentioned, you could put a 1.5" 90° elbow on the bottom of your conical before adding the valve. Should eliminate the clearance problem.
I actually have a 90-degree that I bought at Glacier Tanks when I bought butterfly valves. It has been useful.
Hey Guys, who has an easy method for cleaning the mash colander? I brew in my garage and I don't have a large sink in there. I wind up bringing in my mash colander and cleaning it our kitchen and that does not work. We have a double sink and they are not big enough for the medium mash colander. We also have hardwood floor in the kitchen and I have to be so careful. I get a LOT of water on the floor and I have to find a better way.
ezerhoden14
New Member
- Joined
- Apr 19, 2014
- Messages
- 2
- Reaction score
- 0
I brew in my garage also, when I'm finished mashing and waiting for boiling to get going I dump grains behind shed then place the colander on a 5gal bucket. use the hose to rinse in the driveway and use a sponge with a bucket of hot water & pbw to scrub down, rinse with hose and dry.. takes 10-15 mins.
Garage Brewer as well. I take themash colander outside and balance it in two buckets right side up to scoop most grain out, then balance it on its side across the two buckets and spray out with a hose as well. Think i have a pic earlier in the thread.
If I were a garage brewer, a hose in the yard/driveway would be the way I'd go. But I'm an apartment brewer: unlock wheels, roll to bathroom, life into shower. Scoop everything into 5 gallon buckets, then rinse the thing off. Ideal? Probably not. Damn easy? Yup.
Thanks Guys. I live on a golf course and there is no place to dump grain. It would be severely frowned upon. I also live on a corner lot with a side entry garage. Every single neighbor who drives by seems to constantly stare into my garage. I guess they wonder what the hell I'm doing in there. At least the BIAC is electric and I can keep the doors closed or just partially open.
I would be afraid that dumping the grain would attract rodents and then snakes and every other kind of varmint. Right now, I use my electric winch to lift the mash and then I lower it into a tote until I"m ready to empty it. I then empty it into a large heavy duty contractor grade garbage bag and tie it tightly. Then it goes into the trash bin. I wish I had a place to compost. I will try to use the hose for cleaning from now on. It is just too big for the kitchen sink!
I would be afraid that dumping the grain would attract rodents and then snakes and every other kind of varmint. Right now, I use my electric winch to lift the mash and then I lower it into a tote until I"m ready to empty it. I then empty it into a large heavy duty contractor grade garbage bag and tie it tightly. Then it goes into the trash bin. I wish I had a place to compost. I will try to use the hose for cleaning from now on. It is just too big for the kitchen sink!
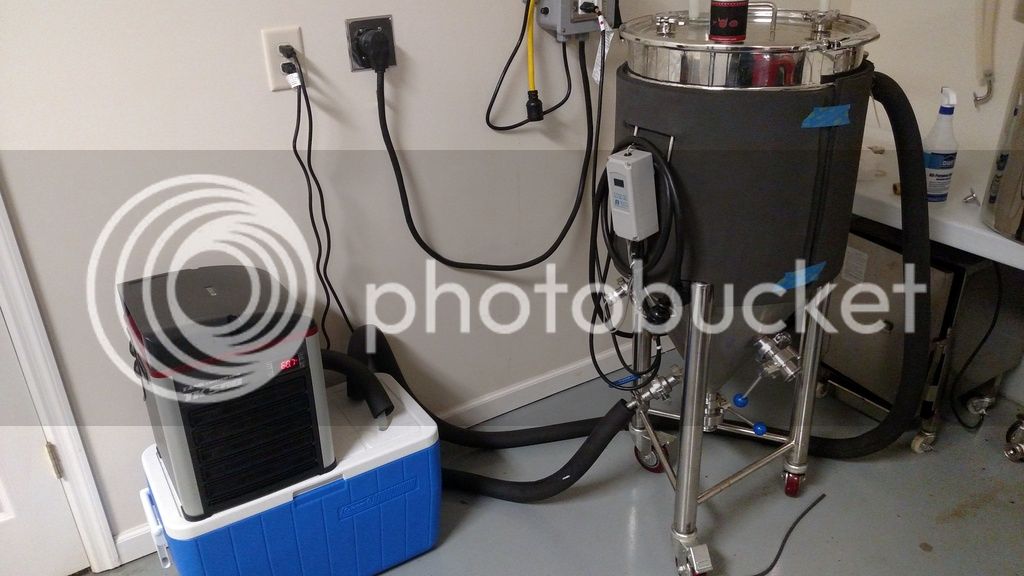
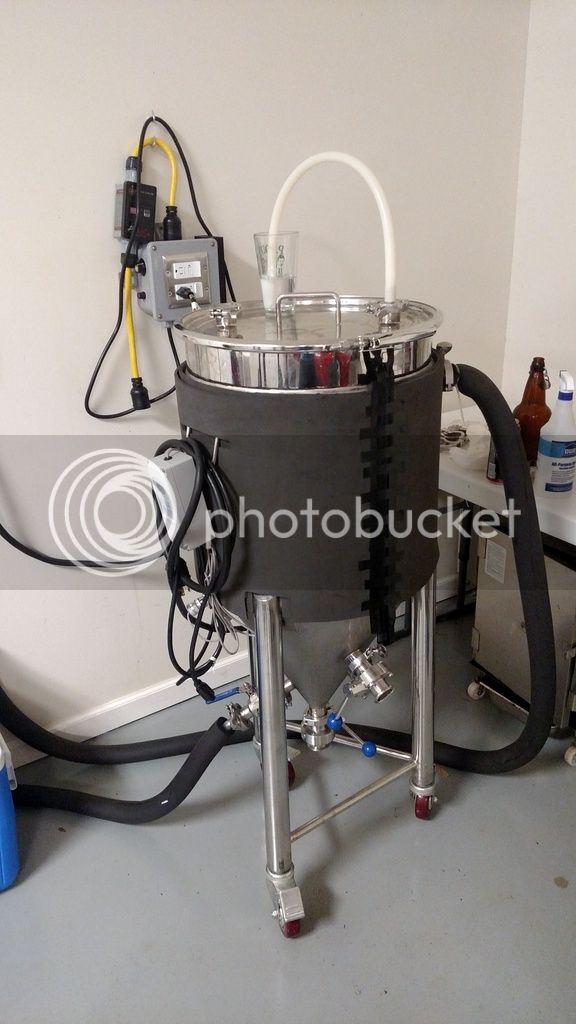
Now that I have had some time with my glycol system, I thought I would post a schematic and some photos.
First is the schematic of a glycol loop. Second is my chiller and third is my BIAC fermenter.

First is the schematic of a glycol loop. Second is my chiller and third is my BIAC fermenter.
My version of the drawing above. Just expand the photos to read the labels. In the first photo, there is a valve that is closed a little which makes the hose to the fermenter the path of least resistance when the electric valve opens. The fermenter setup is pretty basic except the extra valve in the glycol return:


Similar threads
- Locked
- Replies
- 15
- Views
- 3K
- Replies
- 17
- Views
- 2K
- Replies
- 7
- Views
- 768
- Replies
- 1
- Views
- 714
