Electric brewery plans - need help

Homebrew Talk - Beer, Wine, Mead, & Cider Brewing Discussion Forum

Help Support Homebrew Talk - Beer, Wine, Mead, & Cider Brewing Discussion Forum:

This site may earn a commission from merchant affiliate links, including eBay, Amazon, and others.
You're lucky your employer doesn't block this awesome site. My Big Brothers in board rooms don't think it's moral for me to surf "alcohol" sites at work. Can't say I have a legitimate argument, but I'd really like to poke in during a break at work here and there.

TB

:off: You could try a proxy. If they block one of them, simply switch to another. I used to do this all the time at my last job :D (and no, I wasn't fired).

http://www.publicproxyservers.com/
 
We're already on a proxy. There's no chance of surfing this site. They even block cached sites. Trust me, this corporate giant has thought of everything to keep us productive. I guess it worked.

Anyway, back on topic... :D

TB
 
Tiber_Brew,

Here is latest diagram. It incorporates SSRDs (Solid State Relay Dual) and contactors for element control and disconnect.


As usual - Click on the image for a full scale drawing.
The full sacle image is set up for printing on a 11" X 17" sheet of paper.

Please let me know your thoughts.
 
What would you recommend for the HLT? 4500? 4000? Would ULD still be a good idea for HLT? I was thinking I would use ULD for both BK and HLT for a bit of protection against dry fire damage.

Not an expert here, but I would think that you could get away with something like 4000W, maybe even smaller, in the HLT. Like I said before, 5500W can be used, but you'll likely not be able to run your BK element and HLT element at the same time on a 50A circuit.

If you want to be able to run them at the same time, you're probably better off going with something no more like 3500W or smaller in size.

Regarding watt density: high watt density would not be a problem in your HLT since the only thing in there will be water.

However, as for the dry-firing issue... High watt density, low watt density, ultra-low watt density; those things really don't have anything to do with whether dry-firing is going to be a problem or not. If you want protection from dry-firing, you will need to specifically get an element that claims it can handle dry-firing.
 
Oh..... forgot to add...

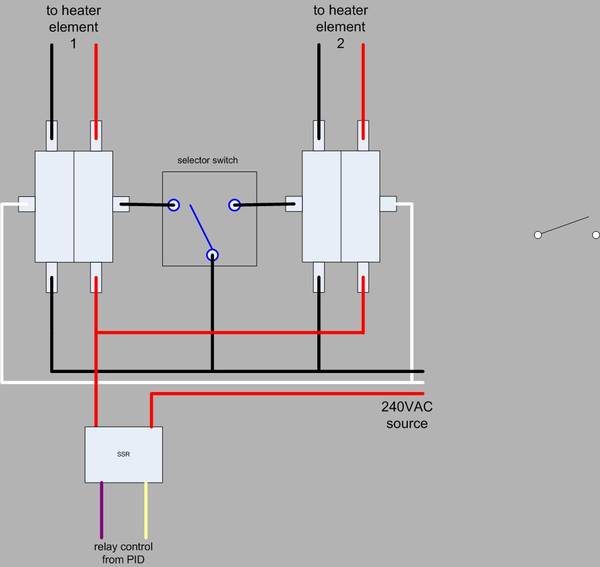
if you do not want to be able to run the HLT and BK elements at the same time, then you can save some money and have your system built using one SSR, one PID, and two contactors.

The output of the SSR could feed to both of the contactors, and you could use a three-way selector to engage the BK contactor or the HLT contactor or have it in an "OFF" position.

Schematic snippet:
oneSSR_twoContactors.jpg
 
Tiber_Brew,

Here is latest diagram. It incorporates SSRDs (Solid State Relay Dual) and contactors for element control and disconnect.


As usual - Click on the image for a full scale drawing.
The full sacle image is set up for printing on a 11" X 17" sheet of paper.

Please let me know your thoughts.

That looks great PJ! That's exactly what I'm looking for. Thanks a lot for your help; it's much appreciated!

Anyone else have any comments? I think I will go with this wiring diagram.

TB
 
Not an expert here, but I would think that you could get away with something like 4000W, maybe even smaller, in the HLT. Like I said before, 5500W can be used, but you'll likely not be able to run your BK element and HLT element at the same time on a 50A circuit.
There might be some overlap during the tail end of the sparge, but I don't anticipate drawing full power from both elements at any point of the brew session. I think I'll stick with the 5500W element, or perhaps get a 4500W.

If you want to be able to run them at the same time, you're probably better off going with something no more like 3500W or smaller in size.

Regarding watt density: high watt density would not be a problem in your HLT since the only thing in there will be water.

However, as for the dry-firing issue... High watt density, low watt density, ultra-low watt density; those things really don't have anything to do with whether dry-firing is going to be a problem or not. If you want protection from dry-firing, you will need to specifically get an element that claims it can handle dry-firing.

I have read that most ULD elements will withstand dry fire. I don't plan on testing that, but you never know - accidents can happen.

Oh..... forgot to add...

if you do not want to be able to run the HLT and BK elements at the same time, then you can save some money and have your system built using one SSR, one PID, and two contactors.

The output of the SSR could feed to both of the contactors, and you could use a three-way selector to engage the BK contactor or the HLT contactor or have it in an "OFF" position.

Schematic snippet:
oneSSR_twoContactors.jpg

That makes sense, but I think I'll stick with what I got from PJ. I'd like to have the ability to run both on an overlap, even if I don't always do that. Thanks for providing that, though.

Thanks again to everyone who helped. I will update as this project progresses. I've ordered some parts already, and the CP should be under construction soon.

TiberthesoontobeelectricbrewerBrew

:mug:
 
There might be some overlap during the tail end of the sparge, but I don't anticipate drawing full power from both elements at any point of the brew session. I think I'll stick with the 5500W element, or perhaps get a 4500W.

<snip>

I'd like to have the ability to run both on an overlap, even if I don't always do that. Thanks for providing that, though.

That's fine, but be aware that if both elements are ever on at the same time, you are possibly going to blow the 50A breaker.

When the elements are on, they are 100% on, so 5500W in the BK + 5500W in the HLT is about 46A. Add in a couple of amps for your pump and misc stuff, and you are pushing the ceiling.

if the breaker trips when you do this, then you can simply back off on running them both at the same time.

Enjoy the build!
 
That's fine, but be aware that if both elements are ever on at the same time, you are possibly going to blow the 50A breaker.

When the elements are on, they are 100% on, so 5500W in the BK + 5500W in the HLT is about 46A. Add in a couple of amps for your pump and misc stuff, and you are pushing the ceiling.

OK, the answer to my next question might further my understanding of PIDs, but, if I have the HLT element on auto at say 170F and the BK element on manual mode at about 50%, will that still draw 46A between the two elements?

Enjoy the build!

Thanks! You'll be seeing the build pictures.

TB
 
OK, the answer to my next question might further my understanding of PIDs, but, if I have the HLT element on auto at say 170F and the BK element on manual mode at about 50%, will that still draw 46A between the two elements?


Thanks! You'll be seeing the build pictures.

TB

Yes, it will draw 46A when both elements are ON.

Manual mode does not reduce the power that the BK element draws. It actually turns the element (fully) ON or (fully) OFF based on the programming you set. Example: you set a time period of 20 seconds and dial in 75% in the PID. The element will turn (fully) ON for 15 seconds, and then turn (fully) off for 5 seconds.

Likewise, when the PID is maintaining MLT temp, it will periodically turn the element on to boost the temp and then shut it back off.

Your elements each draw 23A when on, 0A when off. The PID just controls how much time the things are on vs. off.

That's what I thought. OK, thanks again Walker.
 
Yes, it will draw 46A when both elements are ON.

Manual mode does not reduce the power that the BK element draws. It actually turns the element (fully) ON or (fully) OFF based on the programming you set. Example: you set a time period of 20 seconds and dial in 75% in the PID. The element will turn (fully) ON for 15 seconds, and then turn (fully) off for 5 seconds.

Likewise, when the PID is maintaining MLT temp, it will periodically turn the element on to boost the temp and then shut it back off.

Your elements each draw 23A when on, 0A when off. The PID just controls how much time the things are on vs. off.
That is not quite totally accurate. When the Auberins PID SYL-2362 is in manual mode for boil control, it controls the percent of power by clipping the sine wave during each cycle (both the positive and the negative portion of the wave). It does the same thing as it approaches a set temperature so that it will not overshoot. BTW the PID also learns this as it goes.
 
Maybe I am not understanding what you mean by "clipping" here.

Are you suggesting that it prevents the voltage to the element from reaching a full 240V potential?
 
From the Auberins PID manual:
8. Manual mode
Manual mode allows the user to control the output as a percentage of the
total heater power. It is like a dimmer switch for the light bulb. The output is
independent of the temperature sensor reading. One application example is
controlling the strength of boiling during beer brewing. You can use the
manual mode to control the boiling so that it will not boil over to make a
mess.
Manual mode will only work with SSR output.
 
I think you are misunderstanding the manual.

They describe it as a dimmer switch to make it easy to understand, but you are setting the percent of On/Off time over a period of time. Over that period of time you dissipate X% of your total power, but that's because you were only firing the element X% of the time.

The PID does nothing more than flip on and off relays. It could be one of the internal relays or it could be an external SSR.

But, all these relays can do is open or close a circuit. SSRs don't clip the voltage they are passing through. There's no way to tell the SSR to do this. You can just tell it to open or close.

Also, the PID has no idea what kind of heat source you are even using. Maybe an AC heater element... But maybe a DC element (no wave to clip)... Maybe an on/off valve that is letting steam into a chamber (no options other than open or closed). These things would work on manual mode, too.

For the PID to be clipping the voltage to the element, all hot lines would have to pass through the PID and some circuitry, and the PID might even have to be programmed to know what kind of voltage source you were controlling.
 
Sorry. Re-reading my post, I kind of sounded like a jerk. That wasn't my intention. My goal was just to clarify manual mode operation.

My apologies.

:mug:
 
OK, so I've ordered several parts, and some have even come in already. There are a few things I'm unsure of, though, which I'll need some help with.

Here are some more details:
  • I'm planning to use DIN mount breakers.
  • I'm open to DIN mount terminal blocks, but I've seen the standard chassis mount ones for much cheaper. Jury's still out on this one.
  • I'm planning on using the wiring diagram provided by P-J here.

Now the questions:
1. I'm not sure what kind of terminal blocks to get, and where to get them. I've looked on www.digikey.com and www.automation.com, among others, but there are several choices and I want to make sure I don't have to order anything more than once, or worse yet, put the wrong thing in my CP and fry something (or someone).

2. Also, the same for the breakers. What kind? Where? Safety first.

3. What kind of fuses and fuse mounts to get, and where?

4. What's the best way to cut the square holes in the enclosure panel for the PIDs? I've got a 22.5 mm knock out punch for the switches, but the square knock outs go for around $400. Is it time to invest in a Dremel? What methods have you heard/seen/done?

5. I noticed the wiring diagram doesn't have a master power switch. If I were to use one, again - how to select the right one and where to buy?

P-J, Would I wire that with L1 and L2 right after the terminal blocks?

6. Also, I'm thinking of using a 4500W element in the HLT now instead of the 5500W. Any changes to the schematic? Any parts changes besides the element of course?

Thanks again,
TB
 
Stop by your local electrical supply shop. They will be able to answer any questions you may have AND sell you what you need. As far as the your master power disconect, you could just use your CB to disco the power. If you want a main disconect on your CP, there are several to choose from, again, a good question for those supply guys.
 
1. I'm not sure what kind of terminal blocks to get, and where to get them. I've looked on www.digikey.com and www.automation.com, among others, but there are several choices and I want to make sure I don't have to order anything more than once, or worse yet, put the wrong thing in my CP and fry something (or someone).

2. Also, the same for the breakers. What kind? Where? Safety first.

3. What kind of fuses and fuse mounts to get, and where?

4. What's the best way to cut the square holes in the enclosure panel for the PIDs? I've got a 22.5 mm knock out punch for the switches, but the square knock outs go for around $400. Is it time to invest in a Dremel? What methods have you heard/seen/done?

5. I noticed the wiring diagram doesn't have a master power switch. If I were to use one, again - how to select the right one and where to buy?

P-J, Would I wire that with L1 and L2 right after the terminal blocks?

6. Also, I'm thinking of using a 4500W element in the HLT now instead of the 5500W. Any changes to the schematic? Any parts changes besides the element of course?

Thanks again,
TB

1) Not sure - As long as they are rated for the current, you're fine. No worries with too big ;)
2) If you're going DIN, I haven't found them any cheaper than Automation Direct, And I looked... A lot.
3) I haven't looked into fuses - Breakers all the way in my rig - You're on your own... I would think anything rated for the current will get you there.
4) I used a "Roto-Zip" like tool. It's not a roto-zip brand, but it worked great, with a little cleanup with a file.
5) +1 to instapman - You can use your master circuit breaker as your primary disconnect.
6) I don't think anything changes if you go to 4500 watts. You could, however, go to a 25 amp SSR to save some grain $$ and still have some (4.6 amps, or 18%) headroom...
 
1. I'm not sure what kind of terminal blocks to get, and where to get them. I've looked on www.digikey.com and www.automation.com, among others, but there are several choices and I want to make sure I don't have to order anything more than once, or worse yet, put the wrong thing in my CP and fry something (or someone).

For what it's worth, I used DIN rail mounted distribution blocks. They are modular so you can pretty much add as many as you want and they were not very expensive. My stuff was all rated for 50A and 240V, so cheaper things might be available, but it was still pretty damn cheap to get the 50A stuff.

Links to the modular power distribution stuff at mouser.com are in this post:
https://www.homebrewtalk.com/f51/my-herms-build-ready-criticism-173077/#post2003768

4. What's the best way to cut the square holes in the enclosure panel for the PIDs? I've got a 22.5 mm knock out punch for the switches, but the square knock outs go for around $400. Is it time to invest in a Dremel? What methods have you heard/seen/done?

HA HA HA!

What kind of enclosure are you buying? Plastic? Steel? The material for the enclosure makes a WORLD of difference when it comes to cutting holes!

I snagged a pretty good sized 12 gauge steel enclosure for a BITCHIN' price on ebay and was pretty proud of myself. But then.... I had to cut lots of small rectangles in it because I bought rectangular rocker switches. An, of course, the PID needed a big square cut for it, too.

Cutting those holes was a royal PITA. Drilling round holes was no problem at all. My cheap-o cordless drill was able to do it easily, I just had to take a couple steps with increasing bit sizes to get large holes, but it was still pretty easy.

I bought a dremel thinking I could use it for the squares and rectangles.

NOPE.

It was slow slow slooooooooooooow going, the dremel would get HOT, the battery would have to be recharged often, and I was going through the little cutting disks rapidly. I ended up tossing the dremel to the side completely.

I took a drill bit and went around the whole outline of the hole I wanted to cut drilling many holes very close together. Then I took a tungsten carbide cutting bit that was meant for the dremel and put it in my old plug-in drill and used that to "connect the dots". Then I used a dremel grinding stone (installed in my drill) to grind off the shark tooth shaped pieces of metal that were left around the edges, and then finally had to hand file the edges to get them clean and large enough to slide my components into.

My bitching and moaning can be found here: https://www.homebrewtalk.com/f51/control-box-enclosures-some-tips-anyone-considering-168536/

If your enclosure is plastic, then a dremel will rip through it like butter. If your enclosure is steel, the thickness of it could make your life difficult.

I spent many many nights in a row out in the garage drilling, grinding, and filing holes in my steel box. In retrospect, I think I would have been happier and saved my self hours of work by just taking a jigsaw and cutting out almost the whole front of the box (one LARGE window) and then using the company Front Panel Express (link is in this thread: https://www.homebrewtalk.com/f51/control-panel-labeling-give-us-some-ideas-159796/) to layout a sweet looking panel on a sheet of aluminum with text labels on everything, and then paying $50 for that company to punch, cut and engrave the thing and send it to me. I could have just installed it on my box with a few screws.

More expensive for sure, but when I think about the pain I went through....

If I ever decide to make enough changes to my system that I need to reorganize the panel, I am going to do exactly what I described. Cut the whole front of the panel off and hire those guys to make me a nice one.
 
I have installed several of PID's in CPs of all type. The best way for ME is to mark your "square hole" then drill a 5/8 hole in one corner inside of the the "square hole" then take a sawz all to it....carefully...very carefully...this never fails for me. If you go with a plastic CP then this would be made easy just like Walker said.
 
What's the best way to cut the square holes in the enclosure panel for the PIDs? I've got a 22.5 mm knock out punch for the switches, but the square knock outs go for around $400. Is it time to invest in a Dremel? What methods have you heard/seen/done?

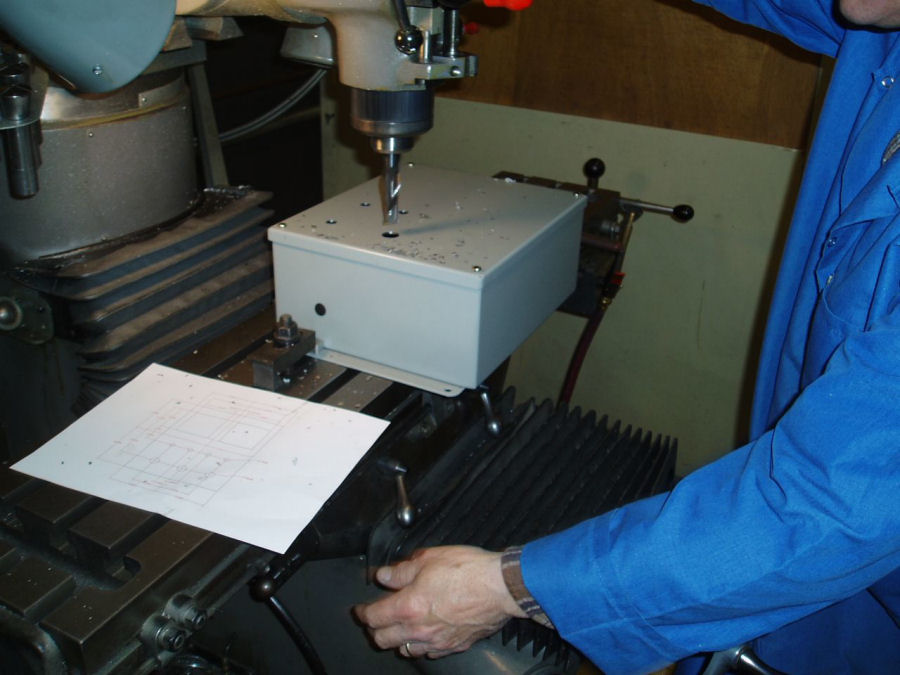
I did my square cutouts with a Bridgeport Milling Machine. It's really the easiest way to cut a nice square hole. I am lucky because my next door neighbor owns a machine shop. When he goes in on Saturday to do his paperwork he lets me use one of his Bridgeports.

Control_Panel_Milling_2.jpg
 
I did my square cutouts with a Bridgeport Milling Machine. It's really the easiest way to cut a nice square hole. I am lucky because my next door neighbor owns a machine shop. When he goes in on Saturday to do his paperwork he lets me use one of his Bridgeports.

Control_Panel_Milling_2.jpg

Cheater :p
 
I bought a steel enclosure. I wanted it to dissipate some of the internal heat, and polymer boxes are more insulating.

I'll punch out the round holes for the switches with my knockout punch, easy as pie. But, for the square holes, I like Sawdustguy's approach. I still live in the same town where I went to engineering school, and still know some people who have access to the machine shops. If that falls through, I'll struggle with some of the other methods mentioned and do my best.
 
OK, after further searching, I've got more questions, some related to previous ones:

1. I've decided to get chassis mount terminal blocks, but I'm not sure about which ones to buy. I'm guessing each of the ones from the diagram are identical? What's the minimum current rating I'll need? Will these work for my application?

2. I'm confused about the 15 amp 120V double breaker. Is that the same as a double pole breaker? From P-J's diagram, it appears that there's one line in, and two out.

I'm looking at getting this for the 15 amp 120V breaker, and these for the 25 amp 240V breakers. Thoughts?

Thanks again for all the help.
TB
Re: 1. The terminal blocks for the 240 volts should be rated for the wire size (current delivered) on the input to the block. The last diagram shows that to be 60 amps. based on the current supplied and the total demand for the application. The neutral and ground blocks can be smaller as they will be carrying far less current.
2: The 15 amp double breaker is simply a breaker that is manufactured to fit into a single breaker position in a main panel. It is 2 single breakers that occupy 1 position. With your mounting plan, you would need 2 - 15 amp 120V breakers. The one you link to is a 240V double breaker.

I hope this helps. Let me know if you need some mods done to the diagram.
 
Dang, P-J beat me to it. According to the data sheet posted with the terminal blocks, they are rated for 30 amps. If you get 2 of these and divide your amp drap correctly they would work. Keep in mind you would have to bring 30 amps to each block, not hooking one up to the other, that puts your amp draw at 60 amps on your first block. Not sure how that would work with your diagram as I have not looked at it close enough...time to read up....


P-J-- knucks to you for modifying your diagram, nice to see going out of their way to be helpful...
 
Re: 1. The terminal blocks for the 240 volts should be rated for the wire size (current delivered) on the input to the block. The last diagram shows that to be 60 amps. based on the current supplied and the total demand for the application. The neutral and ground blocks can be smaller as they will be carrying far less current.
OK, thanks!

2: The 15 amp double breaker is simply a breaker that is manufactured to fit into a single breaker position in a main panel. It is 2 single breakers that occupy 1 position. With your mounting plan, you would need 2 - 15 amp 120V breakers. The one you link to is a 240V double breaker.

I hope this helps. Let me know if you need some mods done to the diagram.
Excellent. Makes sense to me.

Dang, P-J beat me to it. According to the data sheet posted with the terminal blocks, they are rated for 30 amps. If you get 2 of these and divide your amp drap correctly they would work. Keep in mind you would have to bring 30 amps to each block, not hooking one up to the other, that puts your amp draw at 60 amps on your first block. Not sure how that would work with your diagram as I have not looked at it close enough...time to read up....
I think I'll try to find a terminal block rated for the current I'm using for simplicity. Anyone know a good place to start? I've been looking at www.digikey.com and www.newark.com.

P-J-- knucks to you for modifying your diagram, nice to see going out of their way to be helpful...
No kidding. That was really nice of him to do that for me. What a great bunch of people homebrewers are, eh?

TiberthankstothesparkysBrew
 
When I built mine earlier this year, I honestly could not find terminal strips rated for over 30A anywhere without them costing INSANE amounts of money.

That's why I went with that modular DIN rail stuff I posted earlier for the initial incoming high current part of the box. Everything between the 50A GFI breaker in my panel and the smaller breakers inside my control panel is rated for 50A or more.

From that central power distribution block, my hot lines go immediately to smaller breakers to limit the current into the other parts of the design. Once I had those breakers in there, I was able to use the smaller terminal strips to distribute power to all of my 120V items (pumps, switches, PID, PWM).

50A GFI breaker -> 50A receptacle -> 50A plug -> 65A power cable -> 50A power distribution -> smaller breakers -> terminal strips
 
I think I'll try to find a terminal block rated for the current I'm using for simplicity. Anyone know a good place to start? I've been looking at www.digikey.com and www.newark.com.
From newark.com You would need 2 of these for the 2 - 240V lines. The neutral and ground terminal strips will be carrying a max of 15 amps so a much smaller strip can be used for them.

HTH
 
Re: 1. The terminal blocks for the 240 volts should be rated for the wire size (current delivered) on the input to the block. The last diagram shows that to be 60 amps. based on the current supplied and the total demand for the application. The neutral and ground blocks can be smaller as they will be carrying far less current.
2: The 15 amp double breaker is simply a breaker that is manufactured to fit into a single breaker position in a main panel. It is 2 single breakers that occupy 1 position. With your mounting plan, you would need 2 - 15 amp 120V breakers. The one you link to is a 240V double breaker.

I hope this helps. Let me know if you need some mods done to the diagram.

I bought two of these for the 120V circuits, and two of these for the 240V circuits.

One question though: in your diagram, there is only one line going to the double 15A breakers, but two coming out. Is that a mistake? How would I wire it with the breakers I've got (above)? Could show that on the diagram? I have an idea, but want to make sure.

Thanks P-J!
 
When I built mine earlier this year, I honestly could not find terminal strips rated for over 30A anywhere without them costing INSANE amounts of money.

That's why I went with that modular DIN rail stuff I posted earlier for the initial incoming high current part of the box. Everything between the 50A GFI breaker in my panel and the smaller breakers inside my control panel is rated for 50A or more.

From that central power distribution block, my hot lines go immediately to smaller breakers to limit the current into the other parts of the design. Once I had those breakers in there, I was able to use the smaller terminal strips to distribute power to all of my 120V items (pumps, switches, PID, PWM).

50A GFI breaker -> 50A receptacle -> 50A plug -> 65A power cable -> 50A power distribution -> smaller breakers -> terminal strips

Walker, could you provide links to the items in bold? My next step is power source work. I've found a few things that might work on Home Depot's website (I don't have a HD, Lowe's, or Menard's near me), but I'm open to other ideas. Most of what I've found is rated for 30A, not 50.

Thanks!
 
IOne question though: in your diagram, there is only one line going to the double 15A breakers, but two coming out. Is that a mistake? How would I wire it with the breakers I've got (above)? Could show that on the diagram? I have an idea, but want to make sure.

Thanks P-J!
You are welcome. I'm working on the updated diagram as I (well when I get done) type.

Congrats on receiving the parts. That's great. I like the terminal strips. You won't regret it.
 
Don't forget to look for power cables and plugs receptacles!

60A stuff can be expensive, so you might need to shop around for a while to find the stuff.
 
Tiber_Brew,

Ok... It took a little while with the bits and pieces - but - Here is latest diagram. It has the breakers that you ordered and I've also placed pix of your switched. I've changes some of the foot notes as well.


As usual - Click on the image for a full scale drawing.
The full sacle image is set up for printing on a 11" X 17" sheet of paper.

I sure hope this helps you. Please let me know your thoughts.
 
Don't forget to look for power cables and plugs receptacles!

60A stuff can be expensive, so you might need to shop around for a while to find the stuff.

Tell me about it. At first look, it appears that I was going to have to spend $100/receptacle! I found some cheaper ones on eBay, but they were still around $80 with shipping. It's tough to find 50 or 60 amp stuff, as they all seem to be 30 amp for dryers. Suggestions?

What did you get, Walker? Do you have links? I live 100 miles away from the nearest Lowe's/Menards, and 250 miles from the nearest Home Depot. :( I would make the drive to Lowe's if I knew they had what I needed.

Thanks!

50A is easy to find. That's what electric stoves plug into. Shouldn't cost any more than 30A stuff either.

I use "NEMA 14-50" plugs and receptacles, bought them at Home Depot (or Lowe's... I can't remember).


edit: fyi, 4-wire dryer plugs and receptacles are "NEMA 14-30". the "14" is the style of plug and the "30" is the amp rating.

Nema 14-30 and 14-50 look similar. The difference is that the 30A one has one of the prongs on the plug shaped like an "L" while the 50A is shaped like an "l". This is done to prevent you from plugging the wrong thing in.
 

Latest posts

Back
Top