OP
OP
Wanted to bump this thread and find out if anyone else is using this system? I am still loving this way of fermenting and the ease of carbonating. Would love to hear more try'ers and do'ers stories.

I haven't tried full closed-fermentation and have yet to try it to any degree on an ale. And I still need a spunding/relief valve. But I do the carbonating part of my lagers similarly.Wanted to bump this thread and find out if anyone else is using this system? I am still loving this way of fermenting and the ease of carbonating. Would love to hear more try'ers and do'ers stories.
")
Wanted to bump this thread and find out if anyone else is using this system? I am still loving this way of fermenting and the ease of carbonating. Would love to hear more try'ers and do'ers stories.
. Oh well, it works for me but I always want more. I like that you are staggering pressure like you are, but I have read yeast actually likes a little more pressure and thrives in it, so that is why I pressure up at the get go. Keep us informed. I love the P-ferment, and the only issue I have had is a needed diacetyl rest after primary is slowing. It is supposed to clean up quick though, and I have only had a problem once. I was using pilsner grain so maybe that was why.I need a pressure valve that releaves higher than 20 psi, and a gauge that reads higher than just 30 psi
I love the P-ferment, and the only issue I have had is a needed diacetyl rest after primary is slowing. It is supposed to clean up quick though, and I have only had a problem once. I was using pilsner grain so maybe that was why.
Ok, so you've noticed an increase in diacetyl before? Have you brewed a lager using this method? I ask because lagers tend to produce more diacetyl than ales and require a longer conditioning period.
Ok, had to check the link because you said regulator... reg's don't hold pressure they allow a certain pressure to constantly escape, lol. Glad you went with the recommended "adjustable pressure relief valve" and not a regulator (for all those reading). Those are great, just wish they came in a 1/4" connection and not 1/8". Still a great buy, and something I need to purchase and not just recommendlamarguy said:I'm using the 0.5 - 30 psi back-pressure regulator from mcmaster. They sell the same regulator with different settings that go up to 90 psi, but the regulators are by no means inexpensive.
.According to the chart Kaiser so happily showed us in this thread, diacetyl does ramp up but also comes down fast with the pressure technique. It was my first attempt, so numerous things accured I wasn't sure about. I haven't had a problem since, but I also haven't attempted a lager yet with this technique. Honestly, my main concern was DMS in lagers after I conquered the diacetyl in my first beer.lamarguy said:Ok, so you've noticed an increase in diacetyl before? Have you brewed a lager using this method? I ask because lagers tend to produce more diacetyl than ales and require a longer conditioning period.
I don't think you will have any worries about diacetyl with this technique unless you rush something and not let the yeast do its clean-up job. I really think my recipe and procedures are what screwed up my first attempt.lamarguy said:It will be hard for me to evaluate the diacetyl level in the current beer since I'm using irish ale yeast, which already produces excess diacetyl.


I haven't made a dedicated thread as of yet due to me not testing my proposed experiments in this thread. I do plan on it once I have some baseline tests to even see if it would be worthwhile. I think, from what I have been reading in my pre-research, that it has some serious merit as far as lagers go. I mean, if some of the largest breweries do some "forms" of this already (beechwood aging, and accelerated yeast scrubbing vessels) for a quick product, then why wouldn't it... right? Guess we will see when I can get to it.:rockin:variverrat said:WortMonger,
Is there a thread about the stir-bar accelerated maturation technique? I'm starting to plan on using sanke fermenters and wanted to read up on that so I can plan ahead, sounds interesting.
Well, I haven't experimented with such a small batch in such a small container, but Poindexter has. I think 4 gallons in a 5+ gallon keg would be fine. Especially now that I have been reading about Fermcap. The krausen and blow off are your biggest enemies with this technique, so anything you can do to minimize those is going to allow for it IMHO.skinny said:What size batch works well in a corny keg? Would 4 gal work well or would it still be too much?
Sorry to hear about your keg kit. Leaks suck! The guy looks like he sells quality stuff, so I bet he can get you taken care of. Worse case, you could always use the regular keg connections and do as I do. Hope it turns out good for you though.lamarguy said:Well, I ran into a small glitch. The sanke fermentation kit has a slow leak around the gas out port (at the weld). I love the kit, but I tend to have bad luck with equipment. So, if there is a bum one in the batch, I'll get it 98% of the time.
So, the pressure made it to ~10psi last night and, unfortunately, it leaked down to ~1psi by this morning. I just hit it with 5 psi from my CO2 tank to confirm it's not holding pressure.
Here are some pics (the bubbles are me testing for leaks with starsan).

Sorry to hear about your keg kit. Leaks suck! The guy looks like he sells quality stuff, so I bet he can get you taken care of. Worse case, you could always use the regular keg connections and do as I do. Hope it turns out good for you though.
I do! This is how I fill my fermenter from the kettle. I remove the "normally" beer-out (ball and holder) check valve, and then also remove the "normally" gas-in (plastic one-way) check valve. This lets the tap operate openly once attached and "tapped" on the keg. I then fill through the beer port on the top of the tap connector and the air leaving the keg does so through the gas port. I do the same for my destination keg when counter-pressure transfering, only I have a pressure relief valve attached to the gas port to control pressure inside the keg for non-foaming.can you fill a sanke through the off the shelf tap?
I made it from grain to glass in 10 days. It was almost too easy. I'll be primarily using this method from now on.
Just my opinion but I wouldn't use liquid-filled gages. If you get a leak (which admittedly is unlikely) it could ruin a batch. If you're not subjecting the gage to a lot of vibration, moisture (external), or 'hammering' it with pressure then you don't really need a liquid-filled gage. They also tend to often leak externally so if you don't leave it in an upright position that rubber plug can leak the liquid out.hey guys, grainger has some nice liquid filled gauges on sale now pretty cheap, if you're looking to upgrade hardware (http://www.grainger.com/Grainger/ecatalog/N-1z13o1f/No-0/Ntt-pressure+gauge?Ns=List+Price|0&op=search&sst=All). i'm looking at a liquid 0-60 for $10 (downside is graduation in marks of 2, and its a rear mount, but a 90degree fitting will fix that). and their pressure relief valve looks nice, for under $25 total!
btw, how are you attaching the T or Y splitter to the gas-in on a sankey tap?
Hey Skinny,
Have you made the same recipe before? If so, are there any flavor and aroma characteristics were suppressed or accentuated with this method?
There was definately more hops influence all around. It makes sense to me since I didn't lose any resins out the blowoff tube like normal. Other than that I am undecided. I have not made this exact reciepe before, but pretty close.
That's interesting. Thanks for passing that along Skinny.
For those of you with experience with this fermentation method, how do you think it affects your beer?
I will be brewing another batch tonight. On this one I am going to split it in half and do a side by side comparison between this method and a normal primary/secondary/kegging/priming process. If all goes well I'll have more info in few weeks.
I actually had a hard time finding a tailpiece that fit with the standard gas-in nut that comes with the tap connector. I have since found one that fits into a 1/4" NPT, but I had mine machined out of nylon for about $8 for 3 of them. I know they are out there, as I found some online after I had mine made, I just don't know where to point you right this second. Maybe Forrest from Austin Homebrew Supply can help, since I know they are made. Sorry I can't be more help in this area. For the life of me I can't remember where I found them in stainless. Still, I may get more made and sell them cheap to us guys.i just bought some/ordered the rest of the parts necessary to build this spunding valve. how are you connecting the T to the gas-in on the sankey coupler? it looks like a plastic adapter of sorts in your original setup. Do you know the thread sizes on sankey D inlets and outlets? thanks for all the help!
Hey, thanks for your interest. I really like using the keg as a fermenter, and I did cut off 3/4" off my dip-tube which leaves me with 1 quart in my fermenter when I am transferred to my serving/secondary. However, after doing so and using the system I still get a little sediment in my target keg during transfer. I wouldn't change a thing on my kegs if I were you. My problem can be fixed with a larger siphon tip thing I need to make. Like this from Austin Homebrew Supply, only for keg dip-tube size.

Or, you could just pour a pint or two before you start the keg transfer. Last, if you weren't going to have carbonated beer, you could unseal the keg and use a normal siphon setup and prime your keg as usual.
I like having everything done before transfer and am getting good at clean (low foaming and low sediment) transfers. This way I have beer that just needs to age/chill/tap.
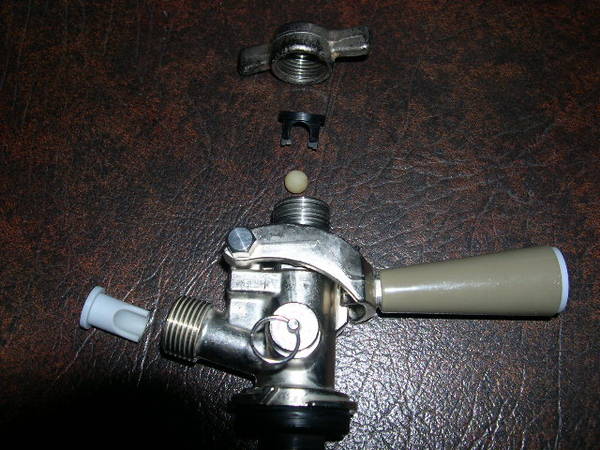
I figured I would go ahead and describe the modified Sanke tap, since it is less of a modification and more of a removal and addition type of thing, so here goes.
Here is what the Sanke tap looks like with the pieces that are normally there taken out. This is how I have the fermenter tap when I am transferring to my target keg (of course there would be a gas-in beer threaded nut and gas line coming from my CO2 Bottle same as a normal tap for serving).
Here is what I look like at the end of my fermentation when I have already built carbonation and have chilled the beer to 33*F (spunding valve not pictured on the gas side with check valve removed). The only difference is during normal fermentation I have a beer line hooked up to the beer side (beer check valve installed) with a spigot for testing/measuring gravity and the spunding valve on the gas side with, of course, no check valve.
I only do this on my target keg I am transfering to.Scut_Monkey said:WortMonger,
Thanks for all the info in this thread. I'm looking to give this a shot down the road and I'm trying to figure out what equipment I would need (I already have most of it). My question is why do you remove the liquid check valve from the Sanke tap when the beer has fermented out and has chilled to 33F? Do you have to remove it at that point? Thanks!
