Cooler with Heating Elements for HTL, will it work?

Homebrew Talk - Beer, Wine, Mead, & Cider Brewing Discussion Forum

Help Support Homebrew Talk - Beer, Wine, Mead, & Cider Brewing Discussion Forum:

This site may earn a commission from merchant affiliate links, including eBay, Amazon, and others.

promontory

Well-Known Member
Joined
Jan 2, 2009
Messages
87
Reaction score
1
Location
Bothell, WA
So i am very open to opinions here, just trying to make a good choice jumping into all grain.

The way I understand it, I want to have my strike water a specific temperature, then I want my sparge water to also be a specific temperature. So I am looking at two methods, the first seems to be done alot, just using a keggle with a lid for my HTL. The second is where my question lies.

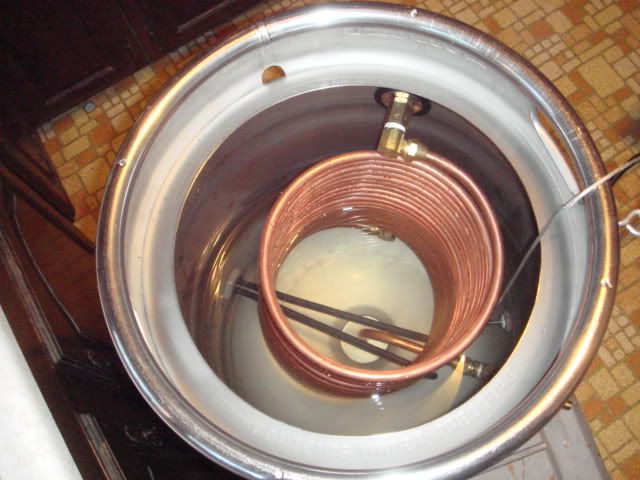
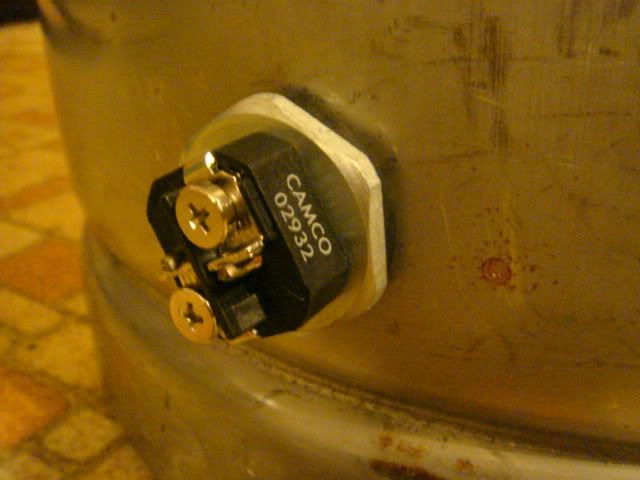
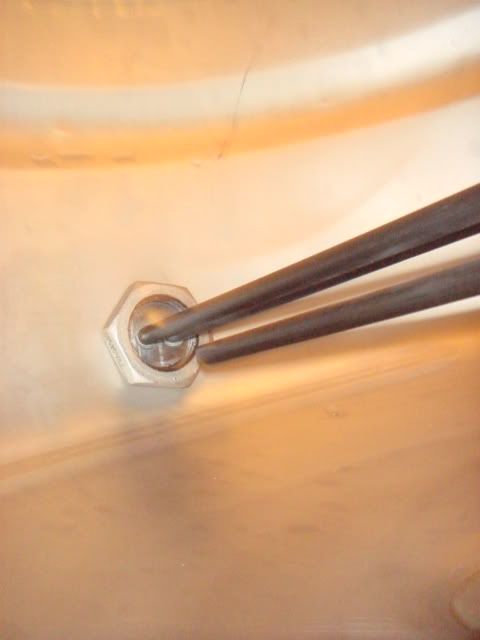
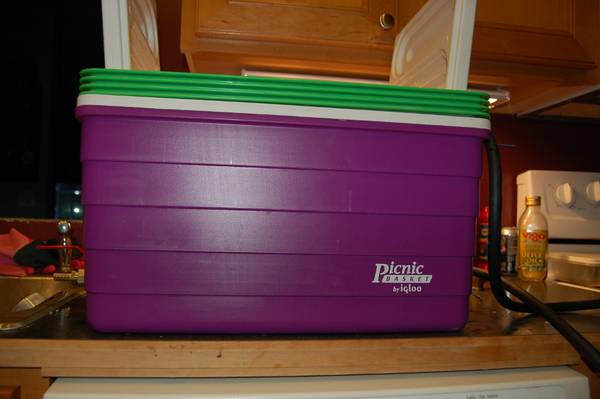
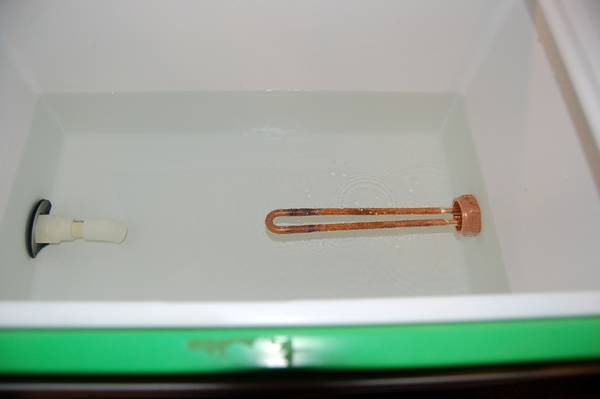
I can get an 60qt cooler for $30. Then if I were to drill two holes and install Hot water tank heating elements (stainless) I could potentially use a cooler for my HLT. The cooler with its lid would keep things a more static temperature. I have to run off 120 so I'll have to use lower wattage heating elements. Has anyone done this? I could build in a thermostat of some kind to keep the heating elements working at the right temps. Overall it just sounds like a potentially good call. Here are my questions about this but feel free to comment overall:
1st, would this work?
2nd, will there be any need to go over 180'? I don't know of one but that seems like an acceptible temp for the coolers.
3. IS this just a horrible idea?
4. I am not trying to cut corners, this actually just seems like a good way to keep temps solid.

Thanks so much for the help and thoughts. If I do go this way I will post pics for sure.

thanks

TJ
 
I actually did this and run the HLT off of my BCS along with a RIMS, pump, for my mash tun cooler. You just have to check and recheck to make sure you have no leaks
 
1st, would this work?
2nd, will there be any need to go over 180'? I don't know of one but that seems like an acceptible temp for the coolers.
3. IS this just a horrible idea?
4. I am not trying to cut corners, this actually just seems like a good way to keep temps solid.

1 - Yes. I use to do this myself
2 - Hmm, probably not. My cooler never melted at those temps.
3 - No
4 - Cut corners? No way, ghetto rules! The only reason I switched was because I came into some sankes and converted one to a HLT.

As far as temp control was concerned, I just dropped my thermometer in there and kept an eye on it. I unplugged the element when I hit the temp I was after. I still have the cooler sitting somewhere, but as I recall, I had the element about 2 - 3" from the bottom. You want to make sure you have plenty of clearance for the element.
 
Also there is no need for the element to be stainless. It won't hurt anything if it is, but since it doesn't come in contact with acidic wort, the metal does not really matter.
 
Since you're already spending $30, why not go with a sanke that will hold more, last longer, and not have to worry about a dry fire meltdown?

DSC05061.jpg

DSC05029.jpg

DSC05031.jpg
 
Hey Klyph-

Out of curiosity - Is that pic a boil kettle with a built in immersion chiller, or is that part of a HERMS setup?
 
So I am checking with my supplier on the Sanke idea because I have seen a bunch of people do it. I was looking at costs for the cooler and also thought about going with electric, so its just an idea at this point. Will I get the temp up with just 120v? I think I found 1700w elements. My two biggest questions still are:

Will I want to move to a sanke later? Capacity won't be an issue... But is there something I am missing?
Will the temp get up to 180 on 120v?
Any recommendations on elements? I was just thinking about going to Home Depot
Any limitations on ways to seal the hole?

thanks guys, so great to get answers from those more experience...
 
Will I want to move to a sanke later? Capacity won't be an issue... But is there something I am missing?
Will the temp get up to 180 on 120v?
Any recommendations on elements? I was just thinking about going to Home Depot
Any limitations on ways to seal the hole?

Most people end up moving to a sankey or some sort of large pot. That's not to say its right for everyone, but it seems common. Certainly, they are more durable than a cooler, but they're more difficult to cut and drill too.

I've got a 2000 watt 120v element in my sanke. I picked it up from Menards. Nothing special there. It cost around $8. My house has 20 amp circuits, so I can run an element that big. An element this large would likely trip 15 amp breakers, so you want to make sure your wiring can handle the load your looking at.

I can get the water up to 180 and my sanke in not insulated. Most people insulate theirs with foil insulation. As a guess, because I have never timed it, it takes about 45 - 60 mins to get the water up to strike temp and maybe another 15 to 20 mins to get to ~180 for sparging. I recirculate the water during heating with a March pump to prevent thermal layers from forming. There's a spreadsheet floating around HBT about electric HLTs and thermal rise.

For sealing the element, most people just use the rubber o-ring that comes with the element. This worked well for me, on both the cooler and sanke. You'll need to get a 1" lock nut to hold the element in place. Or, alternatively, you can try a 1" copper FPT adapter. That's what I've got. It was available locally and was a lot cheaper than ordering a 1" lock nut. However, some people report having trouble with the copper adapter because of the tapered threads. But, worked great for me.
 
Yeah the temp will get up to 180+ on 120v it just takes a bit longer. I filled mine up with 8 gallons and it was about an hour to get up to temp with a 1500w 120v element.

I picked up my element from Home Depot

Make sure you get a bit the right size and get as smooth as an opening you can when you drill.
I ran into the problem of the o-ring being too thick that I used inside the cooler and it was tough to get the threads to bite properly or it would distort the o-ring. I got it to seal and have not looked back.
Finally MAKE SURE YOU HAVE IT GROUNDED!!!! You want to have a ground wire installed at all costs.
 
Hey Klyph-

Out of curiosity - Is that pic a boil kettle with a built in immersion chiller, or is that part of a HERMS setup?

That's the HLT in my HERMS. I guess I could use it as a boil kettle, but I'd have to swap out the neoprene gaskets for silicon.
 
That's the HLT in my HERMS. I guess I could use it as a boil kettle, but I'd have to swap out the neoprene gaskets for silicon.

How often do you have to cool down the water in your HLT? Do you have pics of the rest of your set up? Assuming you put that together your work looks great!
 
I built one myself a couple of weeks ago. I gave it a test run last weekend on an ESB and it worked great.

My plan is to eventually add temperature control so that I'll be able to maintain the proper temperature. I am on the way to creating a HERMS system a piece or two at a time.

I used a 50 quart "cube" cooler and a 1500 watt element. I ordered a stainless lock nut and a weldless bulkhead from Bargain Fittings.

With the 1500 watt element I was able to heat the water an average of .84 deg F. per minute. So it takes a while to heat the water with the small wattage element but the insulated cooler keeps the water at the desired temp pretty well when the element is switched off.

With temperature control and a little planning I should be able to fill it up and set the temp on brew morning, then come back a while later after some coffee and be ready to start brewing.
 
I have done exactly what you're describing. I have a 10g rubbermaid round cooler with a 1500w 120v element in the bottom. On the lid is a small 60rpm motor which turns a paint stirrer to keep the water from stratifying. This is nice, but not essential. I control temp with a ranco controller and the temp probe goes into a carboy thermowell in the lid.

I can't say enough how much I love this system. I use it to heat all of my strike and sparge water which keeps my propane usage down. My normal routine is to set the HLT up first on brew days and fill it to the top with hot water from the tap. I just set the ranco and by the time I've got everything else set up and the grains milled it's at temp. Even with 10g of water the small 1500w element gets it from 140 to 170 in no time. I get about .75-1degree per minute with 10g and its faster with only 5 in the tank. When I'm doing several batches in a row I just top up the tank throughout the day and I always have all of the hot water I need.

Any chance of seeing some pics of this system?
 
Here are some pics of the HLT. As I mentioned before, it's just a simple 1500w 120v hot water heater element. It's pretty small, but since I start with hot water from the tap and am only trying to get to strike/sparge temps it works fine. By the time I get all of my stuff set up it's ready to go.

I used the directions from this website to build mine: http://www.wortomatic.com/articles/The-Electric-HLT-(or-how-I-built-a-water-heater-in-a-cooler).

I did make a couple very small changes. First, I couldn't get silicone to seal well and it's a mess to deal with, so I used JB Weld instead. I think it does a better job. If you read the posts on building a heatstick they talk about it being food safe. I don't know about that, but I'm not all that concerned. Anything that leaches out is probably no worse than the preservatives we eat every day. Second, you don't have to make a pvc nut for the inside of the cooler. There are pvc nuts readily available off the shelf.

This setup has worked well for me, but if you go this route please be careful. Electricity and water don't mix well.

2010-09-12_11-47-04_577.jpg


2010-09-12_11-47-14_303.jpg


2010-09-12_11-47-44_421.jpg


2010-09-12_11-48-27_20.jpg
 
How often do you have to cool down the water in your HLT? Do you have pics of the rest of your set up? Assuming you put that together your work looks great!

Here's the link to my build thread.

https://www.homebrewtalk.com/f11/anti-bling-high-lead-chinese-brass-dirty-cheap-build-159524/

I fill the HLT with cold water, heat to strike temp, transfer to MT, dough in, then top up the HLT and reset to mash temp. Then after mashing I ramp up to sparge temp. The topping up of cold water brings it below mash temp, that's the only time it gets cooled down. Oh, after typing that out, I realize you probably think that is an immersion chiller in the HLT. It's not, the coil is a heat exchanger for the mash to be circulated through to maintain mash temp. That's how a HERMS works.
 
I was afraid of melting a cooler, so I chickened out out the cooler with heatsticks HLT.

Last weekend, I tested out my Keggle HLT with two 2000 watt heatsticks. It worked GREAT! No more heating water in the kitchen!

I still need to mess with the weldless drain fitting (very slow leak) and install my Bobby_M siteglass w/thermometer. A layer of insulation would not hurt.

Oh well, a brewery is never finished...

:rockin:
 
+1 to cooler-based HLT with water heater element. I use a rectangular cooler, so I use a pump to keep the water circulating so the temperature is even throughout the cooler, and I've gone as high as 185F with this system with no issues.
 
Nice build.

Has anyone done this with a rectangular cooler , or is there a reason to go with a round one ?
 
This was the one I made a while back. This was since retired, but worked great while it was still in operation. My temp control was a floating thermometer. I unplugged it when it reached the desired temp. The element is 2000 watt 120V.

HLT_2.JPG


HLT_3.JPG
 
Now that is just about my speed...

Was thinking 1500W 120V

How big a hole did you drill, and how did you ground it ?
 
To mount the element, I drilled a 2" hole through the outer wall and insulation. After clearing away the insulation, I drilled a 1 1/4" hole through the inner wall. The element is then mounted to the inner wall. I did something similar on the other end of the cooler to mount a 1/2" drain.

Grounding is a little tougher. I chose to not ground the element (not recommended). Of course, the cooler is plastic and can't be grounded. You might be able to attach the grounding wire to the "dry side" of the element with a cable tie. The other option might be to drop a copper wire into the cooler and attach it to the nut somehow.
 
Back
Top