You are using an out of date browser. It may not display this or other websites correctly.
You should upgrade or use an alternative browser.
You should upgrade or use an alternative browser.
Show us your sculpture or brew rig
- Thread starter Onescalerguy
- Start date

Help Support Homebrew Talk - Beer, Wine, Mead, & Cider Brewing Discussion Forum:
This site may earn a commission from merchant affiliate
links, including eBay, Amazon, and others.

Compact and easy to use.
Fancy dual regulator off the propane tank, I like it!
Not exactly, it's simply a safety issue. The only time copper was routinely used is for flex connections (rigid pipe was and is run with "black" pipe for added strength and cost savings). The new flex lines that are used are simply less likely to develop leaks after movement than soft copper with a field installed compression fitting.
On a brew stand you have the safety advantage (hopefully) of using it in a well ventilated area (gas should not build up in a living space if leak occurs), open installation (no place to trap excess gas if a leak occurs), and the gas source is typically turned off after use. This being said, copper should be fine for this application if so desired.
That's a good point as well. What I was referencing was the practice of Thiophane's or t-butyl mercaptan's being used to add the smell to natural gas, andthe high concentrations of these additives causing the copper pipes used in older installations to flake off inside the pipe and cause stoppages in the small orifices in appliances. It looks as if the gas industry has reduced the amount of these additives, thereby reducing the problem. My current installation is all black pipe.
My new(ish) strut build, eventually I'd like to go all electric, but for now it's much easier than setting up a bunch of stuff every time I want to brew.


Facebrewing
Well-Known Member
Figured I'd throw up some pics of the brew rig. Home made keggle set up with uni strut and a couple of pumps. Works great for now, have 1 barrel set up coming from stout tanks and welding up a new stand. Cheers. Sorry for the crappy quality.


wilconrad
Well-Known Member
Brew52 said:This is my purpose built for: Low Gravity Session Beers - RIMS Brewery (batch sparge). Not done yet, but a little closer each month.
That is awesome, looks like a laboratory grade setup!
ShootersBrewCrew
Well-Known Member
- Joined
- Nov 24, 2013
- Messages
- 81
- Reaction score
- 1
wilconrad said:As a long time consumer, here's my own contribution to the world of brew porn: (more pics at the link in my signature, if you're interested)
This is pretty cool! Looks complicated
ShootersBrewCrew
Well-Known Member
- Joined
- Nov 24, 2013
- Messages
- 81
- Reaction score
- 1
bd2xu said:Finished phase two of my strut built brutus rig. Added a second pump, wired pumps in switch box, lids with sparge arm and return loc line. Double brew day of house IPA and Irish red. Went pretty well, still have some adjustments to make. As usual my MLT gave me fits not wanting to drain but was able to tighten it up and got it going. Next major phase is automation but that will be awhile.
Does the head on your beer say sweet? If so thats awesome!
Sorry, not following youShootersBrewCrew said:Does the head on your beer say sweet? If so thats awesome!
Sorry, not following you
Look at your beer picture back in post 2863
https://www.homebrewtalk.com/f51/show-us-your-sculpture-brew-rig-46578/index287.html#post5694521
phreaky
Well-Known Member
ShootersBrewCrew said:Does the head on your beer say sweet? If so thats awesome!
It took me a minute too, but it's the shadow from the glass design.
doh! Sorry forgot about that. Thought it was a cool picture the way the sun made that shadow.reynolds5520 said:Look at your beer picture back in post 2863 https://www.homebrewtalk.com/f51/show-us-your-sculpture-brew-rig-46578/index287.html#post5694521
Thank you. It's been about 3 years in the making.That is awesome, looks like a laboratory grade setup!

doh! Sorry forgot about that. Thought it was a cool picture the way the sun made that shadow.
You're right either way - it's a pretty cool picture, as pint shots go anyway...
Cheers!
")


One hose barb away from having it where I want it. The 3 way valves eliminate hose changes.
I think an octopus might be attacking your brewery
NIce setup with not having to change over hoses... one day I will get there!Ha, yeah the plumbing got a little busy. I wanted to stay away from hard plumbing for ease of cleaning, but still not need to make hose changes. I wish the photos had turned out better. The lighting in my garage is awful. Thanks for the kind words, guys.mattd2 said:I think an octopus might be attacking your brewery
Ha, yeah the plumbing got a little busy. I wanted to stay away from hard plumbing for ease of cleaning, but still not need to make hose changes. I wish the photos had turned out better. The lighting in my garage is awful. Thanks for the kind words, guys.
I was almost there with half hard-plumbed TC/camlocks and a couple of hoses to go to/from the pump so no hose changes were needed. Then it was just outside my budget so cut it back a bit so it could be purchased with birthday money... then we needed to buy a new camera as the current one basically died... now the upgrade is at its bare bones - just enough to mean I don't have to varlouf into a pitcher and reduces my hose changes to 2.
Stealthcruiser
Well-Known Member
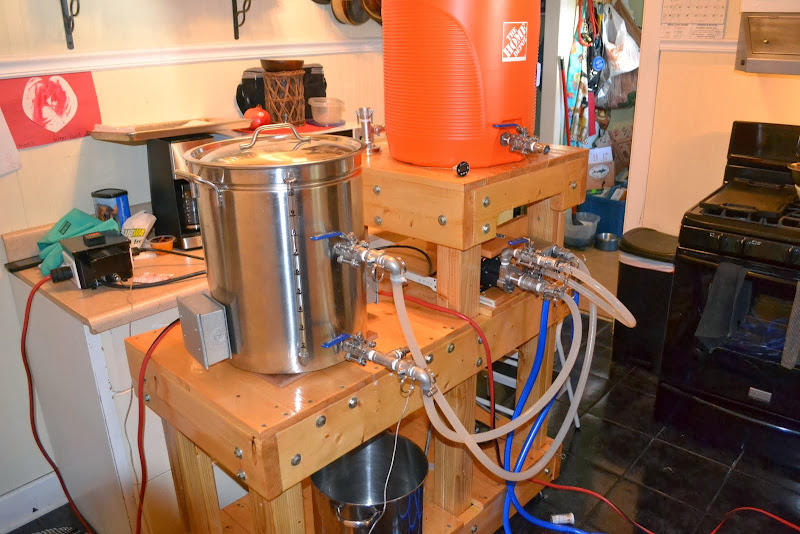
I think I've got my setup to the point where I can share some pics. It's a single tier stand made out of two Edsel bin shelving units from Menards and a 2x8 piece of butcher block countertop.
The bins are great for additional storage of grains, hardware, chemicals, etc.
The only thing that I have left to do is convert to 3-way ball valves so that I'm not having to manually switch lines in the middle of the brew day.
Nice setup!
I hope your vent hood draws WELL, as you need to keep the moisture away from those engineered floor trusses!
I'm in the beginning stages of designing a single,possible duel level convertible brew stand. What I need is the outside diameter of an average keg and/or the overall length of your stand minus extras just the area for the 3 vessels.
I have a good ghetto setup now but would like to weld up a stand that I can expand to keggels if iI decide to.
Thanks in advance, cheers
I have a good ghetto setup now but would like to weld up a stand that I can expand to keggels if iI decide to.
Thanks in advance, cheers
DanH
Well-Known Member
- Joined
- Jun 11, 2012
- Messages
- 1,020
- Reaction score
- 83
ChefRex said:I'm in the beginning stages of designing a single,possible duel level convertible brew stand. What I need is the outside diameter of an average keg and/or the overall length of your stand minus extras just the area for the 3 vessels.
I have a good ghetto setup now but would like to weld up a stand that I can expand to keggels if iI decide to.
Thanks in advance, cheers
Approximatly 16 inch diameter for the keggles. Probably closer to 15.5" if I remember correctly.
Edit to add:
Mine are exactly 15.5 inches from the outside edge of the keg, across to the opposite outside edge (what you called the "outside diameter").
That would make a single tier about 54" in length with about 3" of space between kegs.
Thank you sir!
GoodDogShelby
Well-Known Member
One hose barb away from having it where I want it. The 3 way valves eliminate hose changes.
That is one system you wouldn't want to brew on while drinking!! Keeping track of one 3-way valve is tough. I can't imagine using a BAZILLION.
Nice looking setup.
Ha, thanks no beers until I start the boil (usually). It really is pretty intuitive, the valve handle points in the direction of flow.GoodDogShelby said:That is one system you wouldn't want to brew on while drinking!! Keeping track of one 3-way valve is tough. I can't imagine using a BAZILLION. Nice looking setup.
wilconrad
Well-Known Member
GoodDogShelby said:Keeping track of one 3-way valve is tough.
Haha, really?? How many beers are you drinking during a brew?!
HellBentBrewCo
Well-Known Member
And Done! For Today... The extra computer monitor is hooked up. Now I need to refinish the basement and move everything down there.

It still needs some gas plumbing and a paint job. Can't wait to brew with it. About $75 in it so far.

Can't remember if I posted this up here or not! So just in case:
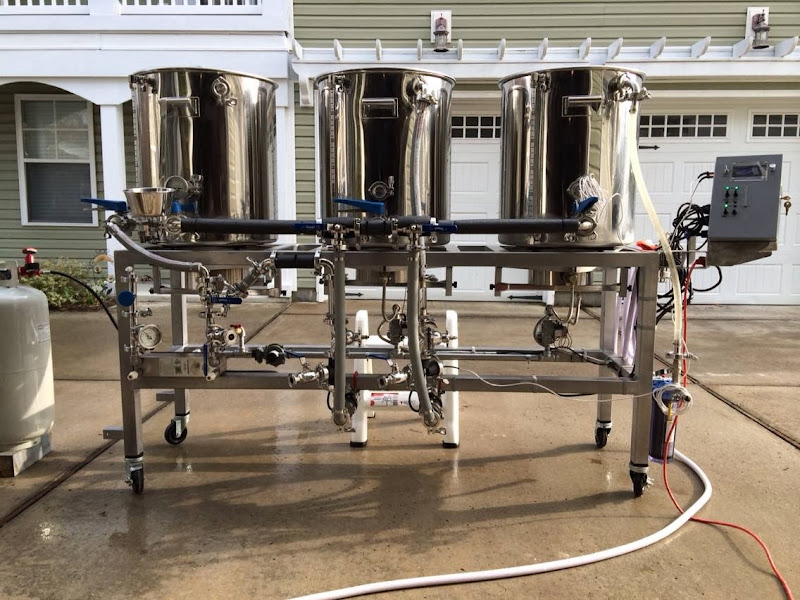
30 gallon direct-fired RIMS with Brewtroller. All kettles interconnected via hard pipe and 3 way valves control the direction of flow. All soft tubing is 3/4" ID chlorobutyl brewery hose. Ceramic coated 1" steel tube stand, combination high and low pressure propane, 30-plate chiller, inline aeration. Last mod will be hard plumbing the water into the end of the main rail instead of direct to the HLT. This also gives me a CIP entry/exit point.
30 gallon direct-fired RIMS with Brewtroller. All kettles interconnected via hard pipe and 3 way valves control the direction of flow. All soft tubing is 3/4" ID chlorobutyl brewery hose. Ceramic coated 1" steel tube stand, combination high and low pressure propane, 30-plate chiller, inline aeration. Last mod will be hard plumbing the water into the end of the main rail instead of direct to the HLT. This also gives me a CIP entry/exit point.
FredTheNuke
Well-Known Member
Nice clean setup!
Wow that is pro. You must have close to 10k in that awesome rig. Do you usually brew two barrels at a time?jcaudill said:Can't remember if I posted this up here or not! So just in case: 30 gallon direct-fired RIMS with Brewtroller. All kettles interconnected via hard pipe and 3 way valves control the direction of flow. All soft tubing is 3/4" ID chlorobutyl brewery hose. Ceramic coated 1" steel tube stand, combination high and low pressure propane, 30-plate chiller, inline aeration. Last mod will be hard plumbing the water into the end of the main rail instead of direct to the HLT. This also gives me a CIP entry/exit point.
jcaudill said:Can't remember if I posted this up here or not! So just in case: 30 gallon direct-fired RIMS with Brewtroller. All kettles interconnected via hard pipe and 3 way valves control the direction of flow. All soft tubing is 3/4" ID chlorobutyl brewery hose. Ceramic coated 1" steel tube stand, combination high and low pressure propane, 30-plate chiller, inline aeration. Last mod will be hard plumbing the water into the end of the main rail instead of direct to the HLT. This also gives me a CIP entry/exit point.
That is a sweet looking rig!!! Like all the shinny stuff to!
wilconrad
Well-Known Member
30 gallon direct-fired RIMS with Brewtroller.
Very impressive! What is the stainless bowl looking thing at the BK?
Wow that is pro. You must have close to 10k in that awesome rig. Do you usually brew two barrels at a time?
No idea how much I have into it and frankly I don't want to know! Once I'm done using this as my home system I'm hoping that it becomes a nice pilot system for me. I brew anywhere from 15-25 gallons normally - so basically a half barrel to just under a barrel (barrel is 31 gallons).
Very impressive! What is the stainless bowl looking thing at the BK?
That is just a stainless dipper I use for taking samples out of the brew kettle. KISS - I say that with a little smirk on my face because there is really nothing simple about this setup lol. But it does work pretty nicely and I have a lot of flexibility with the 3-way valves.
Here is my old propane rig -
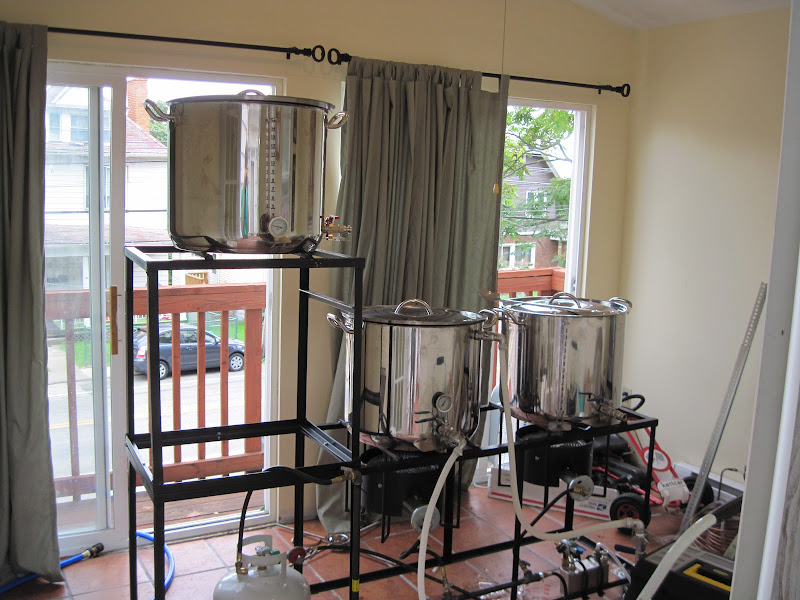
Which I sold this past Summer to get the parts needed for my new (all electric) rig - https://www.homebrewtalk.com/f51/dual-element-5-gallon-batch-120v-build-419598/
Which I sold this past Summer to get the parts needed for my new (all electric) rig - https://www.homebrewtalk.com/f51/dual-element-5-gallon-batch-120v-build-419598/
Similar threads
- Replies
- 4
- Views
- 904
- Replies
- 2
- Views
- 1K
- Replies
- 33
- Views
- 2K
