Heat Stick 3D model

Homebrew Talk - Beer, Wine, Mead, & Cider Brewing Discussion Forum

Help Support Homebrew Talk - Beer, Wine, Mead, & Cider Brewing Discussion Forum:

This site may earn a commission from merchant affiliate links, including eBay, Amazon, and others.

klyph

Well-Known Member
Joined
Dec 9, 2009
Messages
1,792
Reaction score
53
Location
North Pole, Alaska
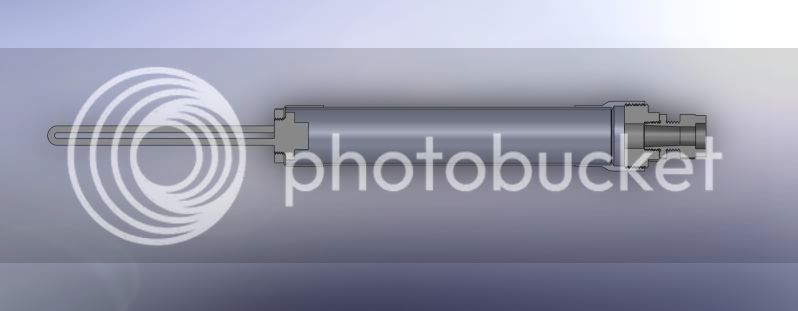
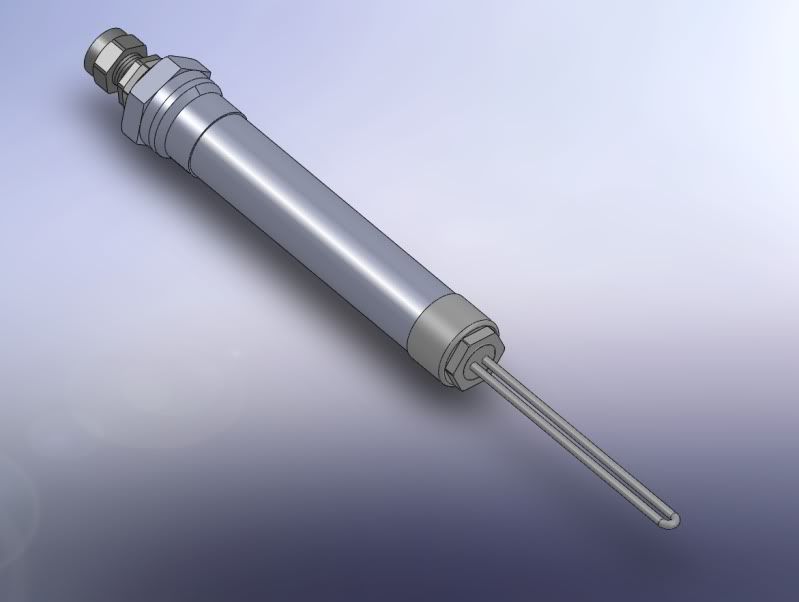
Trying to design a heatstick that is all metal, water tight and able to be disassembled for maintenance. I modeled this then realized tri-clamps would be cheaper/easier/simpler, so I'm working on the tri-clamp version.

HeatStickCrosssection.jpg

HeatStickPlano.jpg
 
wouldnt all metal get hot!!?? assuming you would have a part of the handle in the hot water.
 
wouldnt all metal get hot!!?? assuming you would have a part of the handle in the hot water.

That's a great point. An insulated handle at the top will be a design consideration. The goal is to create a better heatstick than the drain pipe/plumber's putty for a minimal added cost, so any other critiques or ideas are welcome.
 
The goal is to create a better heatstick than the drain pipe/plumber's putty for a minimal added cost, so any other critiques or ideas are welcome.

What do you consider "better"?

What are the design goals?

What makes the drain pipe/JB Weld design inferior?

How much of a cost adder are you looking for (5%, 10%, etc)?

sorry for the 20 questions, but I'm just curious. :mug:

BTW, are you using Solidworks?
 
What do you consider "better"?

What are the design goals?

What makes the drain pipe/JB Weld design inferior?

How much of a cost adder are you looking for (5%, 10%, etc)?

sorry for the 20 questions, but I'm just curious. :mug:

BTW, are you using Solidworks?

I think he wants one major goal of it to be that it can be disassembled/reassbled easily, hence avoiding the use of the epoxy.
 
What materials are you using,
Here is my parts list to build two of these:

http://www.mcmaster.com/#copper-pipe-caps/=6rci22 - 2" copper pipe caps - $5.22 x2 = $10.44

http://www.mcmaster.com/#brass-pipe-fittings-and-pipe/=6rckze - 1" Brass Locknut - $5.09 x2 = $10.18

http://www.mcmaster.com/#copper-tube-to-pipe-adapters/=6rcn99 - 2" Copper tube to Pipe adapter - $16.01 x2 = $32.02

http://www.mcmaster.com/#brass-pipe-fittings-and-pipe/=6rcp35 - 2" to 3/4" Brass bushing - $19.29 x2 = $38.58

http://www.mcmaster.com/#cord-grips/=6rcpvw - Liquid tight Strain Relief - $17.21 x2 = $34.42

http://www.mcmaster.com/#copper-tubing/=6rcsrs - 24"x2" Copper tubing - $37.37 (may need longer piece depends on element length)

http://www.mcmaster.com/#electrical-wire-cable-and-cords/=6rcvc5 - 12/3 Service Cord - $1.03 x16 - $16.48

http://www.mcmaster.com/#nema-plugs-connectors-and-receptacles/=6rczmn - Male Plug - $7.03 x2 - $14.06

http://www.amazon.com/dp/B0006JLVBW/?tag=skimlinks_replacement-20 - Camco 2000w Element - $11.05 x2 = $22.10

TOTAL = $215.65

I could probably get much better prices if I shopped around.

and what fitting is it that you have that holds the water heater element in the pipe? Is it something special?
It's a 2" copper cap with a 1.25" hole drilled into it and a 1" locknut on the outside. the cap would be soldered to the tube, but the element can be removed by taking off the locknut.

I think replacing that with a triclamp end cap with 1" nps female threads might be a better solution, as the body of the unit could be reduced in diameter enough to only accommodate the cord.
 
Last edited by a moderator:
It's a 2" copper cap with a 1.25" hole drilled into it and a 1" locknut on the outside. the cap would be soldered to the tube, but the element can be removed by taking off the locknut.

EXCELLENT idea!

edit: forgot to add one thing:
24"x2" Copper tubing - $37.37 (may need longer piece depends on element length)

I think 24" is PLENTY long. You could probably go shorter even. A keg is only 24 inches tall, so your pipe alone would come all the way up and out of a keggle. Add a 9" (I think that's the shortest I have seen) element and your probably longer than necessary.

I like your plan, but I do agree that you could cut the costs down considerably.
 
damn... more comments I forgot to make...

be careful with those locknuts. heater elements have straight threads (NPS), and plumbing fittings have tapered threads (NPT). I'd be a little nervous about leaks through the threads going right into where your wiring is.

bargainfittings sells 1" stainless NPS locknuts w/ o-rings for $9 specifically meant for heater element applications... might be worth considering.

I am positive you can get plugs at Lowe's or Home Depot for half the price of what McMaster is selling them for, too.
 
The only problem is the element can only be removed through the back, that's why the unit is 2" all the way up. Tri-clamps would solve this issue.

Well... you could use 1/2" tubing most of the way down the handle (just big enough for your cord) and then expand out from there with male and female threaded 2" parts.

You would be able to unscrew it near the bottom then where it is 2" and get at the element.

but that might be more expensive. The threaded copper parts might be expensive at 2" diameter.
 
be careful with those locknuts. heater elements have straight threads (NPS), and plumbing fittings have tapered threads (NPT). I'd be a little nervous about leaks through the threads going right into where your wiring is.

bargainfittings sells 1" stainless NPS locknuts w/ o-rings for $9 specifically meant for heater element applications... might be worth considering.

Yes, I used NPS locknuts in the design. and the stock element gasket will seal on the inside, so I've never understood why the oring on the outside is necessary. Seems it would just add more flex.

Well... you could use 1/2" tubing most of the way down the handle (just big enough for your cord) and then expand out from there with male and female threaded 2" parts.

You would be able to unscrew it near the bottom then where it is 2" and get at the element.

but that might be more expensive. The threaded copper parts might be expensive at 2" diameter.

That's the rub. To reduce it with pumbing fittings, you end up using MORE pieces and it's more expensive.
 
What do you consider "better"?

What are the design goals?

What makes the drain pipe/JB Weld design inferior?

How much of a cost adder are you looking for (5%, 10%, etc)?

sorry for the 20 questions, but I'm just curious. :mug:

BTW, are you using Solidworks?

Better is:

All metal
Serviceable
Easily assembled
Robust

I don't like the drain pipe/JB weld design because it just seems like too many compromises.

For the cost, I'm obviously just trying to make it as cheap as possible while maintaining my design criteria.

And yes, Solidworks 2008.
 
Yes, I used NPS locknuts in the design. and the stock element gasket will seal on the inside, so I've never understood why the oring on the outside is necessary. Seems it would just add more flex.

I think most folks ditch the stock gasket that comes with the element and use ONLY the o-ring when they install one in a keggle.
 
So optimally, a 2" triclamp that reduces to a .75" pipe with female threads on the other end would be optimal. But I doubt such a thing exists for any reasonable amount of money.
 
Would there be any concern with it being all metal in the event of a wiring/element failure?
I don't know for sure but, I think having a non-conducting handle would be a good idea.
Greydog
 
Would there be any concern with it being all metal in the event of a wiring/element failure?
I don't know for sure but, I think having a non-conducting handle would be a good idea.
Greydog

The problem is finding a cheap readily available material that can withstand a boil. Plus, if you ground the body, a short will just trip the breaker.
 
I just went through the same exercise with heatsticks for an upcoming Basic Brewing Radio though I didn't go this far. I did manage to get one sealed up water-tight with a 1.5 to 1.25 compression reducer but after a couple of heat cycles, the reducer started working itself loose. I eventually conceded that potting the element wiring in epoxy really is best.

Ultimately, heatsticks are a bit of false economy IMO. The plumbing bits end up running about $20 - $25 and you still need a pot. May as well mount the element directly in your pot. $20 28-32qt aluminum pots are trivial to find too. I also found managing heatsticks took extra mental care not to dry-fire and they pose a greater tip-over risk with the cord hanging out the top of a pot.
 
I like this discussion and brainstorming...food for thought...what i like to do, and I believe I started doing this when I accidentally brought home a 1/14" pipe rather than a 1 1/2" pipe, is to grind down the hex nut that is part of the element so the overall housing can be substantially reduced for an overall sleeker design? The dia. of the element base nut can be reduced pretty easily,. just leave a slight shoulder for the gasket.

Nobody's biting on my silicon tube idea, huh.
 
I like this discussion and brainstorming...food for thought...what i like to do, and I believe I started doing this when I accidentally brought home 1 1/14 pipe rather than 1 1/2" pipe, is to grind down the hex nut that is part of the element so the overall housing can be substantially reduced. Going w/ 2" seems large to me? The dia. of the element base nut can be reduced pretty easily,. just leave a slight shoulder for the gasket.

You know, you may be right, I think the hex on my element is larger than reality. I based it on a 1" locknut, but now that you mention it, a 1.5" pipe will probably work.
 
You know, you may be right, I think the hex on my element is larger than reality. I based it on a 1" locknut, but now that you mention it, a 1.5" pipe will probably work.

Yea klyph, w/ the hex on the element reduced, you may get away w/ either 1 1/2 or even 1 1/4 fittings. Those 2" fittings you listed are pricey. I must say I have thought about the copper tube and drilled end cap...work it out for me and keep the price down ok...you might just come up w/ the new standard.:mug:
 
I just went through the same exercise with heatsticks for an upcoming Basic Brewing Radio though I didn't go this far. I did manage to get one sealed up water-tight with a 1.5 to 1.25 compression reducer but after a couple of heat cycles, the reducer started working itself loose. I eventually conceded that potting the element wiring in epoxy really is best.

Ultimately, heatsticks are a bit of false economy IMO. The plumbing bits end up running about $20 - $25 and you still need a pot. May as well mount the element directly in your pot. $20 28-32qt aluminum pots are trivial to find too. I also found managing heatsticks took extra mental care not to dry-fire and they pose a greater tip-over risk with the cord hanging out the top of a pot.

I concur. Out of curiousity what is the advantage?
 
With a stick, you can heat the strike water in the mash tun, then heat the sparge water in the HLT, then boil with it...and then ferment in your kettle. They can also be used to raise grain bed temps by stiring the mash. I guess I also see your point as elements are cheap, I guess I just prefer not to drill my kettle, HLT and MLT.
 
Back
Top