DIY 2-Tier AG brewstand build

Homebrew Talk - Beer, Wine, Mead, & Cider Brewing Discussion Forum

Help Support Homebrew Talk - Beer, Wine, Mead, & Cider Brewing Discussion Forum:

This site may earn a commission from merchant affiliate links, including eBay, Amazon, and others.

bhambrew

Supporting Member
HBT Supporter
Joined
Sep 30, 2009
Messages
116
Reaction score
11
Location
Bellingham, WA
As always: thanks to the members of this community who take the time to share so many great ideas (and some not so great ones), post images and links and tell us about your successes and failures. :mug:

This project started for me almost a year ago, and I have spent countless hours pouring over the forums looking for ideas and inspiration. The setup is not yet complete, but with any luck I may be able to brew up my first AG batch on the new setup within the week. But, before I put the finishing touches together I figured I would go ahead and start this build thread. Comments are encouraged: if you see something you like, or if it looks like I am heading down the wrong path, let me know...I will continue to post more images over the next week as I try and get to the first brew day. Thanks for looking.

Here is the old workshop space before being converted into the brew space:
old_shed.JPG


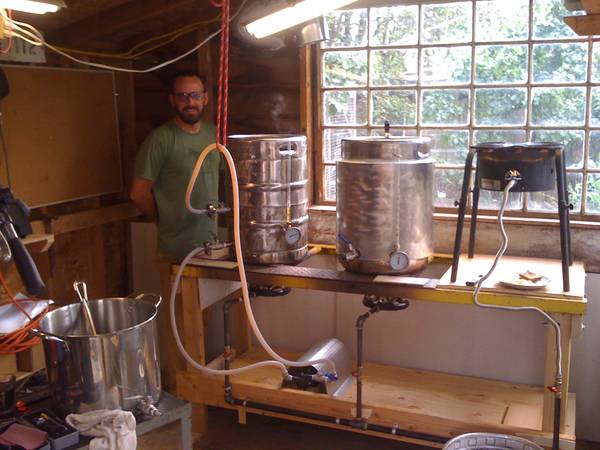
And after being cleaned up...this is one side of an old 10x12 shed in the back yard:
new_brewspot.JPG

a blank slate...
 
I consider myself to be a handy guy, and with a reasonable collection of tools and my modest workshop setup I can tackle most backyard DIY projects. That being said, I don't have any welding equipment, or experience (or $$ to buy welding equipment). I decided to spend my money on other parts of the brew setup and build the stand of wood.

Thanks to Scuba Steve who's wood brew stand was inspiration for my first attempt.

Here is what it looked like put together:
brewstand_mk1.JPG

Decided not to apply a finish, mostly because I am lazy and I wanted to keep the progress going towards brew day.

I am going to be using 23-tip jet burners, so I figured I would need some sort of protection for the wood. I picked up some flashing at the box store and made a little jig to bend the stuff to conform to my setup.
flashing_jig.JPG


Here is the flashing bent and installed on one of the top rails of the stand:
flashing_installed.JPG
 
With the flashing installed, I was ready to install the rails that the kettles would sit on. We are very fortunate to have a huge scrap metal yard here in town with tons of stuff that would lend itself to DIY brew projects. After picking through a few bins, I found these BURLY tubular steel pieces that looked like they would make good supports for the kettles. I measured, marked and cut them to size using a cutoff wheel on the angle grinder:

brewstand_mk1_flashing.JPG


brewstand_mk1_burner.JPG
 
You can see the 23 tip jet burners in the last post.

My previous setup was propane, but I was tired of re-filling those tanks and wanted to take advantage of the natural gas that was only 15-feet away from the brew shed. I decided to use the 23-tip jet burners because they were the most affordable and looked impressive on videos posted by other members.

Here is a shot of all the misc. plumbing pieces used for the burner manifold:
gas_plumbing1.JPG


I installed a "T" in the 3/4" gas line that was feeding the hot water heater in the house, and added a shut-off valve. The gas then goes through a 3/4 heavy-duty hose out to the brew shed about 15 feet away from the house. The hose is only left hooked up when the gas is being used. On the brew shed side of the setup the hose attaches to a length of 3/4" black pipe which runs over to the brew stand. At the brew stand, I have another shut-off valve for the main feed, and 3/4" black pipe to feed three burners. From the 3/4" main supply on the brew stand there are three "T" fittings which reduce down to 1/2" with a shutoff/control valve for each burner. The pipe is all secured to the wood frame and easily holds up the heavy burners.

brewstand_mk1_burner_pipe.JPG


Here is a shot with the kettle sitting on the rails with burner below:
brewstand_mk1_under.JPG


With this setup, the bottom of the kettles were about 5 inches from the burners.
 
So, at this point there is still lots to do before I can brew, but it was finally time to fire this thing up and see what she could do. SWMBO was a little nervous for some reason and wanted to call in a plumber to make sure I did everything correct. After double and triple checking all the pipe and fittings AND getting a fire extinguisher for the brew shed SWMBO reluctantly gave me her blessing and then left the scene. "Will the insurance company cover us if you burn down the shed or house?" I don't know the answer to that question, and don't recommend anyone do anything I may or may not have done with natural gas.

I don't actually have any pictures of the first burn test, but the bottom line is that this setup makes some serious heat! Getting the gas safely from the house to the burners was successful. :rockin:

Unfortunately, the wood and flimsy flashing on the brew stand were no match for the 23-tip jet burner, even at half throttle. After about 15 minutes, I was forced to abandon the test due to the flashing starting to melt, and some charring on the wood:
first_fire_test.JPG


melted_flashing.JPG


charred_wood.JPG


So...it was back to the drawing board to figure out a way to better protect the wood from the fire. I had all ready purchased and installed two sheets of hardi-backer on the exposed studs behind the brew stand to as not to catch the brew shed on fire, but wrapping the brew stand in that stuff would be a little more challenging...
 
I think I would go back to the scrapyard and find some more steel and remake your stand out of that.
 
The next day I went back out to the scrap metal yard to look for some steel plating that I could use to protect the brew stand from the flames. I had even decided that maybe I would buy a small sheet of scrap steel and have a welder cut two holes in it, a little smaller than the diameter of the keggles.

While wondering around the scrap yard I stumbled upon a heavy duty steel ladder / scaffold piece of scrap and after some head scratching decided I would try something completely different. The piece was about 10 feet long and weighed 106 pounds (but sold for only 20 cents / lb.)!! I loaded it up and carted it home to be chopped up and used as a new top for the brew stand.

Here it is in the backyard over two saw horses with mystery keg:
new_brewstand_top.JPG
new_brewstand_top_cu.JPG

I forgot my tape measure at the scrap yard, and was stoked to find out that this thing was the perfect size for supporting the kettles over the burners.

Using a cutoff wheel on the angle grinder, I cut the beast down to length. Then I cut two 2x6 pieces to fit the width of the steel frame, which would support the thing on top of the brew stand. I removed the old horizontal pieces from the brew stand, and bolted the two 2x6 pieces in place:
brewstand_mk2_detail2.JPG
brewstand_mk2_detail.JPG

I replaced the burners and made some small adjustments to the piping to accommodate the new spacing for the kettles on the stand and things were starting to look good.
brewstand_mk2_complete.JPG
brewstand_mk2_detail3.JPG

brewstand_mk2_detail5.JPG

So, now its a hybrid wood/steel brew sculpture: DIY 2-tier AG brewstand MK2
 
After everything was re-assembled I hooked up the gas and filled one of the kettles with 5 gal of water for fire test #2:
brewstand_mk2_firetest_detail.JPG
brewstand_mk2_firetest.JPG


The burners were now a little lower compared to the previous version, but the flames seemed to be reaching the kettle just fine:
brewstand_mk2_firetest2.JPG


As with the previous setup I was a little concerned about the valve handle and thermometer dial getting hot, so I placed a piece of steel diamond-plate in the front as a shield which seemed to work fine. I also tried some small scraps of the hardi-backer to see if that would make any difference. After 20 minutes at about 1/2 throttle, the water temp had increased 100 degrees F and the valve handle was still cool enough to touch with bare hands
heat_shield_test.JPG

So far so good :rockin:

brewstand_mk2_complete3.JPG


In the next few days I will update the thread with images from the installation of an exhaust fan, installation of the pump and plumbing, making the copper immersion chiller, and hot-water trials before brew day. Thanks for any comments, suggestions, ideas...Cheers:mug:
 
Nice! I thought I recognized that design... :mug:

If I could go back and build the same rig, I would have used unistrut for the railing.....and most likely bolt the burners and windshields on.

If you can find a cylindrical type of windscreen, you'll be able to conserve a lot of fuel. Those burners put off a lot of heat, most of which is wafting around the outside of the kettle....obvious, I know...but very important!
 
If you can find a cylindrical type of windscreen, you'll be able to conserve a lot of fuel. Those burners put off a lot of heat, most of which is wafting around the outside of the kettle....obvious, I know...but very important!

Thanks for the advice! Based on my experience with the aluminum flashing I am guessing any windscreen will need to be a heavier gauge steel. I didn't see anything that looked promising for a wind screen at the scrap yard.

I could easily get my hands on some empty 55-gallon steel drums. We use them here at the house for rain barrels. I think they would be strong enough to stand up to the heat, and would be relatively easy to cut down to size.
 
Had a quick question for everyone about insulating the MLT: I was thinking about using 1-inch-thick closed cell foam, which the local hardware store sells from a big roll they have. This is not an actual picture, but it looks something like the black stuff:
home_foamcolors.jpg

I noticed when testing the burners that the sides of the keggle get really hot, especially near the bottom (duh!). I'm starting to wonder if this stuff can stand up to the heat. Anyone have experience with closed cell foam insulation, or problems with MLT or HLT insulation melting in general?

I doubt that stuff would stand up to the heat. You really only need to insulate your Mash Tun. Bobby M has a good post on how to insulate your direct fired Mash Tun. Do a search.
 
I've used closed cell foam for sound deadening in cars. It will start to bubble and deform/shrink with just a heat gun. It definitely won't stand up to the heat from a burner if it is close at all.

-Steve
 
are you going to be doing brewing in the garage? DO you have a good source of ventilation?

The brew stand is actually set up in a 10x12 shack in the back yard. The door to the "brew shack" will have to be open at all times when brewing to provide fresh air. And, since my last post I did manage to get an exhaust fan installed and working:

brew_vent.JPG


brew_vent2.JPG


Seems to work pretty good. I might upgrade to a bigger fan in the future, but for now this will work. With two of the burners going at medium flame, door to the shack wide open and exhaust fan turned on the atmosphere was good in there. I also have a CO detector to let me know if things get bad for some reason.

Here is an image of the box I installed to control the fan and pump. The top switch controls the exhaust fan and the bottom switch controls a separate outlet box that the pump will be plugged into. The switches are mounted on the wall next to the brew stand.
outlet_switch.JPG


I decided not to hardwire the pump to the switch so I could unplug it between brew days and avoid having someone accidentally turn the pump on. The pump will be mounted to the brew stand, and plugged into the dedicated outlet on brew day.
 
I doubt that stuff would stand up to the heat. You really only need to insulate your Mash Tun. Bobby M has a good post on how to insulate your direct fired Mash Tun. Do a search.

The only kind of rubber that would withstand direct fire is silicone but be prepared to refinance the house. Try this: https://www.homebrewtalk.com/f51/direct-fire-mlt-insulation-project-154652/

Thanks for the information guys. I had read Bobby's post on insulating the MLT before and that looks like the way to go.

Unfortunately, I have to return to work in a few days and it is starting to look like I won't get to the insulation project before I go. I had been making such good progress on the brew shack project but my in-laws are here for a visit, so I had to take a break.

I was thinking I would try and pull off a 5-gal brew before I go using what I have now: no insulation on the MLT, but I can recirculate and stir the mash when I heat it. I have a NB kit which I was going to use for my first brew on the new setup. Hopefully I can pull it off on Monday before I leave for work for another two weeks. I'll post any progress on that mission here.
 
Here's a look at the kettles. First is the boil kettle:
Boil_Kettle1.JPG

The fittings for the lower ball valve and sight glass/thermometer were welded on by a local welder. The upper ball valve I installed using "weldless" method.

Boil_Kettle_detail2.JPG
Boil_Kettle_Detail.JPG

I will be using a large copper immersion chiller with this setup. The bottom valve is the drain, and I arranged the pickup tube so it does not go to the very bottom of the kettle. My plan is to use the pump to re-circulate the wort during cooling, creating a whirlpool and hopefully leaving the trub behind in the bottom of the kettle. The top valve is the return for recirculated wort during cooling. I also have a SS mesh to install on the drain pickup.

Boil_Kettle_Detail3.JPG

Detail of Boil Kettle thermometer and sight glass.
 
Here is the MLT without insulation:
MLT.JPG


Inside of MLT showing my home-made false bottom and pickup tube:
MLT_detail.JPG


The plan is to insulate the MLT, although I may not get to that before I try at least one brew on the system. I have one more ball valve and tri-clamp which are for the MLT, but not yet installed. I was thinking of installing them on the future lid of the MLT so I could re-circulate the mash during direct-fire heating, if needed.

Not sure the best way to recirculate the mash during heating...Maybe make a small copper manifold which would attach to the underside of the MLT lid with holes drilled so the fluid would be evenly distributed over the top? Any ideas from folks who direct-fire their MLTs?
 
The second tier of the system is my old "camp chef" burner stand, which the HLT will sit on. Water from the HLT will flow to the MLT by gravity during sparging. I have a sanke keg which will become the HLT as soon as I have time to cut the top open and drill some holes for drain and thermometer/sight glass. In the meantime, I will use my old 7.5 gal brew kettle as the HLT for my 5-gallon "test" brew.
temp_HLT.JPG
future_HLT.JPG


Here is the whole setup...NG not yet connected to the HLT burner.
mk2_brewstand3.JPG
 
Here are some shots of the exterior of the brew shed:
brew_shack.JPG


brew_shack3.JPG


brew_shack2.JPG

The shack was here when we bought the house, I cleaned it out and converted in into the BREW shack! I also added the "cold frame" green house in front of the shack, which is currently occupied by SWMBO's tomatoes.

Here is a shot of the inside of the shack, opposite the brew stand:
brew_shack_shelves.JPG
 
This does look awesome. I'm thinking of incorporating my brew system into an outdoor patio smoker/grill. The basic mechanics would be the same, but I'd be building a brick cover over the freamework, etc...

I wanted to build an outdoor smoker, and think that incoroporating a brewing system into the whole deal would be a good longterm investment. The entire system would tie into the backyard patio. Just an idea at this point, but it's nice to dream...
 
Okay...so I made it back from work safely, and got right to work the brew stand project. Everything is coming along nicely, and I should be able to cook up the first brew tomorrow!

Here are a few photos of my BobbyM-direct-fire-Mash-Tun-Insulation-CLONE...Thanks Bobby!

MLT_al.JPG
mlt_insulation2.JPG


I sealed up the top of the insulation with silicone sealant, which you can see in the next photo. After the sealant had dried, filled 'er up with 12 gallons of water and heated to 170 deg F. Then I had to go to dinner with SWMBO, and when we returned three-and-half hours later it had only lost 15 degrees! Not Bad?!

mlt_insulation_complete.JPG
 
Here's a shot of the pump installed with some flashing as heat / drip shield.

pump_plumbing.JPG


And here is the custom MLT lid I made from the plastic top of a Cambro food-service storage bin. It has a sanitary fitting attached to a SS 90, which goes through to a compression fitting on the bottom with small copper manifold I made. The manifold will help distribute re-circulated wort if I need to heat during the Mash. I will not use this lid during the sparge, as I have a sparge-arm whirlygig (not pictured).

diy_MLT_lid.JPG


And here is a shot of the DIY copper immersion chiller made from 50' of 3/8" copper tube ($25) from scrap yard.
diy_chiller.JPG
 
I think everything is finally ready to go. The refractometer came in the mail yesterday from National Industrial Supply. The yeast is swimming around on the stir plate and the grain for the inaugural brew (NB Brown Ale) is waiting patiently for its date with some warm water tomorrow afternoon. :ban:

Special thanks to Scuba Steve for the inspiration for the original brew stand, BobbyM for MLT insulation and IC ideas, and Swagman for his custom fittings.

Over the past 9 months I have ordered almost all of the various components for this system from different vendors- many of them small, independent and DIY types. You never know what you are going to get when you order something online from a small business possibly run out of someone's garage...

I don't think it is inappropriate if I mention that I was impressed by the prompt and professional service I always got from the guys over at Bargain Fittings. I was also impressed with the speedy service and quality product I received from Dan at Stir Starters. I don't mention these two guys as a shameless plug, but instead I just want to help anyone working on their own DIY system find honest vendors that provide the highest quality stuff. After all, I discovered these vendors by reading the forums in the first place.

I'll post the results of the first brew when it is in the carboy tomorrow evening...:rockin:
 
Well...after months of research, development, building, tinkering, head-scratching, and minor frustration- I finally made my first brew on the new System yesterday! :ban:

All my planning seemed to pay off as the brew session was about as smooth as I could have hoped for, without any major headaches. Best of all, I ended up with 5.5 Gallons of cooled wort in the carboy, and almost right on target for my OG! :rockin:

Now of course, I'm hooked on AG. The kegerator has been empty for months and it is time to gear up for some marathon brewing days. The first batch is bubbling away behind me as I type, and yeast are swimming around on the stir plate for tomorrow's brew day.

Thanks again to everyone who followed this thread and offered advice. I will keep this thread alive as I continue to tweak the system and make improvements.

Cheers,
Eric:drunk:

first_brew4.JPG


foam_snake.JPG
 
Here are a few photos of my BobbyM-direct-fire-Mash-Tun-Insulation-CLONE...Thanks Bobby!

MLT_al.JPG
mlt_insulation2.JPG


I sealed up the top of the insulation with silicone sealant, which you can see in the next photo. After the sealant had dried, filled 'er up with 12 gallons of water and heated to 170 deg F. Then I had to go to dinner with SWMBO, and when we returned three-and-half hours later it had only lost 15 degrees! Not Bad?!

mlt_insulation_complete.JPG

Dude. Respect. It's the best clone I've seen and I'm always amazed that I was able to pull it off with my meager metalworking tools and skill set.
 
Dude. Respect. It's the best clone I've seen and I'm always amazed that I was able to pull it off with my meager metalworking tools and skill set.

Thanks Bobby...You will notice that I didn't show a photo of the other side where the aluminum sheet that wraps up the insulation comes together. I Did order the same latches from McMaster that you recommended however...the aluminum I picked up at the scrap yard was too thick, and even with ratchet straps holding the thing on tight I couldn't get the overlapping end flush enough to make the latches work. Maybe I'll try to install the latches for version 2.0. In the meantime, I secured the thing with three short SS lag bolts I had. Doesn't look as good, but no one will see that side anyway, and it still insulates the same so I figure WTF?

In any case, I'm planning on brew day number two tomorrow. Now, its off to see if I can find some metal to use as wind shields for the burners...
 
Back
Top