GE 7 CF (FCM7SUWW) keezer conversion

Homebrew Talk - Beer, Wine, Mead, & Cider Brewing Discussion Forum

Help Support Homebrew Talk - Beer, Wine, Mead, & Cider Brewing Discussion Forum:

This site may earn a commission from merchant affiliate links, including eBay, Amazon, and others.
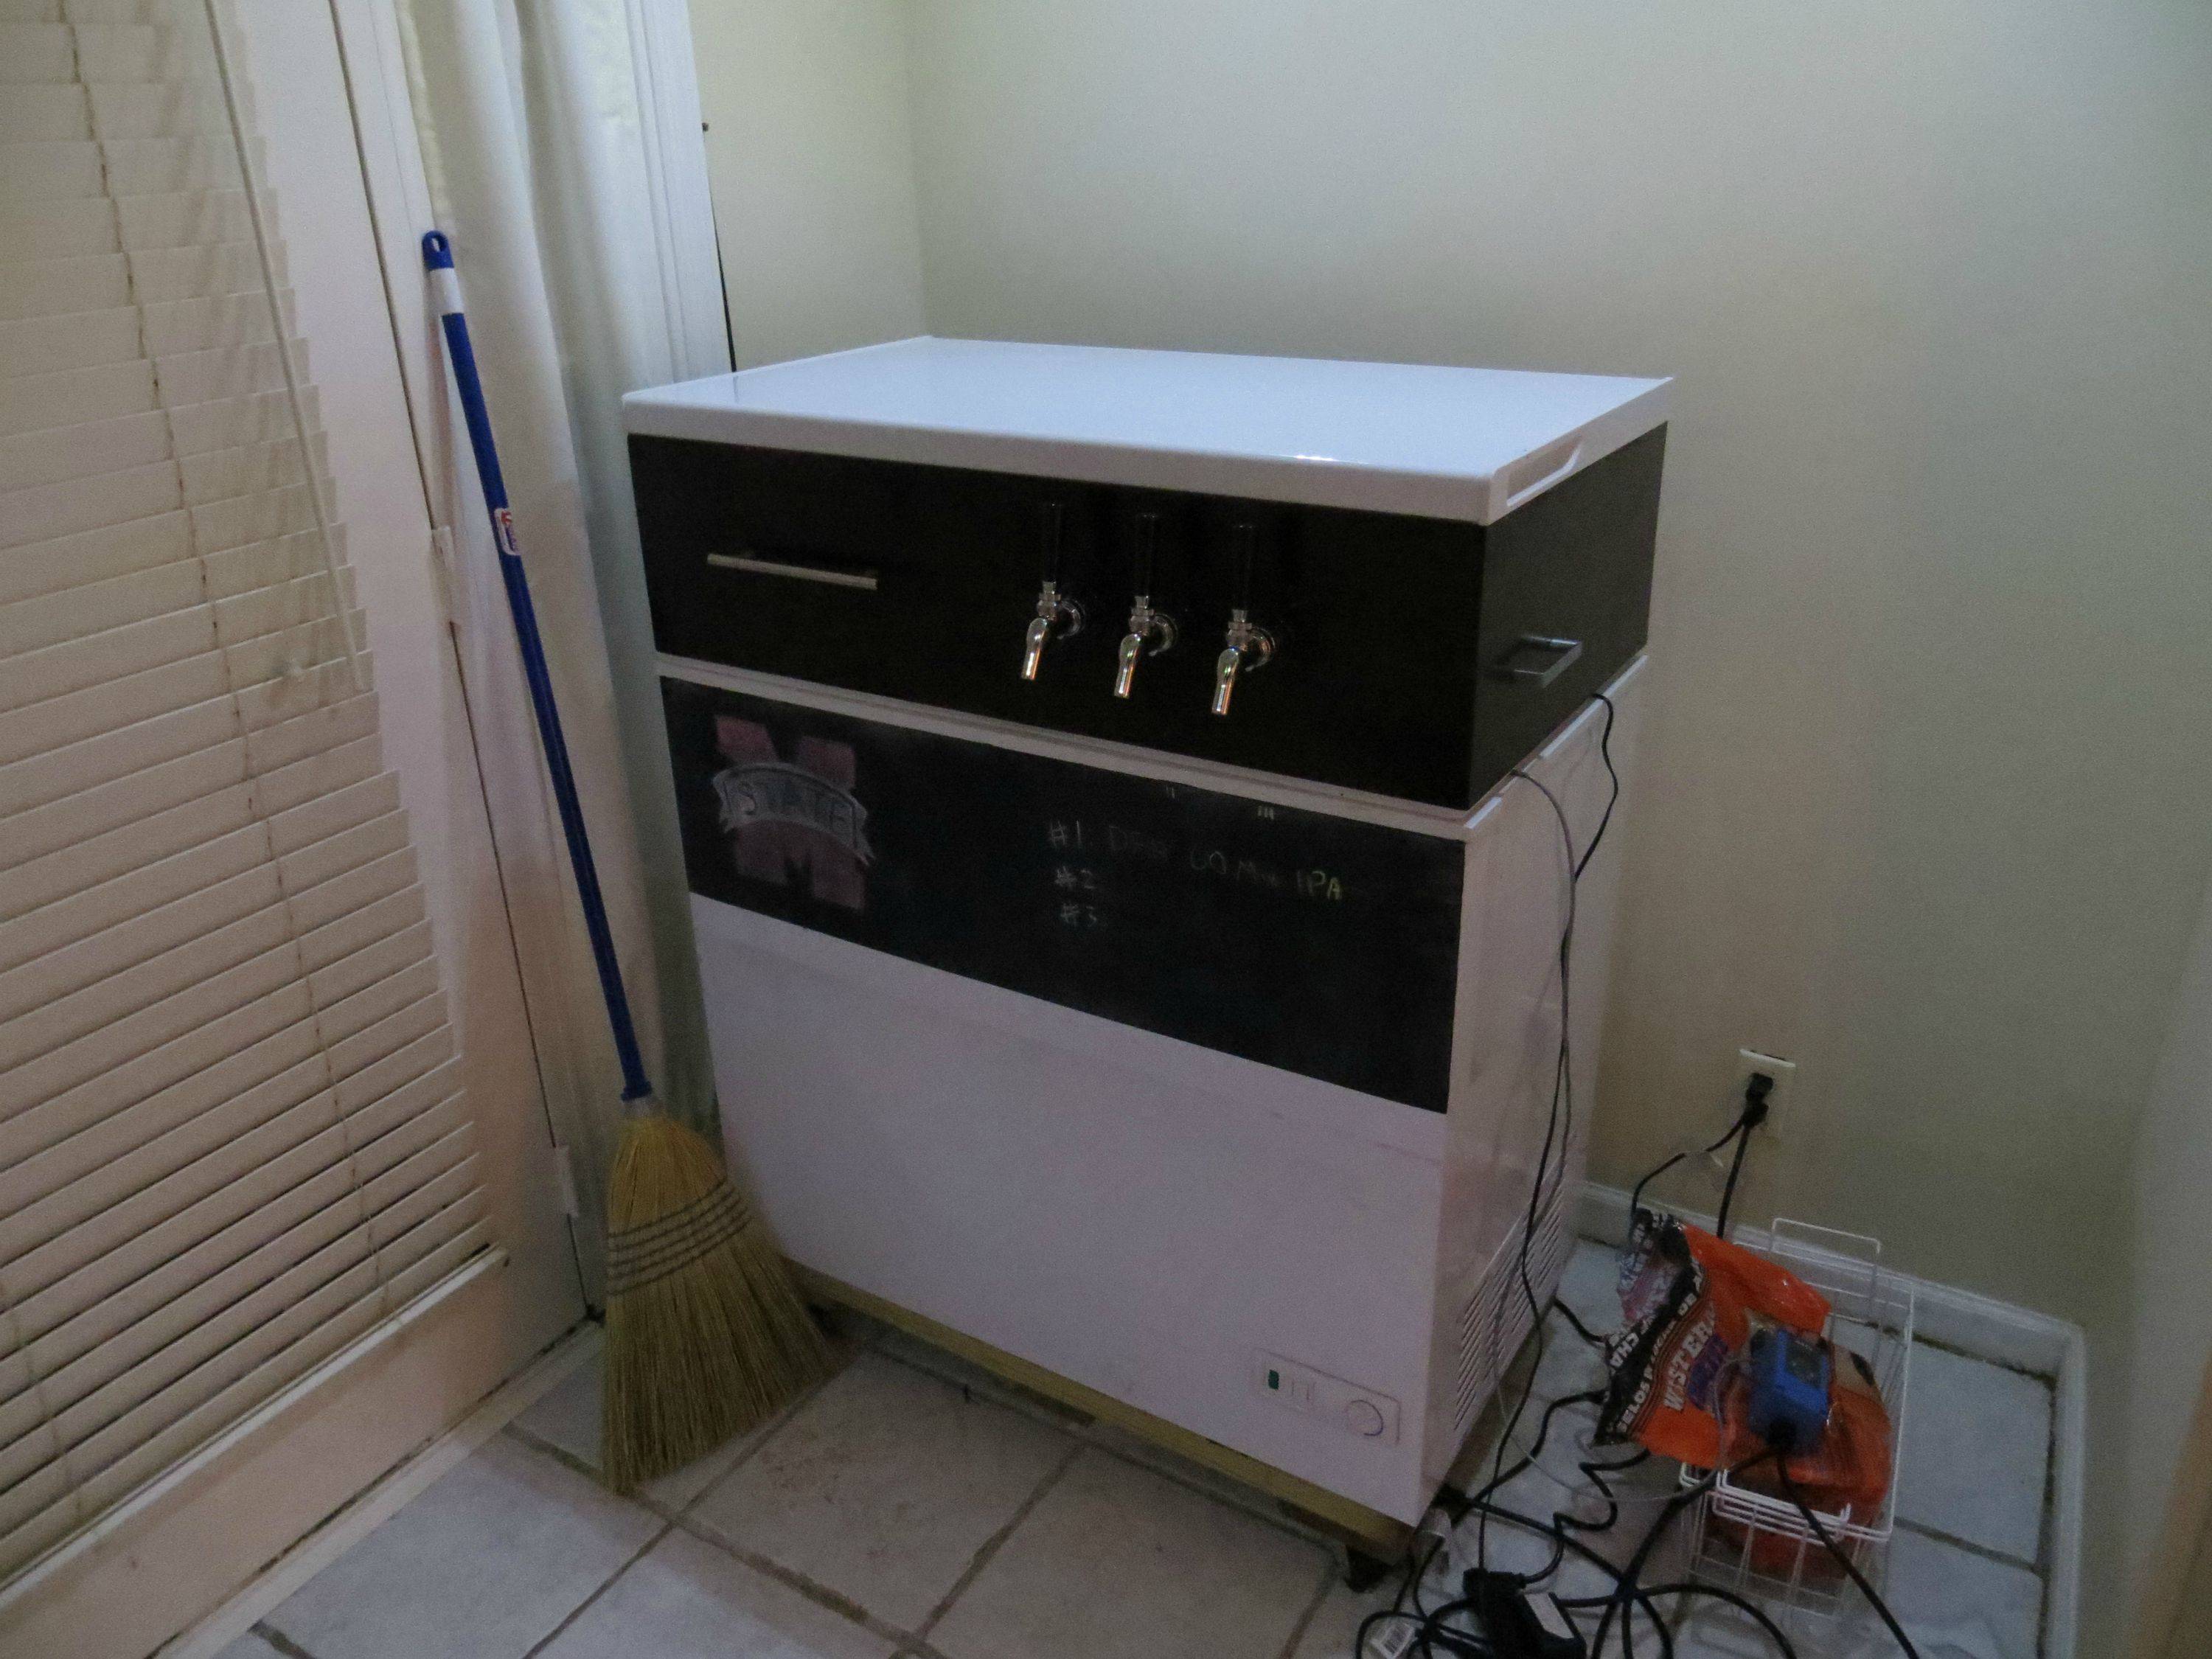
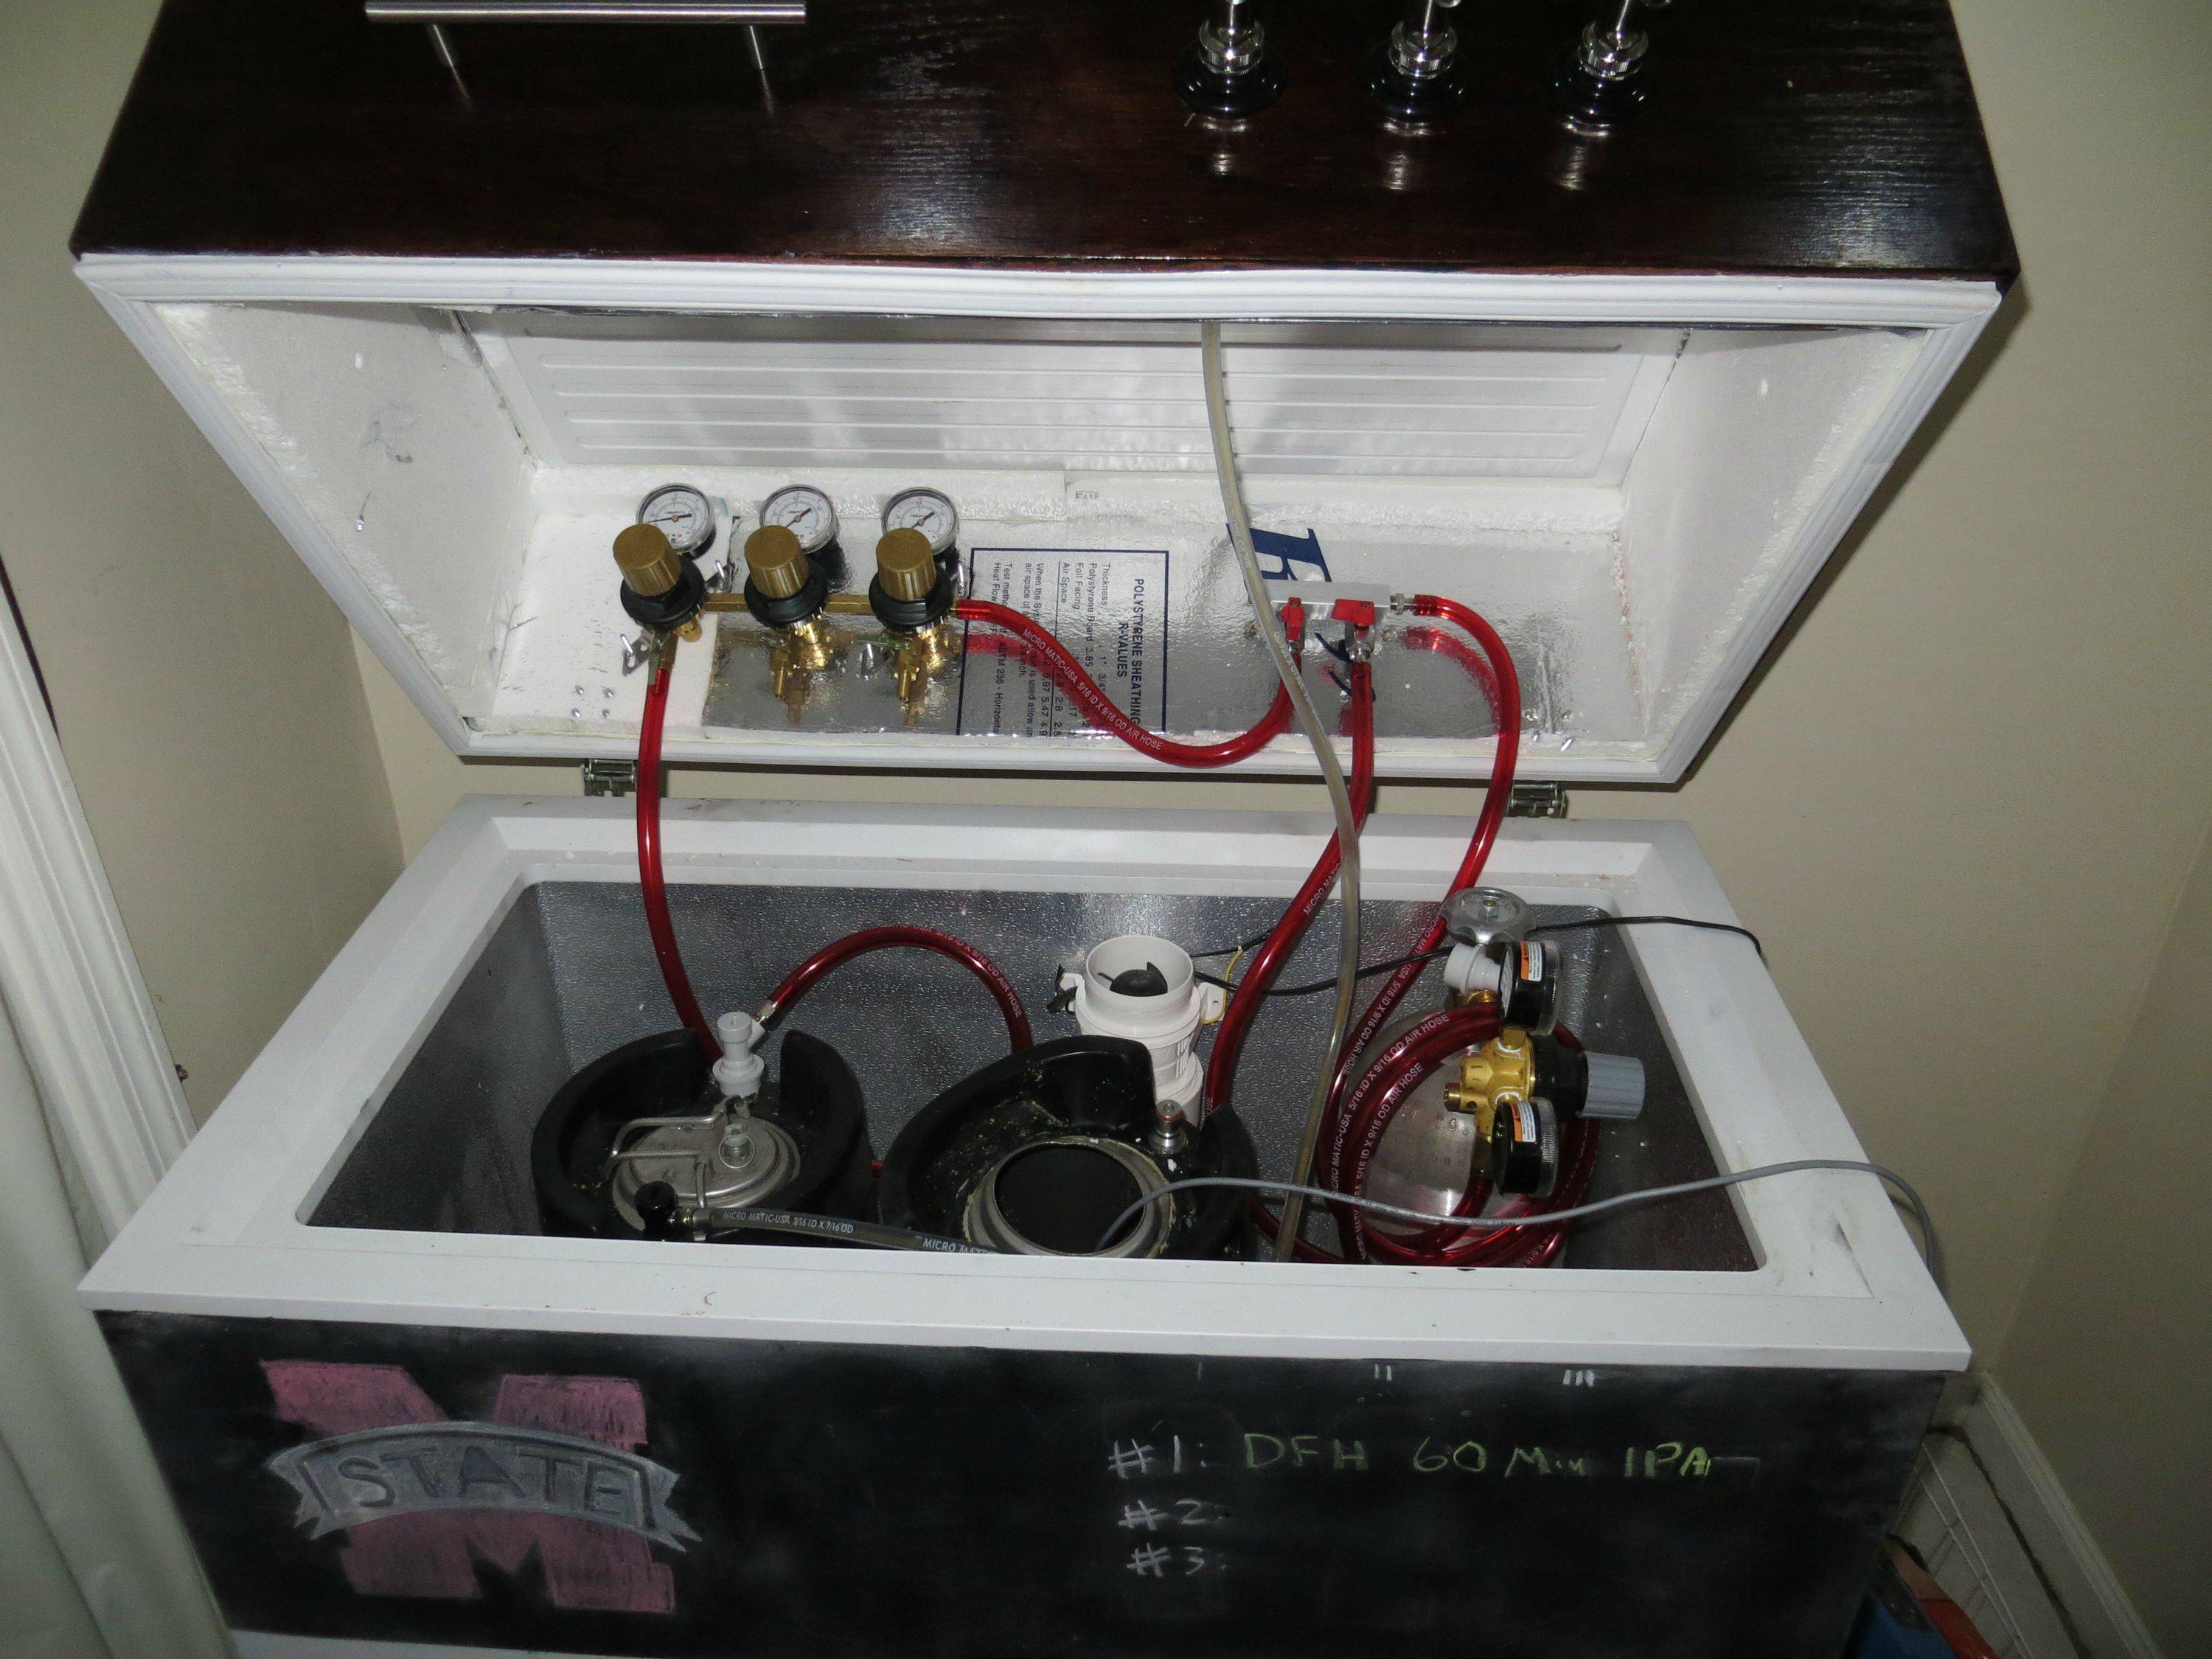
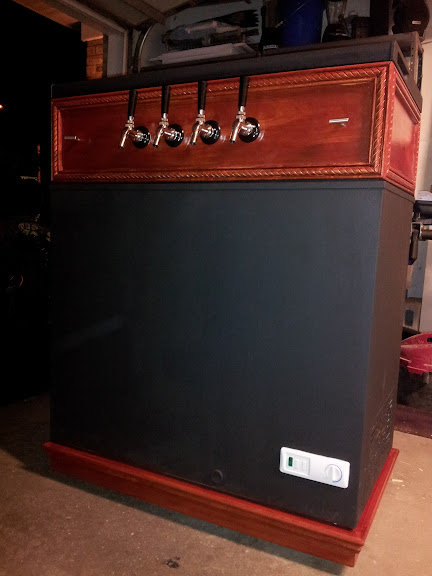
Holy cow, that's an aggressive chalkboarding. I ended up just doing an 11inch stripe from the top of the freezer so that I can label my taps and maybe add some artwork. I also didn't want to paint over the right side, as it can get somewhat hot from the compressor, and I want to prolong the life and thermal efficiency. Looks like you took that chalkboarding to a new level :p

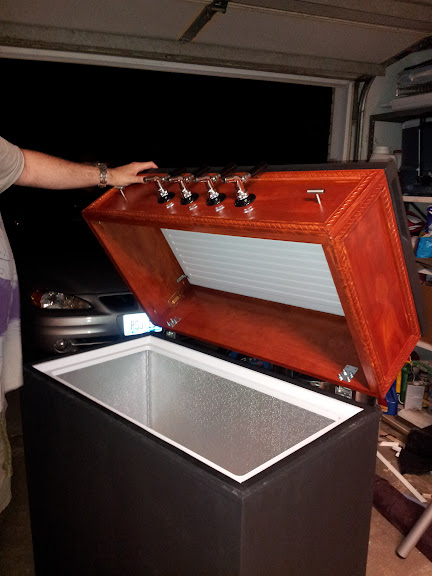
Anyways, I started mine last weekend as well and got the collar insulated last night. I ended up running out of silicone late at night just before I wanted to attach the gasket and let it sit overnight. Doh!

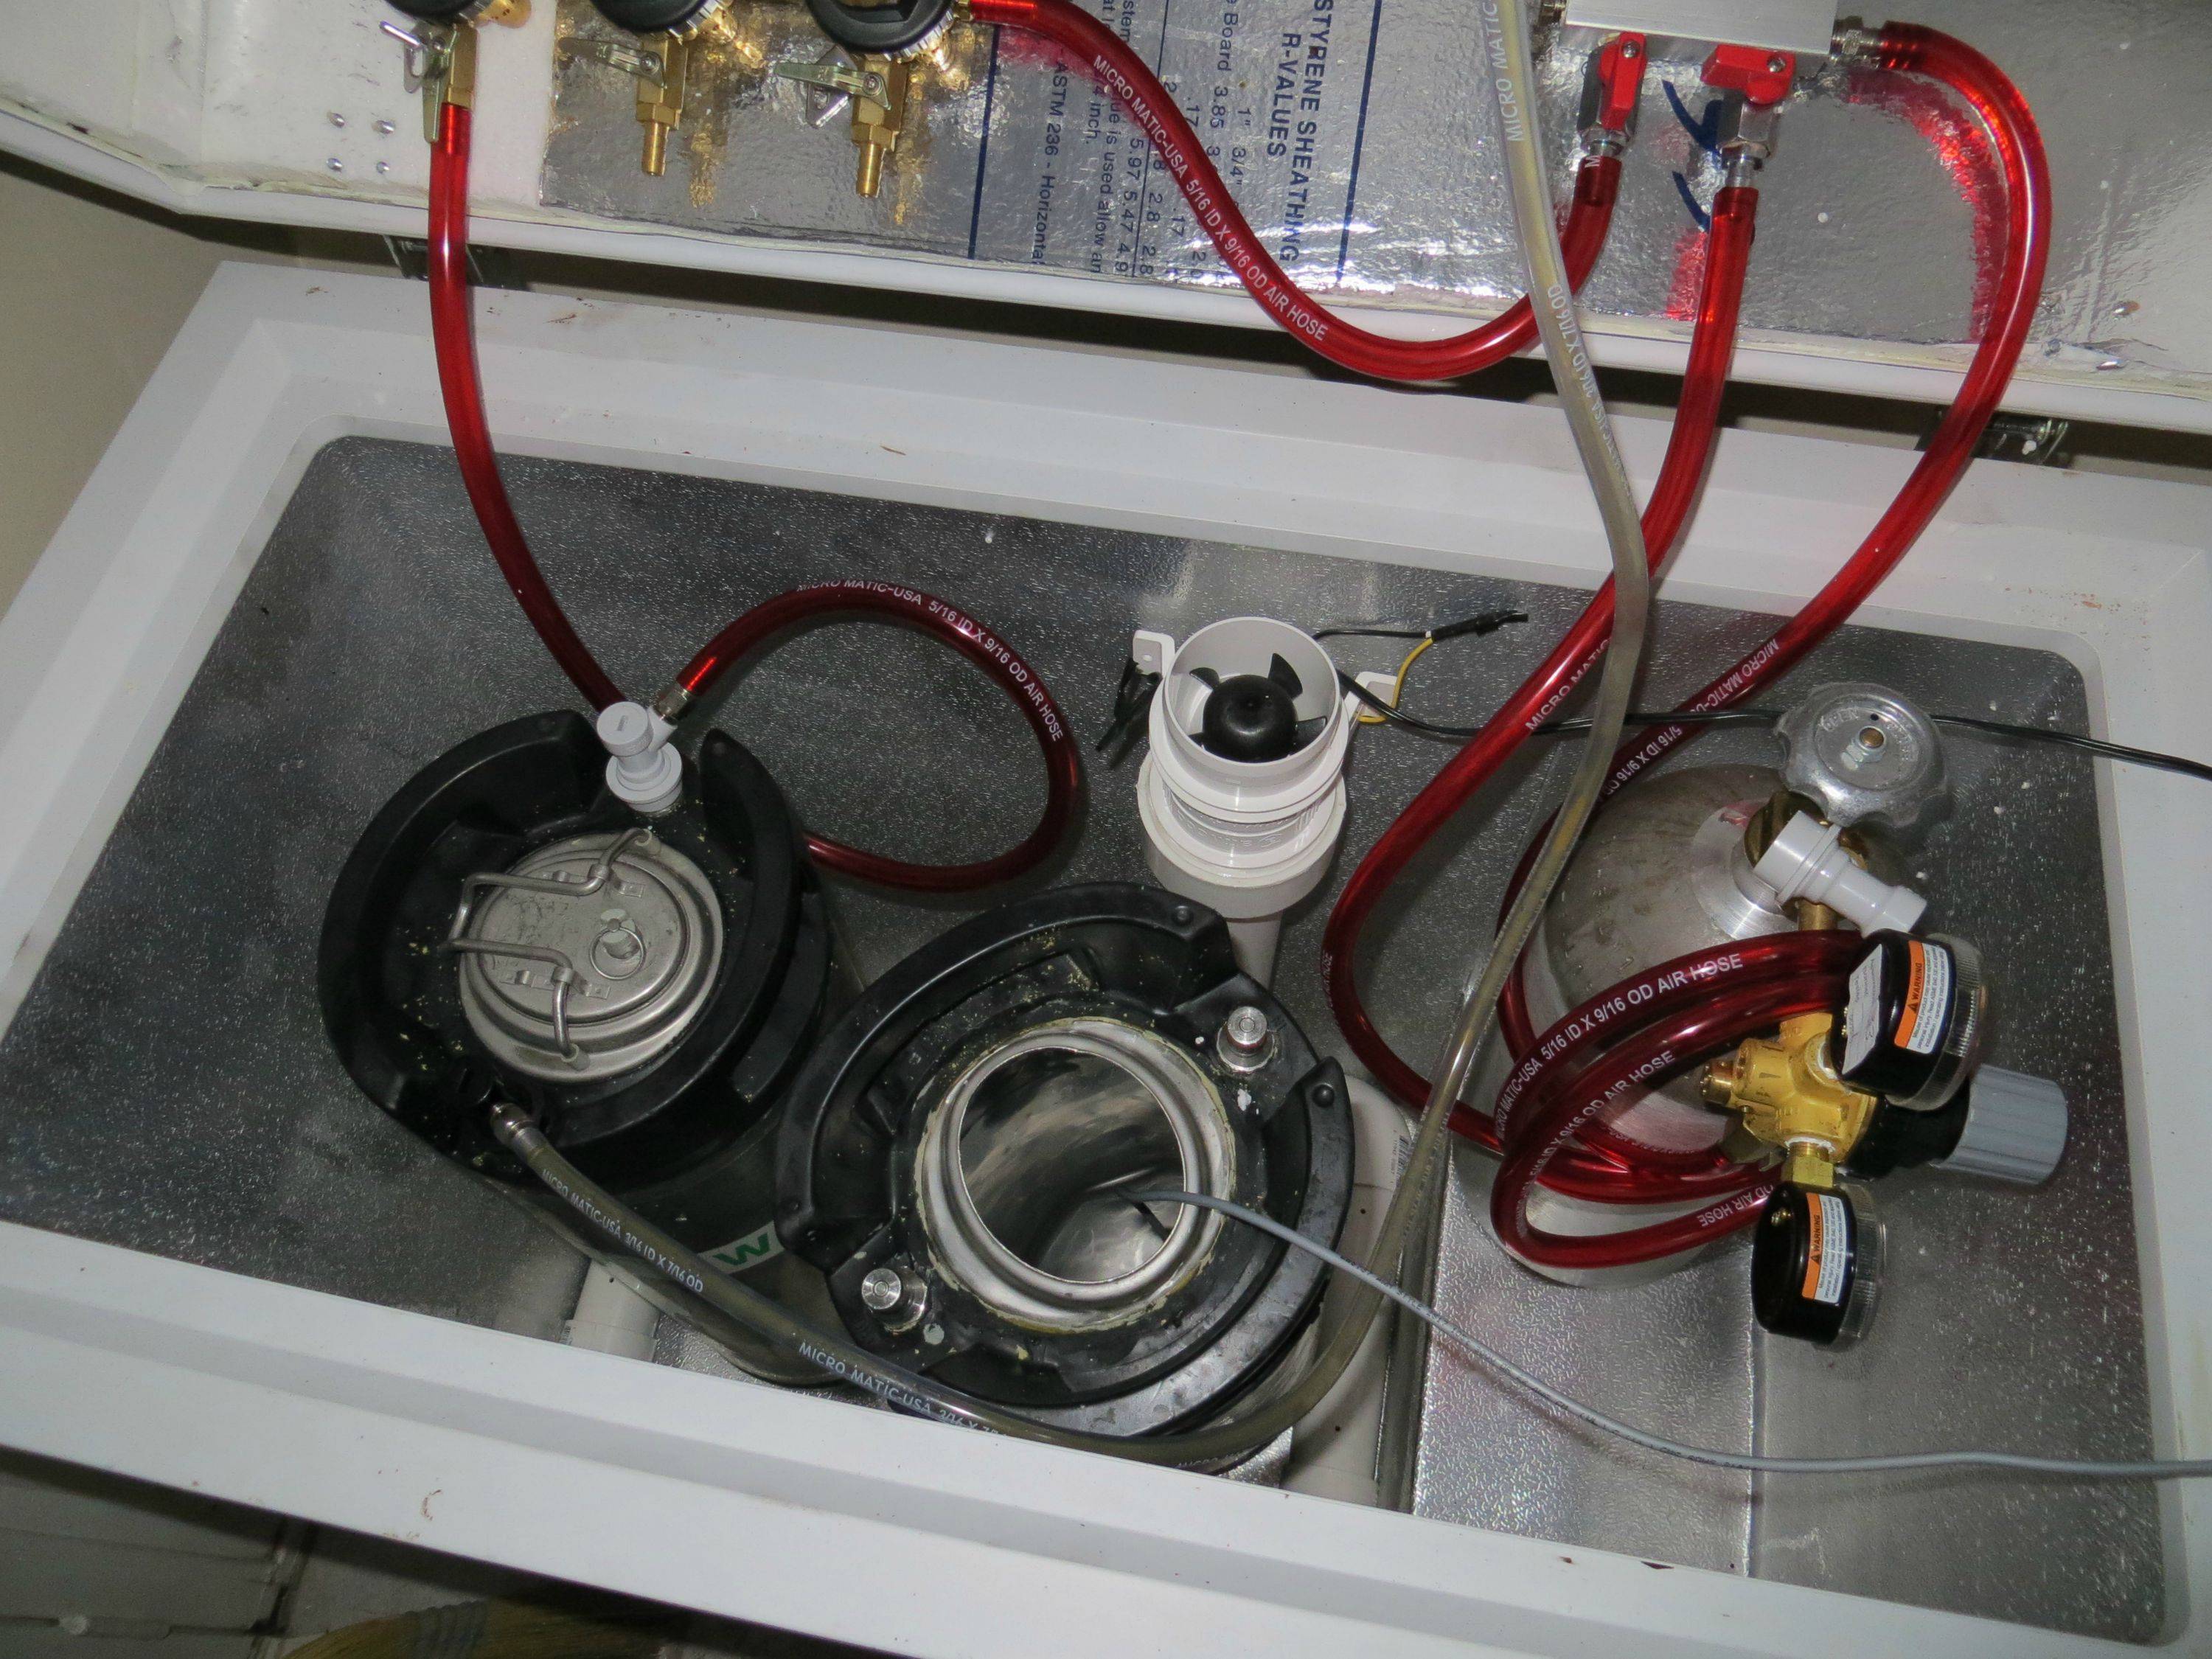
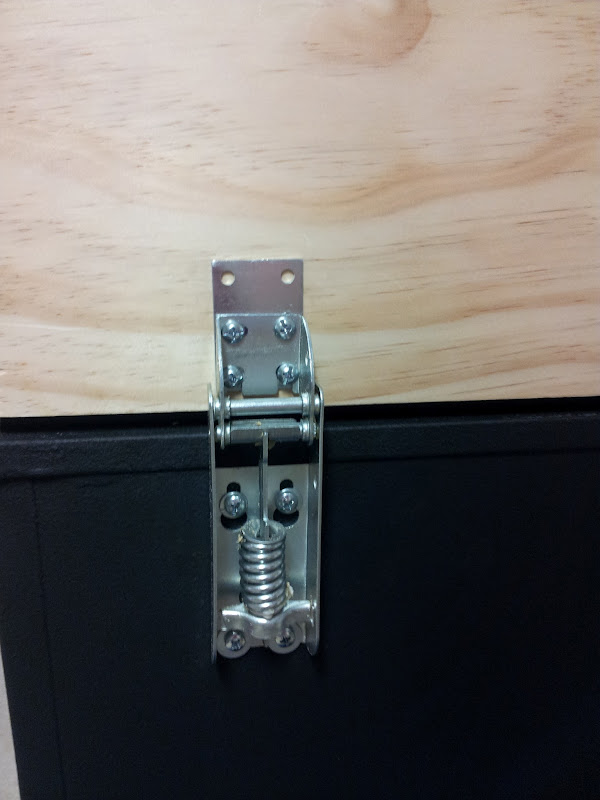
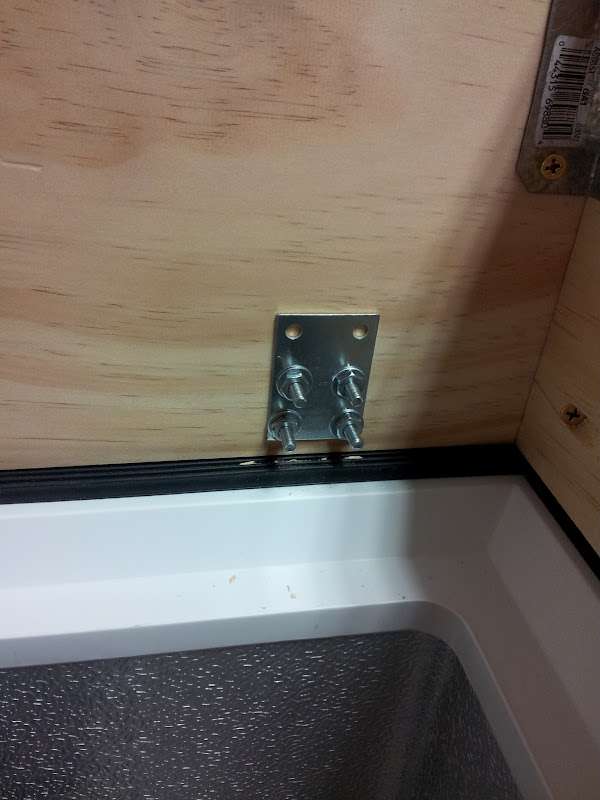
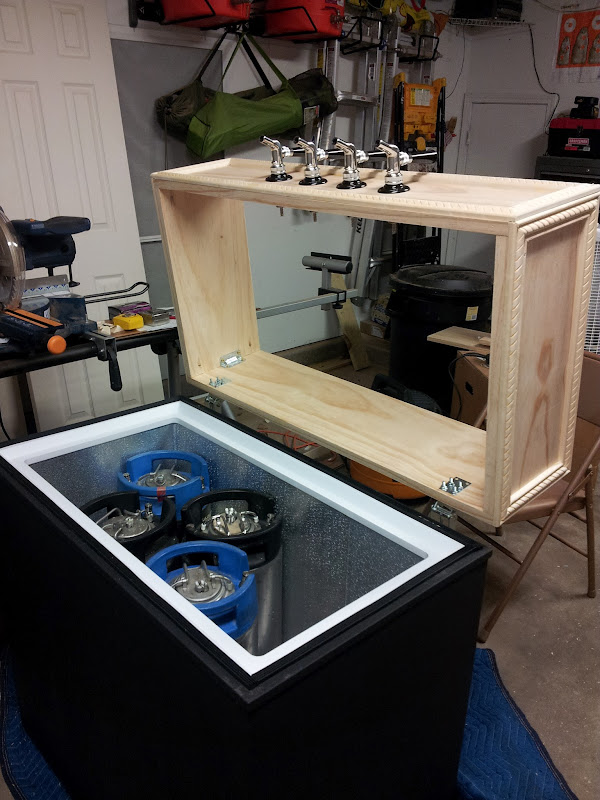
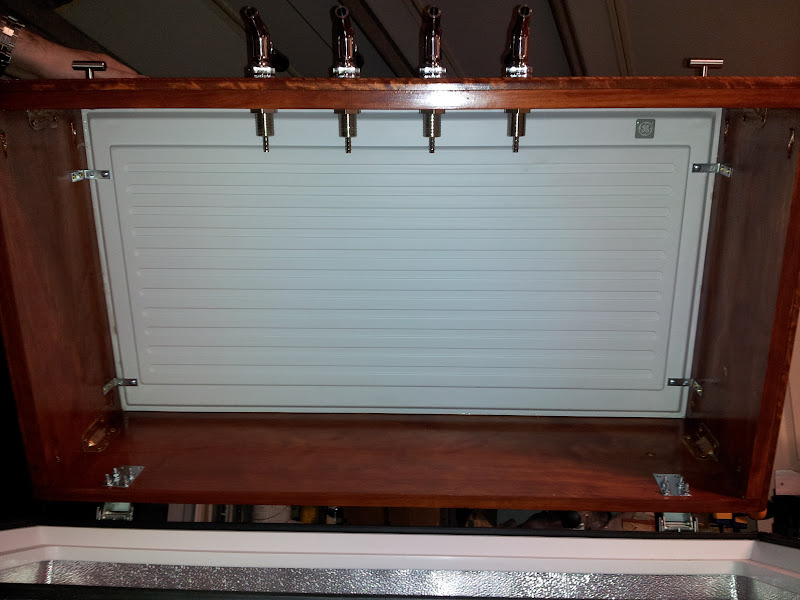
Through the rest of this week, I've gotta get the rest of my stuff drilled, regulators mounted, hinges reattached and redone with stronger bolts and locknuts, bilge blower set up, and mounting the rest of my hardware. Should be ready for a Fri afternoon/night first pour. Perfect timing!
 
Overboard! No way. It was only 1 pint of paint. :)
I thought about the heat from the compressor as well, but it will still have its vent on the right side and it will live inside my house. So the want for a nice uniform look won that debate.

What size bolts did you get? I still need those and a bilge blower.

I hope to start adding the trim to the collar tonight and cutting the pieces for the skirt on the rolling base.
 
I haven't gotten the bolts yet. That's on my list after work today. Also, after mounting the hinge to the freezer again, it looks like some washers would be helpful on the outside of the hinge (between the hinge and the screwheads), given that you have to use the stock screws for the freezer portion, and you have to mount it a tad higher. That leaves the screws in a more vulnerable position since they sit on "mounting rails", so to speak.

I guess I'll find out later. I'm planning on getting 1.5 inch SS bolts and locking nuts for the collar portion. Make sure you put silicone sealant on the inside of the hinge before mounting for extra strength.
 
I read your whole thread. Great build. Sorry if I missed it but what went wrong with the mitre cut collar? I am at this point and want the collar with 45 degree angle cut but don't want to make the same mistake.
 
Short version... I suck, lol. No experience working with wood like that. Wrong tools, no experience, wrong adhesive, etc.
Same here, a piece of molding put on with some wood glue hides the joint nicely. No need for a miter cut. I did use a router to round the top edge of the molding.

P1000586.jpg
 
I have used this freezer in my build also. I purchased the freezer from HD a few months back and have been acquiring all of the essentials to make the conversion.

The project began shortly after I got the freezer delivered. The collar was first, and then this past weekend finally completed it (except for the coats of poly that I've been putting on this week).

I wanted to jump in on this thread to give back to the community and help answer any questions that anyone has out there. I got a lot of info from all the various keezer build threads on HBT, and want to contribute to ongoing/future builds.

I plan starting a thread soon with more pics of the project with some details.

IMG_20120805_200323.jpg


IMG_20120806_181856.jpg
 
Same here, a piece of molding put on with some wood glue hides the joint nicely. No need for a miter cut. I did use a router to round the top edge of the molding.

P1000586.jpg

Dude I'm digging that drip tray setup. Where'd you get it, and does it have any way to keep and beer in it while the lid is opened?
 
TomSD said:
Short version... I suck, lol. No experience working with wood like that. Wrong tools, no experience, wrong adhesive, etc.

So how did it not work? It looked nice in the pictures that you posted before changing it out. Was it too weak and broke? Or did you not like what it looked like because cuts were a little off? I do not have woodworking experience so if I do it with the mitre cut I will have a friend who knows what he's doing make the cuts. I just wonder if the mitre cut is inherently weaker. My keezer is a 14.8 cf model and will have regulators, manifold, etc. mounted to it.

As for the box cut. It looks great too. Thanks for the responses on the box cut but if I get confident enough that I can get a good mitre cut and it will be strong enough I'm going to go that route.

He described at the beginning of the thread that it got wobbly. Assuming the mitre cuts were made properly, that leaves support brackets/braces to do the rest of the job. He showed wooden triangle braces that he fab'd for it. I mitre'd mine and I got 8 metal triangle braces (see here). Put 2 in the top and bottom of each corner. It's extremely strong, and my collar is the least of any of my keezer concerns, because of it.
 
nickmv said:
He described at the beginning of the thread that it got wobbly. Assuming the mitre cuts were made properly, that leaves support brackets/braces to do the rest of the job. He showed wooden triangle braces that he fab'd for it. I mitre'd mine and I got 8 metal triangle braces (see here). Put 2 in the top and bottom of each corner. It's extremely strong, and my collar is the least of any of my keezer concerns, because of it.

Thanks. I have seen metal corner supports on other threads and also thought I would go that route. Great to see it can be done with success. I haven't seen any like yours or others I like at Home Depot. maybe I'll go online for them. Sorry I missed the wobbly part when retreading the thread.
 
nickmv said:
Dude I'm digging that drip tray setup. Where'd you get it, and does it have any way to keep and beer in it while the lid is opened?

The drip tray is from More Beer, it's the 13" one. It's attached to the freezer with the supplied sheet metal screws. I carefully drilled pilot holes first to make sure there were no lines.
 
Yeah the cuts were poor and the glue didn't fill in the gaps well so weakened over time. It was poor choice in glue and poor cuts combined with being used in a temporary setup while I got distracted by other things that did it. It was pretty solid in the beginning if I had gone right on to finish the build it would've probably been fine.
 
I got the trim work added to the collar today and the holes drilled for the faucets. Doing a little dry fitting of the faucets before I mount two small handles, one on each side of the faucets.

It's really looking cool now with the trim.
Lots of sanding, staining, and applying poly urethane is in my future.

IMG_20120812_201248.jpg

IMG_20120812_201237.jpg
 
I got the trim work added to the collar today and the holes drilled for the faucets. Doing a little dry fitting of the faucets before I mount two small handles, one on each side of the faucets.

It's really looking cool now with the trim.
Lots of sanding, staining, and applying poly urethane is in my future.

Get that thing sped up! You need beer on tap NOW!

Anyways, I managed to finish mine up (well, 98%) over the course of about a week. Here's the finished result. All I gotta do is drill for the probe and fan wiring, and place a drying rack/fridge grate in the bottom to sit on top of my PVC ventiliation system (which works well, btw).

Here's some pics:

dBcFP.jpg


drbDx.jpg


wrvIV.jpg
 
Get that thing sped up! You need beer on tap NOW!

You aren't the first person to yell at me to get beer on tap quicker!
I have my Dirty Honey Blond Ale ready to tap, just need to finish this damn thing up.

I like the PVC pipping idea, way more durable then other setups I've seen, but does it take away too much space in there? I will be running 4 taps, so there won't be too much extra space.
I just ordered my bilge fan, some flexible conduit, and a variable voltage dc plug for the fan. I will see how that flexible conduit works out.

Well here's the deal -- get those hinges on and attached and the collar insulated (cant remember if you have or not), and you'll at least be able to get it chilling the beer so that you can carb it up.

Trust me, you're gonna want that beer on tap yesterday. So Friday will be a compromise for you, if you can get to carbing ASAP.
 
Also, as far as space is concerned with the PVC venting, it's more of a height issue. I think you lose about 2.25" of height or more because the kegs will sit higher. For me, this is no issue at all.

As far as fitting 4 kegs in there AND the system.....well, that's the beauty of PVC systems being flexible in their designs. Just align the intake pipe wherever there's a space around the 4 kegs. Due to the zig-zag pattern of fitting kegs in there, you're inevitably left with some free space on the perimeter of the freezer.
 
Awesome build thread, there's a lot of good stuff in here. I've just recently started getting supplies together to hopefully start building my own soon. One question for anyone who built a base with the casters, is the freezer just sitting on top of the wooden base, or is it somehow more permanently attached?
 
I built mine with casters, and what you just pointed out is indeed an issue for me. The keezer wants to slide around on the base more than I had hoped. I haven't had a chance to look at it yet, but it may be a simple fix. We'll see.
 
Mine just sits no top of my base. I used four swivel casters though. If two were fixed I think I would have problems with sliding too. As it is now though I can push it all over the place and it doesn't slide at all.
 
Mine just sits no top of my base. I used four swivel casters though. If two were fixed I think I would have problems with sliding too. As it is now though I can push it all over the place and it doesn't slide at all.

I don't think the issue is in any way related to the casters. It's just that in order to move the thing, the easiest way is to push on the freezer. Unfortunately the part that moves the freezer is not what you're pushing. As a result, the freezer sometimes moves across the base instead of staying put. I'm not sure if I can really do anything short of building a new stand with a lip.
 
I move mine the exact same way. The casters and what you are rolling over have a lot to do with it. Also, how full it is. Big wheels, solid casters, all swivel going over large tile (smaller wheels would catch in the gaps) and over door jambs, wood transitions, etc. without a problem... just sayin'. I grab the top and pull, push, twist, etc to move it where I want it without a problem. Really though if you are having a slippage issue just tack a couple pieces on the corners that stick up so it won't be able to slip.
 
I never pulled the trigger on the recirculation fan, this might make it easier for me and anyone else building one of these:http://http://www.williamsbrewing.com/TOWER-COOLER-P3138.aspx

That should work fine, but with a keezer like the ones in this thread, you're probably going to want to build a small protective "space" of extra insulation around the shanks so that you can have the air pumping straight into that little space.

If you don't have kegs clearing into the collar area, then the main concern is to try to keep the taps cold (and the line if you can). So if you concentrated the airflow into a tiny space (using what I described above), it would probably work pretty well.


I personally went with the PVC ventilation system from another thread (see here), but I really did it just because I thought it was badass looking. That being said, it's very functional and gets the job done, but is a bit loud (I run it in parallel with the freezer so that it only runs when the compressor runs).
 
Question for anyone: Does anyone use a GFCI for their keezer? I'm worried in the long run about the bilge blower which is simply ghetto-wired into a PSU.

Just don't want to take any chances of a fire breaking out from the PSU, etc.
 
Question for anyone: Does anyone use a GFCI for their keezer? I'm worried in the long run about the bilge blower which is simply ghetto-wired into a PSU.

Just don't want to take any chances of a fire breaking out from the PSU, etc.

I would say, when it doubt with ghetto-wiring, better safe than sorry.
The PSU may have a fuse that could blow.

I bought a cheap DC variable voltage plug off of Amazon to run the fan.
Variable AC / DC Unit

I wasn't planning on running a GFCI, but now that you mentioned it, I have a nice one left over from my previous salt water fish hobby that I will use.
 
Last edited by a moderator:
I would say, when it doubt with ghetto-wiring, better safe than sorry.
The PSU may have a fuse that could blow.

I bought a cheap DC variable voltage plug off of Amazon to run the fan.
Variable AC / DC Unit

I wasn't planning on running a GFCI, but now that you mentioned it, I have a nice one left over from my previous salt water fish hobby that I will use.

Yeah, I wanna do that, but my fan is the big Attwood bilge blower that I rigged into a PVC circulation system to blow from bottom up.

I'll prob just use the GFCI and rely on that. I need to see about rigging up a potentiometer that I can simply adjust when I want. That way I can run this thing constantly and not have to worry about noise (even at 6v, it's loud as hell and can move some serious air).
 
Last edited by a moderator:
I drilled the holes for the hinges last night and did a dry run.
I have them reinforced with some small steel plates, but this thing still feels a little sketchy with it being made out of pine, though that does keep it lighter. I'm worried that I should have done bigger metal plates.
I did put plates on both sides of the wood to give it more strength to stretch out the pressure points.

IMG_20120816_203101.jpg

IMG_20120816_203111.jpg

IMG_20120816_203150.jpg


I finished trimming out the base as well:
IMG_20120816_193929.jpg

IMG_20120816_193922.jpg
 
For any of you that have had your keezer up and running for awhile now, how is the moisture level inside where the collar is?
I'm trying to decide how many coats of polyurethane is enough.

I'm using a Minwax Fast Drying Oil Based one. I have 3 coats on already, I was contemplating that being enough for the outside of the collar, but I am considering doing 3 more coats on the inside.

IMG_20120819_183047.jpg
 
Shouldn't be any really with a dehumidifier/fan inside, and either way I assume you'll line the inside with insulation? Note that there will be some condensation on the outside of the faucets if it's at all humid. They should be cold.
 
Yeah, I've only been running for 2wks, but moisture in the collar area is practically non-existent. The only time it occurs for me is if I open it several times and leave it open, then condensation quickly forms. Even then, it shouldn't be getting to your collar.

If you insulate it correctly, the inner wood shouldn't have any contact with moisture or air from the keezer. The insulation should completely cover the inside, save for a few places (mounting brackets, hinges, faucet shanks, etc). Make sure your insulation is flush with the bottom of the collar. Once it's attached to the collar, run over the "seam" between the insulation and wood with some silicone sealant when you're re-attaching the gasket.

I'd recommend insulating and attaching the gasket on separate days, so as to allow the insulation to get a good hold on the collar before you try attaching the gasket.
 
Thanks Guys ---- good input.

I just threw one more coat of poly on the inside of the collar, I'm going to consider that the last one.

I have 2" high density insulation board to mount to the inside of the collar.

My gasket is already on, I bought a new think rubber one that is black. Seemed to be getting a good seal on that with my dry run.

Maybe tomorrow night I can find some time to mount the lid to the collar and then work on the insulating.
 
Yeah I made the ******* mistake of cutting my wood to the outside specs of the freezer. As such, my collar is just a tiny bit large than should be. It sits perfectly fine on the freezer, but the gasket is recessed to the point where it slightly overlaps the insulation foam. No biggie though. That was why I suggested separating the tasks....just in case.
 
2 coats of poly on my collar - no problems in 1 1/2 years. If the keezer remains cold and relatively clean, it isn't a humid environment.
 
So --- Everything was moving along real nice, until now when I realized how much of a mistake it was not insulating the collar with the foam board BEFORE I mounted the top to the collar. Sigh..... Now the last portion will be 10x harder.

Is there any concern about the lack of insulation around the shank b/c of the hole that you have to cut for it?

2012-08-24%252021.17.27.jpg

2012-08-24%252021.17.16.jpg

2012-08-24%252020.52.31.jpg
 
I just drilled the insulation out to fit the shanks and cut everything real close so it all fits snug. I wouldn't be worried unless you are carving out huge holes. It will be harder getting that initial fit though with the top on already, ouch.
 
Why not take the top back off? Did you glue it in addition to those angle brackets?

What dimension did you size the top too if not the outside? The inside then? I was going to duplicate the dimensions of the top itself...
 
Back
Top