Brewstand build finished! 1st brew today

Homebrew Talk - Beer, Wine, Mead, & Cider Brewing Discussion Forum

Help Support Homebrew Talk - Beer, Wine, Mead, & Cider Brewing Discussion Forum:

This site may earn a commission from merchant affiliate links, including eBay, Amazon, and others.
I did receive the whirlpool fittings.

I put them in the kettle today. I'll try to get some pictures posted in the next day or so. Right now I'm charging up my camera's batteries.
 
Here are a couple of shots of the new fittings to allow me to whirlpool in my kettle.

Whirlpool_fitting.JPG


whirlpool_and_outlet.JPG


The fittings were purchased from BargainFittings.com. I had been using a simple street elbow with a coupler before.

Brewstand_Trubpile.JPG


A couple of weeks ago, I removed the coupler and turned the street elbow around. This improved the centripetal force and gave me greater velocity and a tighter trub pile.

The new fittings will more closely simulate a true tangential inlet.

The second picture shows the wort outlet that draws from the side of the kettle. It is an elbow with a close nipple threaded into it. I leave behind 0.625 gallons of wort and trub when I run into my fermenter, as shown in the third picture.

I hope to be able to brew this weekend to give the new fittings a test. If I remember to take pictures, I'll post them here.
 
Wayne,
I'm considering moving away from my hardline approach (see the website in my signature). Can you give some details on the new SS camlocks you installed? I've never seen anything like that.

Thanks!
 
Wayne,
I'm considering moving away from my hardline approach (see the website in my signature). Can you give some details on the new SS camlocks you installed? I've never seen anything like that.

Thanks!

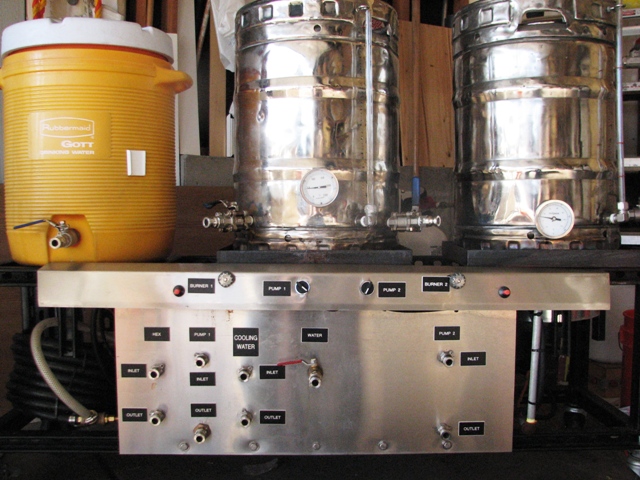
Camlocks, or cam and groove fittings, are very commonly used for industrial fluid movement. They are also used for some solids movement. When we received grain in our silo, back in the brewpub days, the fittings were all camlock.

They are not quite a pure sanitary fitting, but are closer than the brass quick disconnects I was using. I would prefer to use a bevel seat fitting, but those are not made to fit 1/2" hose.

I purchased the camlocks from Pro Flow Dynamics. here

They were great to deal with. I wanted to change the order slightly after I placed it. They graciously accommodated my request and still shipped it the same day I placed it.

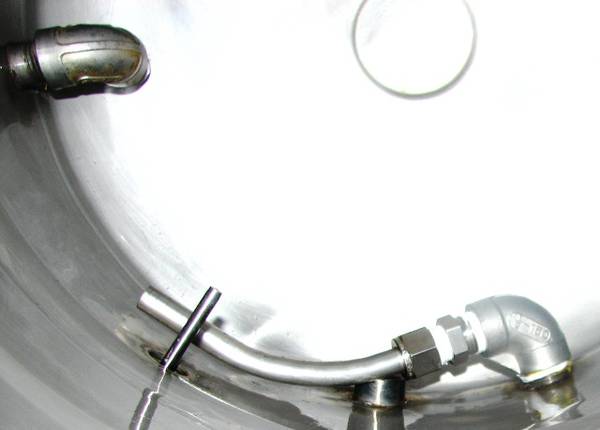
The female fittings with the hose barb do take some getting used to. You have to move both wings at the same time. After a few uses they do loosen up a bit.

I have now brewed twice with them and I am never going back. With the brass fittings I did need to wear a glove to release the hose on the kettle. With the loops on the wings, heat from the fittings never travels out that far. They are easier to release and to attach. There are sometimes during a brew day that I just need to have fluid flow for a short period. I can do so with the camlocks without going through the whole connection process.

Lots of benefits and a cheaper price. They are a win/win for me.

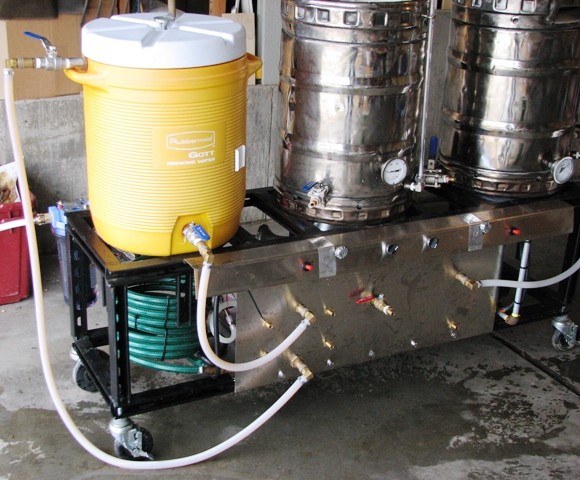
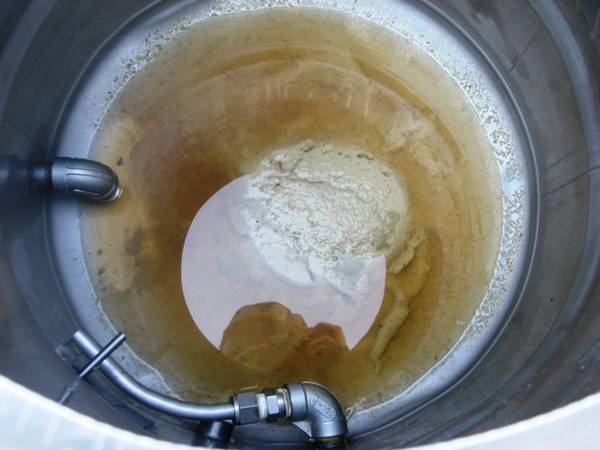
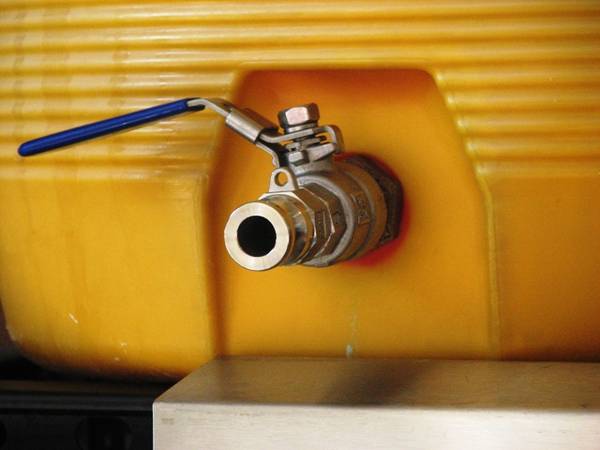
Here are a couple of other shots of the male fittings on my vessels.

mlt_camlock.JPG


kettle_camlock.JPG


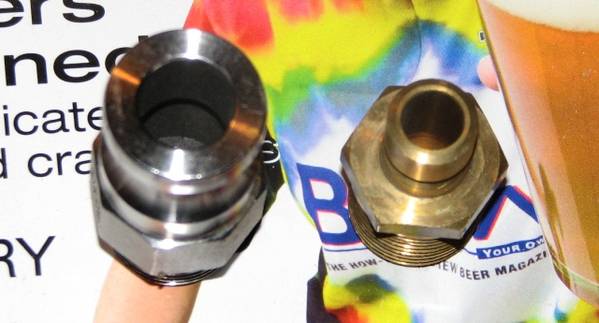
Here is a comparison shot between the old male disconnect and the new camlock.


disconnects.JPG


I have brewed on a couple of all hardpiped systems. I, personally, did not care for them. I like the versatility and ease of cleaning using a diverter panel, disconnects and hoses.
 
Wayne,
Thanks for sharing all the information on your set up. I'm trying to understand these items so as to utilize others experience before making my own. I was just wondering about a couple of things.

Does the relative depth of the tangent inlet relative to the outlet play a role. I would think if they are at the same depth, the tangent inlet would impinge its flow on the outlet connectors.

The second thing is, if you did it over again, would moving the tangent inlet's current position (A), clockwise to a position (B) be more helpful ? Or in your case, lengthen the stainless tube to run around so that its exit is just beyond the outlet connector.


Regards,
BB
 
In most of the systems that I have used, the inlet port is on the side and as low on the kettle as it can go. In my system, for various ergonomic issues, I had to place the inlet and outlet at 90 degrees from each other.

There is no reason I can't have the inlet on the right side of the kettle and outlet on the left. In fact I will do that for my next brew to see what happens. If anything it will keep the flow away from the thermo probe in the middle of the kettle.

For an electric kettle I think you would want the inlet high and outlet low to ease stratification.
 
Yambor, this is the one you want, it's the type F. The female one is correct for your hoses:

732_xlg.jpg
 
Joe,

All my QDs have been sold already. Sorry.

Yambor,

ubermick is correct. Those are what I used.
 
Wayne,
Thanks for sharing all the information on your set up. I'm trying to understand these items so as to utilize others experience before making my own. I was just wondering about a couple of things.

Does the relative depth of the tangent inlet relative to the outlet play a role. I would think if they are at the same depth, the tangent inlet would impinge its flow on the outlet connectors.

The second thing is, if you did it over again, would moving the tangent inlet's current position (A), clockwise to a position (B) be more helpful ? Or in your case, lengthen the stainless tube to run around so that its exit is just beyond the outlet connector.
Regards,
BB

That's exactly what I was thinking when I read your reply, why have the drain outlet just downstream of the whirlpool inlet discharge tube when it would be better placed 355 degrees after the inlet whirlpool discharge allowing the maximun amount of time and distance for the trub to collect into a center cone and drop out of suspension? An adjustable height drain pickup tube made with a flared tubing than can be adjusted to the different amounts of trub mass or brews would also reduce dead space or waste doing different brewing batches. Low trub brewing lower the pickup tube lock it tight , lift up higher with higher trub brew batches. JMO's if it were my brew systems additions to the build. BTW this is a great thread and thanks for sharing to all of us it's all great information plus thanks for posting.
 
Wayne,
I'd be interested to see if this would help. Another thought would be to get the SS inlet tube to match as close to the wall of the keggle and just bend it a bit at the end slightly toward the center using a vise. This would just direct the flow tangent or slightly toward the center.

If and when you try this experiment, post a couple of photos. You might be able to just get some flex hose and attach it to your current setup. Using some food die and some water might give you the option to fool around a bit before finalizing.

If I knew how to post a picture I would draw something up. I think I don't have this ability because of my status. I'm not a paying customer yet.

Regards,
BB
 
I have moved my whirlpool fitting to the left position and the inlet to the right.

I'll take pictures when I brew again.

I suppose I can have Wayne make up another, longer tube to do what BrewBeemer and bbbrew have suggested. That will have to wait a bit. More ingredients come first ;)
 
Wayne,
I was looking at your link showing the tangent inlet from Stout Tanks and Kettles. That's some equipment for the price. They don't directly show their outlet in a side view. My question to you is why have you placed a 90 elbow on your outlet? You obviously have much more experience than me but I was just thinking that by putting on this 90 degree downward elbow, you might be pulling that trub from the center into your finished wort. Just a flush outlet might be better. Just wondering what your thoughts are on this.
BB
 
Thanks for you comments.

In a commercial brewery sized kettle, the outlet is placed on the outside edge of the bottom dish or cone. I have tried to emulate the equipment I used to work with.

I do have the limitation of having to run the fitting through the side of a keggle. It has to be a certain distance above the bottom to clear. A straight through fitting with no elbow would leave close to 2.5 gallons of wort behind. While I could compensate when brewing 5 gallon batches, I also brew quite a few 10 gallon batches. I have to fill my keggle to 15 gallons pre-boil to end up with 11.5 gallons in my fermenter. I can't just throw away that much wort.

I compromised with the 0.625 gallons left in the keggle. With some highly hopped IPAs, the trub cone is high. I do keep an eye on it and shut off the valve when I see too much trub going into the outlet. The exact same problem exists with the larger brew kettles.

Whirlpooling and using SuperMoss does compact the trub into a fairly tight cone. This does allow you the ability to draw off more clean wort than a flat bottomed kettle with just a side outlet.

There is no kettle design that will allow you to brew every style, perfectly. You have to be willing to make compromises. This system is the best I was to put together for the money I was able to spend. I have upgraded a few items in the year since I built it.

I would love to be able to buy one of the Stout kettles now but other items need attention first. The current whirlpool fittings are quite an improvement over what I had a year ago.
 
Wayne,
Thanks for taking the time to further elaborate on the placement of the outlet and the remaining wort given the fact that we have keggles. I was wondering about this.

I have the same thing and will do as you have however I might place a tube inside of my outlet pipe to try and make your 90 elbow configuration (ie. weld in place SS bended tube).

Another question I have is, when you are sparging in the keggle, do you have a false bottom or some form of filtering?

Because I didn't cut the keg's lid all the way to the outmost diameter, would the false bottom have to be (2) pcs construction, so that it could be assembled inside the keggle? Or don't you even worry about this because you will recirculate and trap the trub in the center later.

Thanks again,
BB

There's lots of us using 15" diameter hinged false bottoms in kegs. The false bottom folds nearly in half to allow it to fit in the top of the keg.
 
Another question I have is, when you are sparging in the keggle, do you have a false bottom or some form of filtering?

Because I didn't cut the keg's lid all the way to the outmost diameter, would the false bottom have to be (2) pcs construction, so that it could be assembled inside the keggle? Or don't you even worry about this because you will recirculate and trap the trub in the center later.

Thanks again,
BB

I don't sparge in the keggle. I mash and lauter in a 10 gallon Gott cooler. I use a second keggle as a HLT. I pump the sparge water into the top of the cooler and use a second pump to move the wort out of the bottom of the cooler into the brew keggle.

There is no false bottom or filter in the brew keggle. Use of kettle finings (Irish Moss or SuperMoss in my case) cause proteins to coagulate and settle out after whirlpooling. The centripetal force of the whirpool will make the solids form a cone. The majority of trub is left behind in the cone in the center of the keggle. That is why I draw off from the side of the keggle.

Here are the three vessels I use on the brewstand.

brewframe_upgrade.JPG
 
Wayne,

Another question I have is, when you are sparging in the keggle, do you have a false bottom or some form of filtering?

Because I didn't cut the keg's lid all the way to the outmost diameter, would the false bottom have to be (2) pcs construction, so that it could be assembled inside the keggle? Or don't you even worry about this because you will recirculate and trap the trub in the center later.

Thanks again,
BB

Here's a link to where I got mine. If you need one, PM me as I bought 2 and only need one.
 
Wayne,
I should have read your original post. You described all this the first time. Thanks for being patient as I am learning more about the process. I can see that you really have thought though how to be most efficient. That's why there is no replacement for experience. Thanks again for helping me understand better.

What is your limit on grains using your 10 gallon Gott Cooler? Do you have to be careful when you are collecting your first runnings and sparging so you don't overflow?

Regards,
BB
 
The most I have had in the mash tun is 25 lbs of grain. Maybe you could fit 30 if the grist/water ratio was on the low side. I believe Bobby M has a chart on here somewhere where he worked out max capacity of various sizes of mash tuns.

I fly sparge. I first recirculate the wort through the grain bed with one pump for about 10 minutes. I change hoses around and then let it flow into the kettle. No problems with first runnings. I adjust the flow rate of the sparge water and the wort flow into the kettle with the two ball valves. It take some time and experience with your system to know where to set them so the flow is even and equal. I try to take between 45 minutes to and hour to lauter each batch. I start the burner after collecting about half a gallon and try to adjust the flame so I hit boil within a couple of minutes of hitting my pre-boil level.

Doing 10 gallon batches, I collect 15 gallons in the kettle. IT can be a challenge to prevent boil overs. I never have a problem with overflowing the mash tun. I constantly monitor the level in the tun.

As I stated earlier, a lot has to do with experience and getting to know your system. Even though I have brewed many batches, it took some time for me to be comfortable with this system. Now I am starting a slow process of changing some parts of it. I'll have to learn all over again.
 
You beat me before I could get back to you. I just finished reading Flyguys post (67 pages of the 104) about MLT filtering and construction. No one has had a problem with the 10 gallon coolers that I read. Flyguys construction is to use a stainless steel braid hose to the filter wort. I like your idea of adding a inlet at the top of the cooler to be able to recirculate initially. I guess I have to purchase the pump then.

Is this how you filter out of the MLT, with one single straight line?

BB
 
Check out Post # 76 of this thread. I post the false bottom I use and a newer stainless steel one that may work. I do not use braid for a "filter" Again, I am trying to replicate the commercial brew gear I used to use.


Brewstand_Recirculate.JPG


Here is the system set up to recirculate the wort through the grain bed. The hoses are connected to pump #1

Brewstand_to_Kettle.JPG


Here is the way the system looks while sparging. The outlet of the MLT goes into Pump #1. The outlet of Pump #1 goes into the brew kettle. The outlet of the HLT goes into Pump #2. The outlet of Pump #2 goes into the top of the MLT.

I adjust the flow from the HLT by adjusting the ball valve at the top of the MLT. I adjust the flow from the MLT by the ball valve on the kettle. Both pumps are running at this time. This is the only point in the brew where both pumps are used.
 
Thanks, Wayne, for the welcome on my intro thread. And thanks for pointing me here. Amazing stuff. Piece by piece, I'll get there, at least beyond the porch and steps I'm using for my "gravity" stand now. I would love to sit in on a brew day with you, if the crowd at your place isn't too big.
 
I don't have a clue as to what's going on in this rig...but I like it!! Great looking rig, nice, clean, polished, what more could you want. I'm curious, the cooler is used for mashing correct? I just have a 44 quart ss pot with ss fitting and a 10 gallon igloo mash tun. Really want to build a gravity system, maybe weld a 3 tier stand but I have no idea how the pump stuff works. Maybe some day?

:mug:
 
I know this is an old thread, but consider me a necromancer. I have a question about your MLT setup. I am considering getting a march or chugger pump, and I also use an Igloo cooler as my MLT. I am curious what sort of fitting you use in the top of your MLT to recirculate your mash without oxidizing the bejeezus out of it? I want to use my pump for fly sparging, vorlauf, and whirlpool. I am planning on installing a whirlpool arm, and I have a little plastic sprayer nozzle on my sparge arm. I guess I could recirculate through it the sparge arm nozzle, but I am worried about hot side oxidation. I would really be interested in seeing your vorlauf fitting. That setup is AWESOME by the way. It looks like a more high tech version of Dogfish Head's first brew setup.
 
I know this is an old thread, but consider me a necromancer. I have a question about your MLT setup. I am considering getting a march or chugger pump, and I also use an Igloo cooler as my MLT. I am curious what sort of fitting you use in the top of your MLT to recirculate your mash without oxidizing the bejeezus out of it? I want to use my pump for fly sparging, vorlauf, and whirlpool. I am planning on installing a whirlpool arm, and I have a little plastic sprayer nozzle on my sparge arm. I guess I could recirculate through it the sparge arm nozzle, but I am worried about hot side oxidation. I would really be interested in seeing your vorlauf fitting. That setup is AWESOME by the way. It looks like a more high tech version of Dogfish Head's first brew setup.

Hey SouthPhilly,
I am not the original poster of this necrotic thread, but having built several versions of of a horizontal setup and made, bought, etc. several versions of MLT you cannot go wrong with the Blichmann Autosparge in my opinion. I invite the comments of anyone else on this subject, because it is very subjective. I prefer the Blichmann because I can walk away from it and don't have to worry about my mash tun overflowing (say in the event of a slow or stuck sparge), and since I use mine continuously as part of HERMS setup, it has to be reliable. Pictures and banal commentary can be viewed on my blog here: https://3dogbrew.blogspot.com/2015/07/how-much-mash-does-tun-weigh.html
 
Back
Top