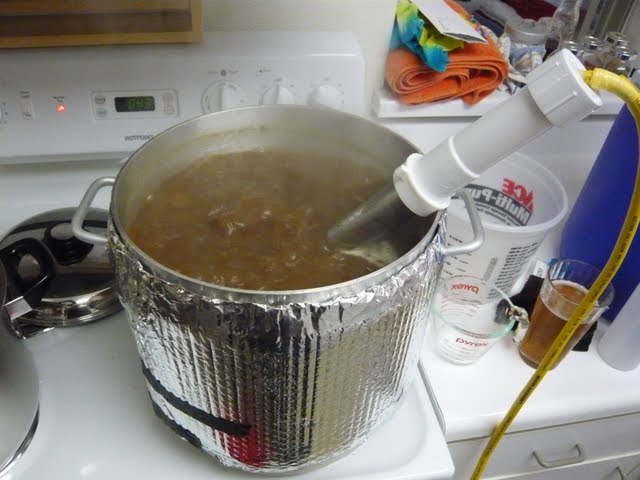
Heatstick = awesome!

Homebrew Talk - Beer, Wine, Mead, & Cider Brewing Discussion Forum

Help Support Homebrew Talk - Beer, Wine, Mead, & Cider Brewing Discussion Forum:

This site may earn a commission from merchant affiliate links, including eBay, Amazon, and others.
I will have to make my heatsticks for 15A outlets.

What's going to be the most appropriate/cost effective way to create the power cords? Can I buy cable and plugs for 15A outlets at HD or Lowes?
 
yes, you can buy cables and plugs at HD or Lowe's for 120V/15A. They sell power cord by the foot, and 15A cord shouldn't be very expensive. They'll have a bunch of options for plugs for the end of it, too. Or you could buy an extension cord (check the amp rating) and cut it in half. One end will have a plug already and you can just buy a plug for the other half.

To ask for plugs by technical name, you want "NEMA 5-15" plugs. NEMA 5 style is a standard house outlet, and the 15 tells the amp rating.

This is one of the first pages I bookmarked when I started investigating and building my new system.

http://en.wikipedia.org/wiki/NEMA_connector#NEMA_nomenclature
 
What's going to be the most appropriate/cost effective way to create the power cords? Can I buy cable and plugs for 15A outlets at HD or Lowes?

I found some 10 foot, 14 gauge extension cords on sale for less than $5, and just cut the female end off. They're ugly neon green, but I couldn't build them for less money.
 
Somewhere in the 37 pages of this post someone asked about the grounding of the unit and I'm not sure I caught the answer. Anyways I'll add to this thread instead of starting a new one . . .

I picked up the items to build 2 of the 2000 watt right angle heat sticks. I'm still not sure why other than my brew buddies with the brutus stands, 3 tier stands and 60 gallon pots don't have one. AND considering stepping up to 20 gallon batches and these MIGHT help save some time with heating LARGE volumes of water and help getting the keggles going. If everything goes well I shouldn't have a problem running 4 5500 watt elements in my garage the way it sits now. OK enough of the intro . . .
I used a 5/8" X 2" neoprene fender washer to help with the sealing and get away from a big goober of JB weld. I picked up a tube of the 400 degree DAP silicone but it didn't leak while leaving it submerged over night so I didnt use it. To bad I soaked it overnight in a bucket of Star-San and the next day it was a dull grey and the retainer nuts coating pretty much came off like grey paint . . . . I'll pick up the chrome nut at the hardware store if someone chimes in about it being an absolute must.
OK I guess my question is simple . . .
Because I'm using a neoprene washer the element DOES NOT come in contact with the 90 degree metal plumbing tube. Should I ground/solder the ground wire to the octagon shaped head of the element or will it be OK to ground / solder it to the metal tubing ??? Does it matter ???
I'll throw in a few pictures to help with the description.

EDIT: the element head does come in contact with the metal pipe on the back side opposite of the washer. Please disregard the question and enjoy the pics . . . SORRY for the bump

100_1713.jpg
[/IMG]


100_1714.jpg
[/IMG]


100_1715.jpg
[/IMG]


100_1720.jpg
[/IMG]


Any and all responses appreciated and all questions welcomed . . .
 
wow, just read all 37 pages of this thread. I just switched to all grain but can't maintain a 6 g boil in my insulated aluminum kettle with the lid off. I'm a pretty handy guy, I can easily build things and wire up small electric motors. I had planned on building one of these heat sticks but now I don't feel comfortable messing around with this much electricity, especially after reading all the posts by people with electrical knowledge. Can anyone give me some advice on how to proceed building one of these bad boys?
 
wow, just read all 37 pages of this thread. I just switched to all grain but can't maintain a 6 g boil in my insulated aluminum kettle with the lid off. I'm a pretty handy guy, I can easily build things and wire up small electric motors. I had planned on building one of these heat sticks but now I don't feel comfortable messing around with this much electricity, especially after reading all the posts by people with electrical knowledge. Can anyone give me some advice on how to proceed building one of these bad boys?

This guy kinda wrote the book, and now he has an audio version...kinda like books on tape...hah
http://www.cedarcreeknetworks.com/heatstick.htm
 
Can anyone give me some advice on how to proceed building one of these bad boys?

Yeah, just follow the cedar creek guide and it'll work. Sounds like a different chrome nut might make it a little neater, but I just gooped blue RTV silicone around the element threads and it's still holding a seal.
I've done 6 batches with my heatstick, doing all-grain on the stove - I have to turn down the stove to medium or so. Pretty easy way to get into making great, cheap beer...
 
I recently did a show with James on Basic Brewing that covered heatsticks. For those that might of missed it, my tweaked design is here. Nothing super revolutionary - looks like most of you covered the same stuff here.
 
I recently did a show with James on Basic Brewing that covered heatsticks. For those that might of missed it, my tweaked design is here. Nothing super revolutionary - looks like most of you covered the same stuff here.

Hey, that was you? Excellent. I listened to that a few days ago. Nice job. I like spencer.

Though, while listening, I was trying to imagine what someone who had never seen a heat stick was picturing. IIRC, you mentioned the cedar creek web site.

Anyway, again, great job. I don't think I have ever heard Jamil or Palmer mention electric brewing, even on their show with John Blichmann. I was happy to finally see one of the podcasters get on the ball.

BTW, are you going to send james a stick?
 
Ok so I've read this entire thread, plus another about BTU and eletric vs gas, I'll admit all the math about how much power from one heating device to the next thrown around there has blown my mind a bit. I'm sure everyone is sick of the "will this wattage boil my wort...." but I'm going to ask anway. Using a keggle on a 55k btu burner plus the 1500 watt stick I plan on building, will I (1) see a rolling boil in 12 to 14 gal of wort in a reasonable amount of time without a cover or insulation (2) Be able to hold the boil with just the stick? and (3) would a second 1500 stick make it possible if the sigle was not enough to hold the boil? Thanks everyone for al the great insight.
 
Joshua,

I think you would be able to do both of those scenarios. I can say that I am able to keep a rolling boil with a 2000W heat stick in 7.5 gallons of wort with no burner. However, I do use my turkey fryer burner to get it up to temp faster. I would think with a burner at 55K BTU you should be able to get it up to temp relatively quickly and hold it there with the addition of the heat stick.
 
Jkarp that's a great idea I tried building one today and I nicked the pipe with my dremel when I was roughing it up I like the idea of using the the gasket for the element
 
Another question how fluid is the jb when you thin it down will it make the bend in a right angle heat stick?
 
Another question how fluid is the jb when you thin it down will it make the bend in a right angle heat stick?

One pack thinned with a teaspoon of acetone gives it the consistency of maple syrup. Should make the bend easily, I'd think.
 
Another question how fluid is the jb when you thin it down will it make the bend in a right angle heat stick?


I'd recommend doing it the way i did, particularly if you're using a pipe with a 90 deg bend. Look on page #28 of this thread for a pic. This way completely encapsulates the bare wires. Then use food grade high temp silicon to seal anything else.
 
I'd recommend doing it the way i did, particularly if you're using a pipe with a 90 deg bend. Look on page #28 of this thread for a pic. This way completely encapsulates the bare wires. Then use food grade high temp silicon to seal anything else.
Have a post # I'm set up on 40 posts a page
 
Update -

The NSF rated expoxy putty I was using on my heatstick started giving me trouble but lasted about a Dozen all-grain brews. For whatever reason, I think that heating the water for mash/sparge was harder on the stick than in the brew itself. (though it could be a thermal expansion issue as I don't currently have my support rigged to keep the heatstick off the bottom of my smaller pot and I just supplant the stove so it could be the stove messing with it).

I believe it was mostly leaking through the threads on the nut which must have not been sealed as well as I'd hoped.

Anyway, I ordered some food-grade silicone from etundra.com COOL STUFF. I think the way to go in the future is Epoxy on the inside (over the contacts), silicone on the outside (and threads) for sealing.

Thank goodness for GFCI huh?
 
An update for anyone trying jkarps version and a 90 degree bend if you pack some newspaper around the cord right past the bend fill the pocket it makes with the thinned jb weld install the element this is A LOT eaiser than trying to pour the jb down from the top.
 
An update for anyone trying jkarps version and a 90 degree bend if you pack some newspaper around the cord right past the bend fill the pocket it makes with the thinned jb weld install the element this is A LOT eaiser than trying to pour the jb down from the top.

So you put newspaper down at the end of the stick, where the cord connects to the element, then put JB weld on top of the newspaper? Is there any JB weld over the exposed wiring? If i'm understanding what you did correctly, i don't think it's going to work out too well.
 
Quite the contrary. It was easy and after I got home from home depot I was done with it in about an hour or so.

Sorry no pics yet but it really does look exactly like the one in the link above.

Myself and several other local homebrewers have been over the ceadercreek page and wrote down all the parts but cannot find the pipe extension, or 90 degree extension at home depot. It looks like they don't carry the 12" extension in canada, only the shorter ones. Any chance you could provide a part # to help us out?
 
I am going to build one this weekend and wanted to know from the guys who have used them a bunch....how are they holding up? I am looking to use silicone versus the JB weld but still want to hear who has had any issues with using it.
 
Myself and several other local homebrewers have been over the ceadercreek page and wrote down all the parts but cannot find the pipe extension, or 90 degree extension at home depot. It looks like they don't carry the 12" extension in canada, only the shorter ones. Any chance you could provide a part # to help us out?

From Home Depot website:

DBHL No. Hp9793a, 1-1/2 In. x 12 In. Pvc Tailpiece Extension
Model # HP9793A
Store SKU # 247195

http://www.homedepot.com/h_d1/N-5yc...splay?langId=-1&storeId=10051&catalogId=10053


I bought all my parts a week or so ago but haven't put it together yet.
 
I am going to build one this weekend and wanted to know from the guys who have used them a bunch....how are they holding up? I am looking to use silicone versus the JB weld but still want to hear who has had any issues with using it.

I made mine with NSF approved plumbers epoxy putty, but I tried to mostly "seal it from the inside" and seal the threads so there wouldn't be much expoy-to-water contact either way. I suffered reliability problems because of that, and had to add epoxy a couple times to the threads and/or ground nut, and at inopportune times. Eventually I got some food-grade silicone sealant and that stuff seems to be awesome so far!

It seemed to mostly happen when using it to heat the sparge water (but not mash or boil) hmmp. don't know if there's anything too that. heating cycles? who knows

So my feeling now is that the silicone is really good for the outer seals. I want to rebuild with a slightly new technique. I would still use epoxy to the connections to the body of the element and maybe the ground nut too. My new idea would be to let that cure completely, then seal the whole thing in with silicone. Silicone in the cavity (i like the newspaper idea), silicone in the threads, and thin beads of silicone for outer seals. I'm only undecided on whether or not it would still be preferable to have epoxy holding the flange of the element in place.

I haven't tried this yet, its just my rebuild idea, but I think using epoxy (probably JB weld since there should then be no contact) as an inner-seal/structural component, and using food-grade silicone as filler and as outer seals, would be the best possible combination for longevity, reliability and materials safety. So if anyone tries it this way, I'd love to know how it works out.

The silicone was kind of hard to find. I bought several tubes to be safe, so if anyone is in the Bay Area we could have a project night and I'll share the silicone.
 
I am going to build one this weekend and wanted to know from the guys who have used them a bunch....how are they holding up? I am looking to use silicone versus the JB weld but still want to hear who has had any issues with using it.

I used JB weld to seal off the electrical connections, then the silicone recommended in this thread to seal off the nut, etc. You can't physically see or feel any of the JB weld or silicone on mine. I've used in for 7-8 batches and it shows no signs of wear.

I'm building another with a friend in the upcoming weeks and i'm going to take pictures along the way this time.
 
Easily the best addition to my brewing practice since I went AG. I'm going to make another one this weekend (90* flavor) with the 2nd half of the 25 ft extension cord i had to buy...a great investment in hindsight. This easily cut an hour off of my brew time, just in water heating/boil. Wort tasted great and the 1500 Watt element cleaned off very easily with a sponge after use, so I can't imagine there's any scorching issues. If only my immersion chiller didn't decide to crap out on me it would've been a perfect brew day...i guess that's what keeps it interesting, right?
 
I know it violates the whole DIY ethic, but I'm wondering if anyone has tried using a pre-made heat stick (bucket heater) like this one:

http://www.amazon.com/Marshalltown-742G-Bucket-Water-Heater/dp/B000BDB4UG/ref=sr_1_1?ie=UTF8&s=hi&qid=1278505714&sr=1-1

It costs about the same as making one and has built-in safety features.

-ben

I have seen people discuss these in different forums. For whatever reason I don't think they worked that well for our application. If you look at the site it states they can heat water to 150F and then it also says up to 100F. So maybe they are limited with how high they will go up to.
 
My puny stove could barely bring 3 gallons to a gentle boil.

I just did a full boil for a 4 gallon batch. With the heatstick on, stove set to high, 5.5 gallons would boil so hard that the pot started rocking back and forth. I had to turn the stove down to 7.

The element is a 1,500 watt, 120 volt from the local plumbing store, it took me less than an hour to build the stick, and with local prices the total cost was $64, including the epoxy and a $20 20 amp extension cord good for 3 sticks.

1Xbvj.jpg


[ame="http://www.youtube.com/watch?v=ageodGNYA-w"]This is a video for the skeptics.[/ame]
 
OK, I have a question --

I do 2.5 gallons batches. Because of many reasons, I can't and don't want to upgrade to 5 gallons batches. 2.5 gallons batches suits my needs perfectly.

And I wanna do full boils from now on. I have a 20 quarts brew pot and my stove, even with a canning element can't bring more than 2.5 gallons to a boil. So, I need something more in order to do full boil like a heatstick. I only want it to help my stove doing and maintaining a full boil. Coincidence: there's an article on BYO about this. I have a friend who is willing to help me.

But then, I read about this guy:

https://www.homebrewtalk.com/f51/heatstick-boils-too-hard-solutions-180920/

1500W seems to be a little bit too much for me. Ideally, my element would've to be something like 500-1000W. I only want to help my stove. However, I really didn't find less than 1500W in any store near me (including Home Depot). I can order online, but before I try that, I may have some questions:

My questions:

1) Would 1000W still be too much?

2) I really don't know about housing power and stuff : if I take a 240V element and plug it into a 120V outlet, will it work at 1/4 the power? (P=V^2/R and R doesn't change). Or it won't work because I'm asking too much from my outlet which is designed for 120V appliance and I plug a 240V element on it? So, will a 2000W/240V work at 500W/120V or explose my panel?? Or 3000W/240V at 750W/120V?!

Thanks!

1-1.5KW would be plenty for 3 to 3.5 pre-boil and you likely wouldn't need the stove at all.

You got the power stuff exactly right, and no it won't blow your panel.
 
I recently converted an insulated (rubbberized) keg into a keggle and used it for the first time on Sunday. That worked out quite well with two heatsticks. The rubber got very warm to the touch but really seemed to insulate effectively. Because of the rubber, I have to limit this keggle to electric brewing, but that shouldn't be a problem.
 
I really want to make a few of these things! It sounds like they really work well but, someone said it earlier! Sticking an electrical device into a pot of liquid scares the ever-loving $H!T out of me.

Not to qoute the MSDS from JB weld but both the Hardener and Resin show:

FIRST AID:
INHALATION: If inhaled, remove victim from exposure to a well-ventilated area. Make them comfortably warm, but not hot. Use oxygen or artificial respiration as required. Consult a physician.
SKIN: For skin contact, wash promptly with soap and excess water.
EYES: For eye contact, flush promptly with excess water for at least fifteen minutes. Consult a physician.
INGESTION: If ingested, do not induce vomiting. Give victim a glass of water. Call a physician immediately.

"Trace amounts of some chemicals known to the State of California to cause cancer, birth defectsor other reproductive harm may be present in this product."
 

Latest posts

Back
Top