Pressurized transfer from conical to keg rig

Homebrew Talk - Beer, Wine, Mead, & Cider Brewing Discussion Forum

Help Support Homebrew Talk - Beer, Wine, Mead, & Cider Brewing Discussion Forum:

This site may earn a commission from merchant affiliate links, including eBay, Amazon, and others.

philipCT

Brewniversity student
Joined
May 10, 2013
Messages
771
Reaction score
171
Hi all. I've been reading various posts, including Matt Chrispen's excelentblog entry on this (http://accidentalis.com/archives/735) and I've come up with my own spin on Matt's design.

I thought Matt's design was really cool because it incorporated it's own low pressure gauge and dedicated regulator. As I was reading up on the regulator, it seems that it did not incorporate any kind of over-pressure relief valve, so I wanted to add that. I also wanted to do this with fittings instead of hose so it would be easier to manage.

My conical is the same that Matt uses and has a 1-1/2" Tri-clover fitting on top. The rig pictured is used only to pressurize the conical safely. Safety is critical here because, as Matt learned first-hand, you can blow these fermenters if you over-pressure them, and 5psi is the max recommended.

Here are some photos. If there's interest, I'll detail part numbers. I also video'd a quick dry-run/demo: http://youtu.be/y0SK4aqJL5w

I've used it once only so far, and found that 1psi was plenty to move the beer quite quickly. It worked perfectly and it was so fast the fun was over before I knew it. One other thing I noticed was that when I wanted to rotate the racking arm, and loosened it's tri-clover clamp so I could do that, beer started leaking out of the clamp fitting. That never happens when it's not pressurized. It's not big deal - you just retighten the clamp. I ony lost an ounce or so. I just thought t was interesting and probably bodes against using any more pressure than necessary.

I also not that Matt says he uses this as a replacement for the blowoff tube when he starts to cold crash. This is to avoid intake of any O2. I hadn't thought of that use but it sounds like a great idea.

20150315_124556_Flicker Ln.jpg


20150315_141000_Flicker Ln (2).jpg


20150315_141026_Englewood Rd (2).jpg
 
Last edited:
That is really nice! I like the PRV and the corny post. I went with the 90 degree because I keep a shelf in the freezer.

SSBrewTek claims to rate at 5 psi, but it starts to leak pressure around 3 psi for me.. I find that using just under 1 PSI is plenty to push beer. I also have worked the springs on the little lid PRV such they vent around 2.

Cool build Phil!
 
The next thing I'd like to figure out is, when transferring to a keg via the beer-out post, how to you figure out when you're done if the corny top isn't open? Right now I'm transferring with the top open so I can see the beer level come up just short of the gas post.

Any ideas?
 
Philip,

To fill your keg "blind", I can think of a simple method that is not extremely accurate - just fill your keg based on weight. That ought to get you in the ballpark but you probably won't be able to get the beer level right to the bottom of the gas dip tube.

The other way to do it would cost a bit of money and time - make a custom long gas dip tube. Let's say you make one a half inch longer than your standard gas dip tube. Pull your original tube and replace with your custom tube. Put a gas connector on the gas post and start filling. Fill your keg with beer until beer starts coming out of the gas connector. Swap your custom long dip tube out for the standard gas dip tube and now you know that the beer is about a half inch below the dip tube.

If you don't want beer going through the gas poppet and connector, then get an extra post. Remove the poppet and screw the "empty" post on to the keg's threaded port. Fill until you get a beer fountain. Swap out the dip tube and the poppet-less connector for the originals.

Cheers!
 
+1 - I set mine on my grain scale that is rated to 50 lbs. I stop around 40 lbs or so, factoring out the tare of the weight of the keg (which varies a bit). Lately, I have just purged the keg, opened the PRV valve and watched the sweat line form - probably easy here with our humidity. If the beer is cold crashed, which I nearly always do - then the condensation line sits just below the level of the cold beer.
 
So Pliny, I'm not sure a longer dip tube will behave any differently than a short one. The liquid won't magically rise up a longer dip tube faster than a short one. In any case, messing around with the diptube kinda defeats the O2-free goal of the exercise, doesn't it?

Matt, the weight thing probably lacks the accuracy you're looking for, right? It's not going to tell you to within a 1/2" to 1". The sweat-line thing, as you point out, probably works great in Texas - not so much here in the Northeast where it's 18-25% humidity all winter long.

Right now I'm running a half inch silicon fill-hose through the lid opening, down to the bottom of the keg. The beer is transferred very quietly, without any bubbles, the the keg was CO2 filled before the transfer, and I pressurize and purge it immediately after filling.

Like you, I store my kegs lightly pressurized. I don't think taking the lid off disturbs the CO2 that is sitting in the bottom of the keg that much, and I'd bet the beer rising from the bottom is just pushing a CO2 layer upward.

So I think that's a fairly O2 free transfer, and until we figure out some other rocket science technique, I'll probably just keep doing it that way.
 
So Pliny, I'm not sure a longer dip tube will behave any differently than a short one. The liquid won't magically rise up a longer dip tube faster than a short one. In any case, messing around with the diptube kinda defeats the O2-free goal of the exercise, doesn't it?


I guess I didn't explain myself very well. If you went the longer gas dip tube approach - here's how it would work (and the beer would indeed rise up the longer diptube faster).

1) Install the longer gas out diptube.

2) Fill your keg to the absolute brim with no rinse sanitizer and put the lid on.

3) connect a picnic tap to the beer out post

4) connect CO2 to the gas in post

5) push the sanitizer out of the keg through the picnic tap (or outlet of choice)

Now you have a keg full of CO2. Next, you have to fill your keg with beer. If I understand correctly, you've been fill through the opened lid. Instead, keep your keg sealed and fill in through the beer out post. Just do the following:

1) attach a liquid quick disconnect to the line from your fermenter.

2) pull the relief valve on your keg so it's at atmospheric pressure (but still all sealed up and full of CO2).

3) attach the liquid disconnect to the beer out post on your keg

4) drain your fermenter (siphon or a CO2 push) into the keg

Your fermenter will drain until the pressure between the fermenter and the keg equalizes. If you pull the relief valve, beer will flow until pressure equalizes again. You are letting CO2 out but no O2 in just beer.

But, you installed a longer gas post. If you equalize pressure through the gas post instead of using the relief valve, you will let CO2 out until the beer reaches the bottom of the gas diptube. Then beer will come out. O2 will not go in during the transfer. If you attach a gas quick disconnect to your gas in post, but don't attach a CO2 source to the disconnect, it will simply hold the gas poppet open allowing CO2 to flow out of the gas in post and beer to flow in to the liquid out line. And beer will come out of the gas quick disconnect when the bottom of the dip tube is covered.

When beer comes out of the gas post, disconnect the beer in quick disconnect.

Next, remove the gas in post, pull the long gas in diptube, replace with a standard gas in diptube, and replace the gas in post. Now you know exactly where your beer level is at - it's right where the long gas in diptube reached. Sure, a little O2 can get in during the dip tube swap, but it's a lot less than filling through the open lid.

That's the way that I transfer except I don't worry about the beer level. I brew 5 gallon batches (plus some to allow for loss) and transfer to the keg based on weight.

Make sense now? Sorry I didn't do a very good job the first time through.

Cheers!
(Edited for what I hope is increased clarity)
 
If you could post the parts necessary to build this that would be great. I have the same conical and I've been looking into making something just like this.
 
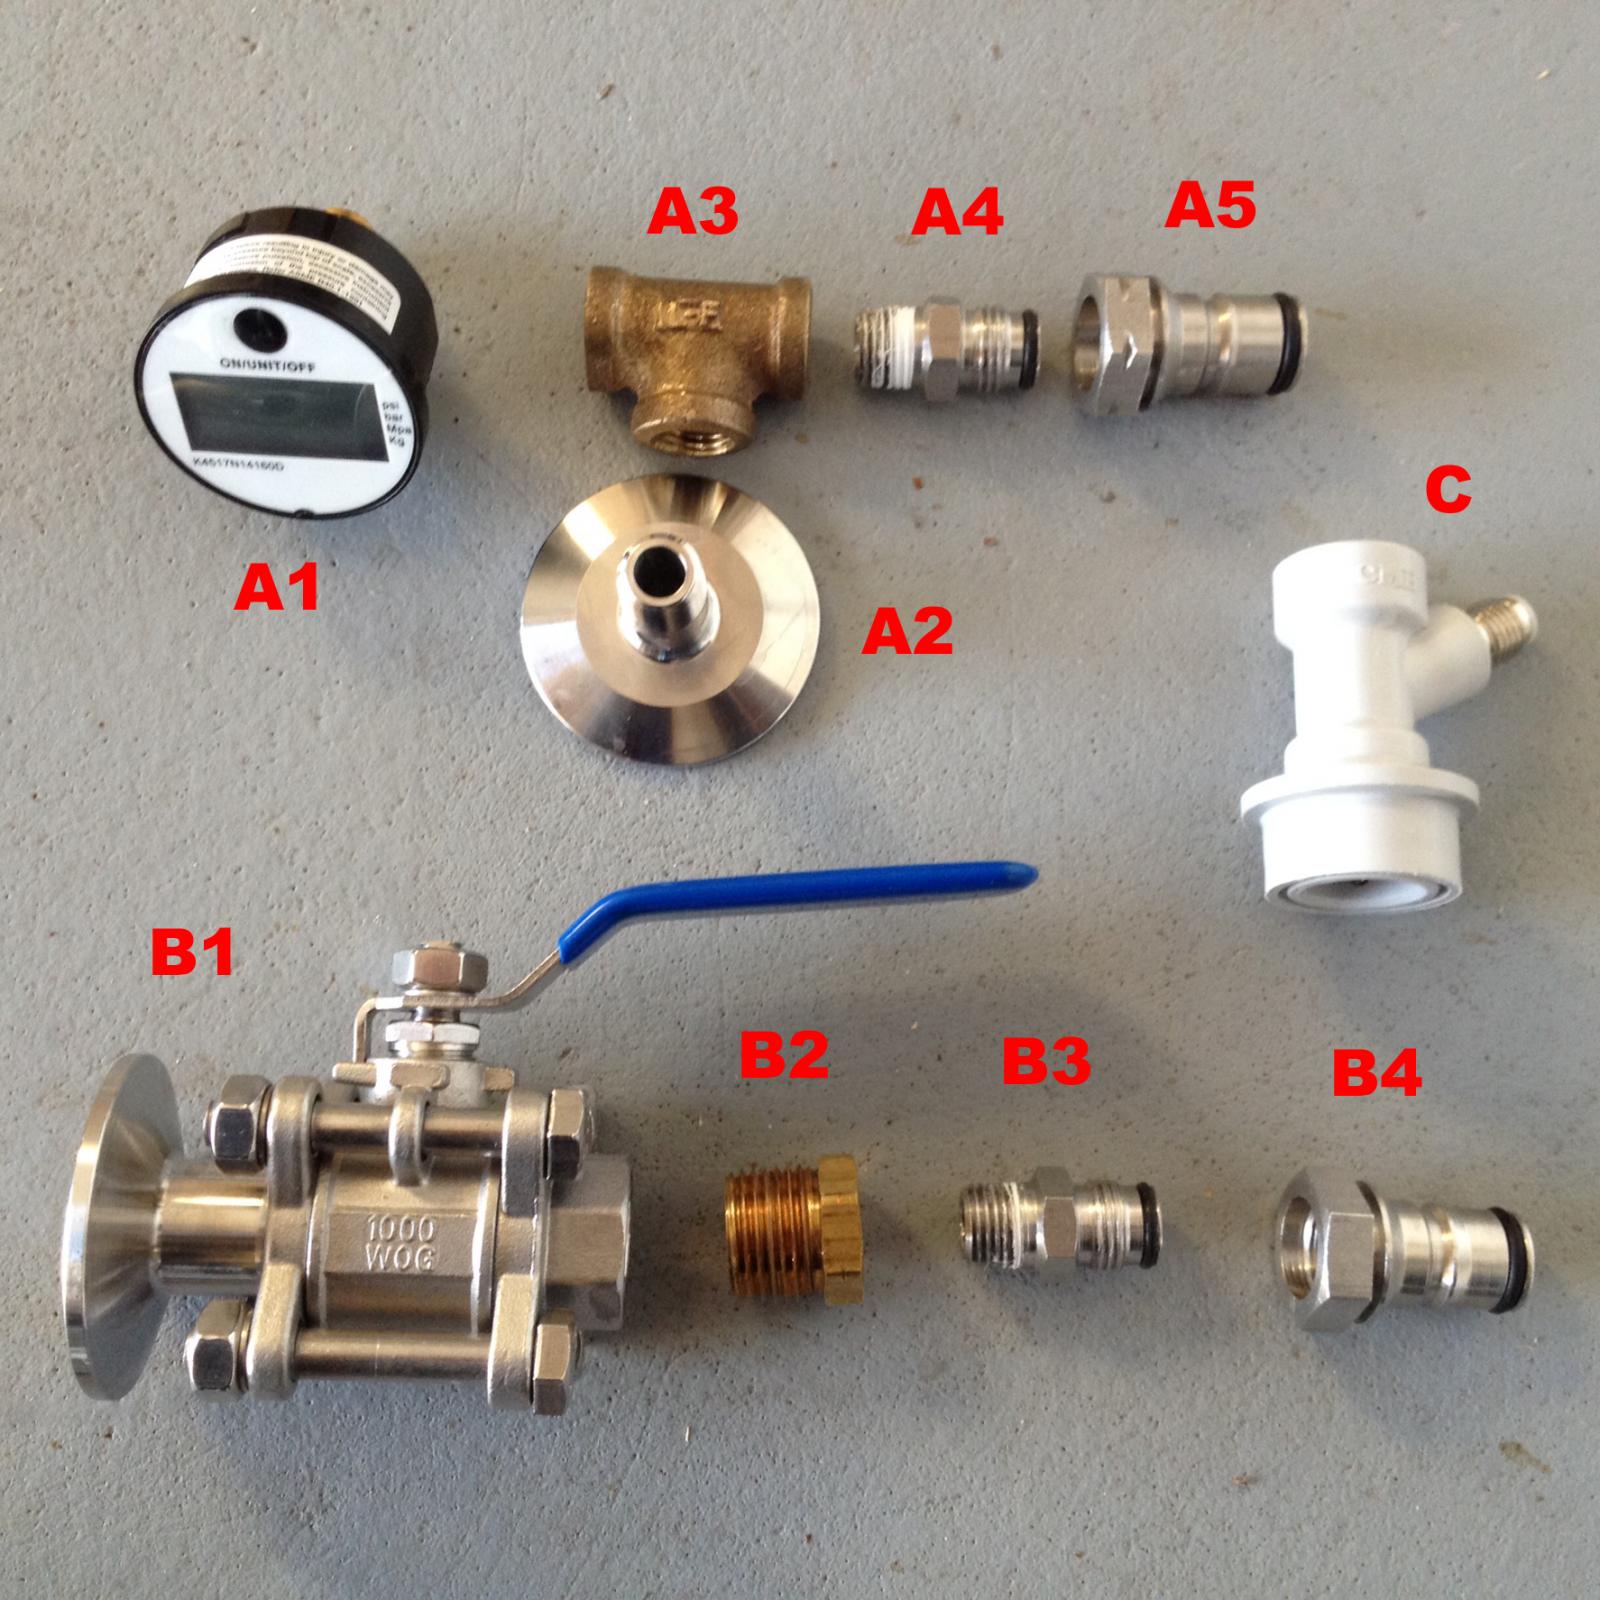
OK. Here you go. These pieces are what I use to do my pressure transfers. The first pic is the parts all broken down in to the individual components.

A1 is a digital pressure gauge that I use to monitor the CO2 pressure going in to the conical. I don't trust the accuracy of the usual gauge on the regulator to read accurately at such low pressures (I use between 1.5 and 2 psi). I bought the gauge here:
http://www.coleparmer.com/Product/D...45_psi_with_1_4_NPT_M_Connections/EW-68950-35

A2 is a tri clover fitting that adapts the airlock outlet on the lid of the fermenter to 1/4" pipe fittings. Here is a link to this part:
https://www.brewershardware.com/1-1.5-Tri-Clover-X-1-4-Male-NPT.html

A3 is simply a 1/4" tee that I picked up at a big box hardware store. Yes, it's brass, but this is on the gas side.

A4 is an adapter. It goes from 1/4" male threads to 19/32"-18 threads. Here is a link:
http://www.chicompany.net/index.php?main_page=product_info&cPath=376_1_3_260&products_id=1146

A5 is a gas in post. I used this post because it is the same as the posts on my keg. If you use a different post, you may have to use a different A4 adapter that is compatible with the threads of your post:
http://www.chicompany.net/index.php?main_page=product_info&cPath=376_1_3_260&products_id=1137

B1 is the tri clover ball valve that came with your conical. This is the one that the racking tube attaches to.

B2 is a reducer. I can't remember where I got this one at. Probably a big box hardware store. It reduces the threads from the size on the ball valve (B1) to 1/4" female pipe threads. Yes, this is brass as well. However, it only touches the beer during the transfer.

B3 is the exact same thing as A4.

B4 is a liquid out post. Again, see my comments concerning A5 - you might want a different part for some reason. Here is what I used:
http://www.chicompany.net/index.php?main_page=product_info&cPath=376_1_3_260&products_id=1401

C is just a gas coupler.

The second pic is all of the pieces assembled.

Pretty simple. The assembly A replaces the airlock when you are ready to transfer. I attach the gas line from my CO2 tank and dial in the correct pressure prior to connecting to the conical - you don't want to over pressurize your conical! Assembly B goes in where the racking tube fitting of your conical always goes. In fact, I usually leave all those extra pieces off until I'm ready to transfer - then I'll screw pieces B2, B3, and B4 into B1.

Next, purge your receiving keg of air. I fill with sanitizer all the way to the top - overflow your keg and put the lid on it. Attach you gas in line and a liquid out line and empty your keg through the liquid out side. Now you have a keg that is filled with CO2. Pull the relief valve to make sure the keg is at atmospheric pressure. Or, if you want to make sure you are not overfilling you keg, attach the gas coupler (C) to the gas-in post of your keg.

Then, all you need to do is attach a jumper line from the conical (attached to B4) to the liquid out post of your keg. The jumper line is a piece of beer line with a liquid coupler on both ends. If your conical is pressurized to about 2 psi and your keg is at 0 psi, then the beer will flow into the keg. You can fill until beer starts coming out of the gas coupler; once that happens, you know your keg is full. If you are not using the gas coupler to vent the head pressure that would build up in a sealed keg, just pull the relief valve once in a while. Otherwise, the beer will stop moving from fermenter to keg.

I probably made this sound really complicated, but it is not. I just wanted to show you all the details. Once you have all the pieces, this goes together in a few minutes.

Cheers!

IMG_4774b.jpg


IMG_4775b.jpg
 
Last edited:
Hi all. I've been reading various posts, including Matt Chrispen's excelentblog entry on this (http://accidentalis.com/archives/735) and I've come up with my own spin on Matt's design.

I thought Matt's design was really cool because it incorporated it's own low pressure gauge and dedicated regulator. As I was reading up on the regulator, it seems that it did not incorporate any kind of over-pressure relief valve, so I wanted to add that. I also wanted to do this with fittings instead of hose so it would be easier to manage.

My conical is the same that Matt uses and has a 1-1/2" Tri-clover fitting on top. The rig pictured is used only to pressurize the conical safely. Safety is critical here because, as Matt learned first-hand, you can blow these fermenters if you over-pressure them, and 5psi is the max recommended.

Here are some photos. If there's interest, I'll detail part numbers. I also video'd a quick dry-run/demo: http://youtu.be/y0SK4aqJL5w

I've used it once only so far, and found that 1psi was plenty to move the beer quite quickly. It worked perfectly and it was so fast the fun was over before I knew it. One other thing I noticed was that when I wanted to rotate the racking arm, and loosened it's tri-clover clamp so I could do that, beer started leaking out of the clamp fitting. That never happens when it's not pressurized. It's not big deal - you just retighten the clamp. I ony lost an ounce or so. I just thought t was interesting and probably bodes against using any more pressure than necessary.

I also not that Matt says he uses this as a replacement for the blowoff tube when he starts to cold crash. This is to avoid intake of any O2. I hadn't thought of that use but it sounds like a great idea.
Nice! If you don't mind, could you please give the parts list for that? Does this setup allow the attachment of an airlock? I was thinking about a setup similar to this, but with a 3-way T valve that allows you to shut off the CO2 port during fermentation and allows CO2 to exit the airlock. After fermentation you could turn the airlock off, open the CO2 port, and push positive pressure in.
 
Nice! If you don't mind, could you please give the parts list for that? Does this setup allow the attachment of an airlock? I was thinking about a setup similar to this, but with a 3-way T valve that allows you to shut off the CO2 port during fermentation and allows CO2 to exit the airlock. After fermentation you could turn the airlock off, open the CO2 port, and push positive pressure in.

In answer to your second question: I guess you could, but what I do is rig blowoff tube at the beginning of fermentation, and then remove that when it's time to rack and install this little rig. I think it adds up to the same thing as CO2 produced by fermentation protects the beer until you swap out the blowoff tube, and then this rig insures that CO2 positive pressure is maintained during racking.

To your second question:
Guage: Kodiak Controls KC25-5# Low Pressure Gauge 5 PSI
Mini-Regulator:
Dwyer Series MPR Miniature Pressure Regulator, Zinc Body, Air Only, Range 0-5 psi
1/4" to 1/8" Adapter: Eaton Weatherhead C3069X4X2 Carbon Steel Fitting, Hex Nipple, 1/4" x 1/8" NPT Male, 1.26 inches Length
Over-pressure relief valve: Vacuum/Pressure Adjustable Brass Relief Valve
1/4 NPT Male, 0-20 PSI

Tri-clover fitting: 1"/1.5" Tri Clover Compatible X 1/4" Female NPT Fitting

You will also need a tri-clover clamp and gasket if you don't already have one.

Hope this helps!
 
Last edited by a moderator:
In answer to your second question: I guess you could, but what I do is rig blowoff tube at the beginning of fermentation, and then remove that when it's time to rack and install this little rig. I think it adds up to the same thing as CO2 produced by fermentation protects the beer until you swap out the blowoff tube, and then this rig insures that CO2 positive pressure is maintained during racking.

To your second question:
Guage: Kodiak Controls KC25-5# Low Pressure Gauge 5 PSI
Mini-Regulator:
Dwyer Series MPR Miniature Pressure Regulator, Zinc Body, Air Only, Range 0-5 psi
1/4" to 1/8" Adapter: Eaton Weatherhead C3069X4X2 Carbon Steel Fitting, Hex Nipple, 1/4" x 1/8" NPT Male, 1.26 inches Length
Over-pressure relief valve: Vacuum/Pressure Adjustable Brass Relief Valve
1/4 NPT Male, 0-20 PSI

Tri-clover fitting: 1"/1.5" Tri Clover Compatible X 1/4" Female NPT Fitting

You will also need a tri-clover clamp and gasket if you don't already have one.

Hope this helps!

Sorry to double post on both youtube and here, but some people never check certain accounts; i.e. me.

The reducers are not listed in the parts list. Where did you acquire the reducer for the pressure relief valve and the gas side post?
Have everything else but these...found several different suppliers, but I like to see what people who already have them use/acquire from bc I've gotten poor quality pieces from suppliers I've thought were reputable.

Thanks
 
Last edited by a moderator:
I guess I didn't explain myself very well. If you went the longer gas dip tube approach - here's how it would work (and the beer would indeed rise up the longer diptube faster).

1) Install the longer gas out diptube.

2) Fill your keg to the absolute brim with no rinse sanitizer and put the lid on.

3) connect a picnic tap to the beer out post

4) connect CO2 to the gas in post

5) push the sanitizer out of the keg through the picnic tap (or outlet of choice)

Now you have a keg full of CO2. Next, you have to fill your keg with beer. If I understand correctly, you've been fill through the opened lid. Instead, keep your keg sealed and fill in through the beer out post. Just do the following:

1) attach a liquid quick disconnect to the line from your fermenter.

2) pull the relief valve on your keg so it's at atmospheric pressure (but still all sealed up and full of CO2).

3) attach the liquid disconnect to the beer out post on your keg

4) drain your fermenter (siphon or a CO2 push) into the keg

Your fermenter will drain until the pressure between the fermenter and the keg equalizes. If you pull the relief valve, beer will flow until pressure equalizes again. You are letting CO2 out but no O2 in just beer.

But, you installed a longer gas post. If you equalize pressure through the gas post instead of using the relief valve, you will let CO2 out until the beer reaches the bottom of the gas diptube. Then beer will come out. O2 will not go in during the transfer. If you attach a gas quick disconnect to your gas in post, but don't attach a CO2 source to the disconnect, it will simply hold the gas poppet open allowing CO2 to flow out of the gas in post and beer to flow in to the liquid out line. And beer will come out of the gas quick disconnect when the bottom of the dip tube is covered.

When beer comes out of the gas post, disconnect the beer in quick disconnect.

Next, remove the gas in post, pull the long gas in diptube, replace with a standard gas in diptube, and replace the gas in post. Now you know exactly where your beer level is at - it's right where the long gas in diptube reached. Sure, a little O2 can get in during the dip tube swap, but it's a lot less than filling through the open lid.

That's the way that I transfer except I don't worry about the beer level. I brew 5 gallon batches (plus some to allow for loss) and transfer to the keg based on weight.

Make sense now? Sorry I didn't do a very good job the first time through.

Cheers!
(Edited for what I hope is increased clarity)

Hey Pliny,

Why bother putting the standard length gas in post back in? Why not just leave the longer one in for carbing and serving?
 
kevink,

There is no real need to swap the diptube. I suggested that it could be done since philipmeese was interested in filling a keg to just short of the gas post without having the top open.

I don't worry about being just short of the gas post. I just fill until beer comes out of the gas connector during the fill process. That way, I know where the beer level is - right at the bottom of the gas diptube. However, philipmeese sounded like he was interested in keeping the level below the bottom of the tube. An easy way to do that without opening the keg is to swap gas diptubes.

But you're right - you don't have to if you don't mind the beer being so high in your keg. I don't.

Cheers!
 
Sorry to double post on both youtube and here, but some people never check certain accounts; i.e. me.

The reducers are not listed in the parts list. Where did you acquire the reducer for the pressure relief valve and the gas side post?
Have everything else but these...found several different suppliers, but I like to see what people who already have them use/acquire from bc I've gotten poor quality pieces from suppliers I've thought were reputable.

Thanks

No worries and sorry for missing that piece.

There actually is no adapter from the Gas Side Post to the regulator. The Gas Side Post is 1/4" NPT and there are two orifices in the regulator that are 1/4" (the other two are 1/8" - go figure).

The adapter for the PRV to the regulator is from McMaster:

Compact Extreme-Pressure Steel Threaded Fitting
1/4 x 1/8 Pipe Size, 1-7/32" Long, Female x Male Adapter


Hope this helps! Let us know how this goes for you.
 
Last edited:
Old thread, I know.

I just tried making one of these, my McMaster prv constantly leaked, at any pressure. Any trick I am missing? Seems like there should be some rubber between the brass and stainless ball.
 
Old thread, I know.

I just tried making one of these, my McMaster prv constantly leaked, at any pressure. Any trick I am missing? Seems like there should be some rubber between the brass and stainless ball.

Photo? Part number?

Obviously that shouldn't happen. Seems like you may have a defective part.
 
If you have one, is the ball on top of the spring or under the spring, mine, the ball was on top, against the vent hole. Wonder if I need to reverse it for a pressure break.
 
Spent an hour testing different things tonight. Never got 100% seal. It always trickled out. You could see it when submerged in water. The spring tension is working, the steel ball on brass just does not a air tight seal. Thinking maybe a squirt of spray silicone to provide some rubber to seal it up.

Only only time i got working sort of normal was when I coated the ball in keg lube, that sealed at low pressure, but was inconsistent.
 
Matt, the weight thing probably lacks the accuracy you're looking for, right? It's not going to tell you to within a 1/2" to 1". The sweat-line thing, as you point out, probably works great in Texas - not so much here in the Northeast where it's 18-25% humidity all winter long.

Right now I'm running a half inch silicon fill-hose through the lid opening, down to the bottom of the keg. The beer is transferred very quietly, without any bubbles, the the keg was CO2 filled before the transfer, and I pressurize and purge it immediately after filling.

So I think that's a fairly O2 free transfer, and until we figure out some other rocket science technique, I'll probably just keep doing it that way.

So never let it be said that I don't learn better by listening!

Here's a follow-up video of my complete closed system transfer that incorporates some of the thoughts shared by others in this thread. I think this is the rocket-science I was looking for :)

As you see, I'll come right out with it: Matt - yes! The condensation line thing totally works. And also, I tried using a scale (not in this video) and that's a great thing too. One unexpected benefit from that is that I can see that beer is continuing to transfer because the weight of the corny keeps going up. Otherwise, by just looking at the beer line, which is always full, you can't really tell beer is transferring. This is really good to know with heavily dry-hopped beers that could conceivably plug the transfer.

In this video I'm transferring to a serving keg, but I've used this to transfer to a specially configured dry hop keg and it works the same. Maybe I'll do a video on the DH keg at some point too...

Enjoy:
 
Last edited by a moderator:

Latest posts

Back
Top