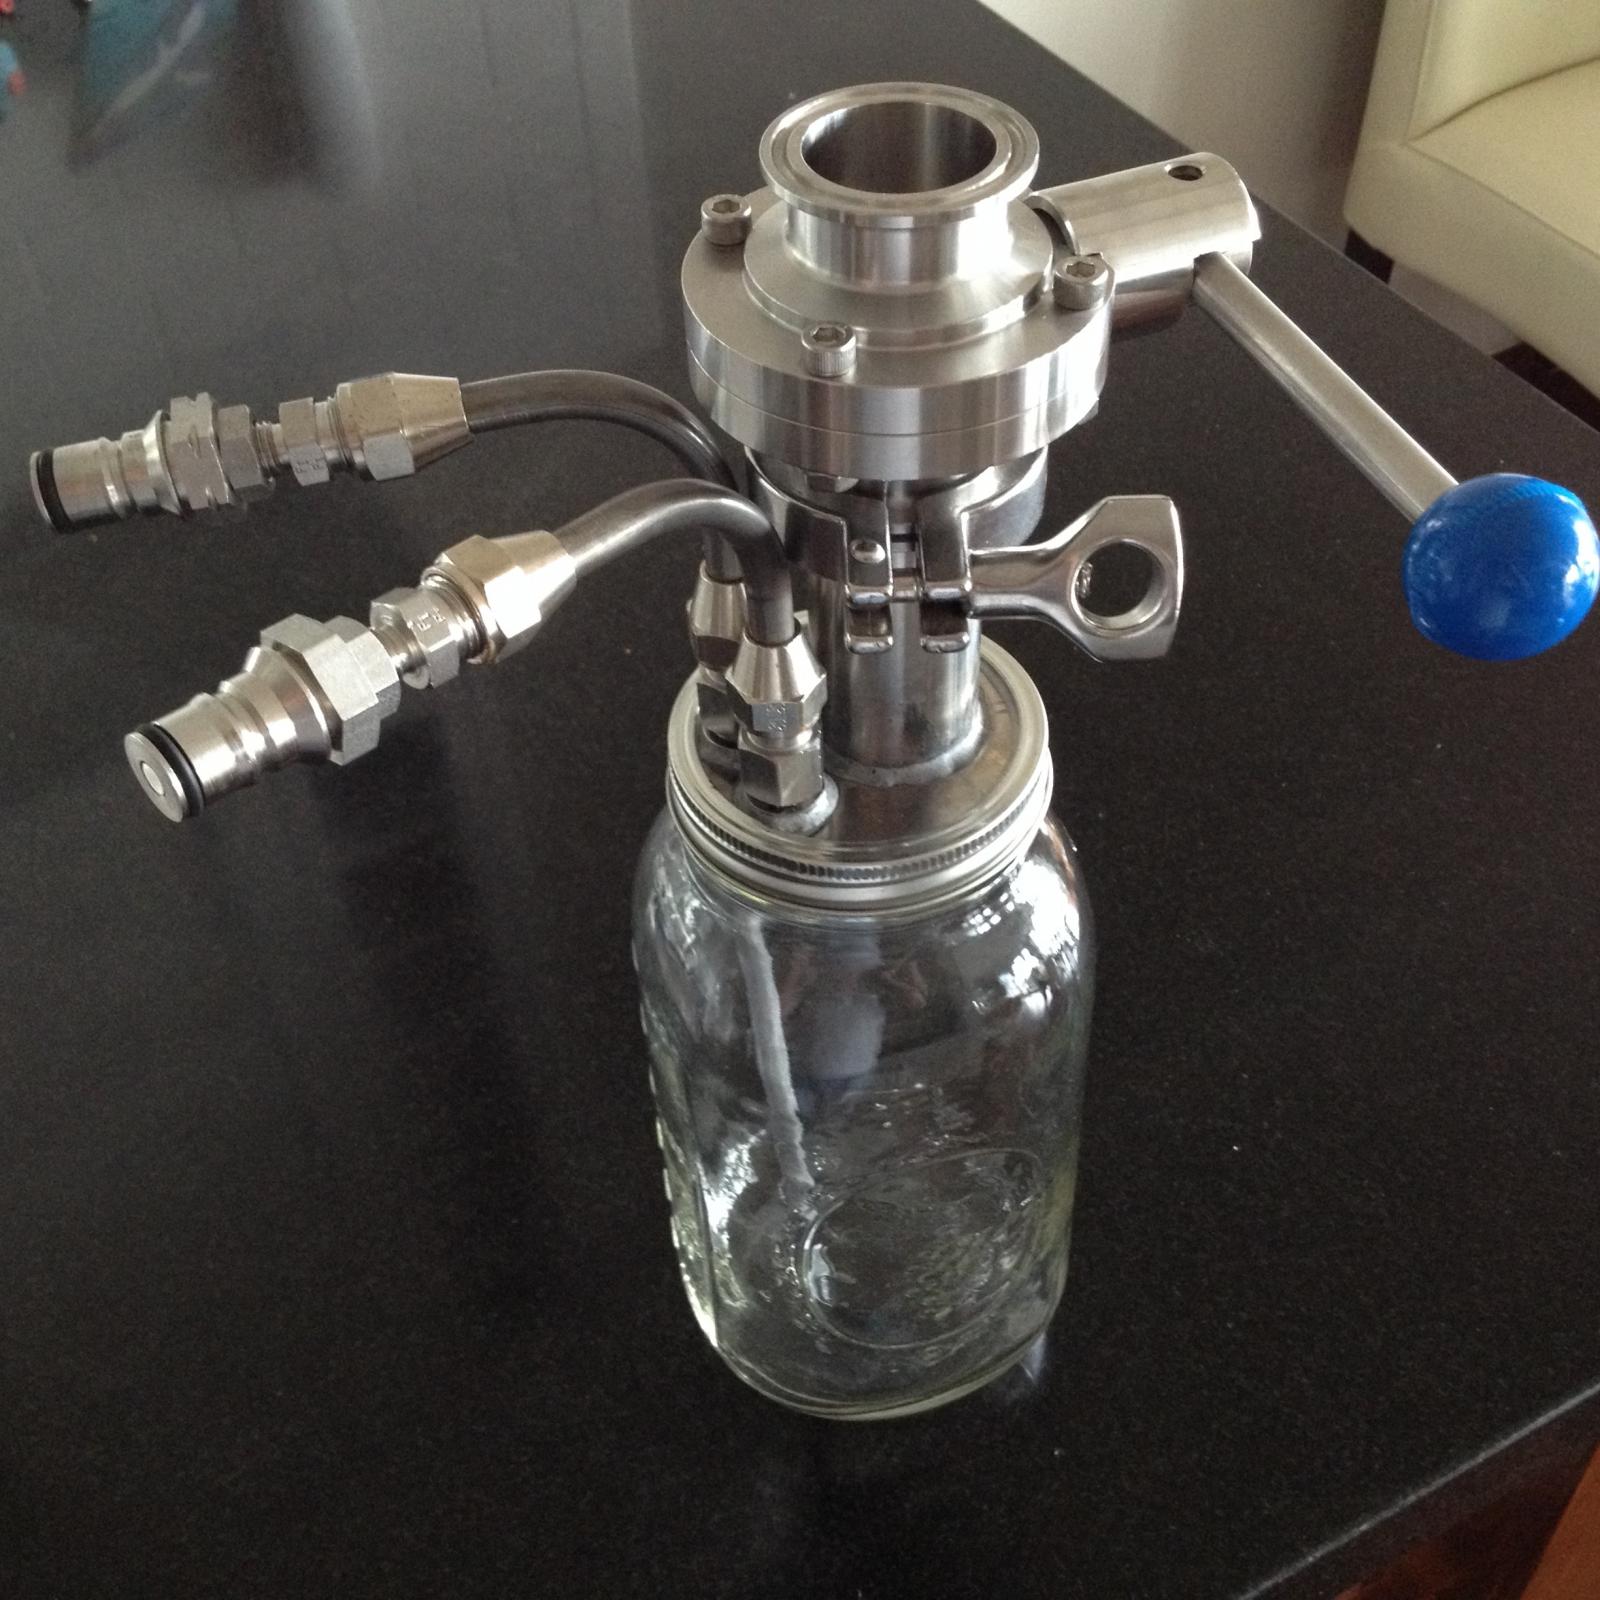
Canning Jar Trub/Yeast Harvester for Conical

Homebrew Talk - Beer, Wine, Mead, & Cider Brewing Discussion Forum

Help Support Homebrew Talk - Beer, Wine, Mead, & Cider Brewing Discussion Forum:

This site may earn a commission from merchant affiliate links, including eBay, Amazon, and others.
Pliny, not sure I can completely clear the air on this one. All the bands that have are Ball. Some are silver, some are brass. I didn't try enough to narrow it down. I will say this, I may have been mistaken as to how easily the lid pulled off before. I finally had success after I made the trifitting soldered to the lid. The pull was even then. Before grabbing and squeezing the lid may have deformed a bit, enough to have it pull off. Also I think if you tighten too much and it skips over the jar threads it may damage the threads on the band. Not sure if any of the above makes sense??
image.jpg
 
paguy,

Thanks - I was struggling with the brass colored bands as well. Like you, I was able to pull the lid off the jar after trying to tighten it down. When I switched to the silver band, I had no problems at all. Strange thing is that to my eye, there is no difference between the bands other than the color. Maybe the threads on the silver band are deeper and therefore less prone to "strip"?

The silver band that I used was very secure - I struggled to remove the lid of the jar once I pulled it off of the conical. I ended up having to use a plumber's strap wrench to remove the lid.

I hope this works out as good for you as it has for me. Cheers!
 
Does it feel like we are on to something too good to be true? Do you guys have any concern that the little yeast guys can't do their job properly through the neck that we are confining them to?

I don't know. I know when they are in their prime there is a lot of fluid motion going on in there. Maybe worst case it takes a day or two longer to complete? Has anyone noticed their fermentation time taking longer or not fully attenuating?
 
Artifishal,

That did kind of cross my mind. However, in my go at this, the yeast were very active and definitely not confined to the jar. The wort in the jar turned cloudy and remained cloudy after I pitched yeast. After several days (I'll take better notes next time), the yeast dropped. I left the jar attached for several more days and then pulled right before dry hopping.

So, my observations are that the main fermentation proceeds as per usual - the fermentation is not confined to the canning jar only and the yeast in the jar do not have to wait for fresh wort to come to them. The yeast are everywhere in the fermenter (and the population is largest in the jar after they drop).

I thought that maybe the funky tasting byproducts of fermentation might be more prevalent because a nice dispersed population of yeast isn't there to clean up after themselves. However, my first batch of beer through the conical tastes pretty good (it's a hoppy pale ale). I do control fermentation temps.

And really, this is nothing new. Folks have been dumping yeast out of their conicals or harvesting via sight glasses since the invention of the conical. This gizmo just makes it easier and limits exposure to oxygen (it's as practically close to zero as one can get).

This does work really well! I'll give it another go on Sunday. I'll keep better notes of the timeline for this one.

Good luck with yours!
 
Thank you Pliny. Makes sense. Great explanation and I'm excited to give it another go. I now have one of each size Ball jar and plan to remove the first one, a small half pint jar, after three hours or so once it fills with trub and hot break. Then I'll replace with a quart size jar, pre filled with wort, then pitch the yeast. This is for s five gallon batch. For a ten I'll double the size of those two jars.

Thoughts?
 
Atrifishal, why fill the jars with wort? If it's to prevent oxygen, I feel it would be just fine to add it to the wort at this time in the fermentation if not beneficial.
 
Atrifishal, why fill the jars with wort? If it's to prevent oxygen, I feel it would be just fine to add it to the wort at this time in the fermentation if not beneficial.


I agree. Go ahead and attach a jar filled with air prior to pitching yeast. Here's what the process looks like:

Attach an empty jar and fill the conical with wort. I let the wort settle for about 12 hours or so. I ended up with a small amount of trub in the bottom of the jar. I remove the jar, pour the clear wort back in the top of the fermenter, toss the trub, sanitize the jar and reattach it just full of air. It refills with wort and then I oxygenate the wort and pitch yeast.

Now, after that, I'd be careful to not introduce oxygen. But prior to pitching yeast, you want some oxygen so don't worry about a jar full of air. But let's say you're going to save your yeast and you're going to dry hop. If that's the case, after you remove the jar of yeast, then install that jar full of sterilized wort and toss in your dry hops. You won't oxidize your beer and the jar will catch the dry hops when they settle.

In summary - before pitching yeast, don't worry about air. After pitching yeast, oxygen is evil.
 
Getting ready to give it another go. Friday night with the neighbors while we watch the Spartans NCAA game. Very excited.

Small leak though. Water is very slowly seeping out through the threads of the threaded nipple that goes through the lid of the jar.

I'm sure a few wraps of Teflon tape will do it. What are your thoughts, anyone, about Teflon tape being in contact with the fermenting beer?View attachment ImageUploadedByHome Brew1427324350.674996.jpgView attachment ImageUploadedByHome Brew1427324385.333510.jpg
 
Artifishal,

I can't see Teflon tape being an issue at all. It's used all over for plumbing. And I've seen others here using it in various places in their rigs. The only "issue" that I see with it is that you should probably retape it every time you use it so that you can easily sanitize it - take the assembly apart, remove tape, sanitize, put on new tape, reassemble, and use.

Nice job!
 
Thank you Pliny. Yes I agree and plan on it. I had the Nalgene bottle cut and solvent welded to pvc before and moved to this bc everything come apart for sanitizing.
 
Pliny, This is quite creative and I hope to replicate what you've done. I've read the entire thread but still have questions (maybe I missed something?).

What size hole did you drill in the stainless covers from ecojarz? Did you use a hole saw (bi-metal) or did you use a knock-out punch?

I have to fit a 1 1/2" tri-clamp to it and the outside diameter of the ferrule to be soldered on the lid is 1 1/2" with a 2" OD flange. Any help would be greatly appreciated.
 
JB/Arti,

I actually did this two different ways:
1) I drilled a hole in the lid using a step bit. I drilled the hole the same size as the internal diameter of the ferrule. I then simply butted the ferrule to the hole and soldered.

2) I drilled the same size hole as in #1, but then pushed the ferrule through the slightly undersized hole. This created a dimple around the ferrule and held the lid to the ferrule by friction making it easy to solder.

#2 was hard to do since pushing the ferrule through the undersized hole was difficult. I ended up setting the mating face of the ferrule on a piece of wood, placing the drilled lid on the ferrule, and using a socket just barely larger than the outside diameter of the ferrule to drive the lid down onto the ferrule. Kind of a pain, but once done the soldering went easier.

I'll be doing another one this weekend with some additional modifications. If you're interested, I'll take some pics along the way to show how I do it. I'm just waiting for the ferrule to show up.

Cheers!

Interested
 
Me too. Any chance you could do a video? It's for a good cause. Lol. Thanks for the explanations too though. Very helpful. I bumped mine the other day when I was wrapping it in bubble wrap to keep it insulated and it leaked a tiny bit. Freaked me out.
 
Pliny,

Thanks very much! That's most helpful. I'll be using your method with the step bit and silver solder.
 
Artifishal,

Your lid removal system is the exact same way I remove my lids. Those suckers are tight! I don't recall cranking them down that hard, but it sure gets stuck. The band wrench (or whatever that thing is called) sure comes in handy.

I just brewed a Pliny the Elder clone. I attached a quart jar to catch the bits of hops that made it into the wort (I used all pellet hops - no hop extract). I had to change the jar twice before pitching the yeast.

Next time I pull off the jar, I should have a decent amount of WLP001 to recycle.

Cheers!
 
Same problem here with the lids. I don't tighten them too much but coming they are really stuck on there! But why? Gasket swells? Other than that slight problem, I love how these work.
 
I bought the same lids as the OP, and have destroyed 2 of them so far trying to solder them with stay-brite solder and Stay-clean liquid flux. I sanded everything clean, used the flux, but couldn't get the solder to tin the joint... it just beaded up on the outside and rolled off. Thought maybe it was not enough heat after it failed once (using a MAPP torch) and overheated the whole thing, made the flux boil off and burn away. As I don't want to waste another trip-clover ferrule and lid, does anyone know is there is a food safe epoxy that might be able to bond these together?
 
kshuler,

I'll be posting some pictures this weekend that will show how I soldered the ferrule to the lid. I think the key is to heat slowly and to focus the heat on the ferrule - not the lid. Since the lid is so thin, it will overheat and burn off the flux before the ferrule gets warm enough to wick the solder.

One other tip, I degrease everything prior to using flux. I clean the ferrule and the lid with soap and water, then I degrease with TSP, and then I apply the flux to prepare for soldering. I've heard that others will clean with acetone prior to hitting it with flux.

I'm not aware of any specific brand of food safe epoxy. Maybe something made for aquariums??? I'd be afraid of the epoxy failing one day and emptying the conical though. I know the solder won't give.

Good luck - I'll post pics later.
 
I bought the same lids as the OP, and have destroyed 2 of them so far trying to solder them with stay-brite solder and Stay-clean liquid flux. I sanded everything clean, used the flux, but couldn't get the solder to tin the joint... it just beaded up on the outside and rolled off. Thought maybe it was not enough heat after it failed once (using a MAPP torch) and overheated the whole thing, made the flux boil off and burn away. As I don't want to waste another trip-clover ferrule and lid, does anyone know is there is a food safe epoxy that might be able to bond these together?

Sounds like you are overheating it, especially if you are using mapp. sand everything down, reflux and heat slowly. If you still have solder on there it should seal up with just a bit more solder needed.
 
I had my local welding shop weld it. They destroyed the ecojarz cap and made me a new one out of a thicker gauge stainless steel. I love how solid it is. The ecojarz gasket fits it just fine too. View attachment ImageUploadedByHome Brew1430006253.502769.jpgView attachment ImageUploadedByHome Brew1430006269.012661.jpgView attachment ImageUploadedByHome Brew1430006302.370780.jpg

They charged me way too much. I bought some sheet ss and a hole saw so I could try to make my own for a small mouth jar. I'll post later how that goes.
 
OK - here are a few picture that show how I did this...

Pic #1 is just drilling holes in a lid - mark your layout and drill away. Since I want a ferrule and two posts (ala maierhof's yeast harvester rig), I have three holes to drill. I used a 1.5" TC ferrule so I ended up drilling a 1-3/8" hole with a step bit.

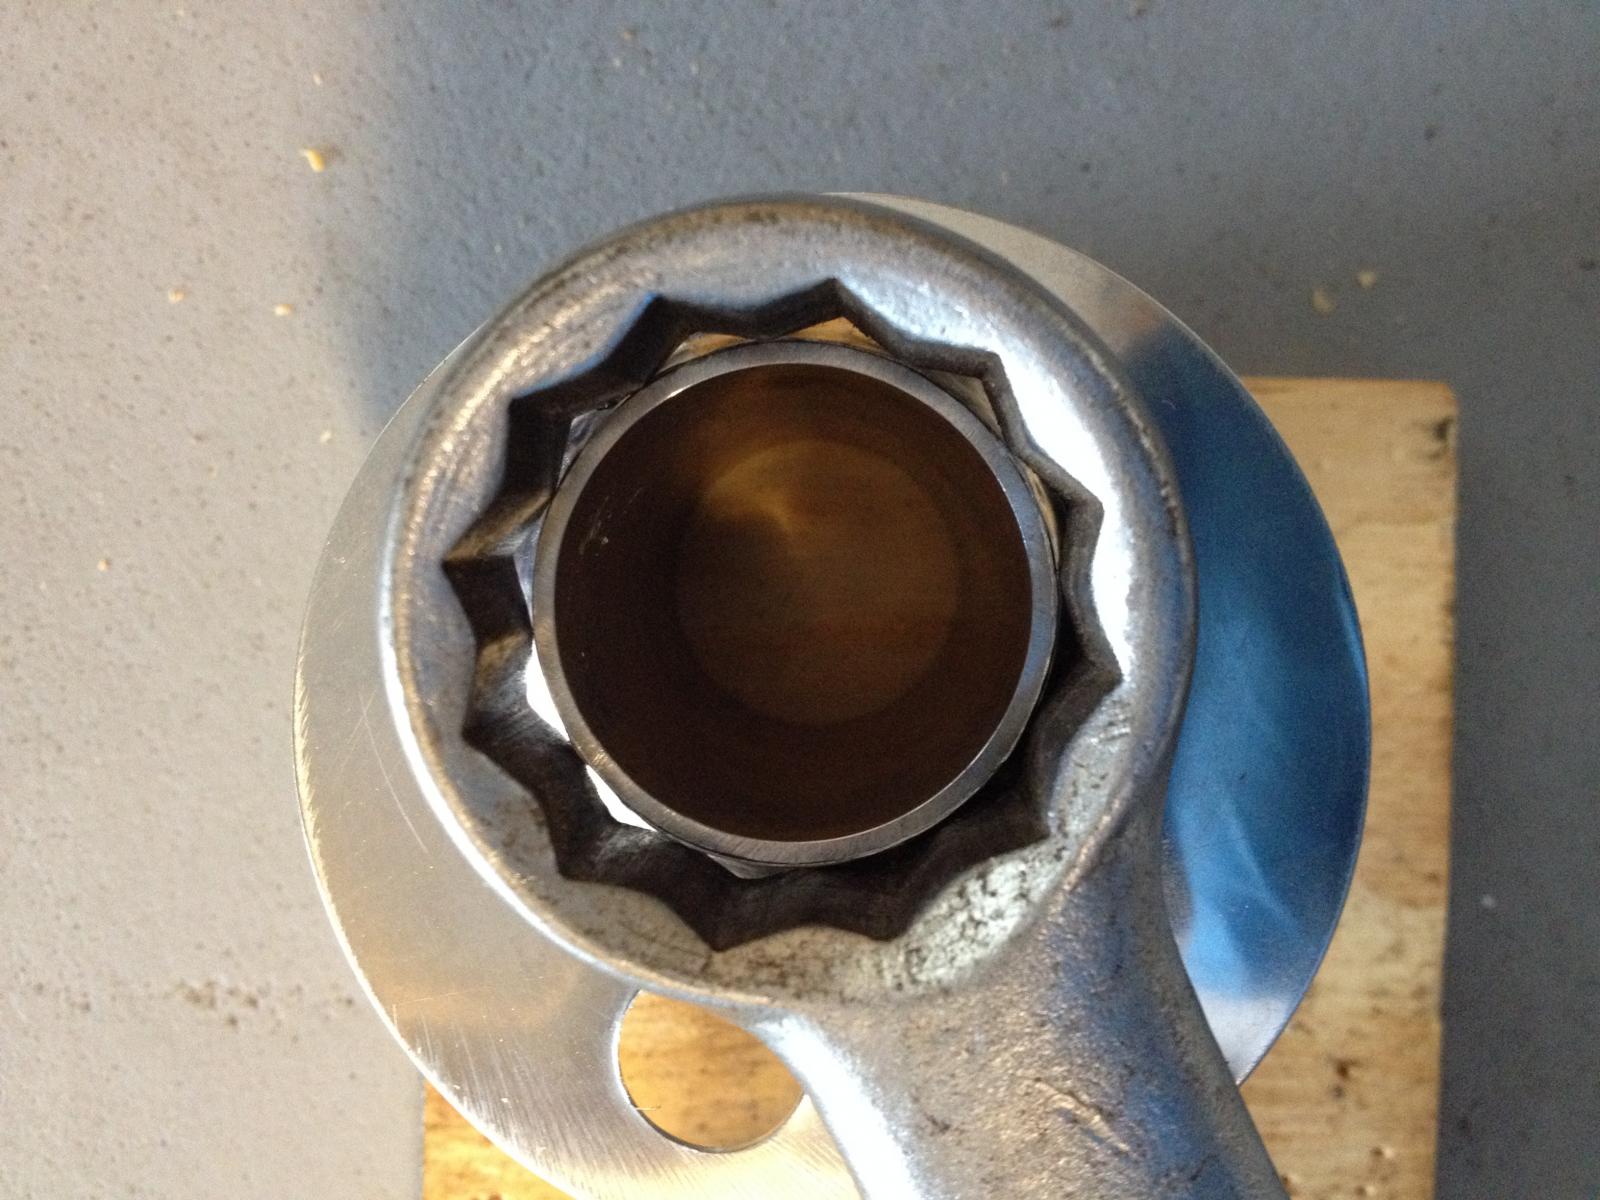
Pic #2: Next, I pulled a dimple on the lid (this is hard since that lid is so thin). Actually, I pushed the lid down over the ferrule. I happen to have a large closed end wrench that fit over the 1.5" ferrule and just hammered the wrench down on the lid until the ferrule pushed through. This is probably not worth the effort - one could just butt solder the ferrule to the lid, but pulling a dimple is stronger.

Clean and degrease everything that will be soldered. Afterwards I used gloves whenever I touched anything so as not to leave oils behind.

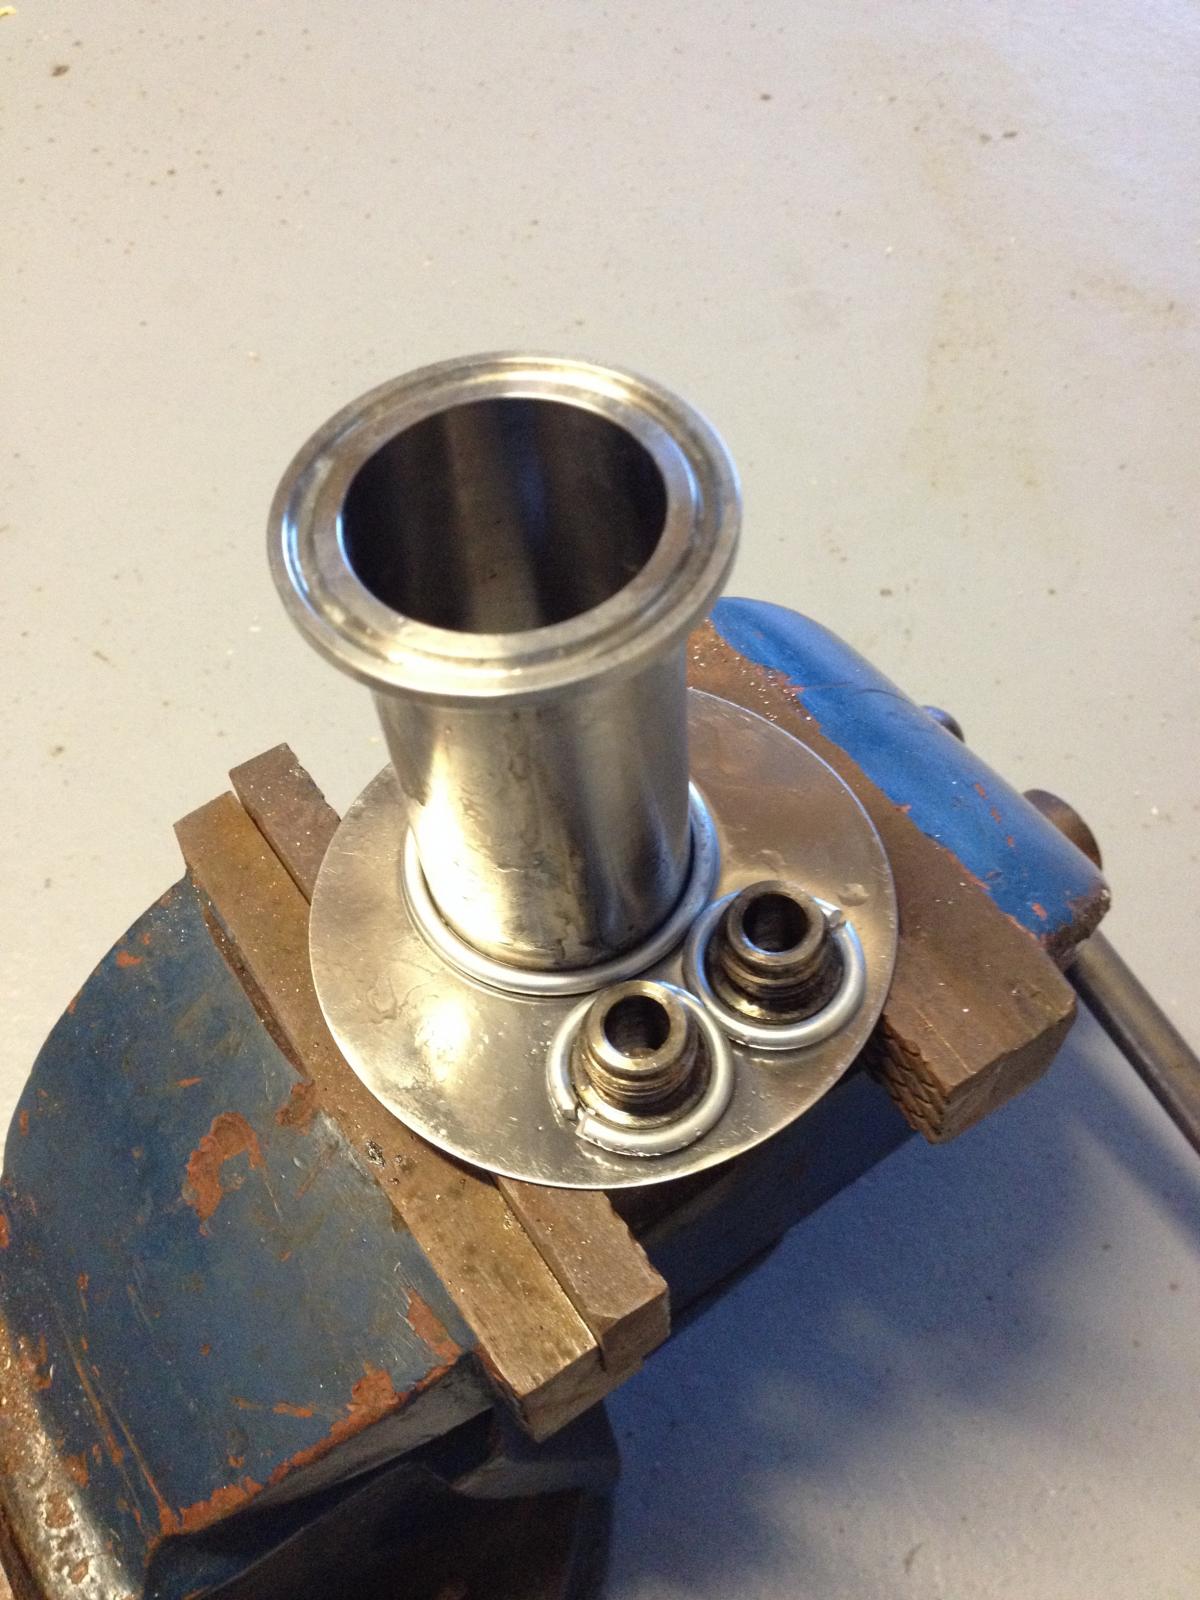
Pic #3: I wrapped each piece with solder and set it in place. Put down a little bit of flux at each joint and let the flux sit for a few minutes. Then, with a low-ish flame on a propane torch, I focused the flame on the item to be soldered to the lid and not the lid itself. I actually tilted the flame up and away from the lid. I let the item I was joining to the lid carry the heat into the lid and the solder. Once I saw the solder start to melt (it'll turn a shiny silver from a dull silver), I moved quickly to the far side of the fitting to apply heat and start melting the solder on that side. The residual heat on the first side of the joint finishes the soldering and wicking when you are working on the second side. When the second side starts to melt, just move around the joint to finish things off and to wick the solder into the joint. Pic #4 shows the lid with the finished solder joints.

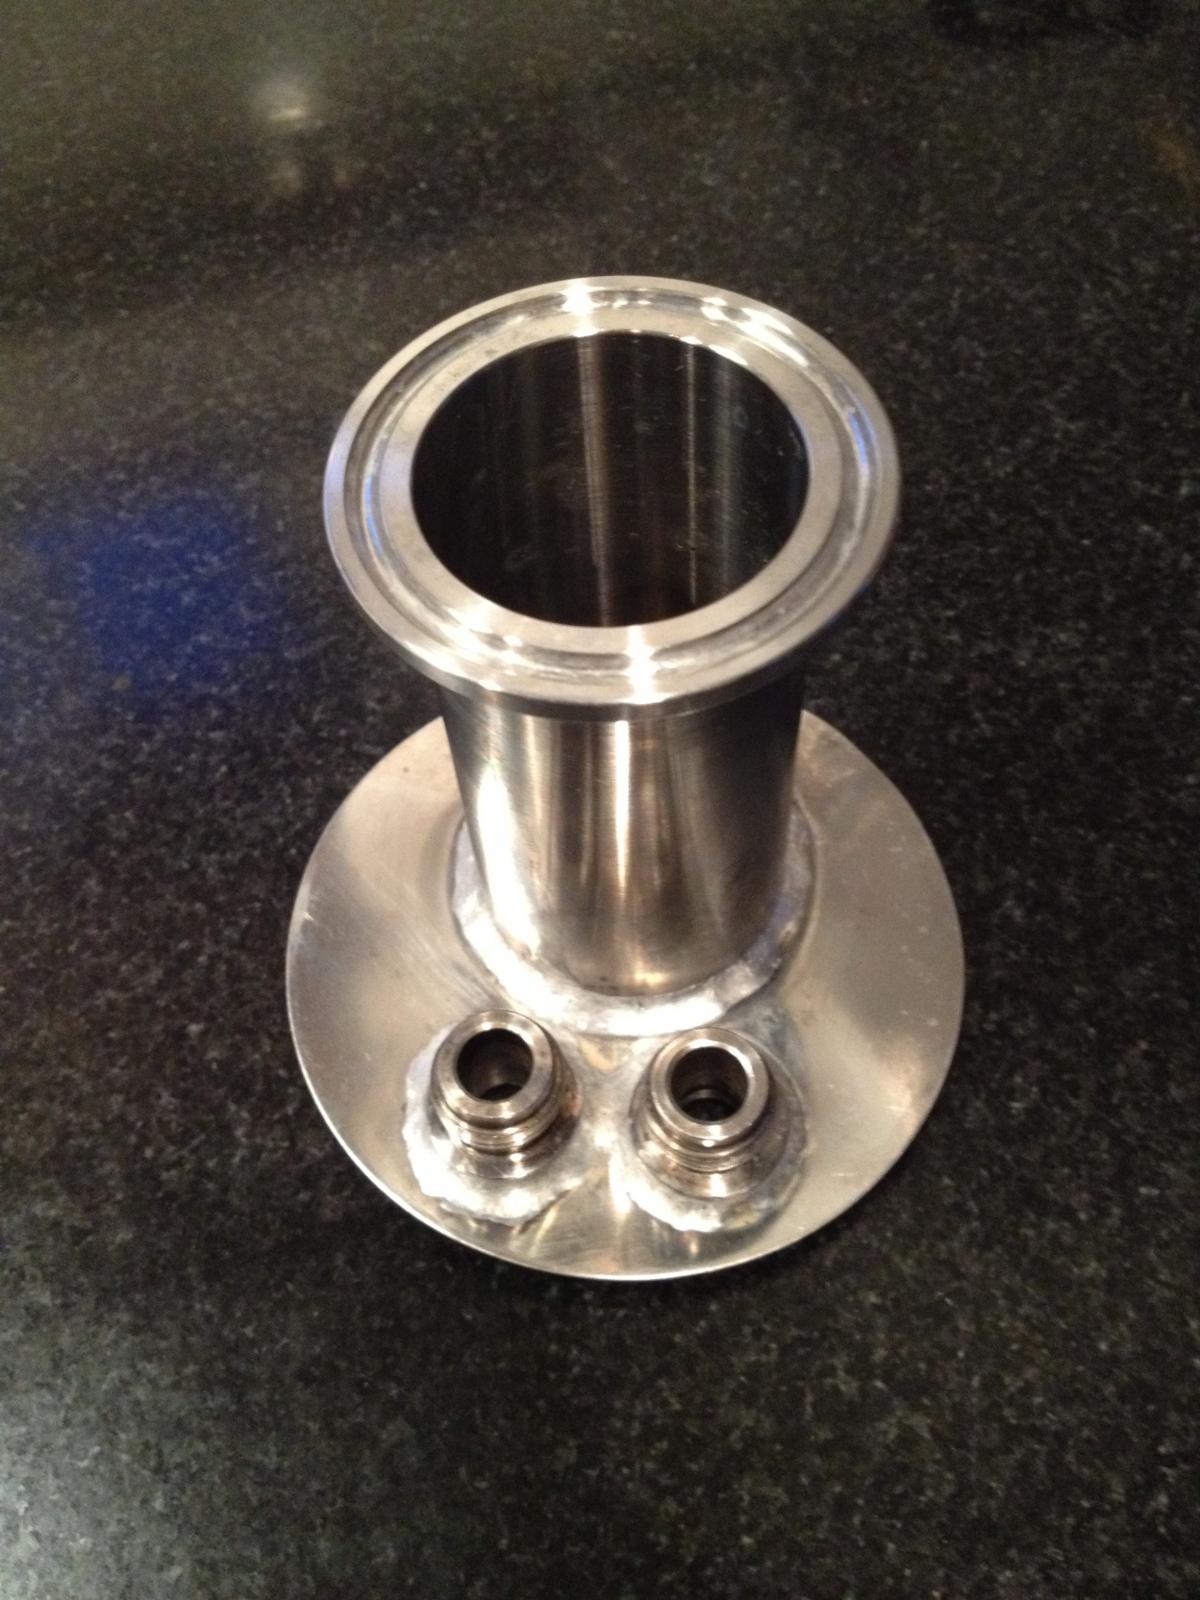
Pic #5 shows the lid all cleaned up (fairly well - still not quite done, but I was tired of cleaning).

And Pics #6 and #7 show what I made. It's a jar lid that I can attach to my conical through the TC ferrule and pull trub/yeast out of. Pic #6 is just a shot of the underside of the lid showing the dimple that I pulled the ferrule through as well as the dip tubes coming through the posts. I now have a lid with a liquid-out post and a gas-in post. If I attach a jar full of water (for example) to the conical, I can put 1 or 2 psi of CO2 on the gas-in side and push all the water out - now I have a jar full of CO2. I open the butterfly valve and the CO2 (no oxygen) bubbles up through the wort and yeast/trub goes into the jar; close the valve and pull the jar. Or I can rouse dry hops as recommended by Vinnie Cilurzo - let CO2 bubble up through the settled dry hops. I think it's safe to say that I have the world's most expensive canning jar lid (that's a lot of stainless steel fittings that I used!). Hopefully, it will also be a useful lid!!!

Pliny

IMG_5985.jpg


IMG_6033.jpg


IMG_6034.jpg


IMG_6035.jpg


IMG_6036.jpg


IMG_6040.jpg


IMG_6038.jpg
 
I bought some sheet ss and a hole saw so I could try to make my own for a small mouth jar. I'll post later how that goes.

Artifishal,

I tried the hole saw approach but didn't like the results. I preferred a slightly undersized hole drilled with a step bit. It was a lot "cleaner" of a cut. I ended up pulling the ferrule through the undersized hole to create a dimple, but simply butting the ferrule to the lid and soldering would be good enough (given a sufficient soldering job).

Cheers!
 
Artifishal,


I tried the hole saw approach but didn't like the results. I preferred a slightly undersized hole drilled with a step bit. It was a lot "cleaner" of a cut. I ended up pulling the ferrule through the undersized hole to create a dimple, but simply butting the ferrule to the lid and soldering would be good enough (given a sufficient soldering job).


Cheers!


Thank you Pliny. I actually meant to cut a large hole in a sheet of stainless steel and use that hole piece as the lid. Like a cookie cutter. This way I'll be making my own ss lids but out of a thicker gauge. I'm sure I will have to grind down the edges, but once I slip that gasket over them it will hide the edges anyways.
 
OK - here are a few picture that show how I did this...

Pic #1 is just drilling holes in a lid - mark your layout and drill away. Since I want a ferrule and two posts (ala maierhof's yeast harvester rig), I have three holes to drill. I used a 1.5" TC ferrule so I ended up drilling a 1-3/8" hole with a step bit.

Pic #2: Next, I pulled a dimple on the lid (this is hard since that lid is so thin). Actually, I pushed the lid down over the ferrule. I happen to have a large closed end wrench that fit over the 1.5" ferrule and just hammered the wrench down on the lid until the ferrule pushed through. This is probably not worth the effort - one could just butt solder the ferrule to the lid, but pulling a dimple is stronger.

Clean and degrease everything that will be soldered. Afterwards I used gloves whenever I touched anything so as not to leave oils behind.

Pic #3: I wrapped each piece with solder and set it in place. Put down a little bit of flux at each joint and let the flux sit for a few minutes. Then, with a low-ish flame on a propane torch, I focused the flame on the item to be soldered to the lid and not the lid itself. I actually tilted the flame up and away from the lid. I let the item I was joining to the lid carry the heat into the lid and the solder. Once I saw the solder start to melt (it'll turn a shiny silver from a dull silver), I moved quickly to the far side of the fitting to apply heat and start melting the solder on that side. The residual heat on the first side of the joint finishes the soldering and wicking when you are working on the second side. When the second side starts to melt, just move around the joint to finish things off and to wick the solder into the joint. Pic #4 shows the lid with the finished solder joints.

Pic #5 shows the lid all cleaned up (fairly well - still not quite done, but I was tired of cleaning).

And Pics #6 and #7 show what I made. It's a jar lid that I can attach to my conical through the TC ferrule and pull trub/yeast out of. Pic #6 is just a shot of the underside of the lid showing the dimple that I pulled the ferrule through as well as the dip tubes coming through the posts. I now have a lid with a liquid-out post and a gas-in post. If I attach a jar full of water (for example) to the conical, I can put 1 or 2 psi of CO2 on the gas-in side and push all the water out - now I have a jar full of CO2. I open the butterfly valve and the CO2 (no oxygen) bubbles up through the wort and yeast/trub goes into the jar; close the valve and pull the jar. Or I can rouse dry hops as recommended by Vinnie Cilurzo - let CO2 bubble up through the settled dry hops. I think it's safe to say that I have the world's most expensive canning jar lid (that's a lot of stainless steel fittings that I used!). Hopefully, it will also be a useful lid!!!

Pliny

Incredible!! Nice work my friend - nice work...
 
OK - here are a few picture that show how I did this...
Pliny

Wow--- brilliant. That is going to have to be my next test. Just as an update, I did as PlinyTheMiddleAged said, and had MUCH better success. The biggest change was not overheating... aimed the MAPP torch upward and held it pretty far away, and when the flux color started changing, moved the torch downward, then touched the solder... it was AWESOME. Just sucked right into the joint. One place had a little less than the others, but I can't see light through it, and I THINK it is liquid tight. I now have a lid that worked and doesn't even look THAT bad! Only question... how did you all pressure test this? Just fill a conical and see if it leaks?

Thank you, PlinyTheMiddleAged.
 
Wow--- brilliant. That is going to have to be my next test. Just as an update, I did as PlinyTheMiddleAged said, and had MUCH better success. The biggest change was not overheating... aimed the MAPP torch upward and held it pretty far away, and when the flux color started changing, moved the torch downward, then touched the solder... it was AWESOME. Just sucked right into the joint. One place had a little less than the others, but I can't see light through it, and I THINK it is liquid tight. I now have a lid that worked and doesn't even look THAT bad! Only question... how did you all pressure test this? Just fill a conical and see if it leaks?


Thank you, PlinyTheMiddleAged.


That's how I tested mine. Just filled conical with valve open to jar with water for a few days and monitored it.
 
... how did you all pressure test this? Just fill a conical and see if it leaks?


That's exactly what I did - attach it to the conical and fill with water. Letting it sit for a while like Artifishal did is a good idea. I let it sit for just a few hours and called it good enough.

I'm glad this worked out for you!

Cheers,
Pliny
 
OK - here are a few picture that show how I did this...

Pliny

I can't help but coming back to this post... that is such an elegant and wonderful way to do trub collection/yeast harvesting. Do you happen to have a parts list? What diameter are the tubes going into the lid? Are those just compression fittings you soldered into the lid? Have you tested this with thick yeast slurries? The last time I tried to dump trub from my conical I opened the valve and.... nothing. I left it open for 5 minutes and still nothing, so stuck on a container and left it for 3 days. When I went back, there was clear fluid only in the container. The trub layer worked like a filter so I got a perfectly clear sample of beer! And this was with a 1.5" butterfly valve!

Just want to make sure I have a tube that is big enough to push out thick trub.
 
I can't help but coming back to this post... that is such an elegant and wonderful way to do trub collection/yeast harvesting. Do you happen to have a parts list? What diameter are the tubes going into the lid? Are those just compression fittings you soldered into the lid? Have you tested this with thick yeast slurries? The last time I tried to dump trub from my conical I opened the valve and.... nothing. I left it open for 5 minutes and still nothing, so stuck on a container and left it for 3 days. When I went back, there was clear fluid only in the container. The trub layer worked like a filter so I got a perfectly clear sample of beer! And this was with a 1.5" butterfly valve!


Just want to make sure I have a tube that is big enough to push out thick trub.


You could just keep it simple and start with a pint jar for a five gallon batch for trub then just remove the first jar with trub in it before you pitch. Then put on a larger jar and then pitch and enjoy the show. View attachment ImageUploadedByHome Brew1430651510.146102.jpgView attachment ImageUploadedByHome Brew1430651528.364381.jpg
 
I can't help but coming back to this post... that is such an elegant and wonderful way to do trub collection/yeast harvesting. Do you happen to have a parts list? What diameter are the tubes going into the lid? Are those just compression fittings you soldered into the lid? Have you tested this with thick yeast slurries? The last time I tried to dump trub from my conical I opened the valve and.... nothing. I left it open for 5 minutes and still nothing, so stuck on a container and left it for 3 days. When I went back, there was clear fluid only in the container. The trub layer worked like a filter so I got a perfectly clear sample of beer! And this was with a 1.5" butterfly valve!


Just want to make sure I have a tube that is big enough to push out thick trub.


Kshuler,

I have not yet test driven this contraption. I'll put together a parts list sometime this week when I get a chance. I'm guessing that heavy trub might be a bit of a challenge - if your trub clogged a 1.5" butterfly valve, I'd guess that it'd be difficult to push out of the dip tube. I'm thinking that a yeast slurry would be ok.

As Artifishal said, the rig without the liquid-out and gas-in posts might be the simplest solution for most issues. That's the design I've been using so far as well. I just connect a jar to the conical with the bottom butterfly valve opened, fill the conical with wort, and let the trub settle. I then close the valve and remove and dump the jar of trub. I reconnect the jar, let it refill with wort, and pitch the yeast. After fermentation is complete, I pull off a jar of yeast. Here is one I pulled off today - I added the first round of dry hops to my Pliny the Elder clone and harvested this prior to tossing in the dry hops.
View attachment ImageUploadedByHome Brew1430712414.800441.jpg

If you look closely at the bottom, you can see a little trub. The yeast is still settling, but I'd guess I'll end up with about a pint of dense slurry.

Anyway, the real intent of the liquid-out and gas-in posts is to allow multiple jar swaps after pitching yeast. With just a ferrule, once I pitch yeast, that jar stays on until the yeast drop and fermentation is complete. I can't add another jar without adding oxygen. With the posts in place, I can attach a jar full of water, displace the water with CO2, and open the butterfly. In theory, any remaining yeast or dry hop "sludge" will flow into the jar without exposing the beer to oxygen. That's the intent. However, being able to pull some yeast out in order to add to another fermentation vessel would be pretty nice as well. I'll definitely give it a try and post back here during my next beer making session (probably 3-4 weeks away).

And I'll post an assembly picture and a parts list in the next couple of days.

Cheers!
 
Do you happen to have a parts list?

OK. Here goes…

This is the parts list. Yes, there are a lot of parts. But everything is just thread together parts except for the soldering as has already been discussed. So, just solder on the ferrule and the 2 tank post & dip tube nipples and thread everything together. I used flare fittings everywhere to make things less prone to leak and easier to assemble. One could probably get the part count down, but this is what I came up with. If the lids were even larger, you’d have room just to slap the posts “J” and “K” on the nipples “L”, but the real estate just is not there so parts “D” through “I” get added (and the price goes up!).

Parts "A" through "L" came from Chi Company, "M" from Brewers Hardware, and "N" from Eco Jarz.

Enjoy!

View attachment ImageUploadedByHome Brew1430800224.018330.jpg


A - Diptube - Liq out - 2-1/2 gal Cornelius Angled (Diptube-Angled-2.5g-15C07200ih) I trimmed this down to fit the jar I’m using – one quart size.

B - Diptube - Gas In - Stainless - Wide Diptube (Diptube - Gas - 15C07111IH)

C – I have no idea where I got these gaskets. They are square shouldered gaskets that fit inside “D” and sit on top of the dip tubes.

D - Tank Conversion Fitting - Cornelius & AEB - 3/8"MFL x 19/32"-18 (Tank Adapter - 04C03322IH)

E - 3/8” Nylon Flare Fitting Washers (Nylon Flare Washers) - 04C03185IH

F - Swivel Nut Elbow (3/8" Swivel Elbow Female Flare) - SSElbowSwvlNut - 04C03238ih

G - Flare Adaptor - Male to Male (1/4" MFL x 3/8" MFL Flare Adapter - MFL x MFL) - SSMFLMFL - 04C03146

H - ¼” Nylon Flare Fitting Washers (Nylon Flare Washers) - 04E04291IH

I - Adapter - Cornelius Keg Posts 1/4"FFL x 19/32"-18 (Plug Adaptor - 04C03317IH)

J - Cornelius & AEB - Spartan - Super Champion. Liquid OUT (TankPlug-CorneliusLIQ-15C07116IH)

K - Cornelius & AEB - Spartan - Super Champion. Gas IN (TankPlug-CorneliusGAS-15C07115IH)

L - Tank Post & Dip Tube Nipple - Weld-in-Place - Stainless Steel (TankNipple-WIP 15C07103ih)

M - 1.5" Tri Clover Compatible Ferrule - 3" Long

N - 12 Pack Stainless Steel Jar Lid (12 Wide-Mouth Jar Lids)
 
Trying to decide how to make the 1 3/8" hole in the stainless lids. I have a drill press and have considered a step bit but I've read somewhere that a knock out punch makes a cleaner hole. Any thoughts?
 
Back
Top