Heated-Direct Fire Mash Tun -- How to?

Homebrew Talk - Beer, Wine, Mead, & Cider Brewing Discussion Forum

Help Support Homebrew Talk - Beer, Wine, Mead, & Cider Brewing Discussion Forum:

This site may earn a commission from merchant affiliate links, including eBay, Amazon, and others.

Bmcclure8

Member
Joined
May 18, 2011
Messages
23
Reaction score
0
Location
San Jose
First time poster, long time reader. Can’t thank all of you enough for the amazing information that has helped my brewing in just one year. I’ve taken the logical steps from extract to now about 10 all grain batches completed. I’m using a converted keg for the HLT and BK, one pump, and a 10 gallon igloo cooler for a MLT where I double batch sparge.

I’m trying to be methodical in evolving my system and not change to many variables so I can focus on process and making better beer and I'm making 10 gallons at a time. The igloo cooler is starting to feel too small and I want to move up to a 15 gallon (keg) heated mash tun. I don't want to tackle RIMS or HERMS yet as I feel it will change my process too much.

What are preferred ways to set up a heated MLT with a propane burner? Do you simply fire for 30 seconds and stir like mad if mash temp drops a degree or two? Do you recirculate within the MLT and if so how does that help?

I'm sure this trail has been blazed already by many and would love to hear your preferences and experiences. Thanks in advance for your input!
 
A direct fired mash tun is technically a RIMS system. Most often, you will want to do a constant recirculation and use low heat to maintain and raise temperature. By recirculating, you are trying to (1) avoid scorching and (2) move the heated mash liquor to the top of the mash so that the heat, over time, will be distributed throughout the mash. I have my probe in the recirculation loop to measure the temperature of the mash liquor after the pump.
 
Can it be as simple as flame on the bottom of the pot, pump out the bottom from below the false bottom and pour on top?

What I don't want to do is build a separate heating element.
 
Can it be as simple as flame on the bottom of the pot, pump out the bottom from below the false bottom and pour on top?

What I don't want to do is build a separate heating element.

Yep, many others and myself have done it successfully this way for years. The trick is to keep the flame low and recirculate as quickly as you can without sticking the mash. Burner automation helps this process a lot and makes it nearly hands off.
 
Can it be as simple as flame on the bottom of the pot, pump out the bottom from below the false bottom and pour on top?

What I don't want to do is build a separate heating element.

In addition to pouring it, if you have a pump, I would suggest putting a return port on your mash tun. I had one welded on for $20, but if you have a step bit, you can drill it easily.

I agree that automation makes this even more worthwhile. I just upgraded my stand to have a center burner to control the mash and automated it at the same time. I had considered doing it in stages, but decided that I would save up to do it all at once. I previously had insulated my mashtun kettle and did single infusions. This was nice and hands-off once you got your mash temp right. Turning the burner on and off to regulate mash temps was not going to make my brew day easier. So automation was the answer.

My recently updated setup.

IMAG0284-1.jpg
 
Dcbc,
That's one great setup! Are those tower of power controllers you have mounted on the bottom shelf? The more I've been reason up lately to make my next brewery upgrade with the MLT, I don't think I want to try to do a DIY with solenoids temp sensors and all. Price tag aside, looks like the ToP is the better out of the box solution for automating the mash. How easy has it been for you and was there much of a setup or learning curve?
 
That is a beautiful setup. I am subscribing to this thread to learn more.
 
Thank you.

Yes, those are TOP controllers. Did my first brew using them last week. Apart from some issues with my burner that I'm still trying to work out, the controllers worked like a charm. Mash temp was easy to maintain within 0.5 degrees of the set temp and the ramp up to mash out worked great. I'm really happy with the upgrade. I considered doing a DIY setup, but with kids at home, I really didn't have time to source components and figure out how to wire a control panel. This was a great turnkey solution.
 
. I feel like I'm in the same boat. I've modified kegs and added selfless fittings. But wiring up and designing an automated system seems like I'd be taking on more than I could accomplish. Glad to hear the TOP was good to go without much learning curve in one brew.

And here I thought I was done upgrading at a heated mash run and I would never consider automation. I think your feedback and vote of confidence in your setup has changed my mind.

Thanks!
 
Well, I have a replacement burner coming from the company that sold me the one that is shooting yellow flames everywhere. Hopefully, that gets me to 100% good to go.

I also sprung for the mash recirculation tube and heat shields from Brewers Hardware. With the high mash recirculation flow that you need to use, I had quite the crater in my mash once I took my first runnings. I had tried a hose in the past, but had had trouble with its sinking. Looking forward to my next brew for sure. The dunkel I brewed is happily fermenting.
 
I use a 3' length of silicon hose laid on top of the grainbed for my mash return. If it's sinking to the bottom through your grain bed, then you've probably got too thin a mash.
 
Sounds like the hose length I used was way too short. I like the looks of the adjustable mash return arm I bought though. And, yes, I do run a pretty thin mash since I have quite a bit of room underneath the false bottom. It's not uncommon for me to get close to or over a 2:1 ratio. But I just lower the sparge volume and it has worked out fine. No ill effects and a slight bump in efficiency.
 
Great info on the ToP controllers. I love my Top Tier Stand, want to automate it. I could build something, but the time, learning curve and doing it myself would be more "expensive" than just buying from Blichman. I've got one on my christmas list already, not sure I can swing two.
 
Is the tower of power from blichmann the only out of the box solution for a rims setup or are there others out there to compete with the ToP?
 
Bmcclure8 said:
First time poster, long time reader. Can’t thank all of you enough for the amazing information that has helped my brewing in just one year. I’ve taken the logical steps from extract to now about 10 all grain batches completed. I’m using a converted keg for the HLT and BK, one pump, and a 10 gallon igloo cooler for a MLT where I double batch sparge.

I’m trying to be methodical in evolving my system and not change to many variables so I can focus on process and making better beer and I'm making 10 gallons at a time. The igloo cooler is starting to feel too small and I want to move up to a 15 gallon (keg) heated mash tun. I don't want to tackle RIMS or HERMS yet as I feel it will change my process too much.

What are preferred ways to set up a heated MLT with a propane burner? Do you simply fire for 30 seconds and stir like mad if mash temp drops a degree or two? Do you recirculate within the MLT and if so how does that help?

I'm sure this trail has been blazed already by many and would love to hear your preferences and experiences. Thanks in advance for your input!

Here's my old set up. It's a March pump connected to an outflow ball valve, some ss nipples, a Blichmann brewmometer and a copper return system that created a whirlpool effect in the mash tun. By adjusting the burner and watching the brewmometer, I was able to maintain a stable mash temp, which I could check with the tun's brewmometer. Pretty cheap set up and the parts can be reused when you build your brewstand (like I did).

image-3100102488.jpg
 
Great pics. That's a great simple setup and a lot cheaper than a ToP. Where do you set the level of the copper 'T' return section in relation to the top of the mash water level inside the pot? I'm guessing just an inch below?
 
Bmcclure8 said:
Great pics. That's a great simple setup and a lot cheaper than a ToP. Where do you set the level of the copper 'T' return section in relation to the top of the mash water level inside the pot? I'm guessing just an inch below?

Yeah, it is adjustable and I put it an inch or so under the surface. I wish I made the arms a little longer.
 
NCGrayson said:
can you explain or show a little more detail about how it is adjustable? This looks like a great step for my brewery.

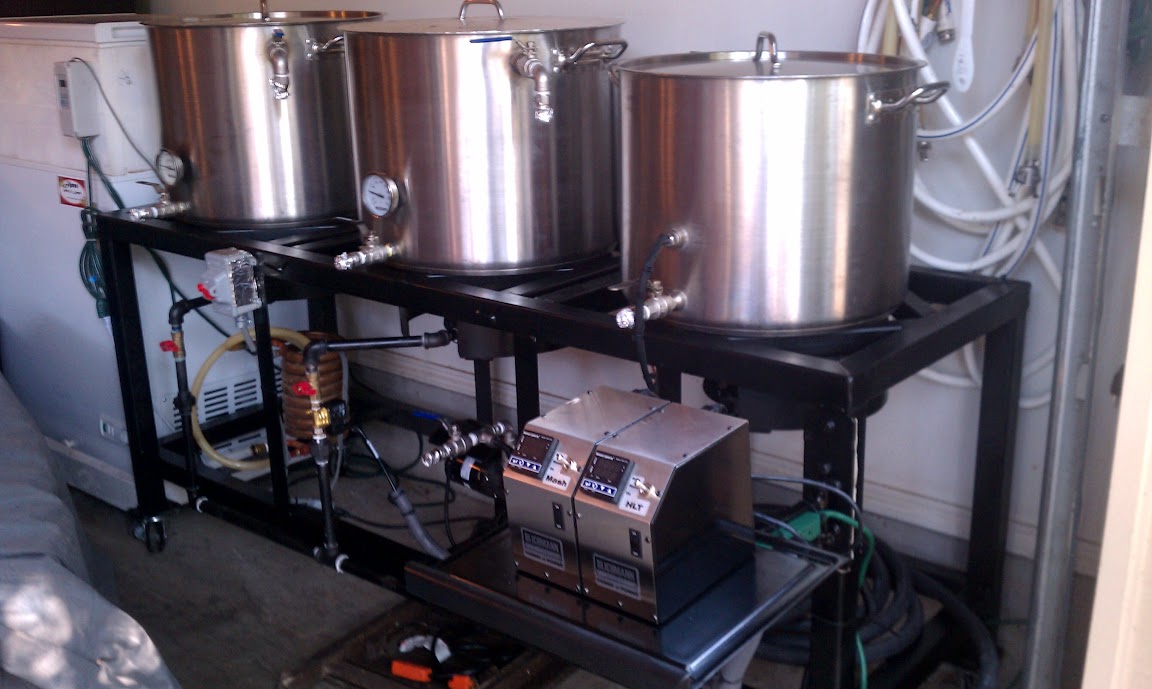
I heated the water to strike temp while watching both thermometers to make sure they correlate then I turn the pump off and add the grain. I stirred to mix and then let the grain settle for a few minutes. I found it best to use about 1qt (~1/2 lb) of rice hulls to keep the grain bed from getting too compacted. Once the bed settled, I took the tubing off the pump and used a pitcher to cycle through a few gallons to make sure I got all the grains out from under the false bottom. This keeps the march pump from getting clogged and prevents grains from getting burned when you heat under direct flame. I then reconnected the tubing to the pump and took the tube off the return device and drained about a qt into a pitcher to prime the pump and then closed the outflow ball valve. I reconnected the tube and then slowly open the ball valve trying to get a flow of ~ 1 to 1 1/2 gal per minute. I did some experimenting and found this to be a good flow that doesn't compact the grain bed. When I ran the pump full throttle, it was going about 6 gal/min and I had some stuck mashing. I used a timer and measuring pitcher to figure out the flow at first but now I can just look at the outflow in the tub and judge it visually. By this point, my mash has usually come down a degree or two from what it was at mash-in. Then I turn on my gas stove burner at a low setting and gradually turn it up until I can see the temp on the pump coming up. When it hits the desired temp, I leave the flame alone and watch both thermometers. Over about 5-10 minutes, I made small adjustments to the flame and once it looked like everything looked stable, I would leave it and start cleaning carboys, transferring beers, etc while taking a peek at the thermometers every 5 minutes or so to make sure the temp was stable. If you brew on a stove with imprecise flame adjustment or a turkey fryer, I don't think this system would work very well.

I was able to do step mashing pretty well with this system. To increase the mash temp, I would turn the burner all the way up (16,000 btu), while keeping the pump running and watch the outflow temp, making sure it didn't exceed the desired next mash temp. When the main mash temp reached the next step, I would repeat the process of adjusting the burner to maintain the temp again.

To collect the wort, I just disconnected the tubing from the return system and used the pump to drain the tun. I measured the gravity and volume if the first running and then batch sparged with enough water to get the boil volume I was looking for and recirculate with the pump for 10-15 minutes and then drained by gravity into another bucket. I would measure the gravity of the second running and then did some calculations to make sure I would get the right ore-boil gravity and then add the second running +/- water to get the right gravity. I rarely undershot, in which case I usually added a small amount of dry light extract.

Wow, that was wordy. Am I the only one out there who warns people "If you ask me a question about beer, make sure you have at least a half hour to kill"? Anyways, I hope that will be helpful in avoiding some of the kinks in the system I had to work out on my own. The only other important piece of advice is about the site gauge. For this system, having one was good and bad. I found that if the water level in the site gauge started going down, my mash was getting stuck. By adjusting the flow with the outflow valve on the pump, I could get the level to rise again and avoid a cluster. The bad thing about the site gauge, was if you weren't paying attention and the air fluid level reached the bottom of the site glass, in which case air would get sucked into the bottom of the mash and shut down the March pump, which then results it you scalding the mash.
 
That all probably sounded really complicated but it was a great learning experience and prepared me well for learning my processes and made it easier to design the RIMS system I have now.

image-3499485403.jpg
 
Is the tower of power from blichmann the only out of the box solution for a rims setup or are there others out there to compete with the ToP?

I think there are some Electric Brewing setups that you might consider plug and play. I think there are also some RIMS tube setups that you can buy with love controllers. But you still have to wire them and play with electricity a bit.

The TOP isn't necessarily plug and play. You still have to work the valves into your plumbing. But all-in-all, I think it's as all inclusive of a system that's not all that complicated to setup I have seen.
 

Latest posts

Back
Top