Frigidaire Model FRC445GB Mini-Fridge Kegerator Conversion

Homebrew Talk - Beer, Wine, Mead, & Cider Brewing Discussion Forum

Help Support Homebrew Talk - Beer, Wine, Mead, & Cider Brewing Discussion Forum:

This site may earn a commission from merchant affiliate links, including eBay, Amazon, and others.
I also completed a conversion for one tap for this fridge. I put my faucet through the door. The only issue I had was punching through the door with my crappy drill.
 
How did you add the external? I would love to do this. I thought if you kinked or bent the other the fridge was then bricked.
 
Also, have you tried to fit a 3 gallon on the back shelf. I have a couple being delivered tomorrow for another project and was going to give it a try. If so, I'll add another tap and move the CO2 to the outside thru the drain.
 
Would someone mind measuring the inside Dimensions? I'm looking for:
distance from the door to hump depth: ??
compressor hump depth: ??
compressor hump height: ??
total inside height: ??
I'm trying to sketch some plans for an inside wood shelf for bottles, to maybe go around a 3 gallon corny. I'm also curious about how much bigger a carboy and Ale Pale ferm Bucket is than the inside of this fridge. Thanks.
 
Hi guys,
first time on this site - stumbled across on accident. I purchased this refrig last weekend and mounted my tower on top - luckily i didn't hit any lines as I didn't think any were even up there! my lucky day I guess. I was hoping to put two 1/6 kegs in this refrig. is that possible?
thanks Ed
 
No. You would only be able to fit one by its self. Two 5gal corneys are a tight fit. Why not just keg jump from the sixth to a 5gal. Then it would fit just fine.
 
I haven't started home brewing yet so I end up buying my beer from the stores and they only sell the 1/6 kegs. I'm assuming it's a width problem
as I would need a touch over 18 1/2" clear for them to sit side by side.
 
exactly. You can buy 2 corney kegs cheap and just make a jumper wih the sankey tap and a ball lock valve. The 1/6th is pretty much the same as the 5gal corney just a bit wider and taller when you use the sankey tap.
 
Thanks for your response's however I'm not following your advice (excuse me as I'm a noob to all this)

I want to put two kegs in this refrig. it appears I can't do this with "store bought" kegs i.e. 1/6 kegs. Are you suggesting I take the beer out of the 1/6 keg and place it into the 5 gal corny? do this twice with two different kegs?
again sorry for the stupid questions.
 
:mug:I just bought one tonight and will be converting it when my tower gets here this weekend. Some one said earlier in the post that a 1/6 barrel will fit in it with the sanky tap, i cant verify it put it is posted earlier... has any one put the tower towards the middle more instead of at the front or the way back? im going to attempt that and hopefully it will work. will post some pics of the finished product this weekend hopefully!!:ban:
 
Mine is in the center. You have to be careful of the coils when you drill it. It is pretty easy, but time consuming getting it together. I have pics of mine on here, just search the thread for the link to them.
 
:mug:I just bought one tonight and will be converting it when my tower gets here this weekend. Some one said earlier in the post that a 1/6 barrel will fit in it with the sanky tap, i cant verify it put it is posted earlier... has any one put the tower towards the middle more instead of at the front or the way back? im going to attempt that and hopefully it will work. will post some pics of the finished product this weekend hopefully!!:ban:


Could you measure these 4 dimensions when you do the conversion? Thanks bud.


depth from the door to compressor hump : ??
compressor hump depth: ??
compressor hump height: ??
total inside height: ??

Also, There is some documentation of a tower mount more towards the middle. its in this thread somewhere.
 
Schupaul, that looks very nice and mine is almost exactly the same, the rails i put on mine look just like yours. i was just wondering where you got the rail mat you use for the driptray in that small size, i have only seen them long. Did you cut it down? from the picture it looks like you didnt.
 
Just bought this fridge this weekend. Scratch and dent for 125. Small dent on the front. However I was thinking of another way to add a tower without risking the coolant lines. Couldn't you mount the tower to the top rear of the fridge, then run the lines throught the insulation to the front of the fridge where there aren't any lines. Then drill a hole in the top to bring the lines inside?
 
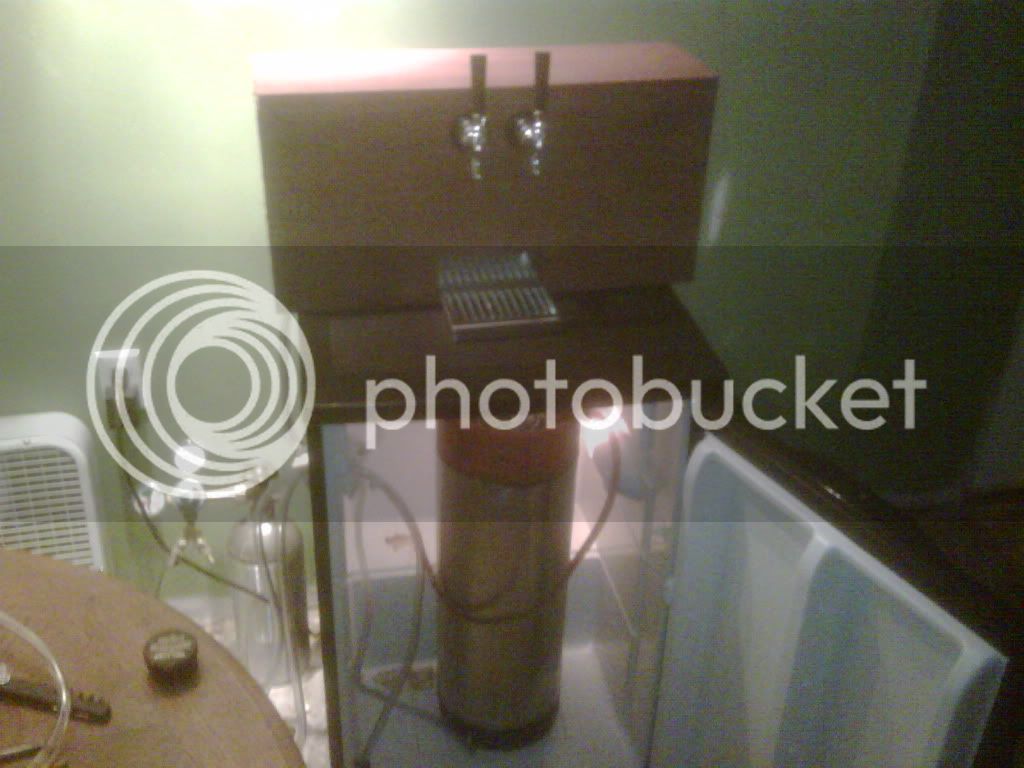
That's a great looking setup! You don't happen to have the dimensions for the cabinet build do you?

I wish I had some plans to give you but it consisted of nothing more than some dimensionless sketches. I bought the Frigidaire from Lowe's and started building around that and my CO2 bottle.

I just used 3/4" pine plywood for the sides and shelves and built the frame from cheap 2x2's. The top is two layers of 5/8" particle board framed in window sash stock of all things. There is a 1/4" thick 6" wide pine board across the top where the towers mount and I left the area below that board with a 1/4 deep inset area for all the bottle tops. They are laid in just as regular floor tile, glued in place then grouted around with clear acrylic sprayed on top.
 
I finally got my corney keg, and was able too fit inside along with my 1/6 keg!
That was exactly what I was hoping for. this refrig is great!
 
Yes! 2 kegs fit.
2_kegs.JPG


There are no extra wires. The manufactures sent the correct amount.

Some people shift it back and some remove it completely.
I did the later. Added an external T-stat.

old_t-stat.JPG


old_t-stat_out.JPG


new_t-stat.JPG


I picked up this fridge, and am looking at ordering this Love Controller:
http://www.coleparmer.com/catalog/product_view.asp?sku=9352000

My question for Bumbler is:
since wiring is my weakpoint in DIY projects, Im learining that people do either of these two, correct me where I'm incorrect:

A) plug the controller between the unit and the wall, and the entire unit comes on/off when the controller switches on/off.

or

B) Wire the controller into the unit's wiring system, replacing the factory thermostat ( as you seem to have done). Its my understanding that this can keep the unit "on" and just cycles the compressor when the controller switches on.

and Bumbler, from your picture that shows the fridge with removed thermostat, did you splice/wirenut anything together there, or just disconnect the wires from the factory controller and tape them to the side?

Does option (A) mean more "wear and tear" on the unit because it gets switched off/on everytime (or use more energy for a 'start up' each time)?
and for option B (as you say you did), did you just remove the factory, and put your Ranco between the wall and the fridge, or wire it in somehow?

I think i'll go A, because i'd rather keep it intact for now, but im wondering if simply disconnecting the thermostat will affect the Love contol plugged in between the unit and the wall socket.


Thanks to anyone who wants to give their opinion, you guys rock.
 
My question is:
since wiring is my weakpoint in DIY projects, Im learining that people do either of these two, correct me where I'm incorrect:

A) plug the controller between the unit and the wall, and the entire unit comes on/off when the controller switches on/off.

or

B) Wire the controller into the unit's wiring system, replacing the factory thermostat ( as you seem to have done). Its my understanding that this can keep the unit "on" and just cycles the compressor when the controller switches on.

Option A and option B are essentially the same thing, the only difference is where you splice the controller in.

these mini-fridges are pretty bare bones operations. No bells and whistles. If the fridge isn't running it's not using power.

Bumbler, from your picture that shows the fridge with removed thermostat, did you splice/wirenut anything together there, or just disconnect the wires from the factory controller and tape them to the side?

No, nothing is splice or wire-nutted on the inside of the fridge. All splices and wire-nuts are done from the back, down by the compressor. After the mod, the 120v that was present at the factory t-stat has been disconnected. That's why all I did was secure the wires to the side of the fridge. This way I can restore the fridge back to it's original configuration someday.

option (A) mean more "wear and tear" on the unit because it gets switched off/on everytime (or use more energy for a 'start up' each time)?
and for option B (as you say you did), did you just remove the factory, and put your Ranco between the wall and the fridge, or wire it in somehow?

Option A and option B place equal "wear and tear" on the unit. The compressor is either on or it's off. For the most part it doesn't matter where you break the power, as long as it's on the hot side.

I chose to completely remove the factory t-stat because I like the look better .


think i'll go A, because i'd rather keep it intact for now, but im wondering if simply disconnecting the thermostat will affect the Love contol plugged in between the unit and the wall socket.


Thanks to anyone who wants to give their opinion, you guys rock.

I doubt there would be any problems or ill effects with having both the love controller and the factory t-stat intact.

With option A - I would recommend leaving the factory t-stat connected as per mfg. Just turn it to its lowest setting so power will always be allowed to pass to the compressor when your controller calls for cooling.

A few weeks ago I had sent someone instructions for the mod. I was hoping he'd write it up and take pictures of the process for all to see, since I didn't. All my pics are after shots.

Hope this helps.

Good luck.
 
Thanks for this report, dude. :mug:

I'm going for it. Next time to Lowe's I'm picking one up. Good price & nice looking unit.
 
Am I correct that this fridge will not fit two pin-lock corny's? Anyone fit two pin-locks in here yet?

well the best way to determine this would be to compare their diameters. Pretty sure there is more than enough vertical clearance.
 
I just bought one of these Frigidaire's yesterday, and am very grateful to everyone contributing to this thread for helping me find a promising kegerator mini fridge! However, my application is different than the standard in that I'd like to put the shank through the side of the fridge. WatereeBrew seems to have put a hole in the side without piercing any vital condenser lines (see below). If you're still monitoring this thread WatereeBrew, would you be able to post a couple pics showing where you positioned your hole and explain your technique if applicable? Or if anyone else has put holes in the side of this model fridge without killing it, I'd be very grateful if you could provide some information about your hole location and size.

The reason I'm hoping to put the shank through the side is that my very old house has an old and beautiful bar in the basement with a tap going through the bar wall into a big walk-in fridge (no longer functional). I need to position a kegerator in the walk-in such that the shank penetrates the bar wall (~9" with all the insulation) and the fridge wall. Obviously, facing the fridge door against the walk-in wall with a shank through it is not going to work. Going out through the top of the fridge and bending 90 degrees would require a longer run of shank and beer line -- raising concerns about keeping the whole run adequately chilled to prevent foaming. My plan was to put a 3" pipe from the back of the faucet, through the 9" wall, and into the side of the fridge, which would provide space around the shank for cold air to circulate. Coming in the side rather than the top may let me get by without a fan. I guess I could go out the top as documented by others and put in a circulating fan to chill the rise and run, but I'd feel safer going with a straight and shorter run. But if I can't get good documentation on going through the side, I suppose I'd rather go out the top using well-documented techniques and avoid the risk of destroying the fridge and having to buy another. Thanks for any help!

 
Am I correct that this fridge will not fit two pin-lock corny's? Anyone fit two pin-locks in here yet?

I am doing a mod on this build to fit my pin lock kegs. So I am essentially adding a 3" insulated column to the front and moving the door out 3 inches. Like a keezer only horizontally...thats what she said.

I drilled the hole for the tower and pulled off the plastic interior of the door panel this evening with no problems. I am building the insulated column and mounting some chrome, stainless, or plastic to the inside of the door tomorrow. I will hopefully rout in a slot for the door gasket as well. Waiting on my tower to arrive.
 
It fits my Ale Pale, but i have to use tubing and a blowoff, the airlock wont fit. I sit it on the back hump and have a wooden block under the front. Sotn have a carboy, so I'd be interested in finding out too.
 
I remember putting one in when I first picked it up. If you prop up the front it will fit but i didn't take into consideration an air lock so I couldn't tell you if there would be enough room.
 
A few things:

Does anybody else hear a persistent whooshing noise while the compressor runs? In other words, how quiet is the coolant as it runs through the lines? I recently purchased this fridge, but I want to know if this noise is normal before I go cutting holes in the unit.

Also, I read somewhere on this forum that installing a small fan will keep the unit from cycling so much. How many people have found this to be true? My unit seems to cycle a few times per hour (more than what I thought it should) even at the lowest temperature setting, which still keeps it at 37. Also, I'm not interested in cooling the tower. I would like to keep this fridge as energy efficient as possible.

To people who want to ferment in the fridge: Have you considered fermenting in a corny keg? (forgive me if this idea has already surfaced here).

Thanks for all the great info!

Cheers!
 
i like to brew 6 gal batches, so i get 5.5 into the fermenter after a 4% volume shrink from cooling, and then rack a clean full 5 gallons off the yeast into the Keg or bottles.
with a corny, you may be limitied to the amount of clean beer you get after fermentation.
this seems kinda dumb, but everytime i try and post a picture, it has my put in a URL. how can i upload a pic from my harddrive?
I have my Ale Pale in there right now. No fan, but with my Love single stage set at 67 its only been kicking on once or twice a day. With the exothermic heat from the ferment, the whole system has been behaving nicely.
 
yes the coolant is a bit loud in these:D, as for a fan, it may help. I have one in to push cold air up into the tower and I dont think mine cyles more that once every hour or two max
 
Has anybody tried to put casters on this model? I was looking at them at Lowes, and they seem to have a pretty good selection. However, I think the heavier duty models' threads are too large to simply replace the levelers on the front of the unit. The holes may have to be drilled out, and that may be hard to do without tipping the fridge. I'm not sure how I would attach the rear casters yet; I thought I saw some holes somewhere back there.

The extra added height of the casters would be appreciated as well.
 
Has anyone eyeballed the 3.3 cu ft Frigidaire that's at Lowe's as well? Can these same techniques be applied there? Will a corny or two fit in the 3.3?
 
Hi all!

This forum has been amazingly informative--thanks so much for posting all of the info and pictures! I read this entire thread beginning to end, and was so excited when I got to page 7 or so and learned that you could convert this model with a tower on the top. I was thinking I would have to pay a lot in shipping to get one of the older models I'd read about elsewhere (Sanyo, etc.) in order to set up a tower-type. Now I can just pick this one up from Lowe's. Awesome!

Anyway, I'm planning to get this mini-fridge and the 2-faucet tower homebrew conversion kit from kegconnection.com for my husband for Christmas. I figured we'd settle for putting the tower through the front part to avoid removing the plastic top, since we're not as DIY-inclined as a lot of the people here who have created some real kegerators of beauty.

My question is about the tools & other supplies we'll need. I can rent a 1-3" hole saw for $6/day--would this be the appropriate tool to get through the top of the fridge? Plus, some people have talked about using PVC pipe segments through the lid, but I think someone else used duct tape, which is more at my skill level. :) Does it matter? I don't care what it ends up looking like on the inside.

Also, I'm assuming that you can only put on the drawer handles as rails if you take the top off and drill through it. If there's another way, though, please share! It looks really cool.

Sorry for the long first post, and thanks!
first I applaud you for being a great wife and buying this for your hubby as a xmas gift!

on to the issue you are concerned with and that is renting a hole saw. Let me share with you my utter noob story that I'm not sure if i fully detailed in my build notes in this thread or not. When the time came to drill the holes in the front area it turned out that the 2.5" hole saw bit I bought could not be driven effectively by my cheap ass B&D 14.4v cordless drill. Whether the battery itself was toast or the drill didn't have the torque I'll never know. Instead what I did was what any other guy would have...drilled lots of little holes with regular bits to outline the approximate hole in the fridge and then cut through them with a knife. I used duct tape and you can do whatever you want really. Make it as simple/complicated as you like. If you're targeting the front area there really isn't much to limit your build.

Good luck!
 
Back
Top