Frigidaire Model FRC445GB Mini-Fridge Kegerator Conversion

Homebrew Talk - Beer, Wine, Mead, & Cider Brewing Discussion Forum

Help Support Homebrew Talk - Beer, Wine, Mead, & Cider Brewing Discussion Forum:

This site may earn a commission from merchant affiliate links, including eBay, Amazon, and others.
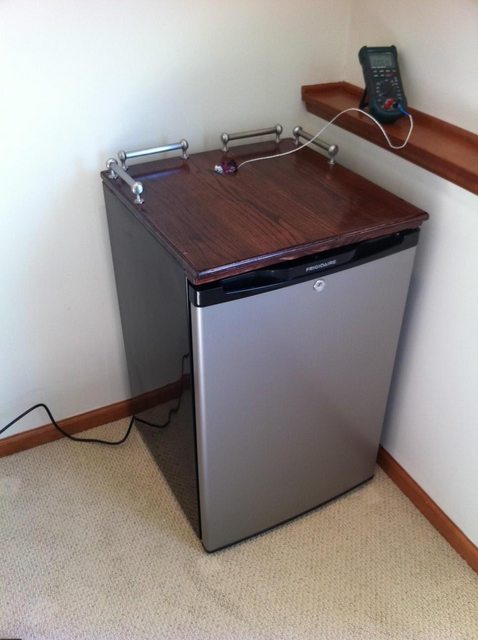
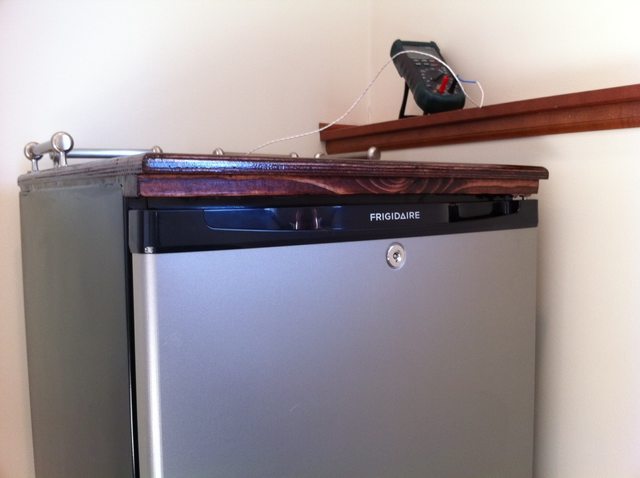
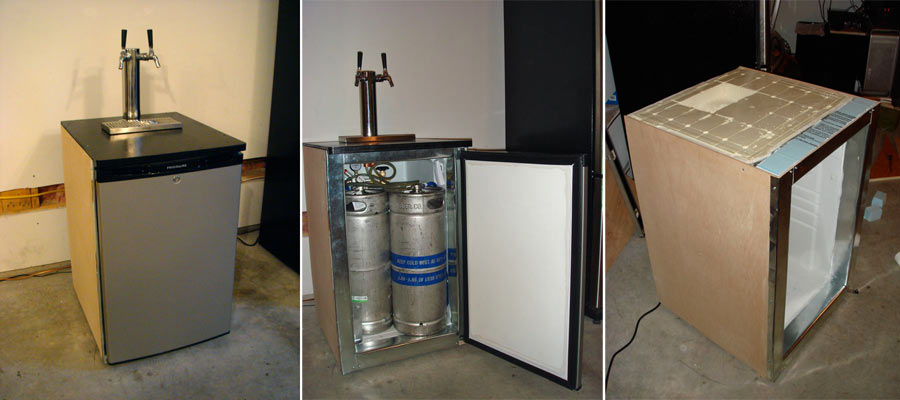
Should have no problems as long as your beverage lines are the right length. Adding a fanwill keep your temps more consistent & the fridge will run less.

Okay, thanks, I'll just call kegconnection and talk with them about the lengths to make sure I've got 'em straight. I'm not too sure on the lengths and CO2 pressure yet. Just getting into the keg portion of this hobby.
 
I have my taps running through the door and haven't had any foaming issues.

I ran through the calcs to estimate line length needed for the range of pressures I planned. I planned to use the calcs as a starting point for line length, bit haven't had to adjust.
 
I just purchased this fridge last night and plan to get my build on. Will post pics if anyone is interested...
 
Okay, thanks, I'll just call kegconnection and talk with them about the lengths to make sure I've got 'em straight. I'm not too sure on the lengths and CO2 pressure yet. Just getting into the keg portion of this hobby.

Ran mine through the door with 7 feet of 3/16 no issues at all. I Love this set up.
 
OK here is what mine looks like with the taps through the door. It doesn't look as fancy as some of the other ones I have seen, but it works and was very easy to do.

kegerator.jpg
 
Just finished the initial work on my new Kegerator. I decided on this model after getting a coupon for Lowes and liked the idea of having a lock!

I ended up going for a tower (waiting for the FedEx driver!) and had no problem pulling the plastic top off and digging for a good mounting position. I ended up cutting a 1.75" by 2.5" hole through the fridge so I can pass two copper pipes for cooling and a piece of plastic pipe that will be attached to a fan to cool the tower. Made a channel using styrofoam and filled the remaining digging space with expanding foam.

I hated the idea of a plastic top. My wife is picky and was sweet enough to let me do this project so I decided to class it up and went with a custom oak top. I threw out the plastic and used a laminate plywood, routered on the edges as my new top. I remounted the door hinge to the new top by using a spare piece of pine. This also allows my to use the lock! I stained the entire top with a dark cherry stain and coated it with 6 coats of glossy poly. This will eventually be polished once the film has time to harden.

The interior of the door was cut off with a razor (AKA Sawzall) and will be replaced with a single piece plastic. The temperature controller was cut in half and flipped so I can fit to corneys and a 5 lb CO2 tank. I decided I wanted better temp control (On setting 2.5 temp flucuated between 42.5 and 46) so I have also ordered a Love TS2 controller and will be wiring that in to replace the stock controller. This also will allow the tower cooling fan to operate with the compressor as others have recommeneded.

Thanks to everyone on this thread for the awesome info!

ZRpq9l.jpg

uhVBhl.jpg
 
Post #463 shows a 5g,3g,3g setup with only the shelves removed no other mods. By removing the light & turning the t-stat 180* you can fit 5g,5g,3g.

I received all of my parts so I finally got around to converting this to a kegerator.

I have the Best Buy model.... I did no door modifications and removed the internal thermostat. I wired the power cord into my new temperature controller, and tied the power directly into the compressor at the back of the unit. The set of wires going into the fridge were abandoned and secured with a wire nut. While I'm working on the fridge, I've routed the temperature probe through the drain hole, but I plan on using the abandoned blue & black wires to connect the probe and replug the existing drain.

Long story short, by removing the thermostat you leave enough room to fit a 5 lb. aluminum CO2 tank next to the 3 gallon keg on the back hump. With some creative hose routing, there is enough room behind the 5 gallon keg on the left (opposite the CO2) to add a single/dual gauge regulator remotely from the tank. I'd say a single regulator would be much easier, but I was able to fit a dual taprite into the space. Ultimately, my tank and regulator are going on the outside, but I was impressed this could all fit with room to spare.

 
Long story short, by removing the thermostat you leave enough room to fit a 5 lb. aluminum CO2 tank next to the 3 gallon keg on the back hump. With some creative hose routing, there is enough room behind the 5 gallon keg on the left (opposite the CO2) to add a single/dual gauge regulator remotely from the tank. I'd say a single regulator would be much easier, but I was able to fit a dual taprite into the space. Ultimately, my tank and regulator are going on the outside, but I was impressed this could all fit with room to spare.

While I have the top off and can look around, I plan to run the CO2 line thru the upper rear corner. Not only am I sure to miss any of the lines but running the CO2 out above the kegs should prevent beer backing up into the regulator.
 
While I have the top off and can look around, I plan to run the CO2 line thru the upper rear corner. Not only am I sure to miss any of the lines but running the CO2 out above the kegs should prevent beer backing up into the regulator.

I ran two bulkheads through the hump for my CO2. I used some tin snips to remove the metal angled piece under the rear of the hump. I'd be careful running your lines through the upper rear, because that back portion of the freezer compartment appears to have refrigerant lines running through it. When I first plugged in the fridge, that back portion got just as cold as the top. The gas and liquid lines from the compressor run up the back at the left and right side, which you can see from the bottom of the fridge where they come out.
 
That's awesome! Been trying to find out if two 1/6 was possible with this fridge...

What's the temp like in your tower? That diversion tunnel seems like it would make it even harder for cool air to find its way to the top. Have you considered running copper lines inside?
 
Thanks Vongo and mcubed45.

mcubed, I don't have a suitable thermometer to give you accurate numbers, but the base of the tower feels about as cold as a can of soda taken out of a fridge. I'm guessing that's about 40 degrees. The top of the tower is probably 8-10 degrees warmer, but every serving is perfectly cold.

I considered copper lines, but wanted to try it without them first, and it seems adequate to me.

We are getting more foam than we like. Does anyone see anything in our design that might be causing it? I'm wondering if the 90 degree adapters on the taps shake the beer up on it's way through.

I haven't built one yet, but from what I've read foaming is usually due to the lines not being kept cold enough. Is it just the first glass or all the time? If it's all the time, I would think it's a pressure vs line length issue.
 
I haven't built one yet, but from what I've read foaming is usually due to the lines not being kept cold enough. Is it just the first glass or all the time? If it's all the time, I would think it's a pressure vs line length issue.

Thanks, mcubed. We have much longer beer lines than we need, so I may try shortening them.

If the tower isn't getting cold enough, I could open another hole directly below it. No room for the beer lines there, but enough to allow more cold air to move upward.

Also toyed with the idea of using the power supply to the lamp inside the fridge to drive a little PC cooling fan that would push air into the tower. If I do, I'll post photos.

Thanks again!
 
homewrecker,
I recently bought a 3 gallon corny for the hump of this fridge. Do you think if I do the same modifications you did to your fridge I could fit 3 5 gal cornies and 3 gal on the modified hump? With my tank mounted outside.
 
homewrecker,
I recently bought a 3 gallon corny for the hump of this fridge. Do you think if I do the same modifications you did to your fridge I could fit 3 5 gal cornies and 3 gal on the modified hump? With my tank mounted outside.

Hi BlindWillie,

I'm pretty certain you could not do 3 5-gallon cornies. The cornies are practically the same diameter as my sixth kegs -- only 1/4 inch smaller. You can see in the plan that there wouldn't be room for another 9" diameter barrel:

http://www.recursivegroove.com/kegerator/Drunks_with_Dremels/Entries/2011/3/12_The_Plan.html

I believe others in this thread have put 2 5-gallon cornies and one 3 gallon corny in this fridge without much modification.

Good luck!
 
This really is a fantastic thread.

Using information mostly from the Home Brew Talk forum and this thread, I modified the same fridge and added a collar so it would fit two 1/6th barrels. I detailed the whole thing on Brian's Belly here:

http://briansbelly.com/featured-new/guide-to-building-a-custom-kegerator/

It is a standalone kegerator right now, but it will be a built-in one day soon. I would love to hear feedback from you guys.

brians-belly-kegerator-x3.jpg


Thanks again for all the great info!

Dave

wow that's awesome! :mug:

btw, the foaming issues were prolly b/c your copper tubes were too short. the tubes need to extend into the fridge several inches so they conduct enough of the heat out of the tower. ideally, you'd want the portion in the fridge longer than the portion in the tower, but people seem to be fine with a good 6" or so. something to consider when you raise the tower for your build-in. passive cooling always makes things simpler.
 
Great job, Dave! I'll be adding a cooling fan to my tower as well.

Thanks homewrecker... the fan made all the difference in the world. There is MUCH more even cooling and the tower has been excellent at maintaining the same temperature as the fridge.

And based on your design I see that if I really wanted to squeeze in a 1/4 slim later on, I might be able to do it!

Dave
 
I'm about 99% done with my build after finallllly receiving a replacement tower from kegconnection. I added a third shank to the two-tap tower. I cut out the foam using the rubber gasket holes as a template, and ended up cutting it perfectly. I was able to get the bolts to clear the refrigerant lines at the four corners of the square opening I made in the foam and bolted the tower directly without any need for plywood support. I'm still trying to decide if I want to run a fan up into the tower. I have a Ranco temp controller, dual regulator, and dual two-way distributors to feed 3 ball lock disconnects and one D style coupler to hopefully run a commercial 1/6th barrel and 5 gallon at the same time. I will check the fit on that combination this weekend.

First pour: NB Nut Brown Ale


I was waiting for this one to go on sale, unfortunately for me BestBuy raised the price of it by $10.00. Bastards..........
 
New poster here. Thought I would share my fridge buying story.
For the past three weeks I have been trying to buy one of the Lowe's Frigidaire 4.4 for $179 but after three weeks of them telling me that there would be one in next week I decided to drive the hour and a half to my closest best buy and plunk down the $199 for one of theirs. I called ahead and said they had two.
After reading this thread and noted how many were damaged I insisted at looking at it before they loaded it and I drove an hour and a half home. Sure enough when they opened it, the back edge was dented. Dented mind you nothing broken or smashed. I said as I am paying full price I would like to see the other one. The disgruntled employee trudged off to get the other one. While taking their time the manager came around and asked us why we were standing there. I told him I was not opposed to taking the dented one as long as it still had the warranty which he said it would have the same one year warranty for a discounted price. He was no less than elated to give me back $60 to take that one.
My cost $140, the dent will never be seen in the back corner. Also of note when I got it home the freezer hinge was broken too which I was taking out anyway. After hearing of everyones experience with damaged units and my own experience with seeing how these things are packaged. I think there is a very slim chance of getting one that isn't damaged. My conclusion is that this is a great unit for conversion and for lack of the manufacturer packaging it well enough, many new fridges could be had for conversion for much less than full retail.
 
I just bought this fridge yesterday. I've decided to run the copper pipes, but had two questions.

1. Should I drill one hole to fit both pipes or a separate hole for each pipe? Haven't bought a hole saw yet and I've seen this done both ways.

2. How long should the copper pipe be? I'm guessing 16" maybe - few inches into the fridge, few inches for the thickness of top, and then most of the way up the tower.

I drilled two holes for the pipes, yes drilled, it wasn't super pretty but I'll never see them again. The nice part about two holes is that the copper pipes actually touch the cooling plate and are held in place by a snug fit. Since they touch the plate it helps them stay nice and cold. I really don't feel the need for a fan. Mine are 16'' and descend a few inches into the fridge.
 
I'm to the point of mounting the tower. How did you guys secure your tower? From what I have read, I purchased a piece of 1/2 plywood, but are you guys screwing the tower to the top/inside of your fridge?
 
I'm to the point of mounting the tower. How did you guys secure your tower? From what I have read, I purchased a piece of 1/2 plywood, but are you guys screwing the tower to the top/inside of your fridge?

I haven't actually done this build yet, but it looks like most people just mounted right into the plywood. I saw one guy mount through the wood and into the fridge, but he had to relocate the mounts to miss the cooling lines. It seems like a big hassle to do it that way.

My plan is to just mount through the top and into the 1/2" thick plywood. I haven't received my tower yet, so I don't know how long the screws are....but as long as they aren't super long, it should be fine to just mount into the plywood.
 
I'm to the point of mounting the tower. How did you guys secure your tower? From what I have read, I purchased a piece of 1/2 plywood, but are you guys screwing the tower to the top/inside of your fridge?

I got lucky on my build. I used the four mounting holes as a template to cut a square hole through the foam. I was able to drill through the fridge and bolt the tower directly because it cleared the refrigerant lines perfectly. Since my square hole was so small I didn't need any plywood support on top of the foam.
 
I'm to the point of mounting the tower. How did you guys secure your tower? From what I have read, I purchased a piece of 1/2 plywood, but are you guys screwing the tower to the top/inside of your fridge?

In my case, I ended up using smaller screws than supplied with the tower to mount it to the top of the 1/2 ply that I used. It's pretty secure... but if it were going to be long term (I plan on making my kegerator a built-in, and it will be mounted to the counter) then I would have used 3/4 ply on the top of the fridge and longer screws.

I see no need to mount it to the inside of the fridge.

Dave
 
Sorry to chanegt he subject a little. But does anyone have a 3 gallon better bottle and this fridge...and could i fit it in their to ferment in? It looks like maybe the door ridges might hit the bottle since it's square. Just curious. If it fits, I'll get this fridge and eventually change it to a kegorator.
 
Well, finally got around to getting this fridge. My birthday was Friday so I got some money and was able to purchase the fridge with that money. Now, I just need to get my next brew day together so I can keg for the first time. WOOHOO!!!
 
Sorry to chanegt he subject a little. But does anyone have a 3 gallon better bottle and this fridge...and could i fit it in their to ferment in? It looks like maybe the door ridges might hit the bottle since it's square. Just curious. If it fits, I'll get this fridge and eventually change it to a kegorator.

I don't have a 3 gallon better bottle. I tried a 5 gallon glass carboy and it will not fit on the floor unless you remove the plastic door insert (with all the can holders, etc.) Then it'll fit quite easily.

On another note, I finished mine this weekend:
818a31a2-1.jpg


Pretty much followed two builds: Build 1 & Build 2. Should have beer in one of the kegs tonight.
 
They keep changing the dang model numbers, best buy has the BFPH44M4LM

Since I live in Brooklyn and they only have one at the Manhattan location (plus getting a cab back is a total hassle, I've looked around for someone with delivery. Another vendor (linked below) has what appears to be the same fridge but with a different model number: FFPH44M4L

I don't mind spending the money as long as I'm not WASTING the money. Or should I just suck it up and hope I get a nice cabby?

Any and all help is appreciated.

http://www.ajmadison.com/cgi-bin/ajmadison/FFPH44M4L.html

They aren't changing the model numbers. The new one starts with L at Lowe's and the Best Buy one starts with B.

I'm pretty sure the one at AJ Madison is the exact same thing. The model ends in M4LX where the M4LB is the all-black model and the M4LM is the silver "mist" model.
 
Do you guys think BestBuy will price match the fridge even though the model number is not exactly the same? Lowe's has it for 179.99 and BestBuy has it for 199.99, but Lowe's does not have it in stock.
 
Back
Top