GE 7 CF (FCM7SUWW) keezer conversion

Homebrew Talk - Beer, Wine, Mead, & Cider Brewing Discussion Forum

Help Support Homebrew Talk - Beer, Wine, Mead, & Cider Brewing Discussion Forum:

This site may earn a commission from merchant affiliate links, including eBay, Amazon, and others.
Did you try to rotate the kegs to get the best possible fit? It is a tight fit but its not the worst thing when you try to get one in/out. If you do one on the hump, make sure your collar is tall enough.

I tried, the collar is tall enough 8":

P1000243.jpg
 
Yes, I use that controller. I don't think the freezer draws 15A or even half of that. I think someone took some current readings on it at one time or another. I can look on the nameplate to see what it says.

GE does however recommend a 15A extension cord if you use one.

The nameplate on the freezer states the rated current is 1.7A. Note that it will draw a couple times this value on start up.
 
TomSD: Nice job on the keezer. I've had this freezer for about a year and have been dragging my feet on the conversion. Now I am inspired.
My concern is cutting the plastic away from the lid where the weatherstrip attaches. You mentioned using a utility knife to cut it. Was it really that easy? I really don't want to mess up this step.

Thanks to all the others that contributed to this thread. Great ideas from all!
 
The plastic shell is stuck to the lid from the spray in insulation in the lid. Cutting the edging around the inside of the lid is super easy. Just fold the striping out of the way and it'll be pretty obvious where you need to cut. Pretty hard to f it up. :)
 
Thanks for Tom SD for starting this post. I just got mine up and running the other day and so far this is one of the best investments I have made. Not as nice as some of the other keezer's I've seen, but it works.

IMG_20111230_203512.jpg


IMG_20111230_203539.jpg
 
chairbornrangerx said:
with the STC-1000 through the collar in the front, is it just exposed to the elements inside the freezer? Any issues there?

I suppose there could be over the long term if there was a condensation issue in the keezer. The controller does generate some warmth, so it shouldn't collect any condensation. The controller is designed for an ambient temperature of 0C, so the temprature it self is not an issue. I keep my keezer at 7C.

We'll see how it does, I'm not too concerned about it.
 
with the STC-1000 through the collar in the front, is it just exposed to the elements inside the freezer? Any issues there?

I am not too worried about a condensation issue with the STC-1000 seeing as the gap between the 2 terminals (hot, and neutral) is quite large respectively.

It doesn't really get humid inside my keezer (yet, but its only winter), just the side walls get frosted over during the cooling cycles, but it all just melts off and very little is seen on the bottom.
 
Tom,

Great build! I've decided to base my build off of your set up. One thing I haven't figured out is where did you end up placing your manifold? Is it attached after one of the four regulators, or is it attached between the 4 and the regulator on the CO2?
 
I have a primary regulator on the tank and a secondary regulator (bank of four) mounted to the back of the collar. There is no need for a manifold since I have a regulator for each keg.
 
Best Buy has it delivered to my door for $206 w/ taxes total. I'm considering it since you can get 5 kegs in there.

I was really thinknig about something a sankey would fit in. Trying to weigh in how much that matters to me, or if after I use the sankey or fermentating (10 gal batches), just transfer it to two cornies and in they go.

When putting in or removing kegs, is it a big ordeal? are you pulling another keg up with you or is it just a little shimy to get it in and out?
 
Correction, after thinking about it. It doesn't matter a sanke isn't going to fit in there. Now the question is for that price is it worth it for $10 to get the Frigidiare 7.2 Cu?
 
A Sanke won't but a sixth barrel will and I have never had a problem getting a sixth from my local keg place. :)

For homebrew though yeah you are limited to the cornies.
 
Got a PM about hinge mounting...

I've mentioned it before but the weak point seems to be the collar and not the hinges. I suggest getting a metal plate and drilling it out for a back plate, or that is what I would do if I did it over again anyway.

How I did it though was just long bolts, nuts and small backed washers. Not sure what they are called but they have depth to them and have a rubber backing. They seem to have gripped the wood without doing too much damage though I am very careful opening and closing the top.

Hinges.JPG
 
I did the exact same thing as TomSD on my unit. Although I haven't had any questionable incidents with lid (yet) I agree that the plate idea to add strength at the collar-hinge attachment joint is warranted. It may be something I will do if I run into a situation where I have to make a change, or if I get a bigger Keezer :D.
 
Parts have been coming in for some time now but I've only started to do any kind of assembly this weekend. I don't see my version being much different from the ones posted on here for the sake of simplicity, but here is what I have so far. I couldn't find the 4" wheel that TomSD used so I worked with 3" that required four points of attachment instead.

2x6x8 @1
1x4x6 @ 2
2x4 pieces were scrap (2x4 - 20.5" @3)

I opted for including a 1x4 piece around the base to hide the casters, so you end up taking off 1.5" off each length & width to accommodate the additional piece. The trim pieces were assembled and attached using a Kreg jig.

IMG_0229_notes-2.jpg


IMG_0230_notes.jpg


IMG_0232_notes.jpg


IMG_0233_notes.jpg


IMG_0235_notes.jpg
 
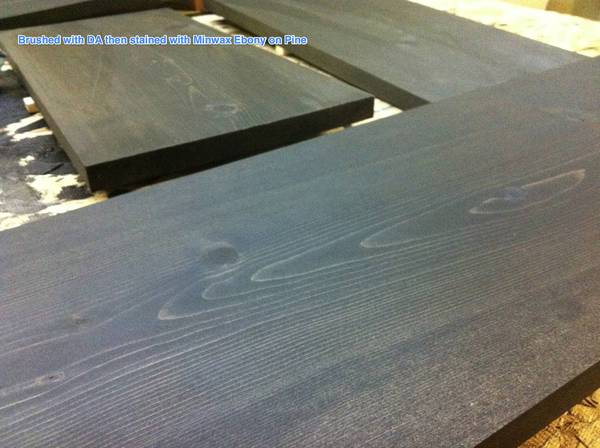
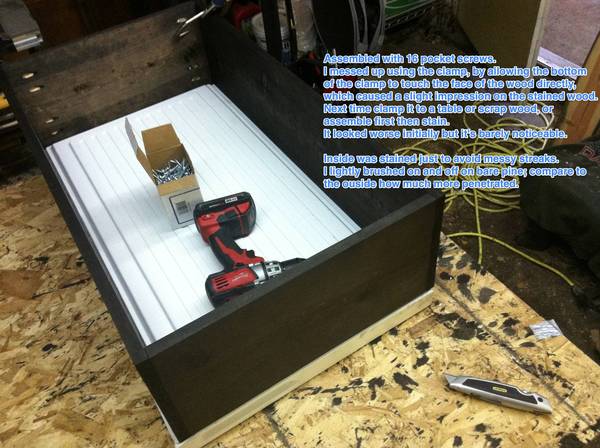
Continuing with the collar, I treated the wood just like the base trim with denatured alcohol and Minwax Ebony. One thing to notice with the bigger pieces is that DA dries FAST. When you apply the stain, it will not mix like oil and water. I just rub it with the stain pad until it emulsifies which doesn't take very long at all. It'll then look almost pitch black (too black), but after you let the stain set in, you just wipe/rub the excess off to your liking.

IMG_0258_notes.jpg


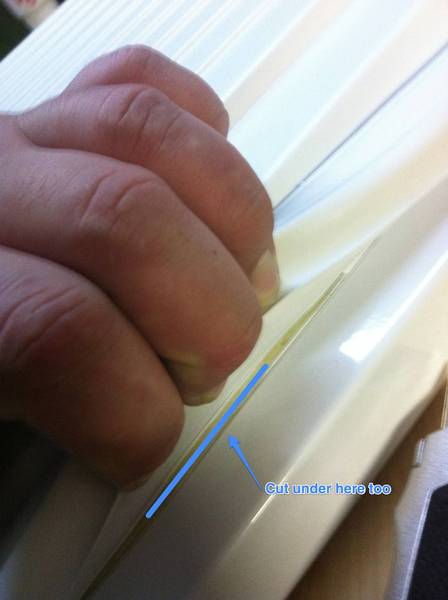
I was a bit concerned with cutting the seal on the lid but after studying this thread and poking about on my own, I found it came off easy with a sharp utility knife when cut on both sides.

IMG_0251_notes.jpg


and here
IMG_0255_notes.jpg


Here's the collar assembly sitting on the lid. You'll need to trim part of the little plastic ends (on the corner) a little to make sure things fit/align, which is easy with a utility knife.

IMG_0261_notes.jpg


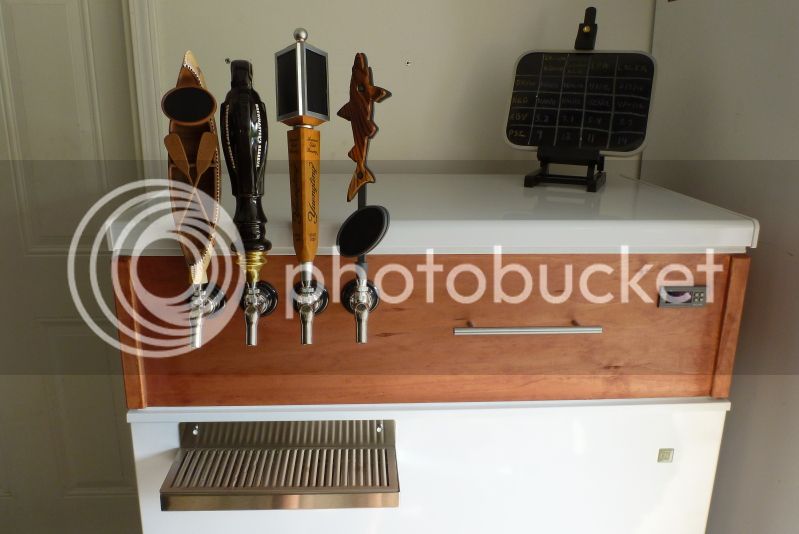
Here's the finished collar. I brought it indoors after a couple days to help it cure at room temp for about a week.

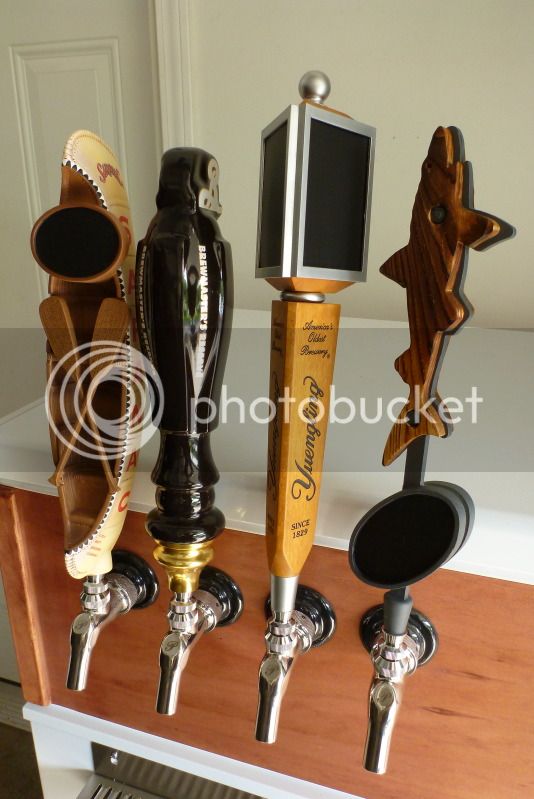
Mapping out where the taps will go
IMG_0277_notes.jpg


Kegs will arrive sometime next week probably. This keezer project has to be back burnered for a little while to take care of more important things. At any rate, I should have this completed no later than 5 weeks time, since by then I should have 2-3 brews already in kegs.

One note about chalkboard paint. I didn't bother looking at an actual HD store for it since I looked online and it said it wasn't available in store. I was in Lowes last week and found Valspar brand for about $15 a quart. It's with their specialty paints area. I later went to HD and thought to check out their similarly placed items (these were next to the sprays behind the cage) and they have Rustoleum brand, which was $10 bucks a quart. AND I BOUGHT 3 at LOWES. AGH... Oh well. I did learn they both carry magnetic paint/undercoating which seems pretty interesting...
 
Hello all,

I am working on this keezer project and have come to a point where i could use a little guidance.

I have my collar built and attached to the lid, but now i need to attach the collar to the freezer body using the stock hinges. Here's where i am getting a little confused...

When I place the collar on top of the freezer and line up the hinges to mark where to drill holes through the collar, i note that the hinges are angled slightly toward the collar in their closed position. It seems if i drill the holes without making some kind of adjustment, when i tighten the bolts to attach the hinge to the collar, they would want to lift up the back end of the collar slightly which could mess up the seal??? i don't know if this makes sense or not, or if this is anything that i need to worry about...

so, in general, my question is -- how did those successful with the project drill holes through the collar for the hinge bolts?

Thanks in advance for any advice! I'd hate to mess something up now...

Jeff
 
The hinges do angle in slightly with nothing attached to them. You will need to make sure they are close to vertical when you mark your collar for drilling the holes. If I remember correctly after I did mine I had to use some of the up and down adjustment allowed by the screws attached to the chest, to get everything right.
 
How about pushing the collar back slightly so that it sits flush on the closed hinge? IF that makes the front not flush - and unacceptable in your opinion then I'd just add some washers as a spacer between the collar and hinge.

Or, just screw it on and see if the small angle affects anything at all. I have a feeling it won't.
 
I just set everything flat like the collar was in the down position then pushed it back so the hinges were straight and marked it. It is ok if the hinges want to over compensate as that will just push the collar down created a good seal with the weather stripping. It can't lift the back up as you suggest because it is fully closed and everything is flush.
 
Thanks all. So it sounds like I tighten the hinges to the freezer body and then push the collar against the hinges until they are flush...then mark the holes...

I appreciate the quick replies!!

Jeff
 
Sorry if this has been covered allready, its a lot to read. Would i be able to put a pin lock keg on the hump along with 4 ball locks on the floor? I intend to put an 8 inch collar on the ge 7.0.
 
Sorry if this has been covered allready, its a lot to read. Would i be able to put a pin lock keg on the hump along with 4 ball locks on the floor? I intend to put an 8 inch collar on the ge 7.0.

with an 8 inch collar no, maybe with a 10". Shouldn't be a problem with a 12"
 
Cheers and thanks for the thread! Finished my keezer build today and got a sixth barrel on tap. Love it. This thread was a great source of ideas and direction
 
Success. I finished my keezer with an eight inch collar. The pin lock does fit on the hump with disconnects on. Very happy with it and thanks to those who blazed a trail for us.
 
I started last fall with my keezer conversion and got the collar on and temp controller hooked up. With that in place I was supposed to start my bar build but that got delayed till January and has been a project that just doesn't get the attention \ funds I would like to give it. (Damn needy kids always wanting to spend their time with me on the weekends)

My collar is only made from 2x4, not requiring to set one on the hump and I wanted it to fit in as part of the counter for the bar.

So anyway, here it is as it stands today:
replaced lid with butcher block as that will match the counter top of my bar on right side and that of the back bar. Also got the single stage controller box built and installed. Love how that looks over the Johnson box.

Keezer.JPG


controller box built in.jpg
 
Thanks for the Love build idea and some tips on the keezer I gleaned from reading on here.

Hopefully I will take the time soon and get a build thread going for my whole bar.

What I am really hung up on and waiting for is mrbowenz to reply to a PM with the specs of his coffin box build that I want to duplicate.

Anyone out there have suggestions they can give me, height to tap? depth of coffin box? space between taps?
 
Finally finished mine off with tap handles and drip tray. I painted over the tap handle labels with chalkboard paint:

P1000586.jpg

P1000592.jpg
 
Finally finished mine off with tap handles and drip tray. I painted over the tap handle labels with chalkboard paint:

P1000586.jpg

P1000592.jpg
Nice work! Did you screw the drip tray directly into the wall as it looks like or did you use magnets? Is it sturdy enough to hold a glass while you fill it up? I want to do a drip tray myself but using magnets just doesn't work for me as it doesn't seem strong enough. I would like to use screws but do not want to screw up my finished project! Any advice?

Also...judging by your pics, did you leave the weather stripping on the lid and then just find some new stripping to apply to the collar? I wish I would have done this. I am finding now that the lid, which is only held on with the standard white silicon used for sealing bathrooms and such, is not holding up well in the extreme heat found in Texas. The garage can get up to 100's and I notice that the lid separated from the collar. I am trying to seal again with silicon but now I am tempted to go and get some liquid nails instead. Any suggestions?

Love this thread!!! and my keezer!
 
ButcherBrew said:
Nice work! Did you screw the drip tray directly into the wall as it looks like or did you use magnets? Is it sturdy enough to hold a glass while you fill it up? I want to do a drip tray myself but using magnets just doesn't work for me as it doesn't seem strong enough. I would like to use screws but do not want to screw up my finished project! Any advice?

Also...judging by your pics, did you leave the weather stripping on the lid and then just find some new stripping to apply to the collar? I wish I would have done this. I am finding now that the lid, which is only held on with the standard white silicon used for sealing bathrooms and such, is not holding up well in the extreme heat found in Texas. The garage can get up t 100's and I notice that the lid separated from the collar. I am trying to seal again with silicon but now I am tempted to go and get some liquid nails instead. Any suggestions?

Love this thread!!! and my keezer!

For the drip tray I did just use screws and it's sturdy, no concerns with it coming off. I got the tray from More Beer and it came with the screws. The screws are up high at the top of the freezer so I don't think there is a concern with the cooling lines. I did however drill pilot holes very carefully just in case.

The lid and collar are hinged, so I did use new weather stripping on the collar. It's self adhesive and I haven't had any issues with it yet, although my garage gets no where as warm as yours.
 
ButcherBrew -
any 100% silicone caulk should hold up in temps up to 400F - so your garage temps aren't what is causing the caulk failure.

You want 100% silicone caulk - if it says "paintable" - you don't want it.
Run a bead under the collar, set it in place, apply a little pressure to spread, and walk away.

166471_300.jpg
 
Thanks for the response guys. I checked and as the pic shows it is 100% silicon. I have had an outdoor fan on for over a week and I just ran my finger along the bead and it left some on my finger... It seems a bit dryer... But still wet. In full disclosure, this is an older tube that I used for the first time maybe 6 months ago but I kept the cap on it. Maybe I need to just start over... Take the lid off... Clean off old silicon, open a new tube and reapply. Scrathin my head on this one.


ForumRunner_20120607_215559.jpg
 
a week and it's not dry??? wow. should be 'skinned over' in 3 or so, solid in 24.
Yep, start with a fresh one.

Yea - hard to believe really....I wonder if it also has to do with the fact that my garage is in the 90's these days....never really drops below 80 at night. I guess I will attempt a re-do.
 
Hi

Silicone does indeed have a "use by" date. Once it gets past that, it's not going to cure very fast (if at all). Most silicone cures when in contact with water vapor. If you put it between two metal plates and squish is thin - no guarantee about the cure.

Bob
 

Latest posts

Back
Top