Jack's Chest Freezer Fermentation Chamber

Homebrew Talk - Beer, Wine, Mead, & Cider Brewing Discussion Forum

Help Support Homebrew Talk - Beer, Wine, Mead, & Cider Brewing Discussion Forum:

This site may earn a commission from merchant affiliate links, including eBay, Amazon, and others.

JackSmith

Well-Known Member
Joined
Jan 14, 2011
Messages
47
Reaction score
8
Location
Pittsburgh
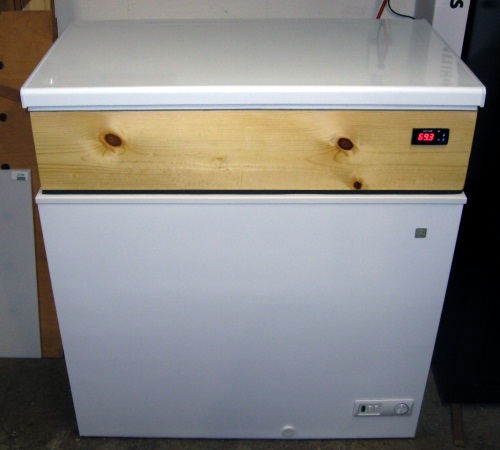
As I attempt to transition from occasional brewer of OK beer to serious brewer of good beer, one of the first things I need to do is get fermentation temperature under control. To that end, I've built a chest-freezer-based fermentation chamber. The design is based on many of the keezers I've seen on this site. It's a simple 7 cubic foot chest freezer with a collar, a Love TSS2-2100, and a space heater.

o1vaB.jpg


Parts:

Tools:

  • Miter Saw
  • Coping Saw
  • Random Orbital Sander
  • Finish Nailer
  • Utility Knife
  • Screwdrivers
  • Wire snip/stripper

I started off by building the collar. It's a simple box with mitered joints. I glued the corners and tacked them together with the finish nailer. While the glue was still wet, I made sure the box was square by measuring the diagonals, then installed the angle brackets. I checked for square once more, then left it overnight so the glue could set up.

The next day I planned where I wanted the Love TSS2-2100 to be mounted on the face, and the receptacle to be mounted on the back. I marked the cuts, then removed the wood by drilling the corners and connecting the dots with a coping saw. A couple coats of polyurethane, and it was time for wiring.

nzxLb.jpg


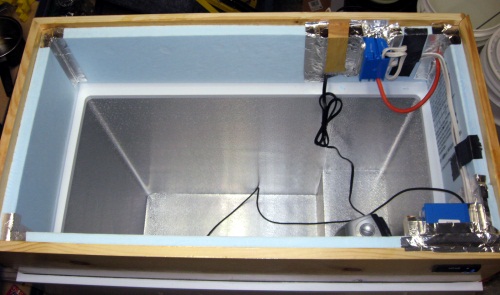
Wiring the Love controller was simple, thanks to all the help I found on this site, especially this diagram. Thanks Boerderij_Kabouter! I chose to wire it up such that it uses a single receptacle, split-wired so that each outlet is switched separately. The upper outlet is for heat, the lower is for cooling:

3ZvEn.jpg


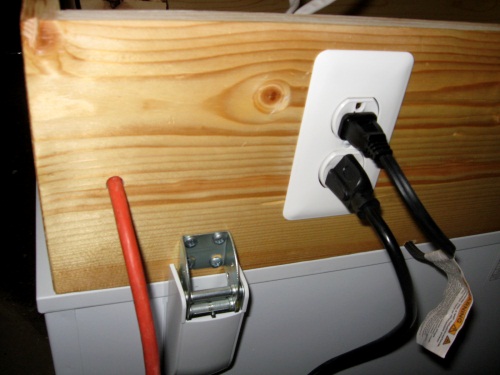
You can see in the picture above that I left the hinges in their factory position and just attached them to the collar. I wanted the collar to lift up when opening the freezer so that I wouldn't have to lift full carboys over it.

With the wiring done, I added some insulation - Blue XPS board cut to fit and stuck to the collar with spray adhesive - then sealed the corners with foil tape. Tyvek tape would be more appropriate for sealing up foam insulation, but I didn't have any on-hand but I did have aluminum duct tape. Then wome weatherstripping on the bottom of the collar and some strong double-sided tape on top for mounting the freezer lid, and it was done.

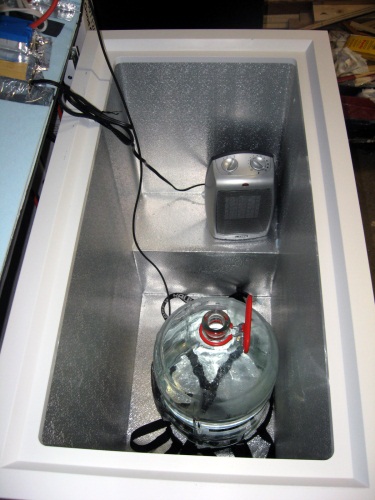
I programmed the Love controller with plenty of help from this board, particularly this post by ClaudiusB. Cheers! I tested it for a day with a carboy full of water. I taped the probe to the carboy under some bubble wrap, set SP1 to 67F, and let it go. After a few hours the carboy temp went from 77F to 67F and was very stable after 12 hours. Now, the freezer's unplugged waiting for next weekend's brew session.

HhCJD.jpg


I know I didn't cover any new ground with this build, but I still wanted to share. If you have any questions, I'll be happy to answer. Thanks for reading!
 
Thanks, kmat. I added your blog to my RSS reader.

I already have a change planned for this build - I need to put together a base on casters so I can wheel it around. To open the lid, it needs to sit about 10" out from the wall, but I'd rather have it closer to the wall when the lid is closed. I don't like dragging it across the floor to move it.
 
I will do something like this eventually as I get more of an understanding of the entire brew process, only done 2 brews to date. Temperature control is so important from what I understand between making okay beer, to great beer.
 
Thanks, kmat. I added your blog to my RSS reader.

I already have a change planned for this build - I need to put together a base on casters so I can wheel it around. To open the lid, it needs to sit about 10" out from the wall, but I'd rather have it closer to the wall when the lid is closed. I don't like dragging it across the floor to move it.

I use the same 7.0 cu ft. GE chest freezer for my keezer and also added a base with casters on it. Much easier to move around when putting kegs in/out.
 
Jack,

I have plans to build one of these in the next 60 days. i currently have a 8.8 ft chest freezer with a collar and digital temp control, with 6-way manifold going to 6 separate taps on the front. when fermenting, i've been using the chiller hump on the inside to place 1 carboy. but while fermenting, i'd set the internal temp to fermenting temps ~65F. obviously you can see the problem, when i try to drink a draft beer and gag. plus i'm building a brutus and will soon be brewing 10-12gal batches (2 carboys worth) and dont have the room for 2. this seems to be the only solution.

for my own knowledge....the only reason i can see the need for the second split to a heater is if you are storing this vessel in a garage/shed/etc, where the winter temps will keep bringing down the internal temp past your desired ferm temps, right? but if i have this vessel in a basement/room that is consistently above ferm temps, wouldn't this not be an issue? i guess i can see the temp controller originally kicking the freezer on full blast to bring down the temp, and may overshoot the ferm temp by a few degrees, making it slightly colder than desired temp, but wouldn't this level out over a day or so? please shed some light.

truthfully, for me to add the heater option would only be what? $20 or so? so i can def add it. just curious is it really makes a deference.

cheers
 
I use 2 chest keezers both with Ranco controlers. In the small one, (1) 15 gallon surplus plastic Iodine bottle fits perfectly to ferment 10 gallon batches in. I use the other which is larger, to prime and cold crash my kegs, prior to going into my mini fridge/kegerator. both are outside on the patio. no need for a heater. I just dump from the keggle, through my 40 plate chiller, right into the fermentation bottle, close the lid, and dial in the ferment temps. works great.
 
Kruuuger,

Yeah, the only reason you would need a heater is if you place the freezer in a location where the ambient temperature is lower than your desired fermentation temperature. If you put it somewhere that never dips below the upper 60's, then you won't need a heat source. I needed a heat source because my basement drops into the upper 50's in the winter.

The point of the heater isn't to bring temps back up after they get too low due to blasting it with cold. That would be inefficient. The temperature controller will take care of hitting the temp you programmed. You can even set it to have a deviation value so that it shuts off when your a degree or two (configurable) above your desired temp to allow for carry-over coolling, if that's what you need.

With my setup, it will likely use heating only in the winter and cooling only in the summer. But in spring and fall it might need one source one week and the other source another week, so I chose to make the system set-it-and-forget-it by having both sources on a two-stage temperature controller.

If you're sure you don't need a heat source, I recommend not adding one. That will save you the cost of the heater and also the cost of a two-stage temperature controller versus a single state one. Also, while the risk is low, the heater does pose a bit of a fire risk. If you don't need it, leave it out.
 
Jack, that looks great! Although, to me it does seem a little overkill for a simple fermentation chamber. But i'm sure with you putting that much effort into a fermenter, you will have one heck of a keezer whenever you do build one.

One question though, it seems as though you are only able to have one carboy in there at a time. Did you look at any larger freezers? I'm looking for one in the 14 cu/ft range in hopes of it housing 2 6.5 gallon carboys at one time.
 
Thanks, Mike. Overkill? Maybe. I looked at all my options - freezer, fridge, dorm fridge, insulated box with a dorm fridge in it, son of fermentation chiller. In the end I felt a keezer worked best for me. I can always convert it to an actual keezer for kegs later if I choose. In addition to fermenting beer, I'll be using it to lager beer and to cold-stabilize wine, too.

I can fit two carboys in there. I've had a 6.5 gallon and 5 gallon side-by-side in the bottom of the chamber. It looks like two 6.5 gallon jobs will be really tight in there and I didn't test it out. (I currently only have two 6.5 gallon carboys and one is full of wine that I don't want to disturb.) If they don't fit, I can just put one on the hump. The collar makes it tall enough for one to sit up there.
 
i didn't mean any offense by the overkill ;). My plan was just to get an old chest, throw the ranco dual controller in there and stick it in the garage and forget about it. I would save the collar and have the nice display for the keezer inside my home.

but that's great about the 2 fermenters, i really need to go measure a 7.2 because from everything i've read on here they seemed too small to house 2 at one time.
 
None taken. Woodworking is another hobby of mine, so I had the scrap pine and the ability to whip up the collar in a half-hour or so. You were right - my keezer build ought to be nice when I get around to it. :D
 
Great build. Thanks for the pictures. I've been eying this exact freezer on Craigslist for awhile now. It hasn't sold and the owner doesn't want to come down on the price. It's listed for $125 which I think is fair being that it is almost brand new. Any idea if two 6 gallon better bottles will fit in the bottom? Also, how wide is the hump?
 
Ed: That's a good point about the light bulb. That would work, too. I considered feeding an E26 light fixture with the second output of the Love controller, but decided against it because I didn't like the idea of shining light on the carboys. I know, I know - incandescent light isn't known to skunk beer, but I figure no light is best. I also considered getting a ceramic reptile heater bulb to plug into the light fixture, but they're pretty expensive. At that point, the heater was cheaper.

Rack04: I don't have any better bottles, but here are the inside dimensions of the chill chamber:

Overall:31 5/8" x 15 3/16
Below the hump: 24 1/16" x 15 3/16
The hump:7 9/16" x 15 3/16

If I want to put one carboy in the lower area and one on the hump, I'll have to build a little bit of support so the one on the hump isn't teetering precariously on the edge.
 
Ed: That's a good point about the light bulb. That would work, too. .

That was my first Fermenteezer. I since moved up to a bigger one. Here you can see I taped the bulb to a jug of water. I leave on 24/7 and let the freezer kick in to maintain temps. Works like a champ.

 
Last edited by a moderator:
Ed, I see in your pic you were fermenting in buckets but any issues with light exposure from the bulb while fermenting in clear containers?
 
Ed, I see in your pic you were fermenting in buckets but any issues with light exposure from the bulb while fermenting in clear containers?

I love my bucket with spigots (no racking canes).

I would not be concerned about a 40 watt incandescent bulb keeping the temps up to snuff. Here's some more info on it and what you can do if you are worrying too much. :D

https://www.homebrewtalk.com/f163/uv-rays-incandescent-bulb-151362/

I have not seen an impact on my beer in buckets. I only use it when the temp in my garage will drop below my set temp.
 
Well...inspired by this project and taking into account the questions/suggestions/recommendations from posters on this thread, attached are some pictures of my project (5.1 cu ft GE freezer)

The only changes made to Jack's original design:

1) Rather than mount an outlet on the back to control 'hot and cold', I ran a pigtail out the back of the collar with a female cord adapter, allowing the the freezer to be plugged directly into it (eliminating a little additional wiring).

2) Rather than using a space heater AND taking into account all of the different suggestions made on this thread, I elected to use an outdoor outlet box with an added light attachment; a 25W red light bulb in the socket works perfectly for increasing temperatures.

3) To address the 'bending over' issues, I built a small platform that allows me to set all carboys at a height level with the compressor hump. I no longer have to reach down to get carboys in and out. As an added bonus, it also allows me to put two (2) 5-gallon carboys in a 5.1 cu ft freezer (which was my real goal).

4) My OCD kicked in (LOL)...and having some some radiant heat barrier left over from a spring time project, I wrapped the insulating foam lining the 'collar' to give it more of a finished look as well as better insulating properties. I also lined the inside top of the freezer lid to give me additional support in holding the lid in place (since I taped the inside corners with silver tape in addition to using 2-sided tape between the collar and the lid seal).

5) I used an inexpensive aquarium thermostat which ran me about $25 on eBay vice the more expensive ones mentioned in this thread. Although it doesn't have as many 'bells and whistles' as the more expensive controllers, I've found that controlling the temperature to within +/- 1 degree F requires the freezer's compressor to run for about 6-7 minutes, followed by about 6-7 minutes of heat from the 25W bulb (rewarm due to the temperature overshoot). Once the temperature reaches the desired setting, it takes about another 90 minutes before the cycle repeats.

6) Still to be completed...adding some casters to roll this bad boy around...but that's a quick add-on.

I wanted to say thanks to Jack for providing pics and guidance on his project...his original posting was an inspiration to get going on this project and create something that looks nice (and can easily sit in my home for all to see). I also wanted to thank everyone else for the constructive comments and additional suggestions...this is a great site with a wealth of information.

IMG_20110903_182443.jpg


IMG_20110906_140150.jpg


IMG_20110903_182507.jpg


IMG_20110906_124018.jpg
 
Awesome build, gclunde. I like how you built the lower floor up to the height of the hump. That's a great idea for fitting two carboys side-by-side. As for thanking me for the inspiration, I can only pass the thanks on to the many on this forum who have done similar projects before me. Pretty much everything I did was copied from other threads on this site. Still, though, glad I could help.

You'll love your new ferm chamber. I have been using mine a lot for both beer and wine; I don't regret building it for a second.

I'm definitely glad I took on the project and spent a little more time doing the 'little extras' that people had mentioned in this thread. I've found that the temperature control seems to be better with having the carboys up off the floor (i.e. not in contact with any portion of the freezer)...I'm sure if I really wanted to do the research, I could come up with all the math that would provide the 'why'...but what fun would that be...lol.

My Kolsch has been fermenting away at 64 degrees F for the past 4 days and I think Saturday will see the addition of a good Irish Stout to the new fermenter...just to see how well it works with two carboys inside :mug: .

Have a great day!
 
My Kolsch has been fermenting away at 64 degrees F for the past 4 days and I think Saturday will see the addition of a good Irish Stout to the new fermenter...just to see how well it works with two carboys inside :mug: .

Were you able to get two carboys into your ferm. freezer? I am seriously considering a 5.1 cu chest freezer (mainly because I can get one new for under 150.00) and do the platform/collar conversion. I have six gallon better bottles and 6.5gal buckets. I'd love to be able to hold 2 batches in fermentation. Not that I do that a whole lot. But I'd love to have that ability whenever I want.
 
I've had no issues getting my 3 gallon and 5 gallon carboys in there (and there is room to put two 5 gallon carboys in at once). I'm not sure about your better bottles as I've never used those before...the 6.5 gallon buckets shouldn't be an issue (as I believe they are the same diameter as the 5-gallon carboys, but you'd want to measure their height with your fermentation lock to ensure everything fits - same with the better bottles).

FWIW, I picked up my G.E. freezer off of Craigslist for $75 (it was 2-years old)...it kept my whole project around the $150 - $175 mark when I figured in all the materials (controller, wiring, plug ends, utility box, etc.). Plus, the changes I made to the original design make my conversion an easy 30-minute transfer to another freezer should the one I have ever stop working.

Good luck with your project. I am definitely glad I took the time to do this project...it was getting old dealing with water baths to keep temps down in the summer and having to heat a closet with a space heater in the winter to keep brewing.
 
Thanks to Jack and all contributors. I know this is an aged post but it is giving me some great idea's. I was given an old Frigidaire chest freezer (lid size ~ 22 x 35), and my Inkbird controller should be here soon. I have self-graduated from doing Mr Beer, extract, partial extract, all grain, to finally attempting a 10 gal. all-grain last fall (turned out decent but seek better). I'm making lots of notes and want to get my process and methods down to more of an art than....not sure how to finish this sentence?

While researching methods to my new found hobby (love), I have of course saved this page for future reference. My endeavor now is to make sure my wort has good oxygenation, fermentation temp in controlled, and eventually, get to keg my beer.

Any and all tips are sincerely appreciated. Happy brewing.

Cheers guys,

Possum
 

Latest posts

Back
Top