Triclamp heater element design

Homebrew Talk - Beer, Wine, Mead, & Cider Brewing Discussion Forum

Help Support Homebrew Talk - Beer, Wine, Mead, & Cider Brewing Discussion Forum:

This site may earn a commission from merchant affiliate links, including eBay, Amazon, and others.
Did you have any problems with the solder running into the threads? How did you prevent that from happening?

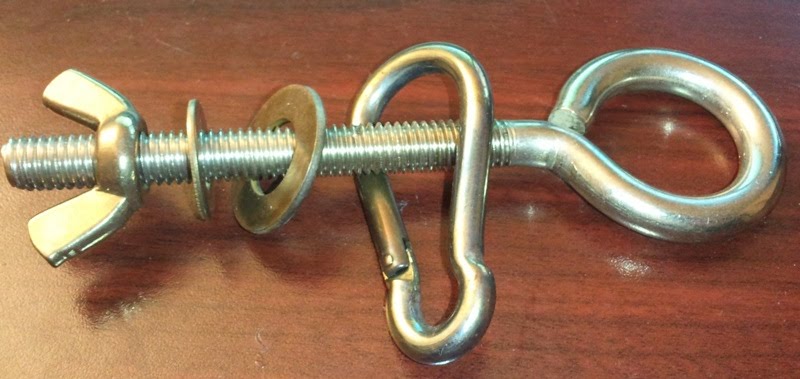
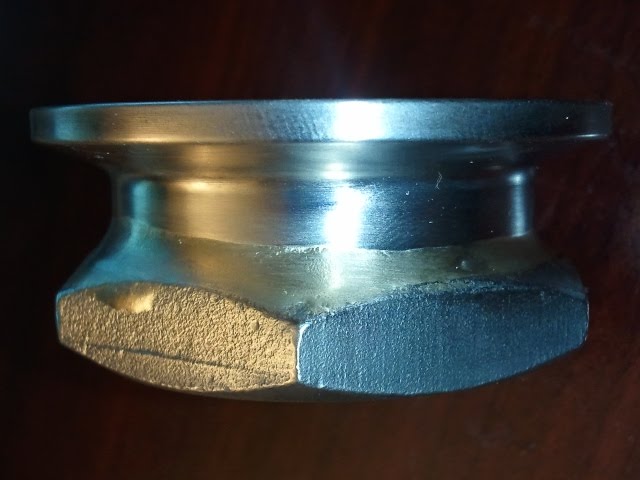
From what I noticed the filler only wicked into the joint. I applied the filler on the outside of the butt joint and after it cooled I notice a small bead around the inside of the butt joint. The small bead on the inside gives me confidence that there is a water-tight seal. Most likely only the joint flowed because it was the only area protected with flux.

For the actual joints I am going to be using on my system I am planning on preheating the two parts in my toaster oven so that I don't have the flame on them as long. I need to perfect my technique because I have a ton of brazing left in my build. Picking up materials tonight to build a jig of sorts for this.
 
ScubaSteve said:
So what did the safety-silv 56 cost ya?

Off the top of my head, it was around $20-30 for 1oz. Stuff is damn expensive. The flux was cheap. Other high silver fillers are similar in price. The low melting point of ss56 is nice.

Although I would love to have a welder, this approach was more appropriate at the moment.
 
Budzu, I saw your post and link to the adapters on St. Pats before you deleted it... I had looked at those before but decided against them due to the NPT rather than straight thread of these locknuts.

Here are a bunch more photos. I strolled through the hardware isle of HD tonight after work and picked up the parts to make a jig for this job.

locknut-brazing-jig.jpg


Made it for about $7, all stainless parts. Could be made for cheaper with zinc plated but I didn't mind the little premium.

locknut-brazing-jig2.jpg


Basically clamps the two parts together so they can be centered easily. I then drilled a matching hole in a 2x4 to insert the jig for hands free brazing.

This time around I soaked the parts, jig and all, in my toaster oven at 450degrees (max setting) for 20 mins. The amount of torching needed to achieve flow was greatly reduced and the parts didn't overheat like last night.

Here is the result after a little buffing:

tri-clamp-locknut2.jpg


And after some finish polishing:

tri-clamp-locknut2-polished.jpg


This has been some good practice and a fun project. Two more of these and it is time to move onto other parts like brazing my triclamp temp probes and actuating my new valves.
 
Dude!!! That looks awesome. I can't wait to see the rest of your build.

Thanks! Don't hold your breath, I have a ton of work left to do. I am working to first convert my BK to electric so I can at least brew extract while the rest of the system is built.
 
I have to hand it to you, I really didn't think you'd be able to solder those parts together without a ton of trouble. Everything looks great, I look forward to seeing the progress on this build. Cheers!
 
I'm just curious why all the trouble to get the element into a TC? I'm generally indifferent to the benefit of using TC in a home brewery so maybe it's just a bias. I can't figure out what benefit you have over say just brazing the 1" locknut right to the kettle.
 
I'm just curious why all the trouble to get the element into a TC? I'm generally indifferent to the benefit of using TC in a home brewery so maybe it's just a bias. I can't figure out what benefit you have over say just brazing the 1" locknut right to the kettle.
__________________

For me, using Tri Clamps just makes the clean up process easier. Undo the clamp, remove element from vessel, take vessel out for cleaning, reassemble.

Don't Tri Clamps have a cool factor too????
 
Bobby_M said:
I'm just curious why all the trouble to get the element into a TC? I'm generally indifferent to the benefit of using TC in a home brewery so maybe it's just a bias. I can't figure out what benefit you have over say just brazing the 1" locknut right to the kettle.

As it has been shown by countless members on this forum (the vast majority actually) triclamps are in no way required to make awesome homebrew. Maybe I am just facinated by them, but it is the design path I have taken with my build. Obviously this isn't the frugal aproach to making beer, but I actually didn't have much trouble at all doing this brazing.
 
Yeah I just bought some 56 today. $$$$. To go a few pages back, is there no danger with having silicon touching the element directly at the base? Seems to me it would fry in short order....
 
Yeah I just bought some 56 today. $$$$. To go a few pages back, is there no danger with having silicon touching the element directly at the base? Seems to me it would fry in short order....

If you have not yet, I would purchase some brazing flux like the stay-silv I used. Normal plumbing flux will not hold up at these high temperatures.

As far as the silicone, I don't really know the answer. I have a couple hopes:
From a generic heating element diagram I saw (can't seem to find it now) it looks like the resistive wire doesn't start right at the fitting, there are a couple of metal wires that connect to the contact lugs and extend a bit into the actual element. These were referred to as cold spears or something. Makes sense as you wouldn't want the heat conducted to the wiring lugs. So I am hoping that the base of element will be cooler than the rest of it.

Second, a thin layer of silicone right at the base of the fitting shouldn't be too much of a thermal insulator, I am hoping it won't heat up above the limits of the silicone.
 
Makes sense about the cold spears. Not planning on doing this - just an observation. I've been using Lucas Handy Flux which is pretty much the same thing. You can use borax too.
 
Update:

I had time this weekend to cut into a virgin keg and begin transforming it into either my BK or my HLT (identical right now).

I brazed a 1-1/2" ferrule onto the side of the keg near the bottom to mount the heating element.

Triclamp-Keg.jpg


Used the same jig as before with the locknut.

Triclamp-Keg-Jig.jpg


Brazing went well and the ferrule is strongly joined with the keg. I still need to polish it up a bit.

Here is a shot of the whole assembly:

_TriclampElementAssembly1.jpg


And everything put together.
_TriclampElementAssembly2.jpg


I will be doing a leak test as soon as the silicone around the threads cures.
 
That is a nice set up I was thinking of doing the same thing.
I was going to use a different element and just drill two holes in a try clover cap here is the element I will use 4KW Hairpin I just have to figure out how to cover the terminals to make it safe.

Dave
Burrning Barn Brewing
 
@davidstar - I'm gonna guess this is not ultra-low watt design which may be of concern (scorching an/or over-carmelization) in your BK ... HLT would be fine

@theflyingbeer - i love stay brite -- nice work.
 
Thanks all. One of these days I might start a "build" thread. My spare bedroom in the basement is packed full of boxes with parts and components. The UPS/FedEx/USPS guys are swinging by my house with packages nearly every day.

I am currently building up my power control box so I can brew a couple of extracts this weekend using electricity!
 
Nice brazing!
I'm gonna try it!
I know, off topic a bit..
I have some SafetySilv 1200, from my refer tech days.
It's 56% silver, lead free, but safe for brewing?
I can make some nice joints with it, but don't want to grow a third eye!:D

Update;
Harris says that the safety Silv 1200 is the same as 56.
1200, refers to the melting temp. They now list based on silver content.
1200 is food safe also..
 

Everytime I think I have a unique idea I find it was already done on these boards! Man you guys are creative. So my question if I may bring to life this thread for a bit, looking at the 3rd attachment, shows the back side of the box and what looks like an NPT to Triclamp fitting, what is connecting that to the box? I have the element screwed into the 1" hole in the back of the same box, but the threads don't extend long enough to screw into the fitting. Maybe the element u are using has longer threads. Basically, what am I missing?
 
FlyingBeer,

Can you confirm that a 1.5" ferrule is enough space for a 5500W RIPP element? Or do you need to go 2"? Thanks!
 
Can you confirm that a 1.5" ferrule is enough space for a 5500W RIPP element? Or do you need to go 2"? Thanks!

A 1.5" ferrule will have some issues with a 5500W RIPP. I am now going to use a 4500W folded element for my BK and a 5500W folded element for my HLT. Purchased them both at Home Depot (Camco 02922 and 02932).

Below is an image of what to expect with a 1.5" ferrule and a RIPP element. The elements can be bent so that the conflict doesn't occur.

RIPP_Element.PNG
 
Are they ULWD or do you expect scorching in your BK? Those ripple elements don't seem to bend easily
 
Are they ULWD or do you expect scorching in your BK? Those ripple elements don't seem to bend easily

The 5500W is this: Camco-02933

The 4500W is this: Camco 4500W

Both are ULWD. I am assuming that the 4500W that I am using for the BK is not AS low a density as the RIPP elements but it shouldn't be any issue.
 
Last edited by a moderator:
I'm experiencing the same issue with the Camco 4500W. When I test fit them, the end of the element (after the fold, closest to the threads) comes into contact with the ferrule. Should I worry about the element having contact with the ferrule during use?
 
Mine hit the ferrule in the keg, doesn't seem to matter. I bent them a little to try to minimize it.

elements.jpg
 
SV, where did you get those tri clamp assemblies? Looks like a basic spool coupler with a NPT adapter for the cord and NPS for the element, but what is the third clamp attached to? Thanks for the info!
 
A 1.5" ferrule will have some issues with a 5500W RIPP. I am now going to use a 4500W folded element for my BK and a 5500W folded element for my HLT. Purchased them both at Home Depot (Camco 02922 and 02932).

Below is an image of what to expect with a 1.5" ferrule and a RIPP element. The elements can be bent so that the conflict doesn't occur.

RIPP_Element.PNG

Additionally, a 1.5" tri clamp ferrule has an I.D. of 1.37" As long as the ferrule is short enough (less than 1.5" deep) you should have a problem with the 5500W RIPP element
 
SV, where did you get those tri clamp assemblies? Looks like a basic spool coupler with a NPT adapter for the cord and NPS for the element, but what is the third clamp attached to? Thanks for the info!

I made them. They actually are very similar to kevink(?)s

Its a short 1.5 ferrule welded to a nut welded to a cap, then two ferrules welded together and another cap. The 1.5" tc mates to the ferrule welded to the keg. Way overkill, but it looks cool and makes cleanup very easy.
 
I made them. They actually are very similar to kevink(?)s

Its a short 1.5 ferrule welded to a nut welded to a cap, then two ferrules welded together and another cap. The 1.5" tc mates to the ferrule welded to the keg. Way overkill, but it looks cool and makes cleanup very easy.

Nice, man!

I don't think that's overkill at all. It's really nice knowing that there's no possibility of water getting on your element connections. It's the only way to go, in my opinion.
 
Hmm, ok so I get the welded lock nut caps, but I still can't picture how the cap that attaches to the keg ferrule is attached to rest of the assembly. If it is welded, what to? Is there any chance you could snap a picture with the clamps removed. I am trying to come up with a tri based design as well, but that is the one part that is tripping me up. Thanks for the help!
 
Back
Top