Fellow Brewers,
Bottom Line Up Front: Here is a CPVC Manifold design option that I have not found anywhere else for a frequently used cooler for mash tuns: the Coleman 70 Quart Extreme Cooler. (Purchased Online [LHBS does not stock them] for approximately ~$40.00)
First, this manifold was primarily inspired by the Homebrewtalk wiki:
https://www.homebrewtalk.com/wiki/index.php/Converting_a_cooler_to_a_mash_tun
And manifold construction virtues contained in Palmer's "How to Brew".
I will try to post pictures for the first time, below:
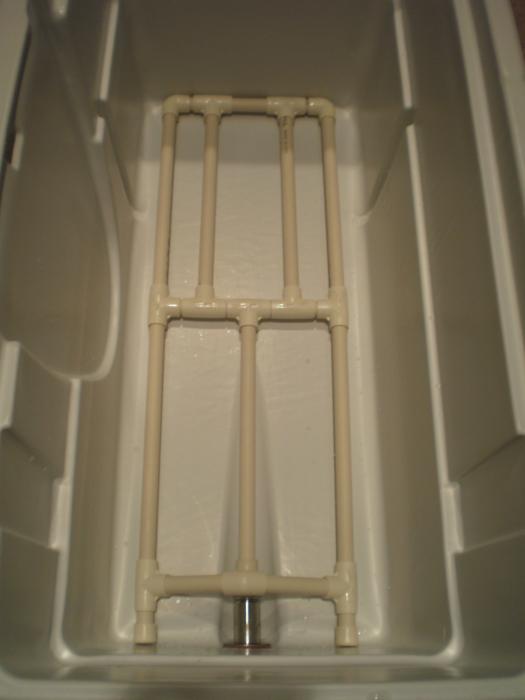
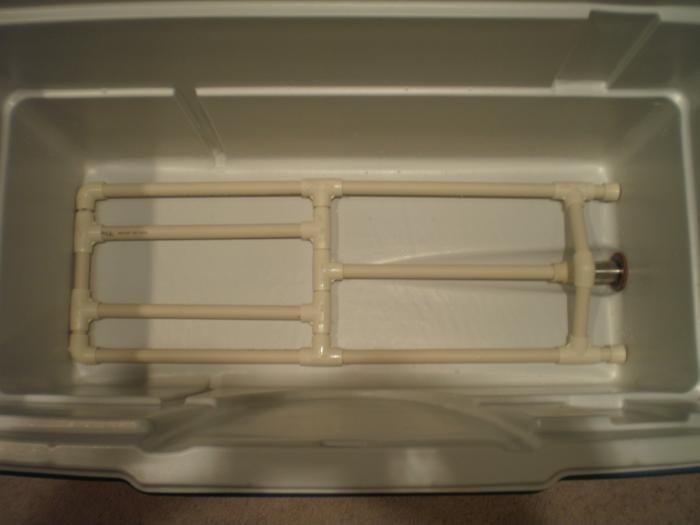
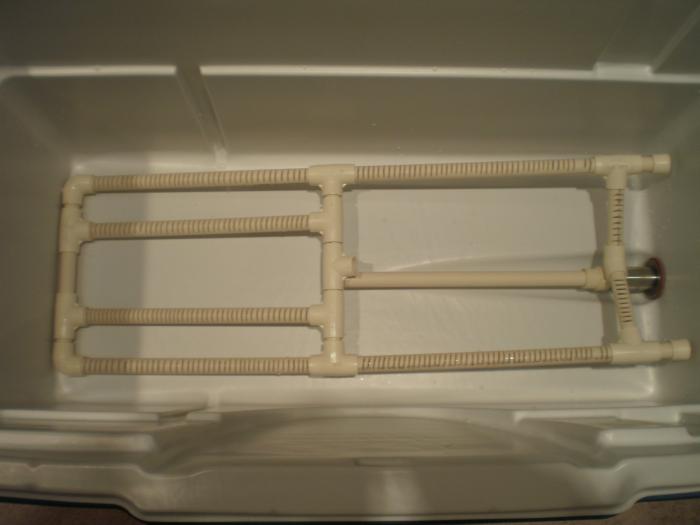
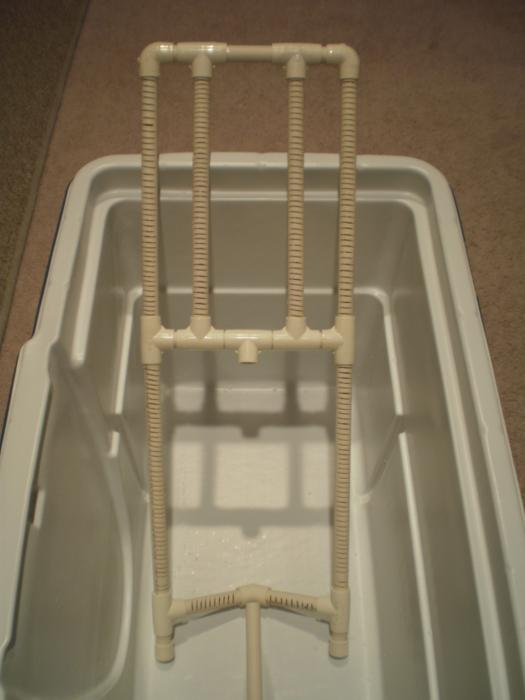
Two photos of the top of the manifold (while attached to the sump tube) should accompany this post, along with two photos of the underside of the manifold (one flipped over, and the other propped against the cooler's sidewall).
This Manifold consists of the following:
-1x 10'x1/2" CPVC line
-9x 1/2" CPVC "T" fittings
-2x 1/2" CPVC 90 degree elbow fittings
-2x 1/2" CPVC end caps
-1x 1/2" CPVC 45 degree elbow fitting
-1x 1/2" CPVC to 1" Stainless MPT Fitting
-1x 1" Stainless 2xFPT Coupler
-1x Weldless Stainless bulkhead fitting with Stainless Ball valve (not in pictures)
-1x Stainless MPT to barb fitting of your choice (not in pictures)
As can be seen in the two underside photos, I slotted the longitudinal portions of the manifold with a Dremel plastic cutting disc. This was fast and easy. (I also used this disk to cut and finish the ends of the CPVC line sections). I also slotted the raised elbow portion that goes over the bulkhead adapter/extension.
The CPVC is not glued (now) I am going to brew with this mash tun and manifold for the first time this Saturday. This will tell me more how necessary gluing (or should I say, "welding with solvent") is. As of right now, the manifold fits lengthwise down the cooler with tension between both ends. (One can see the slotless manifold extension butts on the bulkhead end of the cooler- these were added, replacing 90 degree elbows, because the sump tube alone was not providing enough tension to hold the manifold rigidly enough together, and this also provided insured sidewall standoff for the slotted transverse piece on the bulkhead end.)
One may see that I tried to adhere to Palmer's direction, and not place slotted manifold tubes directly against the cooler walls, so as to avoid channeling of my wort and lower efficiency. As it is now, in order to have as many longitudinal pieces as I do, I was not able to provide more distance from the long cooler walls, so I realize that this (my design) may not be completely ideal. However, there is about an inch or 1.5" between the long slotted lines and the sidewalls, and this design did not require modification of the store-purchased joint fittings. In addition to trying to achieve some sidewall standoff, I also tried to achieve engineering optimization in this design. I toyed with the idea of more than one crossbar in the center of this manifold design. However, I noted that many of those "multiple-crossbar" designs tended to isolate one half of the manifold effectively from the sump tube entry point. This mad me opt for the design depicted. In all cases, wort entering the manifold only will have to travel (primarily) longitudinally for less than half of the total cooler length prior to entereng the manifold sump (exit) tube. There are no complicated (crosswise/crossover) routes for any of the wort to take from any wort entry point to the manifold.
If I forget other aspects motivating elements of this manifold design, I will note them in proceeding posts.
In addition, I will gladly entertain any questions that any may have about this manifold.
Wish me luck for my mash this weekend- It'll be a first "full go" test of this tun and manifold design.
Prost!


