Weldless brew stand.

Homebrew Talk - Beer, Wine, Mead, & Cider Brewing Discussion Forum

Help Support Homebrew Talk - Beer, Wine, Mead, & Cider Brewing Discussion Forum:

This site may earn a commission from merchant affiliate links, including eBay, Amazon, and others.
Excellent build!

That's pretty similar to mine (in construction materials, anyway):
http://www.lancedrolet.com/?p=7
But I didn't want to shell out for the pumps, so mine is a 3 tier...

Hey, that's pretty cool. I specifically wanted the pumps due to mobility issues and difficulty with ladders, but that's a neat gravity system.
 
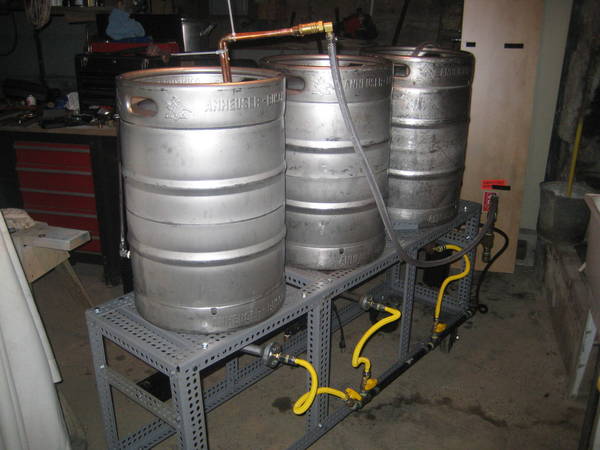
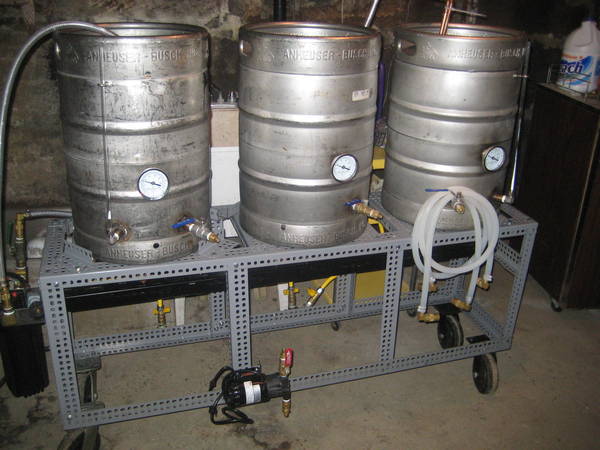
Here are a couple of pics of what I got accomplished today.

_DSC0004new.jpg


_DSC0007new.jpg


_DSC0008new.jpg


_DSC0010new.jpg


_DSC0011new.jpg
 
Hey, Ox.
I was looking in Lowes this week at the various parts available.
Do you have a parts breakdown on what you used?

For additional stability I may lay a piece of plywood or fiberboard screwed in accross the bottom as a shelf for offline storage and to help drop the center of gravity a bit.
 
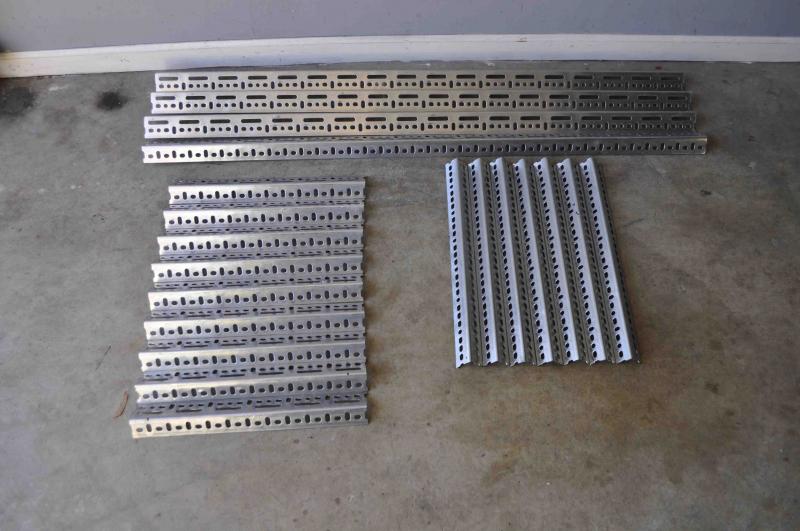
I looked locally as well and couldn't find what I needed, so I ended up getting everything from McMaster Carr. I got the framing, nuts/bolts, and the corner pieces from them. It was cheaper than anything i could find locally, parts arrived the next day with $11 shipping...not bad. Granted I am two hours away from their warehouse in Atlanta. I ended up getting (5) 6 foot pieces of 2 1/4 x 1 1/2 and (1) 3 foot section. Also got (2) 6 foot pieces of 1 1/2 x 1 1/2 pieces and (1) 3 foot section.
 
I can't wait to build one of these too! Thanks guys for posting all your hard work and ingenuity!
 
Yeah I am not sure what I am going to do with the bottom yet...I need to see how I am going to do the gas plumbing as to whether I will build a shelf/bottom or not. I need to order my burners, etc and get those mounted as well.
 
Hey, that's pretty cool. I specifically wanted the pumps due to mobility issues and difficulty with ladders, but that's a neat gravity system.

Mine's actually quite mobile. Of course, you can't move it when the tanks are full, but that's kind of the point of only having wheels on one side. The weight of the tanks provides stability. And ladders aren't required. There's a fill valve on the bottom of the HLT with a quick-hose-disconnect. I'll probably pick up a couple of pumps anyway though. It'd be nice to be able to control the rate of flow through the chiller a little better.
 
What length hoses do you guys use? By my calculations, 4 foot sections should work well. Just wanted to see what y'all recommend before I purchase the tubing.

Thanks
 
Here's mine guys. I have a couple sessions in with it and it has performed well. I was a little concerned about the top horizonal peices bending under heat and weight, so I doubled up in those areas. I think it may have been overkill but the cost was minimal. If I go electric this year as planned, I will probably paint it up real nice.


101010_004.JPG


101010_003.JPG
 
The pruduct I used is made by Republic Storage in Canton and is called "Metal Lumber". It is a product sold by the company I work for and we use a large metal cutter similar to a set for bolt cutters. Basically you put the piece in the cutter and snap it off. Works very nicely.
 
What length hoses do you guys use? By my calculations, 4 foot sections should work well. Just wanted to see what y'all recommend before I purchase the tubing.

Thanks

As short as conveniently possible. Buy the hose in one piece and cut it to the desired length.
 
Mine's actually quite mobile. Of course, you can't move it when the tanks are full, but that's kind of the point of only having wheels on one side. The weight of the tanks provides stability. And ladders aren't required. There's a fill valve on the bottom of the HLT with a quick-hose-disconnect. I'll probably pick up a couple of pumps anyway though. It'd be nice to be able to control the rate of flow through the chiller a little better.

I meant my mobility. I have no business on ladders.
 
Nice! I really like how you have the gas installed on the back. Do you find that it works well or not being in the back?
 
Quick question for Strongbad52's build. Did you have to purchase any extra parts to add the mounting for your pumps? I also noticed you had an additional vertical support in the back.

Cheers,
Brad
 
Miscue - No, I didn't purchase any more materiel to add the mounting bracket for the pumps. I used the Wallace build pictures as a guide when I built mine. I used the 2-1/4 x 1-1/2" for the frame of the stand. Basically the two long rectangles that are connected by the legs are cut from the bigger pieces of steel. Below is how I cut the 2-1/4x1-1/2" steel; if you are careful you will have one 6' length left over.

|____________ 52"____|___16.5"_____|
----------------------------------------- x 4
|__16.5__|__16.5__|__16.5__|__16.5__|
----------------------------------------- x 1
|______________72"__________________|
----------------------------------------- x 1

I cut the 1-1/2 x 1-1/2 steel like below. The fifth one is used as a support on the back side of the frame. the other four are used as the legs of the frame.
|___21____|___21____|___21____|
-------------------------------------
|___21____|___21____|
-------------------------------------

This left over angle let me cut 3 more 21" pieces from the 2-1/4x1-1/2" to use as a pump mount. you can see it on post #89 of the thread on the last two pictures. I also reinforced the pump mount with more scrap leftover from the build. I will post pictures later today, my two year old needs her breakfast.:)

I hope this helps. If you have any more questions just shoot me a pm.

Jabin
 
Here are a few pics of the reinforcing of the pump mount. I found it was a little wobbly when I bolted down the pumps, so I used some bits of 2-1/4x1-1/2 angle to reinforce each end and a 16.5" piece of 1-1/2x1-1/2 to support the middle. I mounted the waterproof switch box on another couple scrap pieces of 2-1/4x1-1/2 that i bent to about 45 degrees with a pair of channel locks.

http://i722.photobucket.com/albums/ww229/Strongbad_can/DSCN0520.jpg

http://i722.photobucket.com/albums/ww229/Strongbad_can/DSCN0526.jpg

hope this helps somebody.

Jabin

I like how you mounted these, and I really like the switch box... are you going to put a drip shield over the top of those pumps??? I like it!

:mug:
 
Here are a few pics of the reinforcing of the pump mount. I found it was a little wobbly when I bolted down the pumps, so I used some bits of 2-1/4x1-1/2 angle to reinforce each end and a 16.5" piece of 1-1/2x1-1/2 to support the middle. I mounted the waterproof switch box on another couple scrap pieces of 2-1/4x1-1/2 that i bent to about 45 degrees with a pair of channel locks.

http://i722.photobucket.com/albums/ww229/Strongbad_can/DSCN0520.jpg

http://i722.photobucket.com/albums/ww229/Strongbad_can/DSCN0526.jpg

hope this helps somebody.

Jabin

Awesome!
 
Thanks guys, I'm glad people like the changes I have made. Yeah the pump shrouds and propane lines are next. I'll keep updating as I go. I put beads of silicone caulk on both sides of the foam insert on the electrical box and where the power cords go into the box just as a little insurance. I would rather over engineer rather than under engineer.
 
Thanks guys, I'm glad people like the changes I have made. Yeah the pump shrouds and propane lines are next. I'll keep updating as I go. I put beads of silicone caulk on both sides of the foam insert on the electrical box and where the power cords go into the box just as a little insurance. I would rather over engineer rather than under engineer.

Where did you get that switch box if you don't mind my asking...

:tank:
 
Got it at Home Depot. They had that one, which fits a metal box and another one with red switches. The one w/red switches fits a plastic box so I figured that since it was going to be relatively close to a propane burner that would be lit for sustained periods metal was the way to go. The box, switch face and power cord clamps cost around $12-13 total. I just drilled through the back of the box to bolt it to the bent angle iron and sealed it w/silicone caulk.
 
Just finished building my frame, made the cuts this weekend and assembled it tonight. Looks really good, I used strongbad's pump design as well, looks and feels very sturdy. Thanks again strongbad for your help! Will post some pics in the next few days to update my progess.
 
Awesome Guys. Yeah thanks Strong for keeping us updated. Should be getting my parts in the next week or so. Then it's off to the build.

Cheers,
Brad
 
I haven't ordered my burners yet but I did notice that with strongbads pump modification it appears that the burner mounting differs from the original wallace plans. It appears that the metal used for the stand is used as the mounting brackets for the burners in the original wallace plans. I like strongbads pump design and I think I am going to have to order another piece of slotted steel for the mount as seen on the second to last pic on the wallace site. So if you want to do the pump modification I think you may have to order another piece of steel, does this sound right Strongbad or am I missing something here?
 
No, you don't have to order any more steel as long as you used the below list to order your stuff from McMaster. I used 5 lengths of the 2-1/4" X 1-1/2" to make the frame and kettle supports on the top of the frame. I cut 5-21" lengths from the 1-1/2" X 1-1/2" for the legs of the stand. This left me with a 6' length of 2-1/4" X 1-1/2" which I used to make the pump mount. I cut it into 3 21" lengths for the pump mount.

Just make sure to keep any scrap pieces, they come in handy for mounting the electrical box and reinforcing the pump mount.

2 each 8968K26 1-1/2" X 1-1/2", 6’ length
6 each 4664T65 2-1/4" X 1-1/2", 6’ length
16 each 4664T22 Steel Corner Plate, 6"x 6"
2 pack 4664T61 Bolts W/nuts & Washers
 
What kind of burners have people been using on their builds? Im leaning towards the 100,000 btu burners from agrisupply.com for 29.99 a piece, however I noticed there are 210,000 btu burners on NB for 40 a piece. 210,000 btu seems like it maybe overkill but for an extra 30 bucks it may be worth it. Any thoughts on this matter?
 
What kind of burners have people been using on their builds? Im leaning towards the 100,000 btu burners from agrisupply.com for 29.99 a piece, however I noticed there are 210,000 btu burners on NB for 40 a piece. 210,000 btu seems like it maybe overkill but for an extra 30 bucks it may be worth it. Any thoughts on this matter?

I ordered the 210's from NB...should be here in the next couple of days.
 
well, I've brewed twice on this and the stability didnt seem like an issue. I made sure the wheels were locked and pointing outward in all directions. Works as advertised. Love it!
I havent permentaly added the burners to it. I just took the 2 turkey fryer burners and unscrewed them from the frame. I liked the whind shild on the burners so I didnt remove them.
 
I have what is probably a ridiculous question, and I have utilized the search option but was unable to find a clear answer so I thought I would go ahead and post the question at the potential cost of being ridiculed for not doing my due diligence......Anyway, I am planning on ordering the BG 14 burners from www.agrisupply.com; Do the burners come with any additional equipment (e.g. the airsupply plate and necessary connection equipment) or do I need to pick that up separately? Thanks in advance for the info!
 
I have what is probably a ridiculous question, and I have utilized the search option but was unable to find a clear answer so I thought I would go ahead and post the question at the potential cost of being ridiculed for not doing my due diligence......Anyway, I am planning on ordering the BG 14 burners from www.agrisupply.com; Do the burners come with any additional equipment (e.g. the airsupply plate and necessary connection equipment) or do I need to pick that up separately? Thanks in advance for the info!

I got these exact burners for Xmas and I am in the process of building this exact brew rig. The burners came with the plates and the flow orifices installed. You will need 3/8" female flare fitting to connect to these orifices. I ordered short lengths of HIGH PRESSURE propane line... one end has this 3/8" female flare, and the other has 3/8" NPT.

The picture doesn't show the orifice, and I was surprised that they came with the burners.

Hope this helps!

Cheers! :mug:
 
Back
Top