element cover

Homebrew Talk - Beer, Wine, Mead, & Cider Brewing Discussion Forum

Help Support Homebrew Talk - Beer, Wine, Mead, & Cider Brewing Discussion Forum:

This site may earn a commission from merchant affiliate links, including eBay, Amazon, and others.

McCuckerson

Well-Known Member
Joined
Sep 10, 2008
Messages
657
Reaction score
13
Location
Zebulon
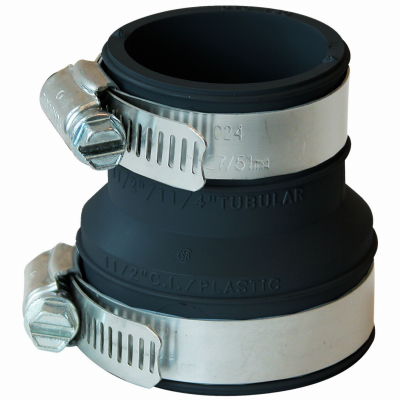
What do you think of this method?

ForumRunner_20111119_135445.jpg
 
Looks almost identical to mine. Not water tight, but it covers the screw terminals,is splash resistant, and makes it easy to change the element out after it dry fires.
 
This is just a 1" PVC cap (sch 40) with a 3/4" hole drilled into it. Next force thread the conduit grip into the hole. Reuse the black ring that comes with the elmt and Viola.


ForumRunner_20111119_165252.jpg
 
skinny said:
Looks almost identical to mine. Not water tight, but it covers the screw terminals,is splash resistant, and makes it easy to change the element out after it dry fires.

This exactly why I did it. Dry fired Monday and brew day was over. All that potting for nothing :)
 
Yooper said:
I assume that you had a problem with "report this post" vs. reply (possibly on a smart phone), and all is ok in this thread?

Yes yooper, sorry! smartphone and sausage fingers are a bad combination LOL
 
Here it is installed on hlt. Ground/TC is in the background. 10 gal of amber planned for 2night; wish me luck.

ForumRunner_20111119_182052.jpg
 
stevehaun said:
What holds the pvc cap onto the element? Unless I am missing something, your approach does not seem to provide much strain relief.

The conduit grip is threaded into the cap. The cap bottoms out on the element hex and the grip is clamped to the cord. Its not rigid like when potting the adapter method, but its not flimsy either. I just think the electrical box method is overkill, and potting is a pain. Cheers
 
Bobby_M said:
A smear of silicone caulk would make it waterproof enough.

Yep, I might do that next. I really was concerned with providing insulation from the contacts rather than waterproofing. I actually bumped into my 120v element during a test run once. It "tickled" and scared the hell out of me.
 
What holds the pvc cap onto the element? Unless I am missing something, your approach does not seem to provide much strain relief.

I don't understand it either. Does the PVC cap friction fit to the back of the element. Your previous explanation doesn't address it.
 
pickles said:
I don't understand it either. Does the PVC cap friction fit to the back of the element. Your previous explanation doesn't address it.

The cap is held to the hex on the element by the clamp on the cord. The cap cannot go closer to the hex and it cannot move up the cord. It is jammed between the hex and the clamp. It worked really well. It can be easily disassembled when I dry fire the element again.
 
thanks for the idea. I'm planing to get a 25 gal pot for 15 gal batches and this looks easier than my electrical box on my 15 gal kettle. With some silicone your cap will be ideal.
 
pickles said:
Oh of course the cord grip holds it on, I had a brain fart!
Sweet, that's how I felt when I thought of it. I said jeesh I could just do this.... The Guy at Lowes asked what I was doing with that stuff anyway. Being in the Bible Belt I said: uh.. nothin....
 
I did copy you...but I added a screw in the side that I tightened until it provided enough friction to hold the cap from moving at all.
Nice neat idea...thank you for it.
 
Ding the light goes on.

I guess you could always run a wire down to the bottom collar and put a bolt though it for a ground.
 
ShakerD said:
Ding the light goes on.

I guess you could always run a wire down to the bottom collar and put a bolt though it for a ground.

Yepper, that's all I did...
 
kklowell said:
I did copy you...but I added a screw in the side that I tightened until it provided enough friction to hold the cap from moving at all.
Nice neat idea...thank you for it.

No worries, glad to help. I live for the K.I.S.S. approach. Good idea to add a screw.
 
This looks pretty clever. So that's a 3/4" conduit nipple on one side and a wire clamp on the other, right? Can it be found at lowes/HD?

From the sound of it the nut that threads onto the conduit nipple is not needed since the nipple itself bottoms out the element base, right?

It looks like a very elegant solution and I believe I will be using this when I install my next element. Thanks.
 
Back
Top