
benthegrate
Active Member
I just converted a fridge into a curing chamber for meat and cheese, and I used an STC-1000, which saved me about $50 off the conventional plug-and-play kegerator conversion thermostats. However, I used the direct-wire method, rather than wiring up a whole bunch of outlets, to save on cost and time.
I'm sharing this wiring diagram, because most of the wiring diagrams I've seen for the STC-1000 utilize outlets (an extra element of confusion for a beginner), and including the heating element, which really isn't needed for a kegerator or fermentation chamber setup. I'm also including programming instructions, because the instructions that ship with the unit are unintelligible.
Please note that if you decide to do this type of wiring, you do so at your own risk. You need to obey all local electrical codes.
You will need to buy or re-purpose a power cord to power the unit. The cord needs to be able to handle enough current to power the fridge, so dont use a lamp cord! If you use a grounded power cord, you can connect the fridges green or bare copper grounding wire to the green or bare copper grounding wire of the power cord, effectively grounding the fridge, which is an absolute requirement. If your fridge cord is long enough, you can simply patch the STC-1000 right into the run of the cord. (You will still need some extra pieces of insulated wire to complete the wiring.)
First off, cut the plug off the refrigerators power cord and strip off the insulation from the hot, neutral, and ground wires.
Some basic electrical knowledge here for those of you who are unfamiliar. A typical power cord contains a hot wire that carries the current to the device a neutral wire that returns the current to the outlet, thus completing the circuit and a ground wire that carries away dangerous electricity if there is a wiring failure inside the device, so that you dont get shocked when you touch it.
The hot wire is always black. The neutral wire is usually white but if theres no white wire, the neutral wire will be indicated by writing, markings, or ribbing along the cords insulation, so look or feel closely to determine which wire is the neutral wire. The ground wire is either bare copper or green.
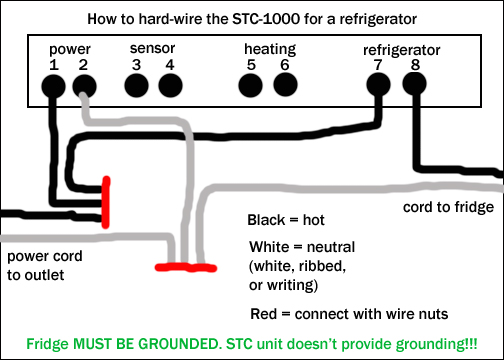
So the hot wire from your power cord needs to be spliced to two other short bits of black wire (called pigtails) that run to slots 1 and 7 on the STC-1000 unit. Tape these wires together around the insulated part with electrical tape, and connect them securely with a properly-sized wire nut. The neutral wire from your power cord (white, ribbed, or writing/markings on the insulation) needs to be spliced to a pigtail that runs to slot 2, and to the neutral wire on the fridges power cord. The hot wire on the fridge power cord needs to run to slot 8 on the unit. (The neutral wire on the fridge power cord has already been connected to the neutral wire from the main power cord, along with a pigtail to slot 2.) Connect the ground wire from the fridge cord to the ground wire of the power cord with a wire nut, and now the fridge is grounded.
Plug in the STC-1000 to power it up. Press and hold the S key for 3 seconds to enter the setting mode. The first item that displays is F1, which is the temperature setting. The unit is in Celsius, so youll have to do a quick conversion. (Google does this for you if you type in this format: "65F in C") To set the temp, press and hold the S key while pressing the up or down arrow until you reach the temperature that you want your chamber to remain. Then press the power button once quickly to save the setting. (The setting will remain even if your power goes out it only resets to the default setting if you manually reset the device.) The other settings dont need to be modified unless you have problems later. (F2 is the Difference value which tells the fridge when to turn on after the temperature rises a specific number of degrees above your setting. The default setting is half a degree Celsius, which is fine as it is for most applications. F3 is the Compressor delay time which gives the fridges compressor a result, because you dont want it cycling on and off every 30 seconds. The default setting is 3 minutes, which is fine. F4 is the Temperature calibration value which is used if you discover your device isnt accurate and you need to adjust it. To switch between these values in the setting mode, press the S key multiple times until you arrive at the feature you need to change. If, at any time during the setting process, you dont press a key for 10 seconds, the device forgets what youve done and returns to its operation mode. Dont forget to press the power button once quickly to save your settings.)
Make sure to attach the temperature probe to slots 3 and 4 on the unit. Then run the sensor probe into your fridge and make sure its not touching the walls, the racks, anything solid. Now the STC-1000 unit will keep your fridge in whatever temperature range you need for the application!
Industrial strength velcro is a great way to attach the STC-1000 to the side of your fridge to keep it out of the way.
Please note that the first time you power up and program your STC-1000, it may take it several minutes to begin the first cooling cycle, so don't freak out if the fridge doesn't come on immediately. It needs a few minutes!
I'm sharing this wiring diagram, because most of the wiring diagrams I've seen for the STC-1000 utilize outlets (an extra element of confusion for a beginner), and including the heating element, which really isn't needed for a kegerator or fermentation chamber setup. I'm also including programming instructions, because the instructions that ship with the unit are unintelligible.
Please note that if you decide to do this type of wiring, you do so at your own risk. You need to obey all local electrical codes.
You will need to buy or re-purpose a power cord to power the unit. The cord needs to be able to handle enough current to power the fridge, so dont use a lamp cord! If you use a grounded power cord, you can connect the fridges green or bare copper grounding wire to the green or bare copper grounding wire of the power cord, effectively grounding the fridge, which is an absolute requirement. If your fridge cord is long enough, you can simply patch the STC-1000 right into the run of the cord. (You will still need some extra pieces of insulated wire to complete the wiring.)
First off, cut the plug off the refrigerators power cord and strip off the insulation from the hot, neutral, and ground wires.
Some basic electrical knowledge here for those of you who are unfamiliar. A typical power cord contains a hot wire that carries the current to the device a neutral wire that returns the current to the outlet, thus completing the circuit and a ground wire that carries away dangerous electricity if there is a wiring failure inside the device, so that you dont get shocked when you touch it.
The hot wire is always black. The neutral wire is usually white but if theres no white wire, the neutral wire will be indicated by writing, markings, or ribbing along the cords insulation, so look or feel closely to determine which wire is the neutral wire. The ground wire is either bare copper or green.
So the hot wire from your power cord needs to be spliced to two other short bits of black wire (called pigtails) that run to slots 1 and 7 on the STC-1000 unit. Tape these wires together around the insulated part with electrical tape, and connect them securely with a properly-sized wire nut. The neutral wire from your power cord (white, ribbed, or writing/markings on the insulation) needs to be spliced to a pigtail that runs to slot 2, and to the neutral wire on the fridges power cord. The hot wire on the fridge power cord needs to run to slot 8 on the unit. (The neutral wire on the fridge power cord has already been connected to the neutral wire from the main power cord, along with a pigtail to slot 2.) Connect the ground wire from the fridge cord to the ground wire of the power cord with a wire nut, and now the fridge is grounded.
Plug in the STC-1000 to power it up. Press and hold the S key for 3 seconds to enter the setting mode. The first item that displays is F1, which is the temperature setting. The unit is in Celsius, so youll have to do a quick conversion. (Google does this for you if you type in this format: "65F in C") To set the temp, press and hold the S key while pressing the up or down arrow until you reach the temperature that you want your chamber to remain. Then press the power button once quickly to save the setting. (The setting will remain even if your power goes out it only resets to the default setting if you manually reset the device.) The other settings dont need to be modified unless you have problems later. (F2 is the Difference value which tells the fridge when to turn on after the temperature rises a specific number of degrees above your setting. The default setting is half a degree Celsius, which is fine as it is for most applications. F3 is the Compressor delay time which gives the fridges compressor a result, because you dont want it cycling on and off every 30 seconds. The default setting is 3 minutes, which is fine. F4 is the Temperature calibration value which is used if you discover your device isnt accurate and you need to adjust it. To switch between these values in the setting mode, press the S key multiple times until you arrive at the feature you need to change. If, at any time during the setting process, you dont press a key for 10 seconds, the device forgets what youve done and returns to its operation mode. Dont forget to press the power button once quickly to save your settings.)
Make sure to attach the temperature probe to slots 3 and 4 on the unit. Then run the sensor probe into your fridge and make sure its not touching the walls, the racks, anything solid. Now the STC-1000 unit will keep your fridge in whatever temperature range you need for the application!
Industrial strength velcro is a great way to attach the STC-1000 to the side of your fridge to keep it out of the way.
Please note that the first time you power up and program your STC-1000, it may take it several minutes to begin the first cooling cycle, so don't freak out if the fridge doesn't come on immediately. It needs a few minutes!


