I give you THE BEAST

Homebrew Talk - Beer, Wine, Mead, & Cider Brewing Discussion Forum

Help Support Homebrew Talk - Beer, Wine, Mead, & Cider Brewing Discussion Forum:

This site may earn a commission from merchant affiliate links, including eBay, Amazon, and others.
Very cool setup, looks great. Is there only the one hole in the tubing attached to the MLT lid, or are there more that I can't see? Does that tube ever clog up on you during vorlauf?
 
Very cool setup, looks great. Is there only the one hole in the tubing attached to the MLT lid, or are there more that I can't see? Does that tube ever clog up on you during vorlauf?

I actually have two lid set ups each with different hole diameters/quantities.

The first lid I use for HERMS recirculation and it has four holes all 1/8" diameter. I learned with smaller holes, the initial grain passing through the false bottom peforated stainless plate would clog up the holes if they were too small.

The second lid is for sparging and has many small holes all 1/16" and pointed in multiple directions to disperse water evenly across the grain surface.
 
AZredneck,

First off beautiful set-up. I am very intrigued to steal/borrow ideas from your build.
I have a couple of questions regarding the use of rigid tubing:
1) have you been satisfied with your ability to keep the system intact and re-circ for cleaning purposes, or do you feel compelled to tear it apart? How often?
2) I would, as you suggested use 1/2" tubing, but have you had difficulty priming the pump? Did you add a place for bubbles in the line to escape?
3) I am a little confused by some of your piping runs. I do see you must use gravity for some transfers. In particular, there appears to be a line that leaves the BK and goes into the bottom of the counterflow chiller. Can you please explain what is really happening there?
4) Any improvements or changes you would make based on your experience brewing with it?

Thanks!

-Half-wheel-hell
 
I appreciate the complements! I posted my ideas hoping they might evolve into something better with the homebrew world.

1) have you been satisfied with your ability to keep the system intact and re-circ for cleaning purposes, or do you feel compelled to tear it apart? How often?
  • I have cranked out a bunch of brews and so far have been very happy with how clean it stays. I have pulled a line or two on occasion and I think they are cleaner now than the day I started it up. While the wort is cooling, I start heating the HLT back up to circulate all hot clean water to clean out all tubing after wort transfer to the fermenting carboy. No time lost and leaves it squeaky clean for the next batch.
2) I would, as you suggested use 1/2" tubing, but have you had difficulty priming the pump? Did you add a place for bubbles in the line to escape?
  • I placed the pump at the lowest point in the system so it can gravity feed and purge the pump. Opening a valve at the end of the run forces fluid through it too.
3) I am a little confused by some of your piping runs. I do see you must use gravity for some transfers. In particular, there appears to be a line that leaves the BK and goes into the bottom of the counterflow chiller. Can you please explain what is really happening there?
  • If I am understanding the question, the line is the intake side from the BK going to the chiller to the pump and routing back to the upper line of the BK returning cooled wort.
4) Any improvements or changes you would make based on your experience brewing with it?
  • The big one I have changed since first posting and resulted in massive improvement besides bigger burners is a sight glass on the mash tun. A sight glass makes it so much easier during sparging. Install a stainless steel mesh body paint strainer like you find in the Home Depot high pressure paint gun/tool display on the inside of the mash tun and your grain won't plug up the sight tube.
 
AZ Redneck,

OK, so back to your response to question 3. Do you do multiple passes through your counterflow chiller?

Or let me simplify: What is happening with the two hard plumbed valves/lines on the BK? Can you walk me through it please?

I'm glad to hear it works well and is easy to clean, because I think I'm ready to ditch the silicone tubing and just flip valves!

Thanks for your responses.
-Half-wheel-hell
 
[russian accent]You give me the beast? Good then, I accept your gracious offer. When can you deliver?[/russian accent]

Seriously, though... looking great! Nice system.
 
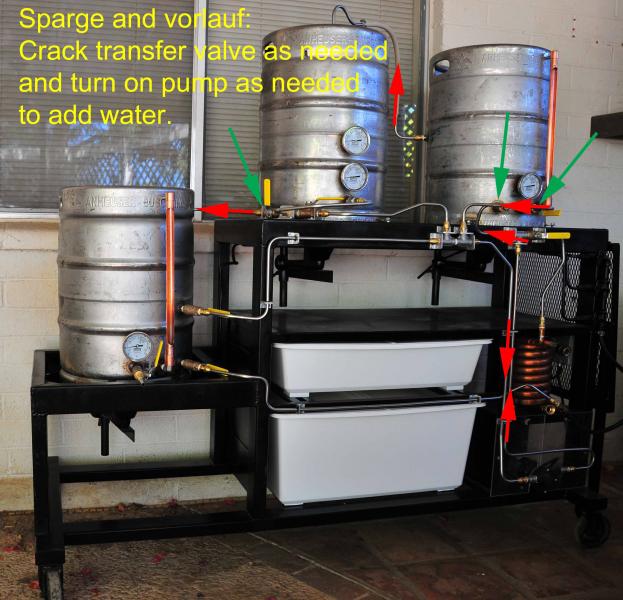
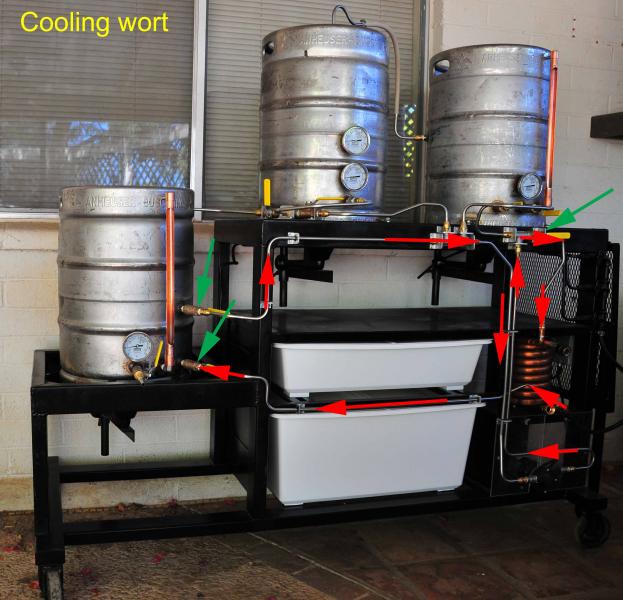
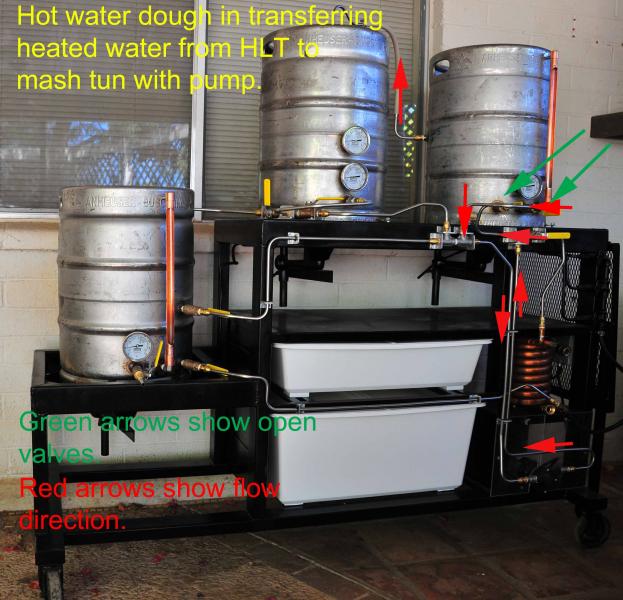
There are eight valves total and all are standard ball valves. I suppose I could have used a three way in a couple places. I bought a bunch of ball valves for cheap and it seemed to make sense at the time.

So maybe these pics can help... I divided them up from kind of start to finish. You can easily feather the valves from a drip to wide open and the pump makes it all work like a dream. I could not imagine doing this any other way since building this. Also easy to forget how much time I dumped into it to build too after the first batch!

dough in hot water copy.jpg


Heat Exchanged Recirculating Mash System.jpg


Sparge and vorlauf.jpg


cooling wort.jpg
 
Az Red,

Thanks for the diagrams. I now see that you must circulate your wort through the counterflow until the temp readings are satisfactory, my guess is this is due to the nice warm groundwater you have in AZ. Next the wort is drawn off via gravity to your fermenter, via the valve without hard plumbing! Mystery solved. I am surprised that you haven't had any issue with pumping/flowing (sort of) uphill there, as I would guess your fill line on the BK would be about even with the horizontal piece of line heading to the pump. Again excellent work, and thank for sharing your design in greater detail with me.

-Half-wheel-hell
 
Nice job !!
I just picked up a pump & am considering hard piping similar to you'res .
How do you mantain mash temps with the herms without an automated burner on you're HLT ?
 
Okay so after studying all of the pictures carefully, I've finally wrapped my mind around how your system is plumbed, valved, and operational. That really is a very functional yet simplistic design, but I do have a few questions before I call you a genius! It appears that with the placement of valves and using a lot of the tubing for multiple purposes, you get a lot of mixing of different fluids and such. Has this affected your numbers at all? (Gravity, pH, etc?) Also, Do you have any issues priming the pump during any stage of the brew day, especially when draining the brew kettle and going into the chiller? Overall great design either way, great job man!
 
jdd12364,
The temps change slow enough that they are pretty easy to maintain. You will learn the pump needs to be shut off before the temp is right where you want it as there is a little stratification of temps in the grain while pumping. The top will get hotter than the bottom and will average out after the pump is shut off. That is why I added two thermometers.
 
Millaj92,

There is very little volume stored in the tubing at anytime and about the only stuff that ever mixes is simple water and wort from the stage you are working at the time. The counterflow cooler has a little more volume but thats like a cup of water at most. No noticeable impact for five to fifteen gallons of brew.

The pump is easy to prime since you always have water in the HLT. Crack open the boil kettle valve and it will bleed a few drops of water right through the pump and wallah! Primed....

I did learn the hard way on brew day that hops are great at plugging up tubing. The hop strainer I made solved every problem they could cause.
 
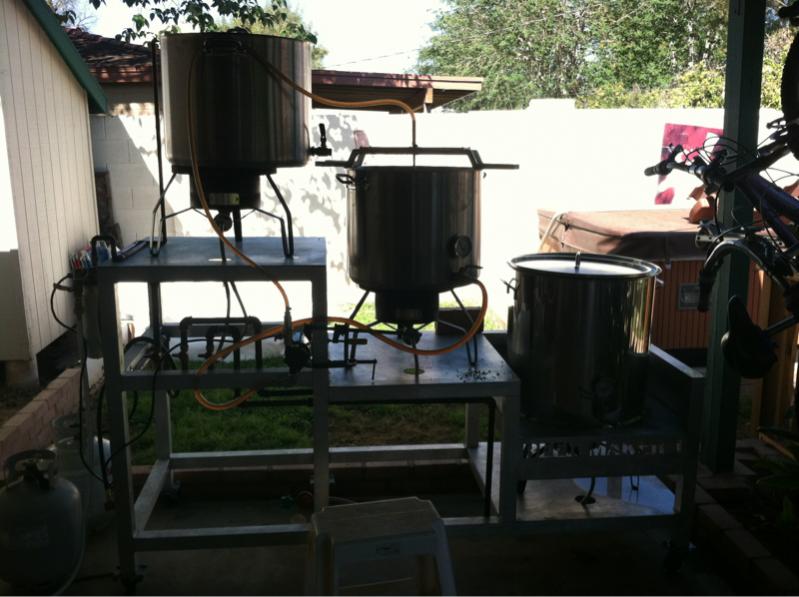
So here is what my wife now refers to as the other woman after a lot of time invested from design to fabrication. I could not have done this without this forum and hope some of my ideas can be useful for you.

Lessons learned:

  • Stainless tubing has to be bent and flared with higher end tools. Not the junk you buy from an auto parts supplier. They are worth buying if you like to fabricate too.


What bender and flare tool would you recommend?
 
AZ,
Dude!!!! That is absolutely freakin awesome. I went back and re-read the things you said you would change and looked closely at all of the pics and that is a sweet well thought out and engineered set up. Have you considered any automation to improve consistency or yeild? A really nice keyboard with scrolling temps and PID's would be really easy to add and provide you with a means to control some additional parameters in your procedure. If I wasnt already nearly done building my three tier I would copy a great deal of your excelent design...And great worksmanship and attention to fine details. Thanks for the great pics, bro...
Wheelchair Bob
 
What bender and flare tool would you recommend?
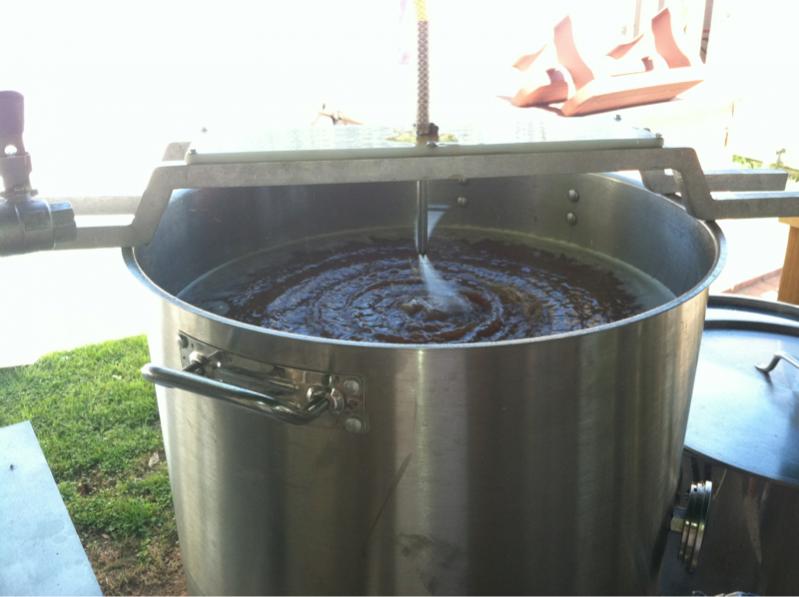
I use a Snap on Brake line flare tool to get the double fold SAE flares. The Snap on kit was not cheap, but it does a great job on single, and double flares in std and metric lines to 13 MM. Glad I bought it when I was an auto mech by trade.
Wheelchair Bob
 
calebstringer said:
What bender and flare tool would you recommend?

I bought a bender made by Imperial and it worked well. I believe Ridgid just came out with a new tube bender series that works well with stainless. There are a few more benders out there that are all good quality. They usually note if they can bend stainless tubing and beware of the cheapies. They are guaranteed to turn your pricey new tube into scrap metal even if they say they can bend stainless.
 
How is the rig holding up to a few years of use? I built a gravity setup a few years back and am upgrading constantly, but want to build a new setup with hard lines and pumps.
What regulator do you use to run all your burners with 1 tank, I have to use 2 tanks with high pressure regs to run all 3 at once.
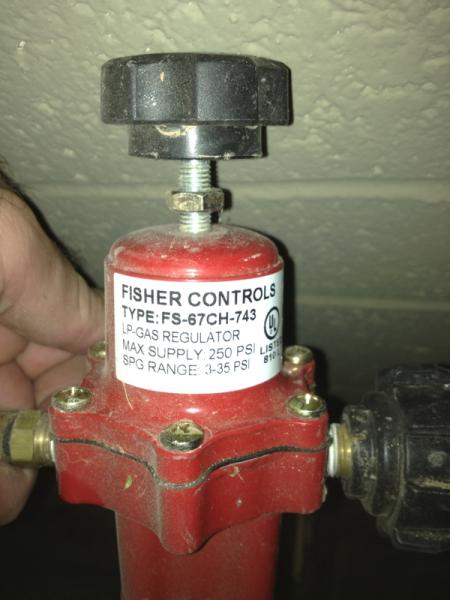
image-2556051791.jpg


image-638279954.jpg
 
johnclark said:
How is the rig holding up to a few years of use? I built a gravity setup a few years back and am upgrading constantly, but want to build a new setup with hard lines and pumps.
What regulator do you use to run all your burners with 1 tank, I have to use 2 tanks with high pressure regs to run all 3 at once.

So far I only had to clean out the pump impeller. Looked like a piece of plastic made it in there...

Besides that and a few modifications, everything has been flawless! Great beer and getting faster every time.

The regulator I am using can fire up all of my big ass burners with no problems at the same time. Find a propane vendor that has parts for everything beyond bbq's and turkey fryers. I attached a couple pics in case you can find it on the Internet. I found an adjustable regulator that pumps out far more gas than I can use. I am thinking you can save your money on adding the gauge as I am not sure I have ever used it. Your real gauge is flame height anyway

image-3655294719.jpg


image-230147995.jpg
 
Freaking Awesome! Don't ever advertise brew day at your house on here. People will be flying in.

Nice! :cross:
 
skadalajara said:
AZRedNeck:
Awesome setup.

Also, did you go by the name "D00d" in a previous life, by any chance? Your avatar looks familiar to me for some reason.

Nope. Just that one. Playing with a machine gun in that pic
 
Im starting my brew rig tomorrow... very excited. Since everything is hard piped, how do you go about cleaning your vessels? What gauge metal did you use?
 
Back
Top