Simple SSVR-controlled e-BIAB rig

Homebrew Talk - Beer, Wine, Mead, & Cider Brewing Discussion Forum

Help Support Homebrew Talk - Beer, Wine, Mead, & Cider Brewing Discussion Forum:

This site may earn a commission from merchant affiliate links, including eBay, Amazon, and others.
I really like the design of your build and am planning on a set up similar to yours. Is there anything you would do differently if you were to start over besides the 40 amp SSVR?
I was also thinking of using reflectix instead of the keg skin.
 
I really like the design of your build and am planning on a set up similar to yours. Is there anything you would do differently if you were to start over besides the 40 amp SSVR?
I was also thinking of using reflectix instead of the keg skin.

I've only got two brews under my belt on this system, and while it all works, there are a few things that could be improved upon.

I *really* like the contoller - it's simple, compact, and it works well. The only minor thing is the non-linearity of the response to the potentiometer - it's really sensitive at the low end, making it a bit fiddly to dial in a specific output. Not a big deal at all, but worth noting.

One other thing about my controller - when I built it, I hadn't yet figured out how to mount it, and I guess I was thinking it would probably just lay on the brew stand next to the keggle. I oriented the heat sink with the fins front-to-back; now that I have the controller mounted upright, the orientation of the heatsink fins is suboptimal. And it does get hot when running at full power - not enough to burn on contact, but hot enough to where I can't just leave my hand on it indefinitely. Maybe a 40A SSVR wouldn't have to work as hard and would give off less heat?

The KegSkin looks cool and it must help, but I'd be lying if I said that the keggle will hold mash temp without any additional insulation. Today I brewed a Stone Levitation clone. BIABacus said that I should strike 163.4F to mash at 157F. I doughed in at 165F (after carefully stirring and making damned sure the temperature of the strike water was consistent throughout) and by the time I was done stirring, it settled at 158F. During the 30 minute mash, the temperature dropped 4 degrees, and as it went from 157 to 156 I applied a little heat (2 amps) for the duration (probably the last 15 minutes or so). The temperature bottomed out at 154, then rose back to 155 right before the end of the mash. I'm hoping I can find a low heat setting that just replaces the heat that is dissipating through the KegSkin, but I'm not there yet. Next time, I'll try to hit my mash temp exactly, then immediately set the heat to 2 or 2.5A and see how it works.

I may add (or switch to) Reflectix at some point, but I really like being able to remove the KegSkin for cleaning/storage.

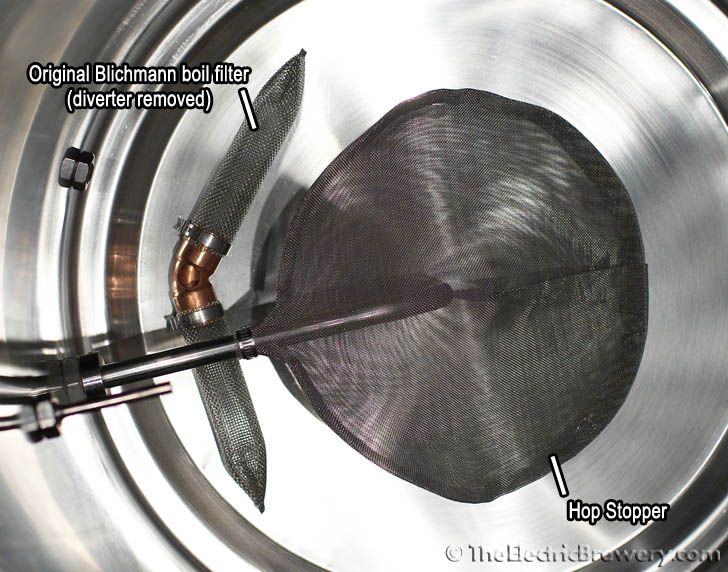
Finally, I still need to work out a better trub filter. I used a hop bag today and that helped A LOT, but by the time I had run 5gal of hot wort into my no-chill corny keg it was running pretty slow. I still needed to collect some wort for my yeast starter; what I should have done was just let it trickle into my starter flask, but I got impatient and dislodged the filter (as I did last time) and was rewarded with 2 liters of trub. I let it settle and eventually was able to pour off 500ml of relatively clean wort for the starter, but it would have been much nicer to have a trub filter that could handle the load.

On the positive side: it works, it heats liquid very quickly, dialing in a rolling boil takes about a second, cleanup is a breeze, and pretty much everything can be stored in the keggle (I don't store the controller that way, but bet I could).
 
Awesome controller setup I live by the K.I.S.S. theory. I would like to use a similar setup to control boil rate only my question is does the rheostat turn the element off at it's lowest setting or is that why you used a contactor?
 
Awesome controller setup I live by the K.I.S.S. theory. I would like to use a similar setup to control boil rate only my question is does the rheostat turn the element off at it's lowest setting or is that why you used a contactor?

I used a contactor because when the power is off (i.e., the button is in its normally open position) I wanted there to be no power to the rest of the system. I've read that SSRs can sometimes fail "on", and assume the same is true of SSVRs.

Interesting question, though, about whether the element is really 100% "off" with the rheostat at its lowest setting. I'll check next time I brew, probably in the next few days - the ammeter should provide the answer, though I guess a better measurement would be to use a multimeter on the output cable connector.
 
I may add (or switch to) Reflectix at some point, but I really like being able to remove the KegSkin for cleaning/storage.

Reflectix has worked very well for my 15-gal EBIAB kettle. I use two layers around my kettle and secure them with a small tab of duct-tape so that they are easy to remove and rinse. Reflectix is rated to 180 F if I remember correctly, but I have had no issues leaving it on during the boil. I have a pad of Reflectix under my kettle and also made a cover for the pot lid. I lose about 2 deg F during a 1 hr mash without having the element on.
 
Reflectix has worked very well for my 15-gal EBIAB kettle. I use two layers around my kettle and secure them with a small tab of duct-tape so that they are easy to remove and rinse. Reflectix is rated to 180 F if I remember correctly, but I have had no issues leaving it on during the boil. I have a pad of Reflectix under my kettle and also made a cover for the pot lid. I lose about 2 deg F during a 1 hr mash without having the element on.

Does your Reflectix wrap tightly around your kettle or did you somehow fashion it so that there is an air gap between the kettle and the Reflectix? I'm asking because the Reflectix web site seems to indicate that an air gap is necessary.

To insulate a water heater, for example, they recommend making three narrow (2in wide?) bands of double-wrapped Reflectix and positioning them at the top, bottom, and middle of the tank and then wrapping the main layer of Reflectix around those bands. Did you do anything like that?
 
I'm guessing most guys don't use an air gap but if they did I'd be willing to bet the heat loss is even less.

I might have to do it. Maybe. ..
 
It's easier to simply make two tight wraps around your kettle than to try to fashion an air gap with a tight seal at the top that doesn't let the hot air out. The outside of the double-wrapped reflectix is warm to the touch but not hot during a vigorous boil. I can boil 12 gal with my 5,500W element at 70% power with the insulation.

I've also been using Reflectix jackets on my fermenters to keep in heat from the lizzard heating pad they sit on during fermentations in my cold basement. The stuff is incredibly useful and easy to work with.
 
Following this thread, and me and a friend of mine are both building similar rigs. I plan on using engine compartment insulation recommended on some other threads instead of the Reflectix.

I just got the remaining components from the parts list for Xmas, I'll have to see if I can take some pics along the way, I plan on incorporating Pogden's lessons learned (40a, heatsink orientation, etc.).

Thanks so much for a great thread!

I'm glad it has been useful - please don't hesitate to post (or PM) any questions you might have along the way.

One thing that worked out really well was the way I mounted the controller box to the brew stand. I wanted it to be upright (and out of the way of any spilled liquid), but it took me a while to figure out how to accomplish that in a simple, inexpensive, and easy-to-disassemble way. I ended up using a cheap 24" aluminum bar clamp ($9 from HF) and a couple of sliding door locks from HD ($3 each). I removed the pins and spring retainers from the door locks and attached them to the back of the Cantex enclosure using nuts and bolts I had laying around. I then drilled holes through the end of the bar clamp to accept the lock pins. To set it up, I just tighten the bar clamp upside down on my brew stand, then hold the controller in place against the bar, align the holes and insert the pins. It's perfect - here's a pic.
controller_mount-61377.jpg
 
Funny I was just at HD looking for those bracket / door locks - couldn't find them. I already had the HF bar clamp for other projects. What are they called exactly?

One other thing I did have to get was a slightly larger junction box (8 x 8 x 4) at HD ($23). The heatsink for the 40a SSVR from Auber is just an inch too long for the Centex box on the parts list. I might add something with the extra room.

I'll definitely PM with questions - I'll start crimping tonight!
 
Funny I was just at HD looking for those bracket / door locks - couldn't find them. I already had the HF bar clamp for other projects. What are they called exactly?

At my HD they are in one of the hardware isles, where they have all of the parts to repair patio doors. You can find them on Amazon as well - search for "sliding door lock push/pull". I've seen them branded by Slide-co, Prime-Line and CR Laurence.

One other thing I did have to get was a slightly larger junction box (8 x 8 x 4) at HD ($23). The heatsink for the 40a SSVR from Auber is just an inch too long for the Centex box on the parts list. I might add something with the extra room.

Extra space is not a bad thing. Even with a pretty darned simple build the 6 x 6 box is a bit crowded inside. You could add a PID, in case you want to try that, but that would require another SSR and an input receptacle for the temperature probe - might not fit. How about a switched 120V receptacle? It would be handy if you ever decided you wanted a pump of some sort or better yet, a mash stirrer (something I've thought about but would REALLY like to avoid as it somewhat violates my prime directive of simplicity).

I'll definitely PM with questions - I'll start crimping tonight!

Excellent - have fun!
 
Ok, crimping away - filing down the pvc control box cutouts took me longer than I anticipated, but looks good so far (see attached).

Following the diagram, did you use 14 gauge wire for the connections between the potentiometer and the ssvr? The diagram indicates a medium gauge, but the photos look more like 10 gauge all around. Since I have solder that connection to the dial, it would be easier to use the lighter gauge, but it doesn't look like you went that route?

WP_20140101_001.jpg
 
Ok, crimping away - filing down the pvc control box cutouts took me longer than I anticipated, but looks good so far (see attached).

Following the diagram, did you use 14 gauge wire for the connections between the potentiometer and the ssvr? The diagram indicates a medium gauge, but the photos look more like 10 gauge all around. Since I have solder that connection to the dial, it would be easier to use the lighter gauge, but it doesn't look like you went that route?

Hey, that's coming along nicely! Well done on the meter cutout.

All three wires from the pot are 14 gauge. I see what you mean about it looking like heavier gauge in the photos (probably just distortion due to cell phone camera), but it's not.
 
Back in posts 5, 7 and 9 Passedpawn and I discussed briefly the non-linearity of the response of the SSVR to the position of the potentiometer. Last brew day I took some pictures of the controller with the pot set at increasing positions (0, 10, 20, ... 80) so I could see the relationship with SSVR output as registered on the amp meter. Google was nice enough to stitch those together into a little animation:

ssvr_response_animated-61785.gif


I plotted the dial position (0..80) against volts and amps, below. As you can see, the response of the SSVR is actually very linear *except* at the very low (0-10) and high (70-80) ends of the dial.

ssvr_response_charted-61787.jpg
 
I've purchased the above ssrv for a similar build and have yet to install it. I will report back when I do
 
acarr160 said:
Pogden, where did you get your panel mount meter?

From China! Search eBay for something like "240v ac digital LCD amp volt meter". Mine cost ~$12 shipped, arrived in less than 10 days, IIRC.
 
augiedoggy said:
I came across this yesterday which says its rated for 40a..... I currently use a pid with manual control so have no use for it but figured I'd mention it for you "analog" guys out there.....
My dads the same way.. still bitches about the remote control and how he misses the knobs on the TV... I understand.

They have 75a ones for $22 too.

http://www.ebay.com/itm/140553987088?ssPageName=STRK:MEWAX:IT&_trksid=p3984.m1438.l2649&afsrc=1

I almost went with that same one, but the Information page for that part on the Kyotto web site contains the following note. I wasn't sure I cared about complying with the "EMC Directive", but then I noticed Auber had an SSVR that didn't seem to need anything additional. Based on their reputation on HBT, I went that route. I suspect the Kyotto part would work fine and not cause any problems with the electromagnetic compliance police, but I am not an expert in that area.

Attention:
In order to be in compliance with the EMC
Directive an additional X2 capacitor at the
output is requried if the SSR is operated as
single component. In case the SSR is
incorporated in an appliance the existing
EMI filter may provide the required EMI
suppresion. The X2 capacitor must be
placed as close as possible to the output
temminats. See also above.

http://www.kyotto.com/eng_KR20.htm

It would have worked fine. X caps (and Y caps) are used for electrical noise suppression. They are not necessary at all for you. If you were designing a medical device and you cared about avoiding conducted noise on the power line, you'd need them.
 
One thing about e-BIAB that concerns me is maintaining temperature during mash. Using a PID is an obvious solution but it seems that it works best with circulation, which introduces another problem: how to prevent the bag full grain from getting sucked down onto the hot element. This seems to be a problem for some guys and not for others, but I was sort of hoping to avoid it altogether by preventing as much heat loss as possible by insulating the keggle with a KegSkin.

Help me understand. Are folks getting away with their voile bags coming into contact with an ulwd element?
 
Help me understand. Are folks getting away with their voile bags coming into contact with an ulwd element?

Yeah, they are. Search in this sub for ebiab. There are a tonne of people without any scorching of the bag. That said, I think the basket on the Bayou Classic is a handy touch. I don't see how people don't get stratification issues even with some recirculation though.
 
Geesh. I almost didn't ask bc it seems obvious that the bag would scorch and melt. I've not seen one of these elements in action yet, so.... I love the idea of not having to use a basket.
 
I don't use a basket, and during my first couple of brews my bag was almost certainly resting on the element (with no evidence of scorching). So far, my approach has been to leave the power on low (~2A / 10%, maybe a bit more), and at this low level it doesn't seem to do any harm at all. However ... there have been times when the temperature still fell below where I wanted it, so I increased the heat to 40-50%, and when I did that I tried to lift the bag a bit to keep it off the element. At this level of power, I can hear the element (like you can hear a pot of water on the stove as it starts heating up). I imagine that some bubbles are forming (steam) which has the potential to create an air pocket underneath the bag, which I think needs to be avoided.

I've done a few things differently in my last two brew days that have minimized (though not eliminated) the need to apply some heat during the mash:
  1. As the kettle reaches strike temperature, stir it REALLY well until it stabilizes. I had ASSumed that convection would tend to ensure that the water termperature was consistent, but this is definitely not the case. If I give it good stir once the strike temperature alarm goes off, the temperature drops 8-9F. Now I stir until the temperature overshoots by a couple of degrees, add the bag and then dough in when the temperature settles at my strike temperature.
  2. Position the bottom of the bag just off the element by pulling the top of the bag down around the outside of the keggle and securing it with a strap/bungee.
  3. Stuffed some towels through the keg spacer into the space under the keggle to prevent some heat loss from the bottom.
  4. Stir more frequently. This is probably a double-edged sword as it lets heat out, which is what I am trying to avoid. But I believe now that keeping the element on low (2-3A) may in fact add more heat than necessary because a couple of times during the first two batches when I stirred the temperature actually rose, leading me to believe that the temperature of the wort (er, sweet liquor?) under the bag was warmer than the grist in the bag. Plus, stirring is supposed to help conversion.
  5. I've decreased mash time to 30-60 minutes. There has been much discussion about how quickly conversion happens, particularly in a thin mash. The Aussie's still recommend a 90min mash, but if I can reduce the variability in mash temperature by decreasing mash time, I'm all for it. I may try to do an iodine test next time, but so far I've had good (>85%) mash efficiency.

During my last mash (a Robust Porter), I managed to keep the temperature at 152F +/1 1F without too much fuss, which is probably good enough. Just getting used to my setup and understanding how it works helps a lot.
 
I don't use a basket, and during my first couple of brews my bag was almost certainly resting on the element (with no evidence of scorching). So far, my approach has been to leave the power on low (~2A / 10%, maybe a bit more), and at this low level it doesn't seem to do any harm at all. However ... there have been times when the temperature still fell below where I wanted it, so I increased the heat to 40-50%, and when I did that I tried to lift the bag a bit to keep it off the element. At this level of power, I can hear the element (like you can hear a pot of water on the stove as it starts heating up). I imagine that some bubbles are forming (steam) which has the potential to create an air pocket underneath the bag, which I think needs to be avoided.

I've done a few things differently in my last two brew days that have minimized (though not eliminated) the need to apply some heat during the mash:

[*]As the kettle reaches strike temperature, stir it REALLY well until it stabilizes. I had ASSumed that convection would tend to ensure that the water termperature was consistent, but this is definitely not the case. If I give it good stir once the strike temperature alarm goes off, the temperature drops 8-9F. Now I stir until the temperature overshoots by a couple of degrees, add the bag and then dough in when the temperature settles at my strike temperature.
[*]Position the bottom of the bag just off the element by pulling the top of the bag down around the outside of the keggle and securing it with a strap/bungee.
[*]Stuffed some towels through the keg spacer into the space under the keggle to prevent some heat loss from the bottom.
[*]Stir more frequently. This is probably a double-edged sword as it lets heat out, which is what I am trying to avoid. But I believe now that keeping the element on low (2-3A) may in fact add more heat than necessary because a couple of times during the first two batches when I stirred the temperature actually rose, leading me to believe that the temperature of the wort (er, sweet liquor?) under the bag was warmer than the grist in the bag. Plus, stirring is supposed to help conversion.
[*]I've decreased mash time to 30-60 minutes. There has been much discussion about how quickly conversion happens, particularly in a thin mash. The Aussie's still recommend a 90min mash, but if I can reduce the variability in mash temperature by decreasing mash time, I'm all for it. I may try to do an iodine test next time, but so far I've had good (>85%) mash efficiency.


During my last mash (a Robust Porter), I managed to keep the temperature at 152F +/1 1F without too much fuss, which is probably good enough. Just getting used to my setup and understanding how it works helps a lot.

Great help here as I begin to imagine what I'm getting into. I just discovered my plumber friend is also good with electrical too. He is going to help me with the cfgi breaker and will double check my work on wiring up the still dragon controller kit.
So I wonder if some scorch their bags because they don't have the the better element. Which do you have? Watts and brand?
I'm not concerned to peg my mash temps. I've always moved within 3 to 5 degrees and I like my beers...a lot. The goal here for me is to work indoors. Otherwise I enjoy the cooking...stirring. Just got a nice new paddle.
 
So I wonder if some scorch their bags because they don't have the the better element. Which do you have? Watts and brand?

I have a 5500W Camco foldback non-ripple element. It was labeled as ULWD on the package, but I've read somewhere that in fact it may just be LWD - it's almost certainly not as "low watt density" as the ripple-type is.

I suspect that those who have had scorching issues have had one or more of the following problems:
  • Did not use a ULWD element
  • Did not stir/agitate/recirculate while applying heat (possibly leading to an air pocket forming around the element, allowing it to scorch)
  • Recirculated with too much draw/suction from the pump, causing the bag to be sucked down onto the element
 
My version of this project is moving along with help from PMs from Pogden, thanks!

I made a small mistake in wiring my panel, specifically the ammeter. I mistakenly wired the AC input to the terminal for the coil, which I believe fried the LCD display. The wires from the coil on mine are green, and the terminal on the panel display for AC input is green, so I incorrectly wired that together. There is also a black and red wired mini plug that is supposed to be wired to the coil, but I wired that to the black and red on the contactor. Colors all match, but big mistake! Actually a $10 mistake since the ammeter is from China, so I just ordered another.

Otherwise, the contactor clicks, the switch lights up (see pic, lights but no numbers!), and I can hear it humming away. Next steps are to finish up the keggle conversion. I'm having a fellow homebrewtalk friend help me with the collar/ferrule for the element. He has access to some sweet tools and a big shop, so thanks to him I'll have a nice tri-clover fitting for the element. I have the ripple version, 4500w. Once I get that done, and my ammeter replaced, I should be able to do a "wet" run in the keggle and see those little bubbles!

Pogden - any advice/thoughts on configuring my keggle? I plan on doing it upside down, getting a bottom drain kit from Brew Hdwe, and the element fitting. Any other suggestions? Thanks again - this is fun despite the setback!

Panel part1.jpg
 
I'm building a bottom drain eBIAB right now. The one thing I'm trying to come up with is a hop blocker-esque screen that mounts in the exit hole so I don't have to use a hop bag (utilization etc). I have a few ideas, I'll post them when they're built. I'm starting to really wish I had gone this route but I built my pwm and then started obsessing over Kals panel and all the gadgets and things have gotten a little out of control. . . I have officially failed at KISS...
 
I'm building a bottom drain eBIAB right now. The one thing I'm trying to come up with is a hop blocker-esque screen that mounts in the exit hole so I don't have to use a hop bag (utilization etc). I have a few ideas, I'll post them when they're built. I'm starting to really wish I had gone this route but I built my pwm and then started obsessing over Kals panel and all the gadgets and things have gotten a little out of control. . . I have officially failed at KISS...

KPSquared, how is your hop blocker coming? Like you, I have a few ideas but so far none has made it beyond the "mulling it over while drinking a homebrew in the garage" stage. Maybe the easiest thing to try is the kitchen strainer with the handle cut off (see post #24), but I think my element is so close to the bottom of the kettle that the strainer will need to be flattened or furrowed in order to fit.

BTW, even using a hop bag to contain nearly all of the pellet hops added during the boil is not enough to prevent my current little SS mesh filter from becoming completely plugged - the hot break is enough to completely stop the flow of hot wort though the bottom drain as the kettle nears empty. I probably only lose a quart or two that way, but I'd rather collect it all.
 
Haven't moved beyond garage beers either. Here's my thoughts though:

Use a screen exactly like a Hop Stopper (as seen in this pic from the Electric Brewery:
IMG_1305.jpg


Instead of a dip tube out the side, flare a hole in the bottom and clamp in around something that will fit tight in the exit hole at the bottom of the keg. Something low profile that won't affect flow. The increased area over your design should prevent plugging up.

When cleaning, just reach in a pop it out of the bottom and rinse.

Can't see why this wouldn't work.
 
Great thread! I just completed a very similar build using mostly Auber parts and the volt/ammeter. I needed to add a 1.5in triclover flange to my keg. Drilling it out and silver soldering was more difficult than expected. Your thread was a huge help!
 
I'm hoping to get a brew session in this weekend. I need to wash/clean out my keg a couple more times prior to brewing. I'm still seeing bits of metal in the bottom after my test heating water with the new panel. The panel is located in a detached garage. Happy to no longer be brewing in the rain!
 
Put the last coat of paint on the control panel last night. Thanks again to pogden for this forum and also a few PM's on the side to help me through this one. I stripped out my old PWM box and used some of the items in this build, which I have to say went much more smooth than I remember the PWM build going. Haven't fired it up yet, but I'm fairly confident in my work.

This system was build alongside a new remote controlled SS chugger pump, and adding a couple ball valves with camlock fittings for a recirculating system.

Now if it would just keep warming up out here I could turn the garden hose back on and get back to brewing.

IMG_2403.jpg

IMG_2410.jpg

IMG_2417.jpg

IMG_2425.jpg

IMG_2426.jpg
 
Back
Top