• Please visit and share your knowledge at our sister communities:
  • If you have not, please join our official Homebrewing Facebook Group!

    Homebrewing Facebook Group

Yet another Brutus Ten Build

Homebrew Talk

Help Support Homebrew Talk:

This site may earn a commission from merchant affiliate links, including eBay, Amazon, and others.
I primed mine with 3 coats, and then added 3 coats of high temp grille paint from walmart that i paid like 6-7 bucks a can for. After about the 2nd time using it the paint has all but flaked off around the burner area.

I still have not painted. I'm think I'm going to hold of on painting for a few months. Let the temp warm up some.
 
It doesn't matter when you paint your frame. Wait forever if you want. Global warming, whatever! To make paint work/ powder coat work, you have to put an insert in your frame to insulate the frame from the burner. I built a stainless insert frame for my powder coated frame with 2x2 stainless and inserted into my brutus 10 frame. A powder coat frame! I can touch my frame even after a 90 minute boil and its warm not hot. My insert is 3/8 smaller all around than my brutus frame. I'm on my laptop with no pics, sorry. I have over 20 brews on my frame with noooooo paint problems. My powdercoat is as awesome as the day is was applied. Rustoleum, weeeeeK? Wake up!!! you knew that when the flame hit your frame it would melt! stop dreamin! Do it right so your paint/powder coat will last. You guys are wearing me out.
Snake10- Brutus 10 builder
 
I've seen your system, and it's definitely the way to go if you have a steel frame. I intend on building a SS insert in the future. The "Let the temp to warm up some" comment was intended for me not the frame. It's been too freak'n cold the past couple of weekends :) The only reason why I'm putting off building the SS sleeve is I'm ready to start brewing!

Rustoleum, weeeeeK? Wake up!!! you knew that when the flame hit your frame it would melt! stop dreamin! Do it right so your paint/powder coat will last.

You remind me of this guy.
shamwow_guy.jpg
 
Got my quick disconnects, pump, and hose in today. Now I have to get my lazy ass out in the garage and finish it. Hoping to have it brew ready in a week.

web.jpg

web.jpg


I want to say these are the same disconnects that bobbyfromnj has in his youtube video.
 
Lucasbm,

I like the "sham wow" thing!

You will really like those QD's. It makes the whole process easier, for sure. Today , I brewed an 11 gal batch of Robust Porter. Guess what I'm trying to say is that its fun to brew on the Brutus, you will love it. If it weren't for Bobby posting those QD's on his video, I would still be looking for them. Or trying to figure out how to read the Mcmaster Carr catalogue. That guy is awesome. sounds like you are getting closer to completion. I'm excited for u.

Bart
 
Nice build! I was just curious where you guys are getting the flex yellow gas tubing from and do you have to add fittings onto the ends specifically to attach to the burners you're using?
 
knight,
The stock yellow flex stuff can be gotten anywhere. I got mine from true value hardware. Home depot would surely have it( probably hot water heater section). It comes in a zip lock bag sorta. It also has large flared fitting attached to it. When you open it, the hose looks like one piece,but the end (flared fitting) is removable. I removed the flared fitting end and placed it on my 1/2 black pipe. That piece now connects my black pipe to my propane bottle hose. The rest off the hose connects perfectly to the 1/2 gas valve (female end) and my burner orifice (male end). Open the bag at the store to check it out. It comes in a bunch of different sizes. Don't forget the yellow gas teflon tape for the threads.
Snake10
 
I got my yellow flex hose from the water heater area at Lowes.

I'm going to work on the brutus again today. I'm really hoping I'm taking it on a test run this afternoon.
 
Luke,
Lets see some pics before it all melts!

I took a break. Here are some pics :mug:

I finished mounting the pumps and made the protective shield for the pumps

web.jpg


I'm a good ways into the gas plumbing but I've ran into a stopping point.
I did not measure one of the pipes right. I would run and get the right size, but I've had a couple homebrews and don't feel like getting a dui today :) I'll pick it up tomorrow.

web.jpg

web.jpg

web.jpg


Since I'm stuck at the house, I'm going to mount the plate chiller with what I have, cut my tubing to length and attach the disconnects.

I'll try to post some more pics later.
 
I finished up everything I could do today. I can't wait to brew on this thing. I played around with the pumps transferring water from vessel to vessel. Pumps are sooooo much better than gravity. Priming the pumps was also very easy.

I do need an idea for setting up the plate chiller. I really do not like this setup, but it will work for the time being.
web.jpg


Also on the plate chiller, I'm going to have to use a stainless coupler to connect my qd. Unless mcmaster sells a qd with a 1/2 female thread. It's not showing on the catalog, I'll call them next week.
web.jpg


My buddy with the mig welder moved, so I can't weld anything right now. I'm planning on getting a hobart mig welder, but it will be later this year. As soon as that happens, I plan on making the back beam a gas pipe. I'm also thinking of swapping out the middle banjo for a smaller burner. I don't know what I was thinking. The mash tun really doesn't need that much heat.

If I'm able to accomplish any more tomorrow, I'll post some pics.

Thanks for the input and advice.
 
I have the same coupler, they don't have Male Coupler with female pipe thread. It's a bummer you have to use a pipe coupler. Would look much better without the extra piece.

You could get a new orifice for the banjo and drill it to a smaller size. Less BTU's. Cheaper, burners already mounted.

Looking good BTW.

I went with mild steel also and know what you mean about waiting to paint. For one thing I want to try things out and make any changes before finish, and paint don't stick to cold steel. That's my story and I'm stickin to it.
 
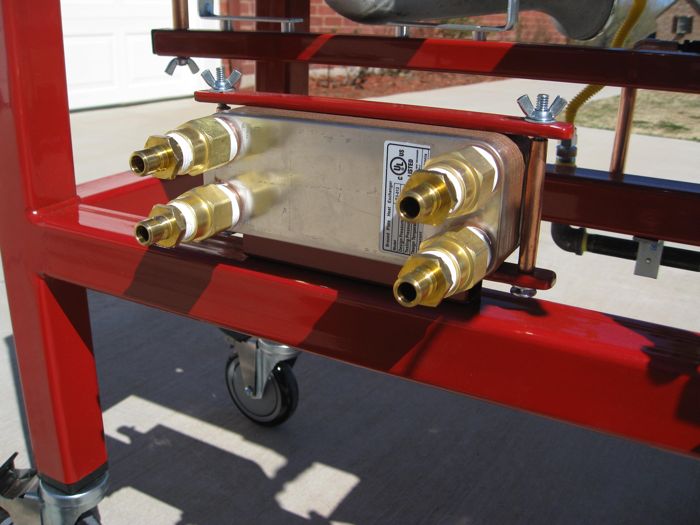
Looks good so far. Here are some pics that might help with mounting your gas line and exchanger. click on the pics to get a better look. The gas line is an angle from home depot with a 1/2" electrical conduit holder screwed to it. Simple as it gets. The exchanger has a 1x1 metal tube under it, secured to the frame. I slide some steel bar thru the 1x1 tube. Drilled holes to allow a bolt and the same on top with wing nuts. Its basically a big clamp. Just an idea.

Heatexh.jpg


Gasbottom.jpg
 
The exchanger has a 1x1 metal tube under it, secured to the frame. I slide some steel bar thru the 1x1 tube. Drilled holes to allow a bolt and the same on top with wing nuts. Its basically a big clamp. Just an idea.

That's slick. A very flexible way to mount a variety of accessories.
 
Nice Snake10. I have a Thermonater and would prefer one like yours with all connections on the same side. Connections on both sides is kind of a PITA as far as I'm concerned. No way to make it look any better than a Cluster***k. As well as difficult to remove for baking.

Now if they had the Wort in/out on one side and cooling water in/out on the other that would be much better. Oh well just my opinion, I'm sure others like the way it is.

Anyway yours looks good.
 
I have the same coupler, they don't have Male Coupler with female pipe thread. It's a bummer you have to use a pipe coupler. Would look much better without the extra piece.

Thanks, that'll save me a phone call. Yeah, it would look a lot better without the coupler.

Snake and RonRock, How long did it take you to build your systems? They're so clean.

I bought a pipe that fits today. It'll work for now. I'm definitely not finished with the gas plumbing or the way the burners are orientated. I'm really trying to use the brutus as an excuse to get a mig welder :rockin: Since I've started building on it, I've seen so many things I want to change already. However, I've got to brew some beer. I think I'm going to finish buying the parts that I need, in order to start brewing. From there I can make the changes as I go. I believe I'm 1 stainless coupling away from my first batch :ban:

What do you think I should brew for the virgin batch?
 
Do a 5 gal batch. An IPA has my vote for your first batch. No stuck sparges and it flows thru the lines nice.
 
I finished the gas lines and they are leak proof. I also found u brackets to mount the gas tubing and plate chiller. It looks much better.

web.jpg

web.jpg

web.jpg

web.jpg


Now I have a new problem. I can ignite 1 burner and it will burn like normal for a few seconds, then it drops to a small lighter like flame. It looks like it's losing pressure. I though the bottle was empty, so I hooked up my other full bottle and got the same result. I double checked for leaks and could not find any. The guy at bayou classic told me I would need a 30psi regulator. I took his word for it. I haven't done any research into what could be the problem yet. Anyone have any advice for me?
 
It looks like my 30 psi regulator is pulling the propane too fast. The solution I've read are 1. Place tank in water bath so it will not freeze. 2. Get a larger tank. Or 3. Get a lower psi regulator.
 
I brewed my first batch yesterday. I love the brutus. All grain brewing is so much easier. I did run into a problem as I started to chill. see, what happen was. :) I used hole hops. Like an idiot, I didn't use any sort of screen or hop bag. When I wanted to chill, I tried to whorl pool, but naturally I clogged up every nook with hops. I used my immersion chiller and auto siphoned to get the wort out. Today I got to clean the aftermath that was left behind in my plate chiller, pump, etc. Lesson learned, I lost about a gallon of wort. I was confused by the different temps during the mash. the liquid coming from the pump was in the mid 150's while the grain temp was low-mid 140s. What am I more concerned with, liquid temp or grain temp? I didn't leave the flame on for long periods. I used the kiss method with a low flame.

I already see a couple of things I want to do to improve the system. I want to put a water heater element in my HLT attached to a timer so when I wake up the morning of brewday I will have strike water ready to go. It will also save propane. I'm also still not impressed with the pressure I'm getting from my regulator/burners. When I started to boil, I hooked the propane directly to the burner. I got better results that way. I'm probably going to load it up and take it to Bayou Classic and get their opinion.
 
Thanks! Looks like the guy has some pretty good deals. You've been happy with them? Would you recommend them?

Like I said, I ordered 2.5" gauges and I got 5. It was either a mistake or an "upgrade". Other than that, quick shipping and I was pleased. I would buy from them again. :mug:
 
I know it's been a while, but here is a video showing the brewing system as it is now.

 
Last edited by a moderator:
Ok, I'm in a rush to get the electronics finished before December. My wife is pregnant and the future brewer is arriving in December. I'm trying to find a good deal deal on asco valves (8210G15) and Love controllers. Wanted to get some feedback on where I should look.

Thanks for the help.
 

Latest posts

Back
Top