I'm looking to move my brewing from an outside 3-vessel propane system to one of Bobby's eBIAB systems in the garage. I've tried to find a good stainless workbench to support it, but I can't seem to find one short enough - I was figuring about 24" maximum height. What are you all using?
You are using an out of date browser. It may not display this or other websites correctly.
You should upgrade or use an alternative browser.
You should upgrade or use an alternative browser.
Workspace suggestions?
- Thread starter fuzzybee
- Start date

Help Support Homebrew Talk:
This site may earn a commission from merchant affiliate
links, including eBay, Amazon, and others.
Nick Poggetti
Well-Known Member
I built a small table. Bought a small piece of butcher's block and some wood from Home Depot, and it's great.
Not sure if it's something you're willing or able to do?
Don't mind the goop on the kettle, it's since been scraped and cleaned. This picture actually convinced me to do a big old clean of the whole area.
I also have the kettle on a big stainless serving tray, not shown in this picture.

Not sure if it's something you're willing or able to do?
Don't mind the goop on the kettle, it's since been scraped and cleaned. This picture actually convinced me to do a big old clean of the whole area.
I also have the kettle on a big stainless serving tray, not shown in this picture.
Nick Poggetti
Well-Known Member
Yessir. It's actually loosely based off Bobby's eBiab system, just parted together myself. There are some differences in parts used, but overall the idea is as close as I could get with the stuff I had without ordering a ton of new stuff.
If I remember correctly, the table legs are 28", so it probably sits at 30"-ish total. I can measure tonight. I wouldn't go any tall than what I have. For reference the corny keg fits underneath with a few inches to spare at 25" tall, but I need to angle it to get under the lip.
If I remember correctly, the table legs are 28", so it probably sits at 30"-ish total. I can measure tonight. I wouldn't go any tall than what I have. For reference the corny keg fits underneath with a few inches to spare at 25" tall, but I need to angle it to get under the lip.
I went with this table
https://www.webstaurantstore.com/re...um=email&utm_campaign=auto-order-confirmation
Had them cut the legs down so total height with casters is 31"


https://www.webstaurantstore.com/re...um=email&utm_campaign=auto-order-confirmation
Had them cut the legs down so total height with casters is 31"


fuzzybee
Well-Known Member
Interesting - how do you find that height works for you? Would you change it given the opportunity?I went with this table
https://www.webstaurantstore.com/re...um=email&utm_campaign=auto-order-confirmation
Had them cut the legs down so total height with casters is 31"
View attachment 759044View attachment 759045

$76.92 ($2,179.04 / Ounce)
Brewing accessories 1.5" Tri Clamp to Ball Lock Post Liquid Gas Homebrew Kegging Fermentation Parts Brewer Hardware SUS304 Brewing accessories(Gas Hose Barb)
chuhanhandianzishangwu

$33.98
DYKWSWYX Heavy Duty Brewing Gloves (1 Pair) - 55CM Long Chemical Resistant Plastic Gloves for Beer & Wine Making, Cleaning, Homebrew Equipment Protection
wuhanshijiayangzhiyimaoyiyouxiangongsi


$719.00
$799.00
EdgeStar KC2000TWIN Full Size Dual Tap Kegerator & Draft Beer Dispenser - Black
Amazon.com


$22.00 ($623.23 / Ounce)
AMZLMPKNTW Ball Lock Sample Faucet 30cm Reinforced Silicone Hose Secondary Fermentation Homebrew Kegging joyful
无为中南商贸有限公司


$176.97
1pc Commercial Keg Manifold 2" Tri Clamp,Ball Lock Tapping Head,Pressure Gauge/Adjustable PRV for Kegging,Fermentation Control
hanhanbaihuoxiaoshoudian

$479.00
$559.00
EdgeStar KC1000SS Craft Brew Kegerator for 1/6 Barrel and Cornelius Kegs
Amazon.com


$172.35
2 Inch Tri Clamp Keg Manifold With Ball Lock Posts, Pressure Gauge, PRV (0-30 PSI) – Homebrew, Fermentation, Kegging System
wuhanshijiayangzhiyimaoyiyouxiangongsi

$53.24
1pc Hose Barb/MFL 1.5" Tri Clamp to Ball Lock Post Liquid Gas Homebrew Kegging Fermentation Parts Brewer Hardware SUS304(Gas MFL)
Guangshui Weilu You Trading Co., Ltd


$44.99
$49.95
Craft A Brew - Mead Making Kit – Reusable Make Your Own Mead Kit – Yields 1 Gallon of Mead
Craft a Brew

$53.24
1pc Hose Barb/MFL 1.5" Tri Clamp to Ball Lock Post Liquid Gas Homebrew Kegging Fermentation Parts Brewer Hardware SUS304(Liquid Hose Barb)
yunchengshiyanhuqucuichendianzishangwuyouxiangongsi


$58.16
HUIZHUGS Brewing Equipment Keg Ball Lock Faucet 30cm Reinforced Silicone Hose Secondary Fermentation Homebrew Kegging Brewing Equipment
xiangshuizhenzhanglingfengshop


$20.94
$29.99
The Brew Your Own Big Book of Clone Recipes: Featuring 300 Homebrew Recipes from Your Favorite Breweries
Amazon.com


$28.98
Five Star - 6022b_ - Star San - 32 Ounce - High Foaming Sanitizer
Great Fermentations of Indiana

$159.99 ($26.66 / Count)
3M High Flow Series System BREW120-MS, 5616001, For Brewed Coffee and Hot Tea, Valve-in-Head Design
SpaceCityProviders


$7.79 ($7.79 / Count)
Craft A Brew - LalBrew Voss™ - Kveik Ale Yeast - For Craft Lagers - Ingredients for Home Brewing - Beer Making Supplies - (1 Pack)
Craft a Brew

$10.99 ($31.16 / Ounce)
Hornindal Kveik Yeast for Homebrewing - Mead, Cider, Wine, Beer - 10g Packet - Saccharomyces Cerevisiae - Sold by Shadowhive.com
Shadowhive


![Craft A Brew - Safale BE-256 Yeast - Fermentis - Belgian Ale Dry Yeast - For Belgian & Strong Ales - Ingredients for Home Brewing - Beer Making Supplies - [3 Pack]](https://m.media-amazon.com/images/I/51bcKEwQmWL._SL500_.jpg)

$33.99 ($17.00 / Count)
$41.99 ($21.00 / Count)
2 Pack 1 Gallon Large Fermentation Jars with 3 Airlocks and 2 SCREW Lids(100% Airtight Heavy Duty Lid w Silicone) - Wide Mouth Glass Jars w Scale Mark - Pickle Jars for Sauerkraut, Sourdough Starter
Qianfenie Direct
I've been very happy with it. I like that it's roughly the same height as the sink and the freezer/ferm chamber on each side. I do need a small stool when squeezing/removing the bag but I'd still need that unless it were several inches shorter. Also, any shorter and I wouldn't be able to store the buckets underneath.
Wouldn't change a thing if I were doing all over.

Wouldn't change a thing if I were doing all over.

RufusBrewer
Well-Known Member
My BIAB kettle sits about 4" off the garage floor. 2x4 plus some plywood and silicone insulator pad.
I have not found any motivation to raise it up any higher. I got a pump that gets my chilled wort into my fermenting vessel just fine.
I have not found any motivation to raise it up any higher. I got a pump that gets my chilled wort into my fermenting vessel just fine.
fuzzybee
Well-Known Member
I'm actually looking right now at a water heater stand. I just need to make sure it gives me enough height to let the steam slayer drip into the sink.My BIAB kettle sits about 4" off the garage floor. 2x4 plus some plywood and silicone insulator pad.
I have not found any motivation to raise it up any higher. I got a pump that gets my chilled wort into my fermenting vessel just fine.
Last edited:
The most important piece of equipment in my brewery is the stainless sink with spray nozzle. When i set mine up I thought about the kitchen triangle and of course ISO 9000. I'm a slave to efficiency!

If you don't need gravity for anything, I recommend keeping the top of the kettle at about waist height.
fuzzybee
Well-Known Member
I don't think I will need gravity - I should be able to use the pump for everything, right?If you don't need gravity for anything, I recommend keeping the top of the kettle at about waist height.
Am I missing a case where I would have to use gravity?
Search for "equipment stand" or "utility stand" instead of table to find shorter units. I use a 24" high stainless equipment stand 24 x 36 for induction BIAB outdoors. It has one shelf for things like mash paddle, ingredients, e.t.c.
RufusBrewer
Well-Known Member
I don't think I will need gravity - I should be able to use the pump for everything, right?
Am I missing a case where I would have to use gravity?
Typically you use gravity to get the wort out of your kettle into your fermenting vessel. You have a pump to do that.
The only height needed is enough gravity and drop to prime the pump.
I experimented and I can get way with some 2x4 and plywood, ~ 4".. (Cheap to build as well) I do not like lifting stuff. I do like being able to look down into the kettle.
fuzzybee
Well-Known Member
How high off the bottom would the steam slayer output sit? I'd like to design my space so I can drain that into the sink as well.If you don't need gravity for anything, I recommend keeping the top of the kettle at about waist height.
I don't have exact measurements but the bottom of the slayer is about 8" below the top lip of the kettle.
fuzzybee
Well-Known Member
Thanks! It needs a straight-down drain, right?I don't have exact measurements but the bottom of the slayer is about 8" below the top lip of the kettle.
fuzzybee
Well-Known Member
Recycling this thread since I finally have gotten contractors out to give me estimates for electrical and plumbing.
Here's what I currently have mocked up (obviously not to exact scale). I am open to swapping the sink and eBIAB system, but I don't want the sink to go too far to the left because the laundry room where the plumbing will be piped off is behind that area. The door to the house is to the right of the sink in this image. The workspace will occupy however much linear footage I have between the ferm freezer and the eBIAB (or sink).

I am having trouble visualizing my faucet(s) in this scenario. I'd like to have a faucet for the sink, but also have a spigot (probably cold only) for filling the eBIAB, feeding my steam slayer, and feeding the immersion chiller. What are y'all's thoughts on this layout?
I'd hoped to drain the Steam Slayer into the sink, but it may need to go into a bucket.
Here's what I currently have mocked up (obviously not to exact scale). I am open to swapping the sink and eBIAB system, but I don't want the sink to go too far to the left because the laundry room where the plumbing will be piped off is behind that area. The door to the house is to the right of the sink in this image. The workspace will occupy however much linear footage I have between the ferm freezer and the eBIAB (or sink).
I am having trouble visualizing my faucet(s) in this scenario. I'd like to have a faucet for the sink, but also have a spigot (probably cold only) for filling the eBIAB, feeding my steam slayer, and feeding the immersion chiller. What are y'all's thoughts on this layout?
I'd hoped to drain the Steam Slayer into the sink, but it may need to go into a bucket.
- Joined
- Jan 3, 2020
- Messages
- 3,216
- Reaction score
- 3,896
I also trimmed the legs on my SS brew stand myself. Can't say it will always be an option based on the table design. If you consider doing it, be sure to check the top and bottom of the leg as the leg may have integral components for the feet so you would want to cut the top.
I use a laundry sink faucet ,they have garden hose threads so i put on a quick disconnect and got a replacement spray hose at HD and put a QD on it and my bottle washer. The cold water pipe got 2 tees with valves,one for the chiller and one for the RO unit.
Boilinginsc
Consumer of beer and spirits
Recycling this thread since I finally have gotten contractors out to give me estimates for electrical and plumbing.
Here's what I currently have mocked up (obviously not to exact scale). I am open to swapping the sink and eBIAB system, but I don't want the sink to go too far to the left because the laundry room where the plumbing will be piped off is behind that area. The door to the house is to the right of the sink in this image. The workspace will occupy however much linear footage I have between the ferm freezer and the eBIAB (or sink).
View attachment 768707
I am having trouble visualizing my faucet(s) in this scenario. I'd like to have a faucet for the sink, but also have a spigot (probably cold only) for filling the eBIAB, feeding my steam slayer, and feeding the immersion chiller. What are y'all's thoughts on this layout?
I'd hoped to drain the Steam Slayer into the sink, but it may need to go into a bucket.
Would installing a pot filler faucet above it while doing the plumbing work?
fuzzybee
Well-Known Member
I was thinking about either that or a hose bib. Would a pot filler have a thread to screw on a quick disconnect?Would installing a pot filler faucet above it while doing the plumbing work?
Boilinginsc
Consumer of beer and spirits
Check this one out,may suit your needs
https://www.amazon.com/Tecmolog-Kit...otate+kitchen+tap,+ct169b,aps,268&sr=8-1&th=1
https://www.amazon.com/Tecmolog-Kit...otate+kitchen+tap,+ct169b,aps,268&sr=8-1&th=1
- Joined
- Sep 1, 2019
- Messages
- 206
- Reaction score
- 101
Check out a stainless mixer table. This link has some expensive ones, but you can find them cheaper.
https://www.usaequipmentdirect.com/mixer-table.html
https://www.usaequipmentdirect.com/mixer-table.html
See if there are any restaurants closing up near you. They might be selling off stuff like that.
- Joined
- Sep 1, 2019
- Messages
- 206
- Reaction score
- 101
Bakeries are an even better source. May have an older one laying around.See if there are any restaurants closing up near you. They might be selling off stuff like that.
rfsee52
Beer Nut
What is a”steam slayer”? I have never the term before. I have been an extract brewer and want to give BIAB a try, instead of the expense of a HLT, Mash tun, etc. Will a propane burner work?
fuzzybee
Well-Known Member
It's @Bobby_M 's steam condenser: Steam Slayer 1.5'' TC Kettle Boil Steam Condenser AssemblyWhat is a”steam slayer”? I have never the term before. I have been an extract brewer and want to give BIAB a try, instead of the expense of a HLT, Mash tun, etc. Will a propane burner work?
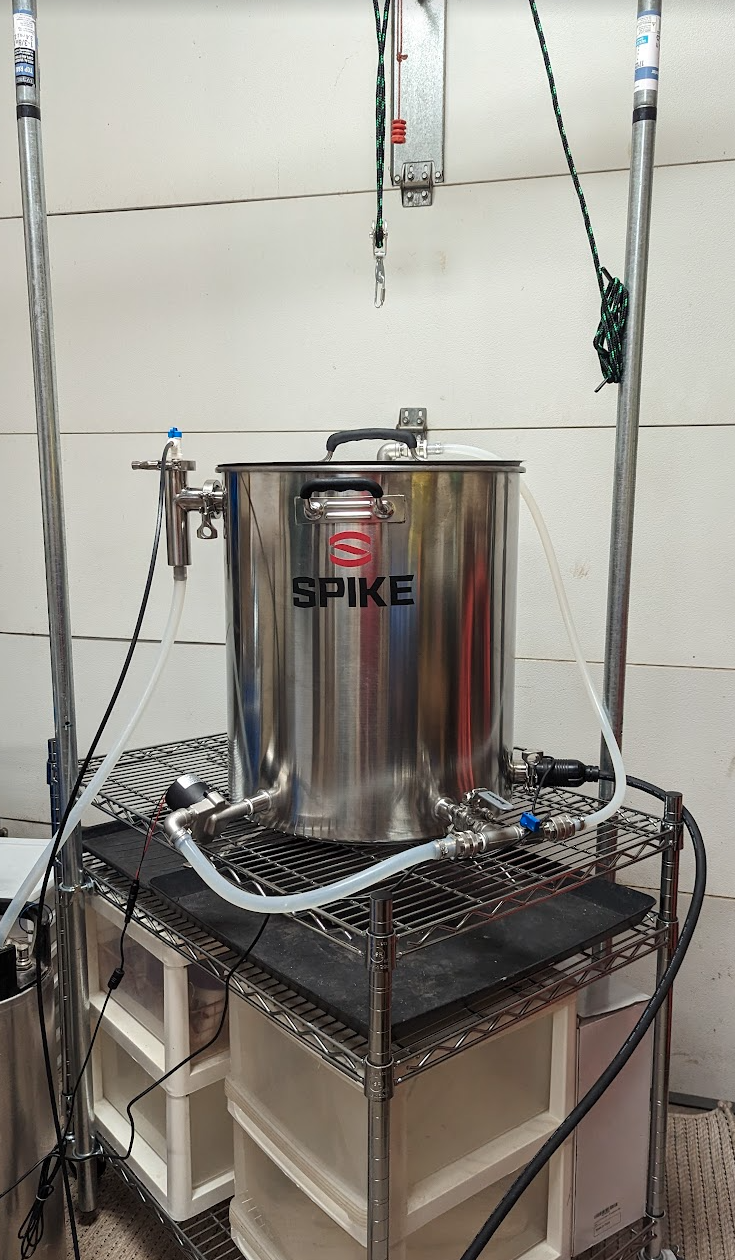
I am late to the party.. but I found this is a perfect brew table. Its very very strong (the picture on the website is deceiving) and the best part is the adjustability. The $129 price tag is easy to deal with as well.
You can buy this unit, and split it into two separate units (bonus!) - The vertical support posts are actually two pieces that you screw together.. You can use the wheels on one half if you want portability, or just use the feet on the floor. I use the wheels as I roll the cart into the center of the shop.. and after roll it back to the wall for storage.
Of course you can adjust the height of the shelves to your liking. and once you have it figured you can shorten the vertical poles in the shelving to not be in the way.. I find leaving a few inches above the top shelf to be useful to hang things on etc.. and of course I can raise the shelf in the future if I desire.
https://www.samsclub.com/p/5-tier-shelving-36in-x-24in-x-72in/prod20641243
Attachments

Similar threads
- Replies
- 63
- Views
- 3K
- Replies
- 24
- Views
- 2K
- Replies
- 6
- Views
- 977
