• Please visit and share your knowledge at our sister communities:
  • If you have not, please join our official Homebrewing Facebook Group!

    Homebrewing Facebook Group

Which electric controller?

Homebrew Talk

Help Support Homebrew Talk:

This site may earn a commission from merchant affiliate links, including eBay, Amazon, and others.
I own and just recently used the SS1V for an eBIAB setup. Love it. Because of this thread I just gave the brewcommander a look. I think it's a lil better. The screen is especially nice. I don't think I need most of the functionality tho and it only powers one pump. I like that the 1V controls both my pumps.
I also prefer the SS element and integrated temp probe over the boilcoil. I don't like that it's weldless and don't care for the looks outside the kettle.
I think any of these things nowadays will get the job done and they're cheap enough that we don't have to rig up our own.

New Jersey,

Thank you for your reply! I am definitely weighing all options. My current plan only includes one pump, so that is no downside for me. I planned on adding a tri clamp port and heating element on my kettle instead of going with a boil coil. After reading lots of threads I came to the conclusion that while the boil coil is nice, it is just as pricy to replace if it fails. Having a non proprietary heating element makes it easier to replace. I am hoping to have a 3v eHerms setup eventually, so flexibility is key.

Brian
 
I know this is an older thread, but I thought I'd just chime in and say that I got the cube and, bang for the buck, it's pretty hard to beat. One 30 amp outlet and I have all the power of the DSPR320, two pump controls and all at a bargain price. I would have preferred a wall mount form factor, but for some reason there's a pretty hefty premium for that. After a bunch of research, I ultimately decided I wanted an EZ Boil based solution and the cube has been great so far.

Is there a way to do delayed start with the auber cube? It seems a little less intuitive than the brew commander, but I am still considering options at this point.

Brian
 
Im 2 brews in with the BrewCommander. I don't think you can beat the bang for the buck. There is only one niggle I have with it and that's how the timer works. You can create boil and mash profiles and have each step run for a period of time, e.g. boil for 60 minutes or mash for 60 minutes and mash out for 10 minutes. Logically you would want it to wait until the step temperature is reached and then start the counter, but instead it tries to calculate it and get's it wrong. Maybe I need to tweak my settings, but it just seems like a bad design to try to predict when you are going to hit a temperature vs when the controller knows the actual temperature. Maybe there will a software update. In the meantime I have a workaround. The timer is the only con for me and if I had the choice between a cube and a brew commander it would be BrewCommander.
 
Is there a way to do delayed start with the auber cube? It seems a little less intuitive than the brew commander, but I am still considering options at this point.

Brian

I'm new to the cube and haven't tried a delayed start, but i think you could just do a "mash" step with temp set below room temp for the delay time (up to 99 hours). The next step presumably would then be a ramp to strike temp.
 
Im 2 brews in with the BrewCommander. I don't think you can beat the bang for the buck. There is only one niggle I have with it and that's how the timer works. You can create boil and mash profiles and have each step run for a period of time, e.g. boil for 60 minutes or mash for 60 minutes and mash out for 10 minutes. Logically you would want it to wait until the step temperature is reached and then start the counter, but instead it tries to calculate it and get's it wrong. Maybe I need to tweak my settings, but it just seems like a bad design to try to predict when you are going to hit a temperature vs when the controller knows the actual temperature. Maybe there will a software update. In the meantime I have a workaround. The timer is the only con for me and if I had the choice between a cube and a brew commander it would be BrewCommander.

What you want to do is program the mash and boil but not hit the start button on the program until you've hit your desired mash or boil temp. The timer then will be in sync.

Helps after the first couple of brews to go back over the instruction booklet and then some of the operations make more sense.
 
My first experience with brewing was using gas. Some brews came out really good, others were a total waste. Root cause seemed to be that I was unable to maintain temps very well at all. So, I stopped brewing entirely for about two years.

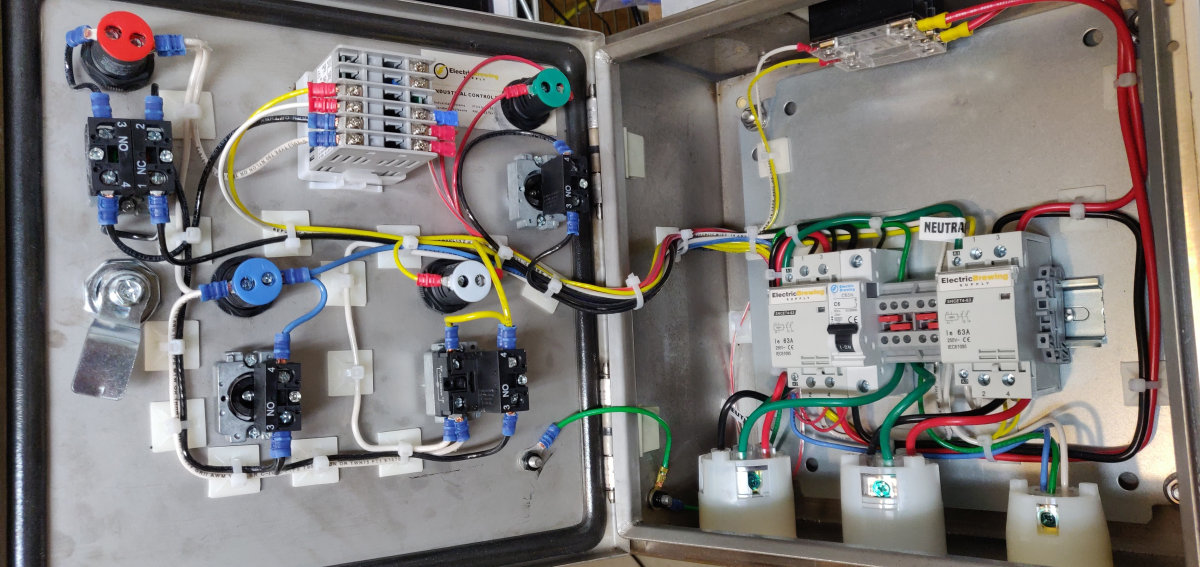
During the first year I was researching electric brewing, control panels, and setups. I finally settled for Electric Brewing Supply, specifically the 30A BIAB control panel. After lots of thought and planning, I purchased the kit and started buying parts for converting and upgrading my system.

Taking my time (About a year) I built the box, modified my existing kettles, replaced all the connectors with quick disconnects, replaced my pump, got a new counterflow chilling coil and pieced it all together. Went through several iterations of leak testing and fixing (Everything is weldless).

Even though my control panel is BIAB, I setup my system very similarly to the Blichmann's BrewEasy. This gives me lots of volume to brew in and does not require a separate kettle for sparge water. Frankenbrew indeed.

After a test run, I found a couple errors on the schematics that took some brain power to resolve. I know electronics well enough, but 240v simply terrifies me. Once resolved, I brewed a batch. What a difference! Temp stayed within a degree of target (Likely closer really). OG results were higher than expected, but boil off was also higher. Simple adjustment there. But damn what a difference. It was a great experience.

Its been in the fermenter now for 10 days and I am looking forward to trying it!

Point being, I would recomend ebrewsupply, but go with a pre-built one. Their schematics are kinda dicy. Works well! no problems.

I had that same issue with the wiring schematic and contacted them about it. Very prompt reply, and I think I edited their schematic to document the change that was needed.
 
I had that same issue with the wiring schematic and contacted them about it. Very prompt reply, and I think I edited their schematic to document the change that was needed.

Same here. I was also missing a couple parts. they were quick to send replacements. But their schematics online are still wrong. Oh well. It works now.
 
My first experience with brewing was using gas. Some brews came out really good, others were a total waste. Root cause seemed to be that I was unable to maintain temps very well at all. So, I stopped brewing entirely for about two years.

During the first year I was researching electric brewing, control panels, and setups. I finally settled for Electric Brewing Supply, specifically the 30A BIAB control panel. After lots of thought and planning, I purchased the kit and started buying parts for converting and upgrading my system.

Taking my time (About a year) I built the box, modified my existing kettles, replaced all the connectors with quick disconnects, replaced my pump, got a new counterflow chilling coil and pieced it all together. Went through several iterations of leak testing and fixing (Everything is weldless).

Even though my control panel is BIAB, I setup my system very similarly to the Blichmann's BrewEasy. This gives me lots of volume to brew in and does not require a separate kettle for sparge water. Frankenbrew indeed.

After a test run, I found a couple errors on the schematics that took some brain power to resolve. I know electronics well enough, but 240v simply terrifies me. Once resolved, I brewed a batch. What a difference! Temp stayed within a degree of target (Likely closer really). OG results were higher than expected, but boil off was also higher. Simple adjustment there. But damn what a difference. It was a great experience.

Its been in the fermenter now for 10 days and I am looking forward to trying it!

Point being, I would recomend ebrewsupply, but go with a pre-built one. Their schematics are kinda dicy. Works well! no problems.

Nice to have that up and running I bet. I am just embarking on e brewing with a 240v induction burner and auber cube. My plan is to do most moderate gravity beers as recirculating BIAB with just one vessel.

Bigger beers that won't fit in my 10G kettle will be done as kettle rims similar to your rig (still with induction, however). I'll use one pump and gravity feed from the MLT to the kettle, then pump through an autosparge back into the MLT. I'll still use a brewbag for kettle rims just for easy cleanup. I love just pulling the bag and dumping it in the back yard for the deer.
 
What you want to do is program the mash and boil but not hit the start button on the program until you've hit your desired mash or boil temp. The timer then will be in sync.

Helps after the first couple of brews to go back over the instruction booklet and then some of the operations make more sense.

Thanks! So lets say I want to do a mash at 154 for 1 hour and then mash out at 168 for 10 minutes. Would I create 2 mash profiles?
 
I just ordered the brew commander. I liked the delayed strike water heating and nice touch screen. I've done enough DIY getting the rig switched over to indoor-electric. ready to plug in and push buttons.
the mash timer will be a bit of annoyance (getting the temp ramp time dialed in) but will be non issue after the shakedown run.
 
Last edited:
Thanks! So lets say I want to do a mash at 154 for 1 hour and then mash out at 168 for 10 minutes. Would I create 2 mash profiles?

No, you'd program 2 mash steps under one profile. It'll hold up to 9 mash profiles/programs but within each profile you can create a number of steps.
So in your example you'd select mash profile #1 and then under the first step you'd enter the temp 154 and hit enter and then it'll ask for the time and you input 60 and hit enter and it'll advance to the next step where you'd enter your temp 168 and then the time.

I created a mash profile with 2 steps. 154 for 60 minutes and 168 for 10 minutes. I set my temperature manually to 154 and then when it reached that, started the mash profile. When it hit the 60 minute mark, the next step started and it hit 168 in a couple of minutes but was in ramp mode for about 6 minutes. Here's the video https://www.instagram.com/p/B68SRleJ8Pr/?utm_source=ig_web_copy_link

I guess I need to try dialing in my ramp time?

I need to as well but it changes depending on batch size.

My 3 gal batches ramp almost twice as fast as my 4.5 gallon ones. Mostly not a big deal for me since I do BIAB and don't often do a step mash.
 
Same here. I was also missing a couple parts. they were quick to send replacements. But their schematics online are still wrong. Oh well. It works now.

Do you mind saying where the schematics errors are? The only one I've found sends the Power-In-Neutral to ground.

Thanks, Richard
 
That Brew Commander looks pretty slick.

I've been using the auger cube for about 2 years and like it.

The one feature that I think is super useful us the physical knob for controlling the power output - when my boil is just starting and the hot break wants to make it boil over it is really nice to reduce the heater element power instantly by turning the knob, without having to look at it. That saves me almost every brew day.
 
Do you mind saying where the schematics errors are? The only one I've found sends the Power-In-Neutral to ground.

Thanks, Richard

Here's a link to their PDF.
Link

And below is an image showing the jumper that needs to be added (RED line).
10192e39-f5d9-42a1-8dd9-2368a2fe5351-30479-0000209e6e1aac09-jpg.612116
 
Thanks for that. For anyone else, there are three sources of info on how to wire this: PDF schematics, the book that they send you, and the assembled photos.

The book and photos show the correct wiring for the e-stop although, as k-os points out, the schematics don't.

One problem is that the book and schematics show white wires as blue, which would be fine, except there are also blue wires. Perhaps they should show white wires as gray, or maybe dashed. Plus they should clean up the schematics to eliminate wires on top of each other.

In the book, page 43 shows a 10ga white wire from the power plug to the grounding block. The schematics and photos correctly show it going to the neutral block. However, there is no 10ga white wire included in the kit or on the list of materials. They should fix that.

A note in the book on page 40 says "... and red from the breaker" which makes no sense to me.

Also, the kit includes two chassis grounding lugs, where clearly three are required. And they should add a chassis ground to the schematics.

My only problem with the physical kit was that I needed to slightly clear out the holes that secure the heat sink. Other than that, the cuts were perfect, the materials were first-rate and the end result is impressive.

I'm glad this kit is available. I'm generally a DIY guy, but was happy to paint-by-numbers on this. Next, I will wire in a Raspberry Pi so I can control everything remotely.

Cheers, Richard
 
I finished mine some time ago and had to deal with those exact issues. Took some time to correlate all the information and find the missing wires. But the good news is that once its running, it does a great job!
 
FWIW, I rerouted the wiring a bit to allow more room if I want to add anything later.
upload_2020-3-26_10-8-6.png
 
Quick question ... Is there a simple way to temporarily convert my 240v controller to run a 120v element?

I'm waiting to buy a Spike EBIAB kettle and basket, but I'd love to practice using my controller with my Grainfather.

Would it work to remove say the black wire from my 240 out socket and replace it with a wire to the neutral block? Or would that somehow confuse the PIR?

(Obviously I would make a special cable that connects a 240 plug to a 120v socket.)

Cheers, Richard
Depends on how things are wired inside your control box. In some cases a 240V control panel can operate from a 120V source. Do you have a schematic that you could post?

Brew on :mug:
 
Depends on how things are wired inside your control box. In some cases a 240V control panel can operate from a 120V source. Do you have a schematic that you could post?

Thanks for replying. I already have the 240v power source. I'm wanting to control a 120v element. My system is shown three posts up, and the schematics are referenced two posts above that. Cheers.
 
The way you get 120v on an element output in a controller like this is to feed the element output receptacle with a NEUTRAL on the line that does not go through the SSR. I'm not crazy about how the actual panel is wired with different color conductors from the schematic. I see there are labels like "neutral" to override your intuition, but that sucks. Anyway, if you remove the black wire from the top left terminal on the Boil Contactor and replace that with a neutral wire, you'll get 120v on the outlet. Make sure that you trace the neutral all the way back to the 4-wire input connector and that the wire size is appropriate (14 gauge for 1600 watt elements).
 
Thanks, Bobby. I didn't have a properly sized white wire which is why I labeled the black one. I believe everything else is wired with correct colors, although the schematic is not. You're confirmed what I expected. Cheers.
 
Quick question ... Is there a simple way to temporarily convert my 240v controller to run a 120v element?

I'm waiting to buy a Spike EBIAB kettle and basket, but I'd love to practice using my controller with my Grainfather.

Would it work to remove say the black wire from my 240 out socket and replace it with a wire to the neutral block? Or would that somehow confuse the PIR?

(Obviously I would make a special cable that connects a 240 plug to a 120v socket.)

Cheers, Richard
I would just make an adapter pigtail, unless you don't mind rewiring inside the panel. In the adapter pigtail receptacle, connect the neutral wire to the neutral slot, and the slot that matches the black hot spade on the panel input plug. Similar to what's shown below.

DSPR120 1-Pump 1-Aux Dual Voltage Input contactor.PNG


Brew on :mug:
 
Last edited:
I have had pretty lackluster experience with hosehead. I would look elsewhere unless You are very comfortable using a raspberry pi.

The probes are wildly inaccurate and need constant recalibration. Have also had 2 units require new sd cards

Can't say I've had issue with a hosehead probe in the few years I've used one, though I haven't routinely done an ice water/boiling water test. The probes do seem one or two degrees shy when I'm boiling, but I figured that was to be expected.

What made you find yours were inaccurate?
 
Can't say I've had issue with a hosehead probe in the few years I've used one, though I haven't routinely done an ice water/boiling water test. The probes do seem one or two degrees shy when I'm boiling, but I figured that was to be expected.

What made you find yours were inaccurate?

Thats a good question. I just assume they don't work well. I have probably 50 batches on the system since that post and the probes are still all over the place and require calibration every batch.
 
Back
Top