Which electric controller?

Homebrew Talk - Beer, Wine, Mead, & Cider Brewing Discussion Forum

Help Support Homebrew Talk - Beer, Wine, Mead, & Cider Brewing Discussion Forum:

This site may earn a commission from merchant affiliate links, including eBay, Amazon, and others.
My first experience with brewing was using gas. Some brews came out really good, others were a total waste. Root cause seemed to be that I was unable to maintain temps very well at all. So, I stopped brewing entirely for about two years.

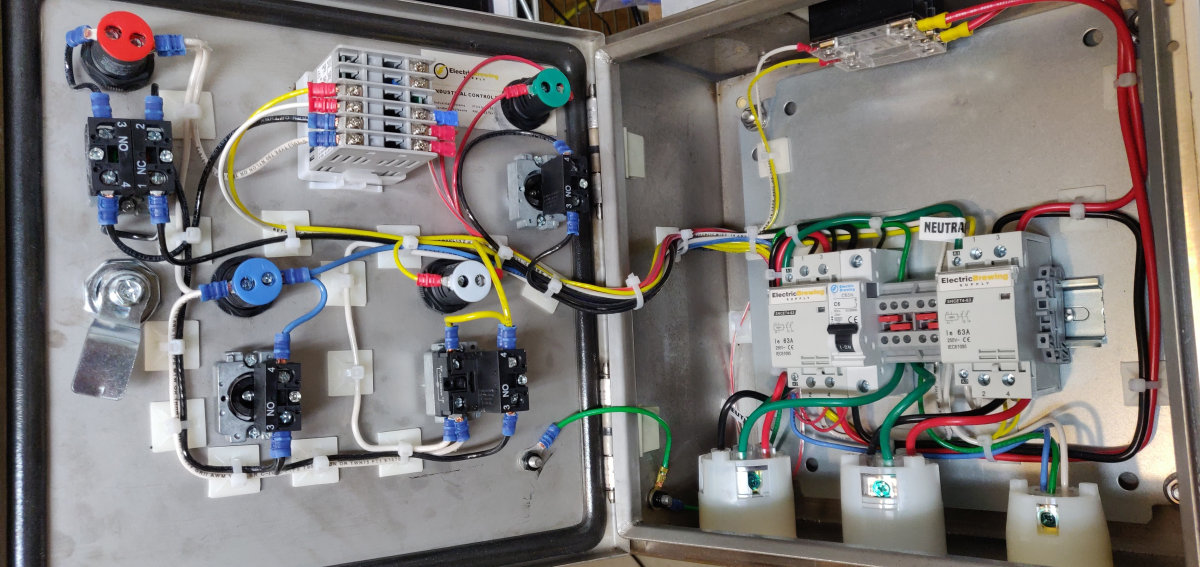
During the first year I was researching electric brewing, control panels, and setups. I finally settled for Electric Brewing Supply, specifically the 30A BIAB control panel. After lots of thought and planning, I purchased the kit and started buying parts for converting and upgrading my system.

Taking my time (About a year) I built the box, modified my existing kettles, replaced all the connectors with quick disconnects, replaced my pump, got a new counterflow chilling coil and pieced it all together. Went through several iterations of leak testing and fixing (Everything is weldless).

Even though my control panel is BIAB, I setup my system very similarly to the Blichmann's BrewEasy. This gives me lots of volume to brew in and does not require a separate kettle for sparge water. Frankenbrew indeed.

After a test run, I found a couple errors on the schematics that took some brain power to resolve. I know electronics well enough, but 240v simply terrifies me. Once resolved, I brewed a batch. What a difference! Temp stayed within a degree of target (Likely closer really). OG results were higher than expected, but boil off was also higher. Simple adjustment there. But damn what a difference. It was a great experience.

Its been in the fermenter now for 10 days and I am looking forward to trying it!

Point being, I would recomend ebrewsupply, but go with a pre-built one. Their schematics are kinda dicy. Works well! no problems.

Nice to have that up and running I bet. I am just embarking on e brewing with a 240v induction burner and auber cube. My plan is to do most moderate gravity beers as recirculating BIAB with just one vessel.

Bigger beers that won't fit in my 10G kettle will be done as kettle rims similar to your rig (still with induction, however). I'll use one pump and gravity feed from the MLT to the kettle, then pump through an autosparge back into the MLT. I'll still use a brewbag for kettle rims just for easy cleanup. I love just pulling the bag and dumping it in the back yard for the deer.
 
What you want to do is program the mash and boil but not hit the start button on the program until you've hit your desired mash or boil temp. The timer then will be in sync.

Helps after the first couple of brews to go back over the instruction booklet and then some of the operations make more sense.

Thanks! So lets say I want to do a mash at 154 for 1 hour and then mash out at 168 for 10 minutes. Would I create 2 mash profiles?
 
I just ordered the brew commander. I liked the delayed strike water heating and nice touch screen. I've done enough DIY getting the rig switched over to indoor-electric. ready to plug in and push buttons.
the mash timer will be a bit of annoyance (getting the temp ramp time dialed in) but will be non issue after the shakedown run.
 
Last edited:
Thanks! So lets say I want to do a mash at 154 for 1 hour and then mash out at 168 for 10 minutes. Would I create 2 mash profiles?

No, you'd program 2 mash steps under one profile. It'll hold up to 9 mash profiles/programs but within each profile you can create a number of steps.
So in your example you'd select mash profile #1 and then under the first step you'd enter the temp 154 and hit enter and then it'll ask for the time and you input 60 and hit enter and it'll advance to the next step where you'd enter your temp 168 and then the time.

I created a mash profile with 2 steps. 154 for 60 minutes and 168 for 10 minutes. I set my temperature manually to 154 and then when it reached that, started the mash profile. When it hit the 60 minute mark, the next step started and it hit 168 in a couple of minutes but was in ramp mode for about 6 minutes. Here's the video https://www.instagram.com/p/B68SRleJ8Pr/?utm_source=ig_web_copy_link

I guess I need to try dialing in my ramp time?

I need to as well but it changes depending on batch size.

My 3 gal batches ramp almost twice as fast as my 4.5 gallon ones. Mostly not a big deal for me since I do BIAB and don't often do a step mash.
 
Same here. I was also missing a couple parts. they were quick to send replacements. But their schematics online are still wrong. Oh well. It works now.

Do you mind saying where the schematics errors are? The only one I've found sends the Power-In-Neutral to ground.

Thanks, Richard
 
That Brew Commander looks pretty slick.

I've been using the auger cube for about 2 years and like it.

The one feature that I think is super useful us the physical knob for controlling the power output - when my boil is just starting and the hot break wants to make it boil over it is really nice to reduce the heater element power instantly by turning the knob, without having to look at it. That saves me almost every brew day.
 
Do you mind saying where the schematics errors are? The only one I've found sends the Power-In-Neutral to ground.

Thanks, Richard

Here's a link to their PDF.
Link

And below is an image showing the jumper that needs to be added (RED line).
10192e39-f5d9-42a1-8dd9-2368a2fe5351-30479-0000209e6e1aac09-jpg.612116
 
Thanks for that. For anyone else, there are three sources of info on how to wire this: PDF schematics, the book that they send you, and the assembled photos.

The book and photos show the correct wiring for the e-stop although, as k-os points out, the schematics don't.

One problem is that the book and schematics show white wires as blue, which would be fine, except there are also blue wires. Perhaps they should show white wires as gray, or maybe dashed. Plus they should clean up the schematics to eliminate wires on top of each other.

In the book, page 43 shows a 10ga white wire from the power plug to the grounding block. The schematics and photos correctly show it going to the neutral block. However, there is no 10ga white wire included in the kit or on the list of materials. They should fix that.

A note in the book on page 40 says "... and red from the breaker" which makes no sense to me.

Also, the kit includes two chassis grounding lugs, where clearly three are required. And they should add a chassis ground to the schematics.

My only problem with the physical kit was that I needed to slightly clear out the holes that secure the heat sink. Other than that, the cuts were perfect, the materials were first-rate and the end result is impressive.

I'm glad this kit is available. I'm generally a DIY guy, but was happy to paint-by-numbers on this. Next, I will wire in a Raspberry Pi so I can control everything remotely.

Cheers, Richard
 
I finished mine some time ago and had to deal with those exact issues. Took some time to correlate all the information and find the missing wires. But the good news is that once its running, it does a great job!
 
FWIW, I rerouted the wiring a bit to allow more room if I want to add anything later.
upload_2020-3-26_10-8-6.png
 
Quick question ... Is there a simple way to temporarily convert my 240v controller to run a 120v element?

I'm waiting to buy a Spike EBIAB kettle and basket, but I'd love to practice using my controller with my Grainfather.

Would it work to remove say the black wire from my 240 out socket and replace it with a wire to the neutral block? Or would that somehow confuse the PIR?

(Obviously I would make a special cable that connects a 240 plug to a 120v socket.)

Cheers, Richard
Depends on how things are wired inside your control box. In some cases a 240V control panel can operate from a 120V source. Do you have a schematic that you could post?

Brew on :mug:
 
Depends on how things are wired inside your control box. In some cases a 240V control panel can operate from a 120V source. Do you have a schematic that you could post?

Thanks for replying. I already have the 240v power source. I'm wanting to control a 120v element. My system is shown three posts up, and the schematics are referenced two posts above that. Cheers.
 
The way you get 120v on an element output in a controller like this is to feed the element output receptacle with a NEUTRAL on the line that does not go through the SSR. I'm not crazy about how the actual panel is wired with different color conductors from the schematic. I see there are labels like "neutral" to override your intuition, but that sucks. Anyway, if you remove the black wire from the top left terminal on the Boil Contactor and replace that with a neutral wire, you'll get 120v on the outlet. Make sure that you trace the neutral all the way back to the 4-wire input connector and that the wire size is appropriate (14 gauge for 1600 watt elements).
 
Thanks, Bobby. I didn't have a properly sized white wire which is why I labeled the black one. I believe everything else is wired with correct colors, although the schematic is not. You're confirmed what I expected. Cheers.
 
Quick question ... Is there a simple way to temporarily convert my 240v controller to run a 120v element?

I'm waiting to buy a Spike EBIAB kettle and basket, but I'd love to practice using my controller with my Grainfather.

Would it work to remove say the black wire from my 240 out socket and replace it with a wire to the neutral block? Or would that somehow confuse the PIR?

(Obviously I would make a special cable that connects a 240 plug to a 120v socket.)

Cheers, Richard
I would just make an adapter pigtail, unless you don't mind rewiring inside the panel. In the adapter pigtail receptacle, connect the neutral wire to the neutral slot, and the slot that matches the black hot spade on the panel input plug. Similar to what's shown below.

DSPR120 1-Pump 1-Aux Dual Voltage Input contactor.PNG


Brew on :mug:
 
Last edited:
I have had pretty lackluster experience with hosehead. I would look elsewhere unless You are very comfortable using a raspberry pi.

The probes are wildly inaccurate and need constant recalibration. Have also had 2 units require new sd cards

Can't say I've had issue with a hosehead probe in the few years I've used one, though I haven't routinely done an ice water/boiling water test. The probes do seem one or two degrees shy when I'm boiling, but I figured that was to be expected.

What made you find yours were inaccurate?
 
Can't say I've had issue with a hosehead probe in the few years I've used one, though I haven't routinely done an ice water/boiling water test. The probes do seem one or two degrees shy when I'm boiling, but I figured that was to be expected.

What made you find yours were inaccurate?

Thats a good question. I just assume they don't work well. I have probably 50 batches on the system since that post and the probes are still all over the place and require calibration every batch.
 
Thats a good question. I just assume they don't work well. I have probably 50 batches on the system since that post and the probes are still all over the place and require calibration every batch.

I've been using the same 4 DS18B20 probes for 5 years. They are all within a 0.5 degree of each other and I've never changed anything. The CFC probe is in thre sun......

If they do poop the bed, they are $1 each.
 

Attachments

  • 20200328_120923.jpg
    20200328_120923.jpg
    3.8 MB · Views: 21
I've been using the same 4 DS18B20 probes for 5 years. They are all within a 0.5 degree of each other and I've never changed anything. The CFC probe is in thre sun......

If they do poop the bed, they are $1 each.

I swapped a few of them out awhile back. Honestly I think its the controller on a whole. We have had to flash the drive twice and have had a few other issues with it. Our previous generation hosehead was great and had no issues for years until the brewery took a power surge and it died. This most recent version just hasn't worked as well.
 
I swapped a few of them out awhile back. Honestly I think its the controller on a whole. We have had to flash the drive twice and have had a few other issues with it. Our previous generation hosehead was great and had no issues for years until the brewery took a power surge and it died. This most recent version just hasn't worked as well.

Ouch. I had to flash it once when I powered it down without preforming the appropriate chants and rituals.
 
I have been considering either the Brew Commander or the Auber Cube but have been leaning toward the Auber. I am wondering if I will be tied to a timer for both the Cube and Commander for mash and boil or do both the Cube and Commander allow one to boil and mash without a timer?

I have also been wondering about the difference between the Cube and the Commander when it comes to using a percentage of the power on output and if one works better than the other in this regard. My thinking is that I would use a 5500 watt element in a rims tube to heat strike water quickly and then use only a percentage of the power to control the mash while recirculating. I know that the Cube allows for pulsing the element and I see the Commander has a percentage power function but is there any difference between them in this regard? Is one better than the other?

Thanks,
Ben
You can use the Auber Cube (EZBoil based) without having to set timers. I can't answer for the BrewCommander.

Both should be equally power efficient, as both use SSR's for power switching/modulation. The EZBoils have faster cycle times (shorter "on" cycles) than ordinary PID's, which is advantageous for a high powered element in a RIMS, where you don't want to locally overheat the wort. I don't know how the BrewCommander cycle time compares to ordinary PID's or EZBoils.

Brew on :mug:
 
My thinking is that I would use a 5500 watt element in a rims tube to heat strike water quickly and then use only a percentage of the power to control the mash while recirculating.

Separate point, but I doubt you'd need/want a 5500W RIMs element. I would think you would use a 5500w element in the HLT or boil kettle to bring to strike temp. I know the 240v RIMs Rocket from Blichmann is only 3500w.
 
You can use the Auber Cube (EZBoil based) without having to set timers. I can't answer for the BrewCommander.

Both should be equally power efficient, as both use SSR's for power switching/modulation. The EZBoils have faster cycle times (shorter "on" cycles) than ordinary PID's, which is advantageous for a high powered element in a RIMS, where you don't want to locally overheat the wort. I don't know how the BrewCommander cycle time compares to ordinary PID's or EZBoils.

Brew on :mug:

Thank you Doug for the reply. That is good to know about not being tied to a timer with the EZboils. It sounds like the EZboils have the ability to effectively reduce the possibility of scorching wort when the short on cycle. Is the time the element is on adjustable at all. For instance in the way a unit with power width modulation is? Can I assign a value to the EZboil that will change the portion of the cycle the element is on?

Thank you,
Ben
 
Separate point, but I doubt you'd need/want a 5500W RIMs element. I would think you would use a 5500w element in the HLT or boil kettle to bring to strike temp. I know the 240v RIMs Rocket from Blichmann is only 3500w.

Point taken tmendick. I had considered a 5500 watt element might just be unnecessary as well. Perhaps heating the strike water quickly in the HLT with a 5500 watt element first and pumping it over to the mash to be maintained with a more reasonably powered element would be a better option. I could then easily heat my sparge water in the HLT during mash with that high powered element.

Thank you,
Ben
 
Thank you Doug for the reply. That is good to know about not being tied to a timer with the EZboils. It sounds like the EZboils have the ability to effectively reduce the possibility of scorching wort when the short on cycle. Is the time the element is on adjustable at all. For instance in the way a unit with power width modulation is? Can I assign a value to the EZboil that will change the portion of the cycle the element is on?

Thank you,
Ben
Yes, the easy boil does something similar to pulse width modulation, but could more accurately be described as pulse count modulation. You can vary the EZBoil from 0% to 100% power in 1% increments, just by turning a knob.

Brew on :mug:
 
You can use the Auber Cube (EZBoil based) without having to set timers. I can't answer for the BrewCommander.

Both should be equally power efficient, as both use SSR's for power switching/modulation. The EZBoils have faster cycle times (shorter "on" cycles) than ordinary PID's, which is advantageous for a high powered element in a RIMS, where you don't want to locally overheat the wort. I don't know how the BrewCommander cycle time compares to ordinary PID's or EZBoils.

Brew on :mug:

The Ez boil sounds a bit more sophisticated from what I've read than my Brew Commander. The Brew Commander default is 5 sec cycles when pulsing but that parameter can be changed. I havent messed with it.

I always use my timers in the BC, but I'm pretty sure you can just set a temp and power percentage manually and not engage the timer. Of the nine different storable profiles, I only use 3. One for a single temp mash, another for a step mash, and third one is for my PBW 20 min cleaning cycle.

I think the touchscreen interface and display on the Brew Commander is pretty slick and at its price point was a no brainer for my single vessel eBIAB. Plug n play and simple learning curve appealed to me as a newbie to controllers. It's sure made my brew days better and less stressful.
 
Can't go wrong with either. I use a hosehead. I personally really like having 3 separate thermometers going (Kettle-RIMS setup: 1 in the BK, 1 in the mash tun, and 1 in a t-intersection to control the element), but it is easily possible to get away with just 1. The one downside I can see to the brew commander is that you may not want the controller right next to the boiling water, should you have a spill or some other issue (my first brew, a hose jumped off my chilling coil out, which resulted in water spraying all over, both into my just-finished boiling pot and perilously close to the electronics). I'd be slightly more comfortable with a waterproof box like the Auber.
 
Can't go wrong with either. I use a hosehead. I personally really like having 3 separate thermometers going (Kettle-RIMS setup: 1 in the BK, 1 in the mash tun, and 1 in a t-intersection to control the element), but it is easily possible to get away with just 1. The one downside I can see to the brew commander is that you may not want the controller right next to the boiling water, should you have a spill or some other issue (my first brew, a hose jumped off my chilling coil out, which resulted in water spraying all over, both into my just-finished boiling pot and perilously close to the electronics). I'd be slightly more comfortable with a waterproof box like the Auber.

The Brew Commander has a 6-8 ft wire to the thermo couple and my boil coil cord is as long or longer. Still, you're right a spraying hose could possibly reach a controller no matter the make. Not sure if any of them are actually waterproof.
 
I get around it now by brewing in an alcove where my water heater is with a door open to kinda seal it off, save for a 1 inch gap. If I move to a place without such a conveniently placed wall, I might build a plywood shelter for it. Water and electricity don't mix, even if it makes good beer.
 
So I wrote Auber about the using a percentage of the power during the mash and this was their response.

"The Cube 2E or 2S is installed with DSPR320 controller. On DSPR320, you can lower the output percentage when the heating is in the acceleration phase, using the parameter mOUT. But once the temperature is within certain degrees of the target mashing temperature, the mOUT limit will on longer be effective. The controller will decide what power percentage to use, ranging from 0% to 100%. Hope that can answer your question. Let me know."

It looks like during the mash the Cube adjusts the power output for the user and that it can't be manipulated.

Ben

I don't know much about controllers but that doesn't seem to make much sense. Even on my Brew Commander I can adjust power output during mash or boil.
 
So I wrote Auber about the using a percentage of the power during the mash and this was their response.

"The Cube 2E or 2S is installed with DSPR320 controller. On DSPR320, you can lower the output percentage when the heating is in the acceleration phase, using the parameter mOUT. But once the temperature is within certain degrees of the target mashing temperature, the mOUT limit will on longer be effective. The controller will decide what power percentage to use, ranging from 0% to 100%. Hope that can answer your question. Let me know."

It looks like during the mash the Cube adjusts the power output for the user and that it can't be manipulated.

Ben
I don't know much about controllers but that doesn't seem to make much sense. Even on my Brew Commander I can adjust power output during mash or boil.
It doesn't make much sense to me either Cato. I was under the impression that you could adjust the power output during mash.

Ben
I don't know of any PID's used in homebrew controllers that allow the user to limit the power while the controller is in automatic temperature control mode. It's the job of the controller to determine the power required to maintain the setpoint temperature. During a mash the power will typically be less than 25%, so setting a manual upper limit is not really of much use. The whole point of automatic temperature control is to let the controller figure it out, so you don't have to do it manually.

Where you need to be able to manually set the power is during boil, since boiling happens at a temperature determined by physics, and not the power input. Higher power inputs cause more vigorous boiling and more evaporation, but no increase in temperature when boiling.

Brew on :mug:
 
The auber DSPR120, which is the more basic of the two EZboils does not have a power limiter during temperature mode. The DSPR320 which is the more complicated (or you could say feature-rich) "step mash" programmable unit and it does have the mOUT parameter that is like a power limiter during the mash mode. As doug said, power limiting is not common on most controllers and the Brew Commander may be the first one that puts that right on the front home screen. However, it's not something that's a part of the programmable mash profile. I mean I don't know if you can retain the max power setting while the step mash program is running.

I think I had a phone conversation with @BenniferBropez about this and based on the idea of using the RIMS for both heating strike and then using it for mash temp control I had mentioned that the two goals were somewhat mutually exclusive in design. That is to say that for water heating, you want as much power as possible. While mashing, you really only want as much power as you need to get the RIMS output temp to your setpoint and nothing more. This is a difficult concept to communicate. If you have a 5500 watt element in a small RIMS tube, flow rate through the tube and the given controller's minimum cycle time is going to be the difference between solid output temps and making a cylinder of caramel. You want the RIMS output temp to be exactly what you set on the controller with no oscillation but that's hard to do with very high powered elements. Even with a short pulse, it may heat the wort hotter than the set point. It may be that the best compromise is a 3500 watt element.

I think I need to setup a 240V RIMS and have a shootout between the two controllers otherwise this is just speculation.
 
... idea of using the RIMS for both heating strike and then using it for mash temp control I had mentioned that the two goals were somewhat mutually exclusive in design. That is to say that for water heating, you want as much power as possible. While mashing, you really only want as much power as you need to get the RIMS output temp to your setpoint and nothing more. This is a difficult concept to communicate. If you have a 5500 watt element in a small RIMS tube, flow rate through the tube and the given controller's minimum cycle time is going to be the difference between solid output temps and making a cylinder of caramel. You want the RIMS output temp to be exactly what you set on the controller with no oscillation but that's hard to do with very high powered elements. Even with a short pulse, it may heat the wort hotter than the set point. It may be that the best compromise is a 3500 watt element.

I think I need to setup a 240V RIMS and have a shootout between the two controllers otherwise this is just speculation.

This is definitely not mutually exclusive in my opinion. On my personal rig, I use a 5500W element with a high/low power feed to do both. Element runs at 240VAC (5500W) for strike heating, sparge water heating, mashout, and cleaning. Runs at 120VAC (1375W) for mash temp control and step mashing. I use a relay to switch between the two automatically (switches an element leg between LINE 2 and NEUTRAL), but this could be done with a manual switch too. You even tested this a while back, Bobby.

With advanced software controls, this can power switching can be controlled entirely in software, adjusting control parameters and output limit to 25% to run on 240VAC full time, but hardware above can be quick path otherwise.

Now, regarding the "caramel cylinder"... that is a legit concern. It can be mitigated however with appropriate operation and hardware. Turbulence, mounting, flowrate, and element density are all important factors. I initially used a 5500W foldback wrapped in stainless wire to create turbulence and spread out heat, but have since implemented a purpose-made RIMS element which has the same power density as the wave foldbacks we use in the BK.
 
The auber DSPR120, which is the more basic of the two EZboils does not have a power limiter during temperature mode. The DSPR320 which is the more complicated (or you could say feature-rich) "step mash" programmable unit and it does have the mOUT parameter that is like a power limiter during the mash mode. As doug said, power limiting is not common on most controllers and the Brew Commander may be the first one that puts that right on the front home screen. However, it's not something that's a part of the programmable mash profile. I mean I don't know if you can retain the max power setting while the step mash program is running.

I think I had a phone conversation with @BenniferBropez about this and based on the idea of using the RIMS for both heating strike and then using it for mash temp control I had mentioned that the two goals were somewhat mutually exclusive in design. That is to say that for water heating, you want as much power as possible. While mashing, you really only want as much power as you need to get the RIMS output temp to your setpoint and nothing more. This is a difficult concept to communicate. If you have a 5500 watt element in a small RIMS tube, flow rate through the tube and the given controller's minimum cycle time is going to be the difference between solid output temps and making a cylinder of caramel. You want the RIMS output temp to be exactly what you set on the controller with no oscillation but that's hard to do with very high powered elements. Even with a short pulse, it may heat the wort hotter than the set point. It may be that the best compromise is a 3500 watt element.

I think I need to setup a 240V RIMS and have a shootout between the two controllers otherwise this is just speculation.

I learn a lot from your posts @Bobby_M ! I'm glad you are so active/involved with this forum. I'm sure it helps quite a few others on here as well to have you as a resource.
 
Back
Top