What does a secondary fermenter do?

Homebrew Talk - Beer, Wine, Mead, & Cider Brewing Discussion Forum

Help Support Homebrew Talk - Beer, Wine, Mead, & Cider Brewing Discussion Forum:

This site may earn a commission from merchant affiliate links, including eBay, Amazon, and others.
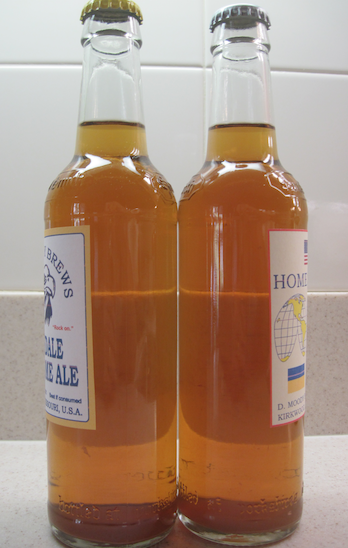
Yesterday I did a comparison of batch #280 and batch #281. This was my "Peter Cotton Ale" that uses amber dry extract, Nugget and East Kent Goldings hops, some toasted pale malt, and S33 ale yeast. (The recipe is here: I brewed a favorite recipe today) Batch #280 was brewed 5/26, transferred to a secondary 6/1, and bottled 6/9. Batch #281 was brewed 6/2 and bottled 6/16.

At bottling, #280, left, was clearer and #281, right, was cloudier.
280:281 when bottled.png


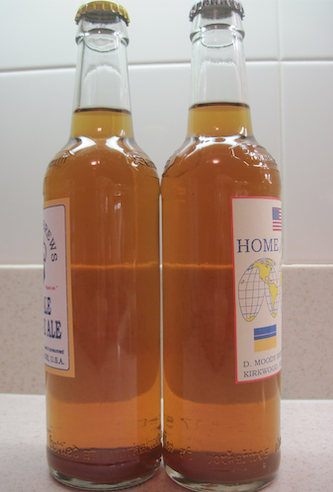
This is a combined picture when each was ten days in the bottle. Both are clear and about the same color.
280:281 10day.png


Yesterday, 7/7, they looked like this side by side:
280:281 7:7.png

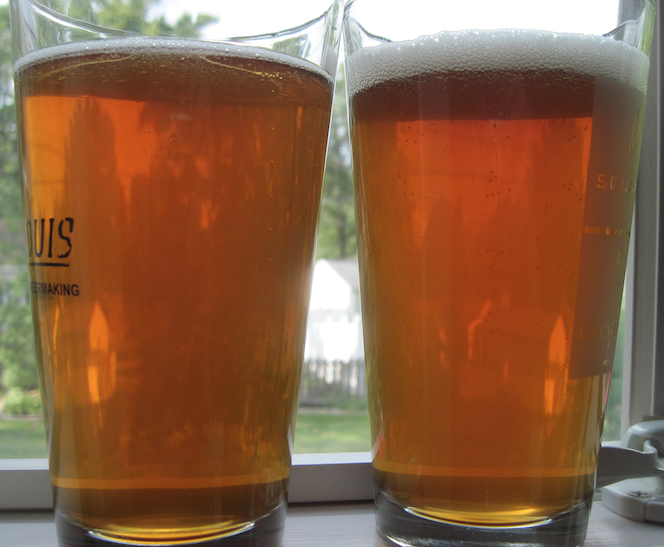
#281 is slightly lighter. This is more apparent in the glass, #281 on the right:
280:281.png


There is much more sediment in #281, which is a week younger and did not undergo a secondary. It required care not to disturb it when pouring.
280:281 sediment.png


There was no difference in clarity, a big difference in sediment, and #280 was just slightly darker. Neither I nor my fellow taster preferred one over the other: they tasted almost the same.

In this comparison #280 was four weeks in the bottle and #281 was three weeks in the bottle. I will do weekly comparisons for a while to see if differences develop and to see if the greater sediment in #281 becomes less irksome.

7/14
#280, left, five weeks in the bottle and #281, right, four weeks in the bottle:
7:14:21.png

The difference in color has lessened. #281, no secondary, has a sharper taste. No strong preference for either, but, if I had to pick, I'd go for #280's smoother taste.

7/21
#280, left, six weeks in the bottle and @281, right, five weeks in the bottle:
7:21 taste.png

There is little difference in color, but #280 is slightly darker. #281 has become easier to pour, but not as easy as @280. We had a taste preference for #280 as being smoother.

7/23
Today i conducted a blind taste taste on my fellow taster. One glass held #280 and two held #281. My taster selected which one was different and expressed a preference for #280, the batch that experienced a secondary. The color difference is more marked in the small glasses used in the test. #280, left, is darker. and #281, right, is not as clear as sediment was disturbed in doing the testing.
7:23:21.png


7/28
Today I did another comparison: #280 seven weeks in the bottle and #281 six weeks in the bottle.
I'm not bothering to post a picture as they look the same as trey did last week and in the 7/23 testing. My preference in taste is for #280, the batch that experienced the secondary. I can enjoy #281 if I just drink it alone. The sediment in #281 is still aggravating. For the eight week test, I will put them in the refrigerator for several days to see if that helps with that.

8/4
Another test today. #280 eight weeks in the bottle and #281 seven weeks in the bottle. I still like them both, but the extra time in the fridge did not keep the sediment in #281 from being a pain. I might try to save two to compare when my older son, who also home brews, is here in September. This will probably be past their "best by" dates, but worth a shot.
 
Last edited:
We did a comparison on the 18th with #280 ten weeks in the bottle and #281 nine weeks in the bottle. Our preference was for #281, the batch that was not subjected to a secondary. It still has hop character and #280, while enjoyable, is too bland in comparison. These are supposed to be IPAs after all.

8:18.png

#281, on the right, is still a pain to pour because of its greater sediment. It is possible to pour a clear glass and I'm attaching a picture (below and, confusingly, in the same glass used for the other batch in the picture above) from during the week and a half after the comparison. Switching to no secondary might entail changing the yeast in this recipe and/or lengthening the time in the fermenter before bottling, but no secondary is good for hop character.

281.png


I have set aside one of each for a September tasting.
 
Last edited:
Today we did a comparison tasting of batch #282 and #283. These are house bitters that use only 4 1/2 lbs. of malt, are lightly hopped, and Nottingham yeast. (The recipe is here: "I Brewed a Favorite Recipe [link]) #282 was brewed 7/26 and was bottled 8/10; #283 was brewed 8/2, transferred to a secondary 8/8, and bottled 8/17.

At bottling #282, left, was cloudier than #283, right.
282L&283R@btling.png


A combined picture of each at two weeks in the bottle shows both clear and the same color:
282:283 2 wks comb..png


Today, 9/7, they looked like this side by side:
282&283 9:7.png

In the glass they look the same. #283, right, does not show extra darkening from oxidation.
At the tasting #282 was 4 weeks in the bottle and #283 was three weeks in the bottle.
They poured easily. #282, which had no secondary, had a bit more sediment in the bottles, but it was not real troublesome. They tasted the same too.
282L&283R in glass 9:7.png

We thought #283 might linger on the tongue a bit longer, but that's the only difference we could detect.

Edit: link replaced text reference thanks to @BrewnWKopperKat's post..
 
Last edited:
Keep 'em coming - this is killer stuff.
Agreed, this is killer stuff.

Those that are looking for shorter indoor brew days this winter may want to take a look at the process that was used to make the beer:
  1. Dissolve 2 1/4 lbs. DME in 1/2 gal. water for late addition
  2. Dissolve 2 1/4 lbs. DME in 1 gal. for boil, begin heating
  3. Steep grains in 1/2 gal water for 30 min. at 150-160 F
  4. Strain into kettle with water and dissolved extract that has been warming and bring to boil
  5. 30 min. boil
  6. 10 min. flavor hops
  7. Pour into fermenter with late addition extract and add aroma hops
  8. Cool in sink bath before topping to 5 gal with cold water
Here's what I see:
  • No need to add DME from the bag over a steaming kettle (no sticky DME mess)
    • 1/2 the DME before "flame-on"
    • 1/2 the DME as a slurry
  • Shorter brew day by steeping grains in a side pot while heating the main wort
  • Shorter brew day with a 30 minute boil
  • Shorter brew day by using "top up" water to cool the wort
  • and there's more if one is willing to do some simple SG calculations
As an aside, before one gets all concerned about color increases during the boil, listen the to BBR podcasts (Aug 25, 2005, Nov 17, 2005). 45 min boils appear to add about "1" L to the color (confirmed to my satisfaction here [link]).

It's a delight to see all these ideas brought together into a single process that results in a good looking (and tasting) extract-based beer.
 
There are a lot of exbeeriments with good intentions that fall just short of common sense or a practical application.

My comparisons are not finished yet, but here's a definite, practical application decision I've already made: my IPA recipe will shift to no secondary transfer because the oxygen exposure hurts the hop character. The same recipe will shift yeast from S33 to Nottingham or S04 because S33 does not settle out well without the secondary. This was in post #83 above.

BTW, I have never used Starsan. I don't sanitize anything. I just wash my equipment and run the bottles through the dishwasher. I've done this since 1994 for 284 brews without a problem. Of course, my equipment is pretty basic. I understand this is not best practice, but neither is doing a secondary.
 
  1. Pour into fermenter with late addition extract and add aroma hops
  2. Cool in sink bath before topping to 5 gal with cold water
Here's what I see:
  • No need to add DME from the bag over a steaming kettle (no sticky DME mess)
    • 1/2 the DME before "flame-on"
    • 1/2 the DME as a slurry
  • Shorter brew day by steeping grains in a side pot while heating the main wort
  • Shorter brew day with a 30 minute boil
  • Shorter brew day by using "top up" water to cool the wort

Another shortener I tried and liked after that was to add the late addition and then the aroma hops at flame out to the brew kettle and cool that in the sink bath before transferring to the fermenter. A more rapid cool down through a metal kettle than a plastic fermenter, but still time for pasteurization and hop aroma steep.
 
@D.B.Moody Wow!

Incredible that you don't use sanitizer, but that is EXACTLY why forums like this exist and why we should conduct and post experiments like these.

I will most likely never stop using sanitizer, but now I know that the dishwasher could be a viable alternative in a pinch.
Minimalist, or "less stress" approaches that still get the job done well are great for homebrewers, and I feel like documenting them is essential to ease the heavy minds of new folks reading that they MUST do X, Y, and Z or their batches will be ruined or taste awful, or not have good head retention.

In my opinion, a lot of the classic homebrew literature is outdated in the sense that it acts as a metronome alternating between far too simple/out of date for the resources readily available today, and then immediately switches to a commercial yeast lab summary for yeast handling.

TLDR: Let's write a book.
 
Minimalist, or "less stress" approaches that still get the job done well are great for homebrewers, I feel like documenting them is essential to ease the heavy minds of new folks reading
Maybe start by writing a topic or two here at HomebrewTalk. People have done this in the past (stove top partial mash in 2009, water chemistry in 2010, ...).

If you're considering approaching the topic of a new brewer's 1st day, How to Brew, 4e (chapter 1, for extract) and Speed Brewing (chapters 1 & 2 for BIAB) could be a useful comparision for your writing efforts.
 
If you're considering approaching the topic of a new brewer's 1st day, How to Brew, 4e (chapter 1, for extract) and Speed Brewing (chapters 1 & 2 for BIAB) could be a useful comparision for your writing efforts.

I'm still very new and have only done BIAB. Thank you for the Speed Brewing resource! I'm currently doing everything on my stove in one 10gal kettle for 5g batches.
 
@D.B.Moody Wow!
TLDR: Let's write a book.

I left working in education in 1980, I left managing people in 1998, and I retired in 2006. I am not the guy to write a book. I am not the person to tell people what to do. :) My brewing is out of date. That's why I'm exploring whether or not I think not doing a secondary will improve my beers. I do like the 30 minute boil and late addition method that I now use because of what I picked up on on HBT. That's not out of date, so I'm not hopeless.
 
I really admire that perspective! Who says you can't teach an "old dog" new tricks?! 😉
 
I also suspect that @D.B.Moody is focused on brewing beer that he likes. Ultimately, that's my goal too. I won't say it should be everyone's goal but I think it's the best path to being happy with what you do.

One would hope that's why we all do it otherwise what's the point?
 
I'm still very new and have only done BIAB.
Simple Homebrewing and Methods of Modern Homebrewing are a couple of additional books that you could consider.

If you decide to add 'extract' to the list of ingredients you brew with, start with the Basic Brewing Radio episodes on Aug 25, 2005 and Nov 17, 2005.

@D.B.Moody isn't "out of date". Whether or not he is "out of sync" with forum wisdom depends on where the metronome is ;).
 
Is this thread about secondary fermentation?

Just a polite heads up...there is no such animal. There is one, and only one fermentation that takes place. You can transfer the wort/beer into different vessels if that's your desire, but it is still the same fermentation that is taking place.

We leave the beer in a single fermentation vessel (SS Conical) from start to finish.
 
Is this thread about secondary fermentation?

Just a polite heads up...
As a polite heads up, in home brewing the technique of transferring beer to a secondary container is commonly referred to as "secondary fermentation".

The recent theme of the this topic hasn't been on the "rightness" or "wrongness" of the technique. It has been on showing the results of the technique.

And some of use seem to see it as an interesting discussion.

We leave the beer in a single fermentation vessel (SS Conical) from start to finish.
You are the "head brewer" in your "home brewery".

Brew how you like, like what you brew.
 
No worries, mate. The info regarding primary, secondary, etc., came from the head brewer at the Hofbrau Brewery in Addison, TX.
He is also a graduate of the Siebel Institute.

Just thought I would pass it on.
 
Is this thread about secondary fermentation?

Just a polite heads up...there is no such animal. There is one, and only one fermentation that takes place. You can transfer the wort/beer into different vessels if that's your desire, but it is still the same fermentation that is taking place.

The denizens here are aware of that. Personally, I don't use the term "secondary fermentation" unless there is one (fruit additions, bottle conditioning, etc.). If the beer is moved to a second vessel, I'll say "do a secondary" or "transfer to secondary" without adding the word "fermentation."
 
It's just one of those idioms that experienced brewers know what is being talked about, but just don't argue semantics of the language. I personally know there is such an animal as "secondary fermentation" (ex. when fruit is added, additional sugar added at dry hopping to scrub diacetyl production, even bottle conditioning), but I know it's not worth parsing that language and derailing the discussion and I try not to bust balls about it when someone does use it inaccurately.
 
Last edited:
Well, pardon me. Did not intend to step on anyone’s toes here…or spill anyone’s beer.
I’m in the camp that believed there were two, yes two, fermentations. A primary. Then a secondary.
Thankfully I was straightened out on the matter.

My thought was perhaps there are others who may be in the same camp.

The pro brewer pointed out to me that there is no need to transfer into another vessel. It creates risks that are not warranted. So we always ferment to completion in a single vessel. Works for us at Bel Air. Might not work for you.

I take words literally. My personal problem. Sorry!
 
Is this thread about secondary fermentation?

Just a polite heads up...there is no such animal. There is one, and only one fermentation that takes place. You can transfer the wort/beer into different vessels if that's your desire, but it is still the same fermentation that is taking place.

We leave the beer in a single fermentation vessel (SS Conical) from start to finish.
In a brewery, its referred to as a settling tank or a bright tank. Its the same idea
 
Yesterday we again compared #282 and #283.
9:14 bottles.png

9:14 glass.png

In the bottle and in the glass they appeared alike. #282 was 5 weeks in the bottle, and # 283, which was subjected to secondary, was 4 weeks in the bottle.

They also tasted alike, almost exactly the same. I had a problem deciding which I preferred and was afraid my knowing which was which might be coloring my judgement. My fellow taster, who was not aware of which was which, stated a preference for #283, but could not describe why, perhaps because the difference seemed so small.

This brew is lightly hopped and has a good amount of crystal malt for only 4 1/2 lbs. of light malt extract. Perhaps this is why there isn't the darkening we saw in comparing batches #278 and #279 which had no crystal malt in posts #61 and #79 as in this:
6:7 278:279.png
 
Last edited:
Sometimes I use a secondary, when the trub layer is really thick like right up to the spigot. My fermenter (BMB with spigot) is up on a shelf that allows easy gravity transfer. If I am transferring to a secondary, which is also a BMB, I purge with CO2 from the bottom, using a line from the regulator of a chilled CO2 tank to the spigot of the secondary. Et wa-lah. Secondary is filled with CO2. I run a line from the spigot of the primary to the spigot of the secondary. That's how the beer transfers. I run another line from the stopper hole of the secondary to the hole in the stopper of the primary. That gives the displaced CO2 in the secondary somewhere useful to go, right in on top of the beer in primary. The displaced CO2 prevents vacuum in the primary and air getting sucked in. Closed loop, just like transferring to keg. A couple of swallows of beer are wasted in the transfer line but one could always use a two hole stopper on the secondary, and fill through one hole while the other lets the CO2 move. I have tried the open end method, using a CO2 tank to push the beer out but that requires constant fiddling with the regulator. Anyway, transfer CAN be done without oxidation, if you are careful. After transfer, the secondary goes up on the shelf, and a week or two later I transfer to a CO2 purged keg, basically the same way. With the greatly reduced trub layer I get a much cleaner final transfer to keg, with greatly reduced sediment if I don't get greedy for that last pint of beer.

I have been meaning to add a second spigot to my BMB's to allow for the heavy trub layer I get from these larger beers I have been making. I have also considered a floating pickup in the BMB. Of course that is more stuff to wash and sanitize. There just ain't no free lunch. Home brewing is all a big exercise in compromise. If you want perfection, you will pay for it, one way or the other.
 
Another opinion in my comparisons of secondary and no secondary batches:
My older son, who is also a homebrerwer, is visiting. Wednesday he compared #282 and #283, and Thursday he compared #280 and #281. In both cases he was able to detect a difference, though he indicated he would probably not have in the case of #283 and #284 if he had not been looking for one. In both cases he correctly identified which batch had been put through a secondary. He felt the primary only batches had a yeastier taste. He had no real preference in either comparison, but, if he had to pick, he would pick the secondary in both cases.
 
Its a long story about how my process works that I don’t want to get into, but my typical brew day yields 2 10 gallon batches split into 4 primaries. The first 2 primaries get kegged around day 10-14 depending on the dry hops. The second two go into secondaries until the first 2 kegs are drained. I keep track of pints to keep ahead of schedule on dry hopping. The second two kegs are always clearer, smother, and IMHO better beers. I have never just left the second 10 gallons in the primary, but maybe I should give it a shot.
 
The second two go into secondaries until the first 2 kegs are drained. . .The second two kegs are always clearer, smother, and IMHO better beers. I have never just left the second 10 gallons in the primary, but maybe I should give it a shot.

Just curious if you do some sort of closed transfer and CO2 thing to avoid oxygen exposure when going to the secondary. Would you test of leaving it in the primary be looking to see if was mainly just extra aging?
 
Just curious if you do some sort of closed transfer and CO2 thing to avoid oxygen exposure when going to the secondary. Would you test of leaving it in the primary be looking to see if was mainly just extra aging?
You have to understand that I’m a walking time capsule. I quit doing any type of brewing research in 2009. I’ve still brewed 200+ gallons a year since, but using the standard, accepted practices of that era. I got back online 2 weeks ago and learned that I was making crappy beer because I use a secondary, don’t purge with co2, yadda, yadda, yadda. I’d be willing to bet most people regurgitating all of this oxygenating stuff have never experienced oxidation, and are just repeating what they have learned as if it was settled science.

The standard theory of 12 years ago was that when you transferred to the secondary, you would get some minimal contact with air, but you keep the output end of the siphon in the beer to minimize splashing. There is some dissolved co2 that gets released during the transfer that blankets the beer. If you aren’t dry hopping, you make sure that your batch is big enough to fill into the neck of the carboy. You are then left with a few cubic inches of air space that will be filled with co2 as fermentation completes.

Same concept for filling kegs, but you purge the top with a few fills and dumps of co2 prior to force carbing.

I’m not saying I’m right. In fact, I am going to buy a pressurized fermenter and see if there is anything to these new gadgets and theories, but at the end of the day I’d be willing to put my beer in front of anybody for a taste test. It will be interesting to split a 10 gallon batch and compare my tried and true methods with minimal oxygen contact methods.
 
You have to understand that I’m a walking time capsule. . . I use a secondary, don’t purge with co2, yadda, yadda, yadda. . .
It will be interesting to split a 10 gallon batch and compare my tried and true methods with minimal oxygen contact methods.

I'm old school and use secondaries too. That's why I've been doing the comparisons I've been reporting on in this thread starting in post #61.
 
Last edited:
You have to understand that I’m a walking time capsule. I quit doing any type of brewing research in 2009. I’ve still brewed 200+ gallons a year since, but using the standard, accepted practices of that era. I got back online 2 weeks ago and learned that I was making crappy beer because I use a secondary, don’t purge with co2, yadda, yadda, yadda. I’d be willing to bet most people regurgitating all of this oxygenating stuff have never experienced oxidation, and are just repeating what they have learned as if it was settled science.

The standard theory of 12 years ago was that when you transferred to the secondary, you would get some minimal contact with air, but you keep the output end of the siphon in the beer to minimize splashing. There is some dissolved co2 that gets released during the transfer that blankets the beer. If you aren’t dry hopping, you make sure that your batch is big enough to fill into the neck of the carboy. You are then left with a few cubic inches of air space that will be filled with co2 as fermentation completes.

Same concept for filling kegs, but you purge the top with a few fills and dumps of co2 prior to force carbing.

I’m not saying I’m right. In fact, I am going to buy a pressurized fermenter and see if there is anything to these new gadgets and theories, but at the end of the day I’d be willing to put my beer in front of anybody for a taste test. It will be interesting to split a 10 gallon batch and compare my tried and true methods with minimal oxygen contact methods.
I think the whole oxygen exposure thing really started with and because of NEIPAs. People making these beers are seeking to capture every hop nuance. Those beers are much more averse to oxygen exposure because of the process used to make them. They don’t use any boil hops and they put all the hops in at the end of the boil in one giant whirlpool addition. If I was a fan of NEIPA and brewing those (I’m not and I’m not) then I would be more concerned with O2 exposure. I’m an old school clean beer guy and I’m happy making my beers the way I’ve been doing them.
 
Yesterday we compared #282, left, six weeks in the bottle, and #283, right, five weeks in the bottle. #283 experienced a secondary. The beers looked the same:
9:21 btls.png


Although #283 was noted as fizzier, the tasting was unsatisfactorily inconclusive, so we did another tasting today. (I know you are all impressed by the dedication this shows, but applause is not necessary.) Our decision today is that #282 is a wee bit sharper/more bitter; but it is slight, and the extra fizziness of 283 confuses things. The upshot is that if we have to choose we again have a preference for the batch that experienced the secondary.
 
Last edited:
Back when I used a secondary because I thought you had to, I noticed that a lot of sediment had collected at the bottom of the secondary in very short time. I thought it had to do with possibly sucking up some of the heavier particles in the transfer and those just fall sooner. Then I was extremely careful to avoid the trub layer and left a bunch of beer behind to be sure. Still a lot of fast sedimentation in the secondary in only an hour. I speculated that it has something to do with breaking surface tension or that the mixing action helped particles to coagulate and get heavy. If either of those are the explanation, a controlled agitation of the fermenter after fermentation is done should also simulate that response. I tend to do it to get trapped surface particles to fall a bit sooner. Sometimes rafts of yeast and dry hops will get stuck up there under a few trapped CO2 bubbles. Jostling the fermenter gets it moving almost like punching down the cap on a wine ferment. Anyway, this ramble is just to say I THINK something happens to the beer when it gets transferred to a secondary and it probably aids in faster clearing. I would never do it because my beers eventually get brilliant anyway and it's not worth the effort or exposure.
 
Last edited:
@Wables : this approach to brewing / storing may be of interest to others - so I think it's worth bringing together a couple of ideas from some recent replies.

my typical brew day yields 2 10 gallon batches split into 4 primaries. The first 2 primaries get kegged around day 10-14 depending on the dry hops. The second two go into secondaries until the first 2 kegs are drained.

Aside to readers: certainly, there are alternatives (buy more kegs, ...). My point here is to highlight an alternative that appears to work in the right set of conditions. If readers find inspiration for other places where a similar idea works, everyone wins.

The standard theory of 12 years ago was that when you transferred to the secondary, you would get some minimal contact with air, but you keep the output end of the siphon in the beer to minimize splashing. There is some dissolved co2 that gets released during the transfer that [...]. If you aren’t dry hopping, you make sure that your batch is big enough to fill into the neck of the carboy. You are then left with a few cubic inches of air space that will be filled with co2 as fermentation completes.

Many people here currently use wide necked containers (that's neither good nor bad, just an observation).

A related observation: There was a recent reply over in the The definitive NEIPA bottling experiment! topic where a bottling process that yielded good beer in the 120 to 200 day range was anecdotally reported. Filling the "dead space" in containers with C02 during the bottling process appears to have been the key.

Thank you @Wables for sharing your process, even though it seems to not fit into common, current "forum" practices and conventions.
 
This is a fascinating thread and I like all the attention to detail with regard to the taste tests. As a serious beginner, I'm going to try to leave my next brew in the primary and compare it to one I already did where I used a secondary.
 
Back
Top