• Please visit and share your knowledge at our sister communities:
  • If you have not, please join our official Homebrewing Facebook Group!

    Homebrewing Facebook Group

Welding 101 = Fun Brutus Build

Homebrew Talk

Help Support Homebrew Talk:

This site may earn a commission from merchant affiliate links, including eBay, Amazon, and others.
Never did thank you for the plans and posts OP!

2443-brewstand.jpg
 
SouthernYankee you inspired me to weld my own brew stand. However I found that although I can do anything I put my mind to, welding is taking a bit longer. You made some pretty nice welds. Mine suck. Theyre either globby or burned through LOL.. They do hold well, so I must be doing something right but man are they ugly. I'm gonna grind em all down when I'm done then paint. Maybe some of the more experienced welding folks can give me a pointer or two. I'm welding 16 Guage tubular steel with a Lincoln 100. I have the 211 flux core wire. I have it set on the B setting and feeding at level 3.
 
SouthernYankee you inspired me to weld my own brew stand. However I found that although I can do anything I put my mind to, welding is taking a bit longer. You made some pretty nice welds. Mine suck. Theyre either globby or burned through LOL.. They do hold well, so I must be doing something right but man are they ugly. I'm gonna grind em all down when I'm done then paint. Maybe some of the more experienced welding folks can give me a pointer or two. I'm welding 16 Guage tubular steel with a Lincoln 100. I have the 211 flux core wire. I have it set on the B setting and feeding at level 3.

Thanks man!
What I did and you can try it for yourself to see if it helps you.
Use a half moon motion, go back and forth.
You want to start at the beginning and go side to side in a half moon like shape or a "U". Bring the welding tip as you weld toward you as you make that pattern.
Do not leave your welding tip on a spot for to long or you will start to burn through the metal.
If you do this pattern (half moon) your welds should look like mine.
If you miss a spot, you can always go back to re-apply.

Also some people like to use the "Z" like method.

Hope this helps out..and once you grind those welds down, it will look nice and clean. :mug:
 
Hey Eric, I'm in the same boat. I too am learning to weld. Just bought the same machine as Yankee did...very nice welder Yankee. He is right about the shapes...I have also learned that if your angle on the weld is too high or too low, you won't get that "frying egg" sound. Also, in the manual it states that the wire should not exceed more that a 1/4". I was very anxious to start on my stand but I decided to take a few hours to practice on some scrap pieces and also to get a feel for the welder. I started on a wire speed of "3" and ended up almost on "4". As I practiced I also found out that I sometimes weld better when I "push" the tip instead of "pull" the tip toward me. One more thing...the auto darken Helmet helps TONS. Last words...Thank you Yankee for your post. I never thought I would attempt this project until I read your threads. thnx again
 
Thanks for the tips guys, I will try the U method and see what happens, also I noticed I was letting the wire get too long as well. I'll try some more practice welds before I do my inside corners as they are a pain to grind.
 
Thanks for the tips guys, I will try the U method and see what happens, also I noticed I was letting the wire get too long as well. I'll try some more practice welds before I do my inside corners as they are a pain to grind.

Everything Mellogrfx stated is spot on.
If your wire is getting to long, your not close enough to the metal. Be no more then 1/4 away from the metal as you move your welding tip around.
Once again I'm not a welding expert, but what Mellogrfx stated and from my experience building mine, this works best.

Have fun EricT and thanks guys for your comments. I'm truly happy that I could "inspire" others!
:tank:
 
So here is the progress so far. Believe it or not the weld I'm posting is my average weld and is an improvement over my first ones LOL. :D

DSCN3540.jpg


DSCN3539.jpg


DSCN3536.jpg
 
Hey EricT...how's your welding skills progressing? Are you still having problems with the inside corners? Looks like you are laying a pretty good puddle and I can see a nice heat-ring around your weld.
 
Hey EricT...how's your welding skills progressing? Are you still having problems with the inside corners? Looks like you are laying a pretty good puddle and I can see a nice heat-ring around your weld.

Thanks Mellogrfx, I finished my build and posted pics over at the Show us your brew stand or sculpture. I didnt want to hijack this thread with my beer porn :) heres the link:
https://www.homebrewtalk.com/f51/show-us-your-sculpture-brew-rig-46578/index117.html

The welds cleaned up nicely with a little grinding and seem very solid. She had her maiden brew last Saturday without any issues. Very happy as I couldn't find anything with a drawer , mobile and compact.
Cost:
60Ft 1.5" Tubular steel = 56.00
4" lockable caster = 42.00
24" drawer from HD = 30.00
1/2" plywood for shelves = 10.00
12x24" aluminum diamond plate = 20.00
Welder = free from neighbor
Learning to weld = Priceless!

Thanks again Southern Yankee
 
I am about to build a stand and am using a design very similar to yours and have a question about your gags pluming. I have read about the propane tank freezing up using these burners and the 30psi regulator. Do you have this problem using three of these burners? I know you will probably only having two running at a time but still wondering.
 
I am about to build a stand and am using a design very similar to yours and have a question about your gags pluming. I have read about the propane tank freezing up using these burners and the 30psi regulator. Do you have this problem using three of these burners? I know you will probably only having two running at a time but still wondering.

I only installed two burners. Never did have a third.
Both burners worked great. Never any problems as you mentioned.
 
so I'm going to build a stand pretty much exactly like this. question is, what saw blade can I use on my table saw to cut the steel tubing?
 
I would not use the table saw unless it is designed for cutting steel. I’m not saying it won’t work but consider this-

Two blade options are Metal or Abrasive -

Metal blade- Expensive

Metal blades designed to cut steel are designed for specific RPM's around 1800 and require allot of torque. Your table saw is probably around 3500. Cutting steel with this could seriously damage your saw. The metal bits are heavier than wood and the guard on a wood cutting table will likely shoot them into your face. Not Good.

Abrasive blade- -Cheap

Abrasive blades discharge red hot metal particles that may melt the plastic parts around your blade and guard. Abrasive blades require even more torque than the metal blades and may damage the motor on your table saw. Abrasive blades get smaller as they wear increasing the RPM's and reducing the depth you will be able to cut. With a 10” table saw your only starting with 4-5” depth.

That been said If this is the first and only project you foresee in the future I would measure your material and take it to a shop to have it cut. Some places that sell steel will cut it for you for a small fee or even free if you buy from them. If you plan on doing many more projects and can justify it get the right tool for the job. I like the chop saws with a dry metal blade. Cuts nice and clean and no fiery sparks while cutting. The edges don’t get pushed over and need little or no cleaning after the cut. Just my two cents. Whatever you do be safe.
 
Thanks for the tips guys, I will try the U method and see what happens, also I noticed I was letting the wire get too long as well. I'll try some more practice welds before I do my inside corners as they are a pain to grind.

So here is the progress so far. Believe it or not the weld I'm posting is my average weld and is an improvement over my first ones LOL. :D

Eric did you starts that weld you showed us at the top or bottom? Good penetration and nice half moon at the bottom.. Wire speed changes with each person.

Glad someone chimed in on the tablesaw, Just spins to fast to be safe. metal cuts slowly and if using a saw blade with lots of coolant.

And im not sure how many people got a nice wide open basement to weld in like Yankee, But its not something you want to breathe at all. Welders commonly battle lung cancer. I know that is career welders, but make sure ya got good ventilation...

Enough PSA...


Awesome sculpture!!! Great job from planning thru design to building!!!


A+ on the AutoCad. That program really rocks.
 
A few thoughts about welding. When I have noticed this subject here most are dealing with 110v machines. The main bottleneck with this type of machine is input. Find a 30 amp circuit to plug into. Use the thickest and shortest extension cord you can find. A 20 amp circuit will do. Nothing less. Performance significantly improves with the higher circuits. Flux core was mentioned by the OP. You must switch the polarity of the machine to run flux core. Consult your dealer or manual. It should be easy to do. Mig with a cover gas is run in DC reverse. With flux core it is run DC straight. Vertical welds are usually done from top down. This looks better but does not penetrate as good as flat or horizontal. Stick welds are started from the bottom up. I find if you turn it up for vertical welds it usually does okay on the tubing products I've seen photographed in this thread. If you must run MIG uphand instead of the "U" technique try proceeding upward making little triangles and turn your wire speed down a bit. It works for me. One poster wanted to use aluminum. If you are not a trade welder I would not recommend aluminum. It is one of the most difficult metals to weld. Heat moves much quicker through aluminum so there is a very fine line between a good weld and a big burned down mess.
 
I just read this thread, all 20 pages, and this is the were I am going to start my brew stand. I would like to comment on how all the needed info to build a great rig is all in one place. You pretty much have a template laid out for crafting a solid and affordable sculpture. Cheers!

I'm going to be placing my order for 10 sticks of 5 foot 1.5x1.5 16 gauge square tubing tomorrow. Ill make sure to post some photos once I finish or of anything that I change or modify.

Thanks for the inspiration.
 
I just read this thread as well and I am going to build it as well. I live in Germany so may be a little interesting with all the international changes.
 
Thanks for the pics and plans, I am in the process of building one myself :mug:

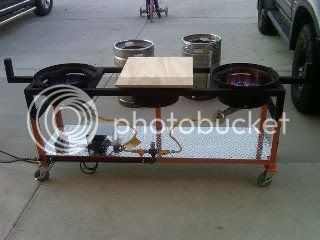
This was after 5 hours last night. None of the 3 of us building it are welders, hopefully it holds up :eek:

stand_resize.jpg
 
Just got mine done as well. First time welder. The welds don't look terrible. Hopefully I got enough penetrateion... haha penetration :ban: guess time will tell. Going to primer it and paint this week. Then I'll have to buy the casters and burners.
 
First, I absolutely love your stand. I would like to do something very similar. If you don't mind, could you tell me what all went into your gas set up (i.e. size pipe, fittings, valves, etc.)? That is the one item that I just can't seem to get a grasp of.

Thanks in advance!
 
First, I absolutely love your stand. I would like to do something very similar. If you don't mind, could you tell me what all went into your gas set up (i.e. size pipe, fittings, valves, etc.)? That is the one item that I just can't seem to get a grasp of.

Thanks in advance!

page 15-16
 
So here is the progress so far. Believe it or not the weld I'm posting is my average weld and is an improvement over my first ones LOL. :D

Try to get ten beads in each inch. count them as you go and try to get them tight. You should be trying to use a small flick of your wrist. Just doing this will make you a lot better welder.
 
brewstand.jpg


Not the best photo but I am almost done with the project. I just need to fine tune a few things. Thanks for the help and inspiration.
 
Back
Top