
Weezy
Well-Known Member
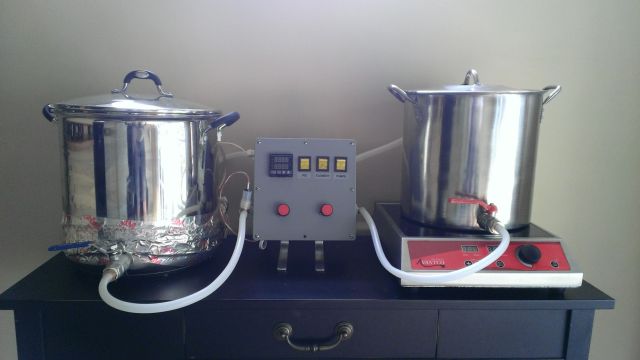
I finished my Brutus 2.0 rig, finally. Thanks to Lonnie Mac for putting this brew method out there.
I've been through a few iterations of electric brewing. The goals for the system were:
1. no elements touching the wort,
2. easy cleanup,
3. incorporate BIAB bag to permit double crushing, shorter mash times (and easy cleanup)
I only do 2-3 gallon batches, so heating requirements are lower than for 5+ gallon batch brewers. This rig only needs two 15-amp circuits.
The system relies on two different sources of heat. I have an Avantco 1800W induction cooker for heating strike water and boiling, and a high wattage thermal wire powered off an Auberins PID with 10-amp internal relay (SYL-2342) for maintaining mash temps. I thought about using two induction cookers, but assumed I couldn't get the temp control I wanted out of an induction cooker alone for mashing.
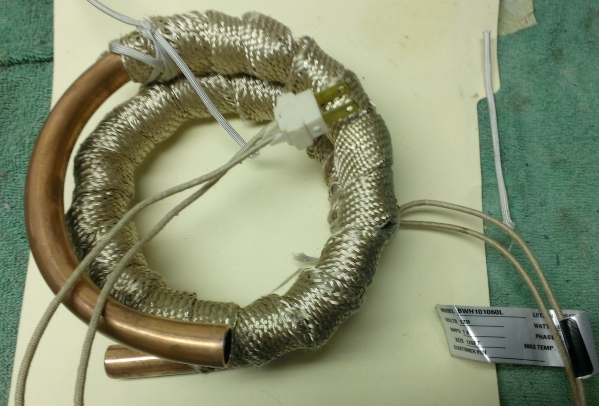
A couple years ago I picked up a 940 watt thermal wire from Omega.com. I wrapped it around a 22 Quart SS pot, and I've used it quite successfully as my mash tun. At first, I used in a sort of RIMS setup, with the wire wrapped tightly around about 15" of loosely coiled copper tube. It worked probably better, as far as thermal transfer, in that scenario. But I like it better wrapped directly to the pot because this setup lets me sour mash for a day or two quite easily at 105-110*F. I used to run it off a Sous Vide controller, until it died. This new setup runs it right off the PID w/o the need for an SSR. The internal 10-amp relay is plenty for the 940 watt wire.
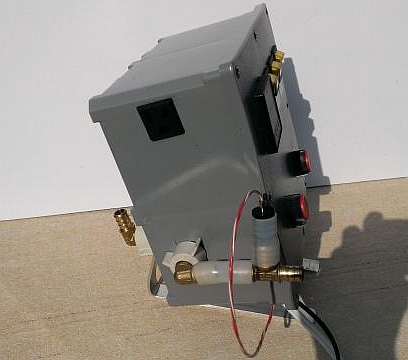
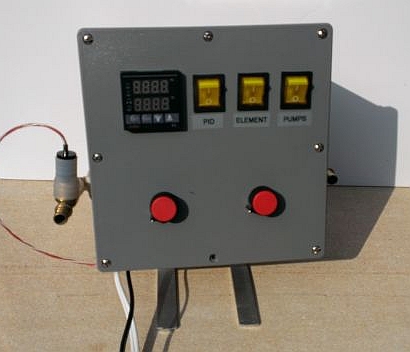
To keep the clutter down, I gutted my pump box and put the pumps & PWMs, into a new 8" Home Depot conduit box along with the PID, ebay 120V-25A switches (the switches light up when on, which is helpful), and a three prong through wall mount outlet to plug the element into (the black square on the left side photo...poor quality pics, I must say). Wiring was simply. Two separate plugs go into the box, keeping the pumps on a separate outlet plug from then PID/element circuit. They both can go to the same 15 amp circuit, since the pumps plus the element are <10 amps. For now, until my home brewery space is done, I run the pumps+element off a 13 amp extension cord to another circuit and I plug the induction cooker directly into the local circuit.
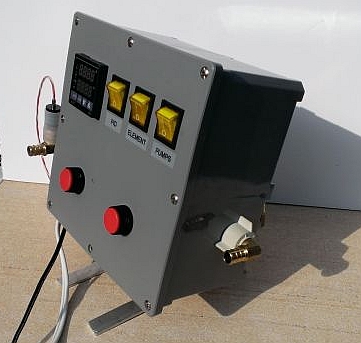
I had some aluminum stock that bent into a stand, to keep this thing off the table and potential puddles.
You can read more about the plumbing (1/2" PEX barbs + 3/8" silicone hose = good stuff) in my pump box post, linked above.
I haven't brewed on it yet but I ran water through it all, including running the heaters, to verify everything is working. First brew this weekend....wish me luck! I'm going to do something very simple to test efficiency and system losses. I'm targetting 70% efficiency but hope for ~75% in the end.
I've been through a few iterations of electric brewing. The goals for the system were:
1. no elements touching the wort,
2. easy cleanup,
3. incorporate BIAB bag to permit double crushing, shorter mash times (and easy cleanup)
I only do 2-3 gallon batches, so heating requirements are lower than for 5+ gallon batch brewers. This rig only needs two 15-amp circuits.
The system relies on two different sources of heat. I have an Avantco 1800W induction cooker for heating strike water and boiling, and a high wattage thermal wire powered off an Auberins PID with 10-amp internal relay (SYL-2342) for maintaining mash temps. I thought about using two induction cookers, but assumed I couldn't get the temp control I wanted out of an induction cooker alone for mashing.
A couple years ago I picked up a 940 watt thermal wire from Omega.com. I wrapped it around a 22 Quart SS pot, and I've used it quite successfully as my mash tun. At first, I used in a sort of RIMS setup, with the wire wrapped tightly around about 15" of loosely coiled copper tube. It worked probably better, as far as thermal transfer, in that scenario. But I like it better wrapped directly to the pot because this setup lets me sour mash for a day or two quite easily at 105-110*F. I used to run it off a Sous Vide controller, until it died. This new setup runs it right off the PID w/o the need for an SSR. The internal 10-amp relay is plenty for the 940 watt wire.
To keep the clutter down, I gutted my pump box and put the pumps & PWMs, into a new 8" Home Depot conduit box along with the PID, ebay 120V-25A switches (the switches light up when on, which is helpful), and a three prong through wall mount outlet to plug the element into (the black square on the left side photo...poor quality pics, I must say). Wiring was simply. Two separate plugs go into the box, keeping the pumps on a separate outlet plug from then PID/element circuit. They both can go to the same 15 amp circuit, since the pumps plus the element are <10 amps. For now, until my home brewery space is done, I run the pumps+element off a 13 amp extension cord to another circuit and I plug the induction cooker directly into the local circuit.
I had some aluminum stock that bent into a stand, to keep this thing off the table and potential puddles.
You can read more about the plumbing (1/2" PEX barbs + 3/8" silicone hose = good stuff) in my pump box post, linked above.
I haven't brewed on it yet but I ran water through it all, including running the heaters, to verify everything is working. First brew this weekend....wish me luck! I'm going to do something very simple to test efficiency and system losses. I'm targetting 70% efficiency but hope for ~75% in the end.


![Craft A Brew - Safale S-04 Dry Yeast - Fermentis - English Ale Dry Yeast - For English and American Ales and Hard Apple Ciders - Ingredients for Home Brewing - Beer Making Supplies - [1 Pack]](https://m.media-amazon.com/images/I/41fVGNh6JfL._SL500_.jpg)


")
