• Please visit and share your knowledge at our sister communities:
  • If you have not, please join our official Homebrewing Facebook Group!

    Homebrewing Facebook Group

Vintage Kelvinator freezer restoration

Homebrew Talk

Help Support Homebrew Talk:

This site may earn a commission from merchant affiliate links, including eBay, Amazon, and others.
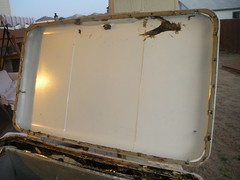
WOW.. Yours has a lot more rust than mine. What year is it? Did it have the same or similar smell to it that I described about mine?

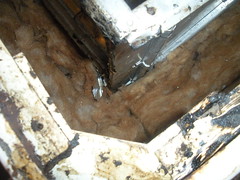
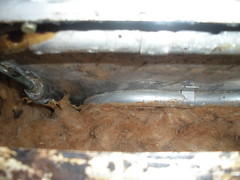
It's a 1952 model. That is just surface rust, and it comes off easily with some 120 grit
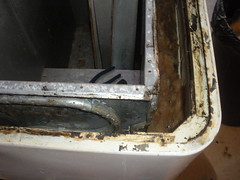
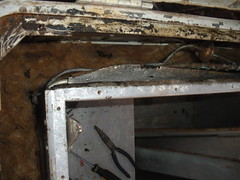
 :) Mine didn't have the smell because it didn't leak or have the condensation issues that I'm sure your chest freezer did. God knows my modern chest freezer sure builds up condensation. The fridge works great and the issues it has are strictly cosmetic. However, those will be alleviated once I get off of my butt and hit it with a DA and some new paint ;) I've also been in the market for an old IH chest freezer similar to your Kelvinator, but they seem to only find their way to Craigslist in the midwest. If I ever find one I'll be using your restoration as a guide. Best of luck!
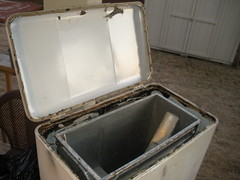
 
Well got some bad news. It was a lot harder than I thought to try and get that old insulation out. The majority of it came out in hand fulls and crumbled. I was only successful in getting about 12-14 inches out off the top all the way around and all of it out of the lid. Only good thing from that was the remaining insulation looks to be ok. Most of the smell was in about the first six inches from the top on just the front side. The rest was just old crumbly stuff...

So the new plan is to get the rust and everything off from around the top edge and lid, repaint, and put a 16" wide batt insulation into the empty top portion. I figure that if there is any light smell still remaining in the bottom half of the insulation that the new insulation, wood, and caulking should mask it into the walls..

Anyone see why this wouldn't work?

4288661177_e62773bb8e_m.jpg
4289407770_81b27d6237_m.jpg

4289404222_5681333a4b_m.jpg
4288662573_ef1a0fbd87_m.jpg

4288663907_4dded287f2_m.jpg
4289405634_b3432406f5_m.jpg


*2 hours/$10
 
Stang,
try this, get a 3 ft. small (1/4 - 3/8") piece of steel rod. chuck it in a drill, and wind that stuff around it. you prob. wont get it all, but i bet you'd get mor than you think!
 
How about leaving the rest of the insulation in there, but isolating any smell by laying down a layer of plastic and then generously caulking it around the inside of the two walls. This should create a smell barrier to help 'discourage' any stink from making its way up the freezer.
 
Stang,
try this, get a 3 ft. small (1/4 - 3/8") piece of steel rod. chuck it in a drill, and wind that stuff around it. you prob. wont get it all, but i bet you'd get mor than you think!

As I was pulling it out, I was curious how hard it was going to be to get more insulation back in because that stuff isn't exactly rigid. I will try that but only take it down a little further on one side to see if it works and then test trying to put some new insulation back in.

Thats probably going to be my best bet unless I try the plastic barrier idea. I will keep you updated. Thanks for the ideas! :mug:
 
i did a simmilar resto on a 1952 frigidair for my kegorator. On the electrical side of things i replaced the old "yt" style relay(a points/contact style relay) with a universal 3 in 1 solid state(start,run,overload) relay from my local appliance repair store. I belive it was a RCO810 from Supco. really easy to wire and no more fear of sparks. i continue to use the origional thermomstat in the fridge and it sits at a steady 3C. Your best bet is to replace the relay and wire it in with some newer temp control unit (love etc) and you'll be set.
 
If you use the "steel rod in drill" or some other method to get the existing stuff out can't you replace it with some kind of expandable foam?
 
If you use the "steel rod in drill" or some other method to get the existing stuff out can't you replace it with some kind of expandable foam?

I been looking around and researching insulation and If I am going to go through all the trouble of getting out the old stuff, I might as well do it right. Looked at loose fill insulation because it seemed to be easier to install than trying to hook up a hose to a can of expanding foam insulation shooting it 37" into the cavity. There are three primary types of loose fill; cellulose, fiberglass, or mineral wool (rock wool or slag wool).

Several pros and cons of different types of insulation. End result of the research is I will either go with expanding foam or mineral wool. Expanding foam is possibly one of the best options when referencing R value and moisture. But, I also think it will be the harder of the two to install. Mineral wool has a better R value and can withstand more moisture than cellulose or fiberglass loose fill and its easier to install than foam. But I will have a lesser chance of mold and mildew coupled with higher R value if I go with foam... TORN :confused:

Pros and Cons of different types of insulation: http://greenhomeguide.com/know-how/article/buyers-guide-to-green-insulation
 
There is a pourable kind of foam insulation, it is a two part product, in other words, it has a separate activator. It's used in marine applications, this could be your best bet, it's also not as expanding as the spray cans so it's less likely to damage something in there.
 
There is a pourable kind of foam insulation, it is a two part product, in other words, it has a separate activator. It's used in marine applications, this could be your best bet, it's also not as expanding as the spray cans so it's less likely to damage something in there.

Cool. That sounds like a good option. I will take a look...

I really like your gauge that you have in your picture. Where did you get that?
:mug:
 
Ok. Looked into foam insulation and it is a great product. It has a higher R value rating than any loose fill insulation. It is a great product for marine use and other misc. uses. As for my project, it would work well in the install portion but I am afraid that when and if I need to work on any internal parts in the future that the foam will be a huge problem. With as difficult as the fiberglass batt insulation is to remove, I can't imagine how hard it would be to carve out the foam insulation. With that all determined, I will be using loose fill insulation. I have determined that I will probably use mineral wool based on the R value, cost, and probability of mildew. If anyone finds any different with loose fill, let me know.

Thanks! :mug:
 
All modern freezers I've drilled into (don't ask me why) use a solid foam insulation around the coils. The coils should be a permanent fixture and the foam should prevent any damage to them. The things that wear out on freezers are capacitors and compressors.
That being said, I think the foam insulation can be dissolved with a solvent.
 
Just a thought..
Where I work, we use the 2 part foam chemical to pack odd shape stuff for shipping. We have a machine that takes a roll of plastic and makes a sort of bag on the fly. You punch in something like 18" and it spits out a custom bag with a measured amount of foam inside. You have to place it in the box with the product to be shipped, and seal the box as it expands.
You could slide some thin plastic sheet down the cavity, maybe using some broom handles or something to push the corners of the "bag" to the bottom. Think of it like a pool liner, or like pressing a single sheet of plastic into a cereal box. Then pour/spray the foam into that.
It won't make it any easier to remove, because as the foam expands, it'll press the plastic to the contours of the cavity (A good thing I think). However, it will prevent the foam from surrounding the coils, or contaminating other delicate parts in the walls.
 
And that is why I love this site. You get tons of different views of how something can be done. Now, I didn't think about using some type of barrier for the foam insulation. That's a great idea!

I know the lines shouldn't need to be replaced but I am just afraid that by doing all this work to make this a great accessory to my man cave, Murphy's law will take place. Was just trying to look into the future of possibilities.. And removing this insulation seems to be my biggest fight as of yet. Wanted to try and avoid it being difficult in the future if ever needed. But the more that we talk about foam and ways to help restrain it, the more I like the idea.

Mildew is one other concern. Foam insulation does a pretty good job of minimizing mildew and mold. Plus, it is light! Not adding any more weight to this beast than necessary. Which is a great thing!
 
Where I work, we use the 2 part foam chemical to pack odd shape stuff for shipping. We have a machine that takes a roll of plastic and makes a sort of bag on the fly. You punch in something like 18" and it spits out a custom bag with a measured amount of foam inside. You have to place it in the box with the product to be shipped, and seal the box as it expands.

When you close the box while its expanding, the box is able to contain it and keep it from expanding and busting through the sides?

I might have to experiment a little with this using a small built version of a wall cavity. I have never worked with foam insulation before. I always assumed the foam expansion was aggressive in its expansion process. I thought that if I used foam, an option would be to leave the top open and cut off any excess that expands beyond the top of the walls. Would I be correct in assuming that?
 
I thought that if I used foam, an option would be to leave the top open and cut off any excess that expands beyond the top of the walls. Would I be correct in assuming that?

If you do that (not sure if you need to or not), make sure you use masking tape around any finished edges to make sure the overflow doesn't harm the finished surfaces. I used expanding foam in some doors once and taping off the area first made clean up alot easier.
 
89OctaneStang,
Mildew: Another great reason for foam in a bag - It's sealed from moisture! At least on 5 sides, and as long as nothing sharp in the wall punctures it...
The foam we use doesn't deform the boxes at all. This stuff expands A LOT! But with very little pressure. The last time I used it the machine spit out a 24" x 24" bag, with just about an inch of un-expanded foam at the bottom edge. When it was done, it was a 2x2 pillow about 4 inches thick. It uses "FOAMplus" foam. We get it in 55gal drums. I'm not sure if it would be available in smaller quantities.

ajwillys,
Good point on the cleanup! Foam is a b***h to get of of anything it touches. I'd just cut the plastic sheet big enough so it hangs out 2 or 3 feet on every side. When it's done expanding, just run a blade across the top edge of the wall to cut it off. Looks like it would work in my head anyway...
 
Some foam spray, like what they sell at the hw stores, is capable of making a lot of pressure, and can deform windows and door jambs. Other kinds do their expanding before hardening, there are all kinds of formulas.
I would do a trial run for sure, and yes you would cut off the excess after it cures.
 
Well, first test of foam insulation in my rolling portable kegerator project took a dissapointing turn. From the way the guy spoke at Home Depot that is a sales person for "Hilti CF 116", I was sure that I got a decent product for the projects. Not so much...

It sprays out like a thick version of silly string and is hard to cover all the areas. And I expected it to expand and close the voids that I accidentally created but it did not expand much at all. It is very difficult to get a good even coat of this into something like my projects require.

- Hilti CF 116 expanding foam insulation: Not Recommended
- $8.00/Can for one cubic foot of uneven coverage
 
Just a thought..
Where I work, we use the 2 part foam chemical to pack odd shape stuff for shipping. We have a machine that takes a roll of plastic and makes a sort of bag on the fly. You punch in something like 18" and it spits out a custom bag with a measured amount of foam inside. You have to place it in the box with the product to be shipped, and seal the box as it expands.
You could slide some thin plastic sheet down the cavity, maybe using some broom handles or something to push the corners of the "bag" to the bottom. Think of it like a pool liner, or like pressing a single sheet of plastic into a cereal box. Then pour/spray the foam into that.
It won't make it any easier to remove, because as the foam expands, it'll press the plastic to the contours of the cavity (A good thing I think). However, it will prevent the foam from surrounding the coils, or contaminating other delicate parts in the walls.

Can you find out if they sell the product you use anywhere for consumer purchase?
 
You know, I can't find the stuff we use. We buy 55gal drums of the "FOAMplus" brand foam for the STOROpack system. However a quick search of McMaster Carr turned up these
It looks to be about the same thing, but pre-packaged, almost smack-pack type stuff.
Alternatively, you can get 550 Gallons of it here! :rockin:
High-level information is here

I'm having a hard time finding small quantity suppliers online, but I don't have the time to dig very deep right now. I'll try again later.

If you want to look, Google "foam-in-place" packaging. I know SOMEBODY has to sell this crap in gallon cans somewhere right?!?
 
That's the stuff!
Didn't even think about the boating industry...
Relatively cheap too, considering if the freezer wall has a 2x24x30" cavity, that's only about .8 cubic feet of space. Should cost less than $50.00
 
Just to keep everyone informed on my progress...

Ordered the 2 part pour in foam insulation from Aero Marine Products Inc.
http://www.jgreer.com/boat-foam.htm

Will be pressure washing out the remainder of the isulation that is in the walls and cleaning it with bleach to kill off any bacteria that might be growing inside. Then when my insulation gets here, we will finish with that phase of the transformation.

I have also been working on my portable kegerator. Started that project to see what I was up against with foam insulation and found that the spray cans are crap for what we are intending to do. I went with just the Polystyrene Sheathing foam board insulation, 2 layers thick. Figured for as little use as it will get, that would be plenty. I will post pics of its progress this weekend as I get it further to completion.

Thanks guys for the suggestions on the pour in foam insulation! I think it will work out great.
:mug:
 

Latest posts

Back
Top